Kinetic 1/32 F-86F-40 Sabre
| KIT #: | 3203 |
| PRICE: | 85$ |
| DECALS: | One option |
| REVIEWER: | Francisco Santoro |
| NOTES: | Rather weak landing gear. |
| HISTORY |
 At the end of the 50s, Argentina
was looking to replace its old Gloster Meteor F.4s. The cancellation of the
Pulqui 2 programme added more urgency to the purchase of new fighters. The F-86s
were then selected after the green light given by the US government and 28
units, which had between 1200 to 2000 flight hours, were selected by the Fuerza
Aérea Argentina. The selected Sabres were all from the -30 variant, but were
modified to carry the F-40 6-3 wing with slats. Operation Sabre, the ferry of
the aircraft, began in August 18 of 1960, the first 12 units arrived at El
Plumerillo, Mendoza. By December, all of the 28 aircraft had arrived, and were
assgined to Grupo 1 de Caza, IV Brigada Aérea at El Plumerillo.
At the end of the 50s, Argentina
was looking to replace its old Gloster Meteor F.4s. The cancellation of the
Pulqui 2 programme added more urgency to the purchase of new fighters. The F-86s
were then selected after the green light given by the US government and 28
units, which had between 1200 to 2000 flight hours, were selected by the Fuerza
Aérea Argentina. The selected Sabres were all from the -30 variant, but were
modified to carry the F-40 6-3 wing with slats. Operation Sabre, the ferry of
the aircraft, began in August 18 of 1960, the first 12 units arrived at El
Plumerillo, Mendoza. By December, all of the 28 aircraft had arrived, and were
assgined to Grupo 1 de Caza, IV Brigada Aérea at El Plumerillo.
Fast forward to 1986, on June 19th of this year, Sabre C-120 crashes in the midst of a training flight, and the remaining aircraft are ordered to be grounded. The final flight of the Sabres was in August 15th of 1986, when they pulled from service.
The aircraft I built, C-110, was added to FAA stock in November 12 of 1960. The aircraft was destroyed in a crash with C-127 while in training, the pilot ejected safely.
| THE KIT |
 From what I was able to find,
Hasegawa was the only player in town that had a big scale F-86F-40, the original
tooling dating back to 1970. From then, the brand reboxed the kit mainly
changing the boxart and decals, with either Japanese or German markings. In
2007, Kinetic released the F-86F-30, and in 2015 the F-40 variant. A quick look
at both the Hasegawa and Kinetic manuals showed they were very similar, the only
difference being in the main gear, with Hasegawa providing very positive
locating tabs, whereas the Kinetic one offers shallow protrusions (more on that
later).
From what I was able to find,
Hasegawa was the only player in town that had a big scale F-86F-40, the original
tooling dating back to 1970. From then, the brand reboxed the kit mainly
changing the boxart and decals, with either Japanese or German markings. In
2007, Kinetic released the F-86F-30, and in 2015 the F-40 variant. A quick look
at both the Hasegawa and Kinetic manuals showed they were very similar, the only
difference being in the main gear, with Hasegawa providing very positive
locating tabs, whereas the Kinetic one offers shallow protrusions (more on that
later).
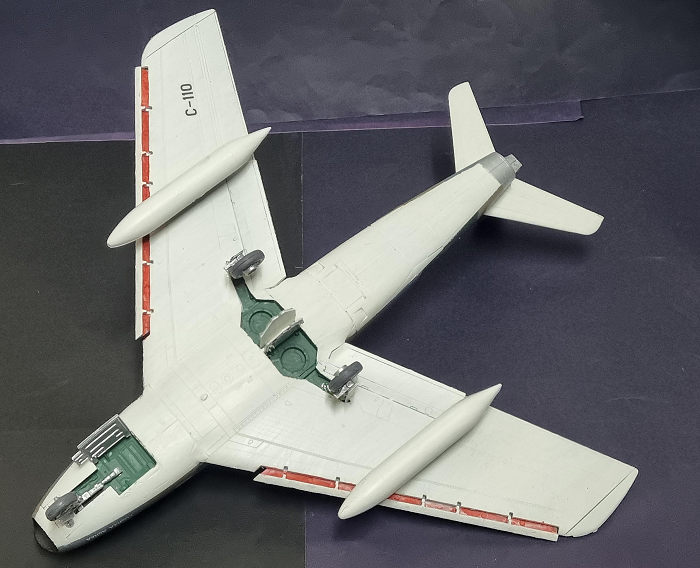
The Kinetic kit comes in a large top opening box that shows Sabre JA-344 of the Luftwaffe flying. The top is flimsy but the bottom section is made of hard cardboar. Inside the box there’re less than 200 parts, cleanly molded in a light grey and hard plastic. The kit has a complete engine that can be exhibited or glued inside the model. Fuselage halves are divided in front and rear sections. The landing gear is sturdy, and only a strong hit will break them, they do have the disadvantage of not coming with long mounting tabs, so they’re prone to collapsing, even when you left the glue cure until next day.
Decals are provided for the boxart aircraft, and they look really nice.
| CONSTRUCTION |
Before gluing stuff, I painted lots of parts on the sprues. The cockpit parts were painted Revell Aqua 76 Light Grey (though black can be also used) with different colours for the seat cushion, instrument panel, control stick and rudder pedals. Wheels come as separate assemblies, with the tyres and hubs being individual units. The hubs and landing gear were painted Revell Aqua 90 Silver, and the wheels in Revell Aqua 78 Tank Grey.
 With most parts painted, I
assembled the wheels and cockpit. The cockpit was glued to the upper section of
the intake trunking and dry fitted to the fuselage. I then realised I wouldn’t
be able to add weight with the rear section of the intake, so I grabbed my saw
and hacked away that area. The resulting empty space was idea to add 140 grams
of lead as far forward as possible. With that done, I glued the cockpit and the
other side of the front fuselage. In order to save weight even further, I left
off the engine and exhaust nozzle. Then the rear fuselage was put together and
glued to the front half.
With most parts painted, I
assembled the wheels and cockpit. The cockpit was glued to the upper section of
the intake trunking and dry fitted to the fuselage. I then realised I wouldn’t
be able to add weight with the rear section of the intake, so I grabbed my saw
and hacked away that area. The resulting empty space was idea to add 140 grams
of lead as far forward as possible. With that done, I glued the cockpit and the
other side of the front fuselage. In order to save weight even further, I left
off the engine and exhaust nozzle. Then the rear fuselage was put together and
glued to the front half.
Work on the fuselage continued by adding several gun panels and the intake ring to the nose. The rudder and horizontal stabilizers were also glued in place. The only drawback of the stabilizers is that they can’t be glued evenly, the left one hangs higher than the right one.
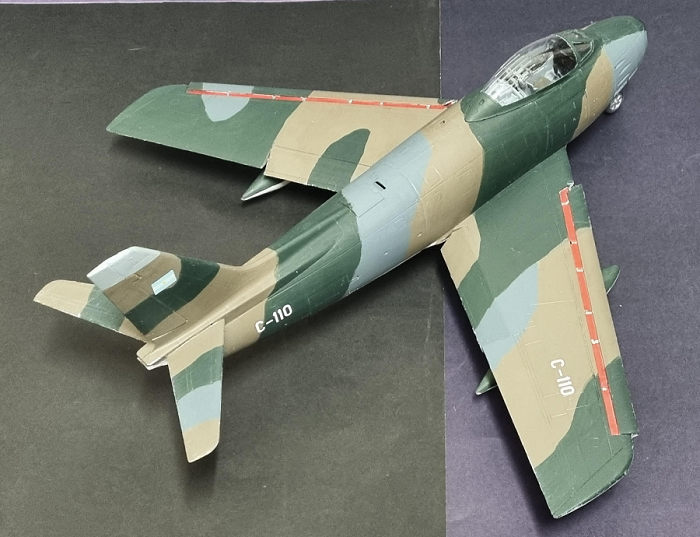
With the fuselage drying, I paid attention to the wings. I wanted to have my slats and flaps extended, so I cut away the rear rails of the slats, assembled the wings together, and glued them down. The flaps were much simple to add, I just placed them in the down position.
Argentinian Sabres external fuel tanks didn’t have the fins, so I glued the fins that came in the kit and then trimmed them. The resultant gaps were filled with Vallejo’s Plastic Putty. The entire aircraft was then wiped clean with IPA and every gap was filled with said putty.
| COLORS AND MARKINGS |
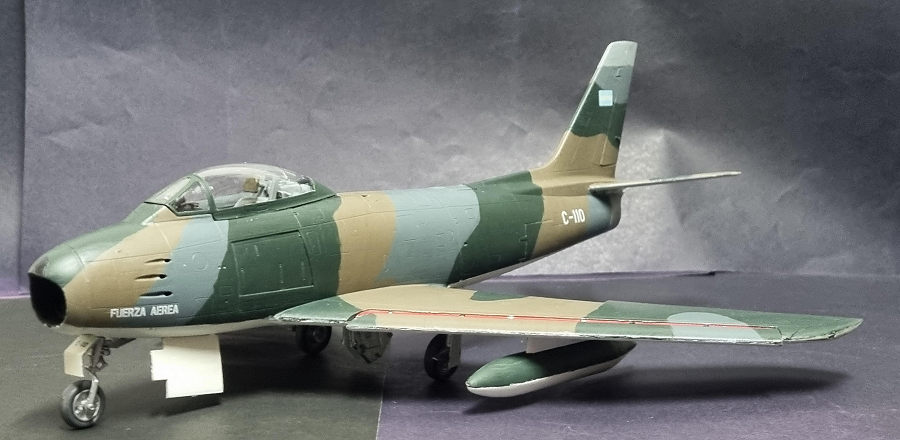
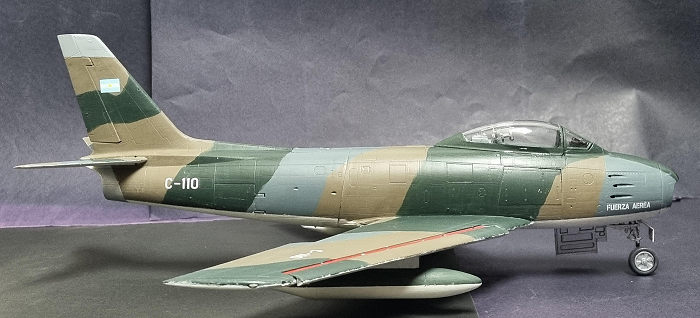
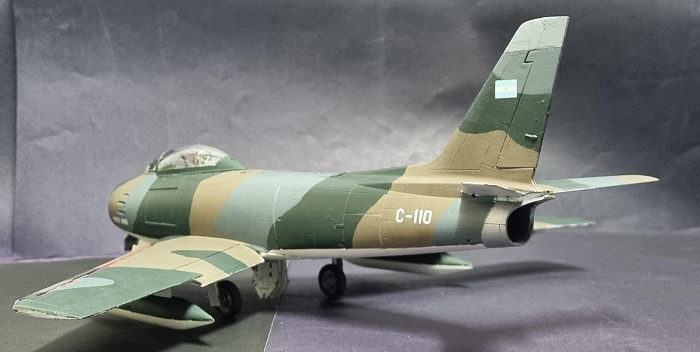 My plan was to make this aircraft
as FAA’s Sabre C-110 in a camouflage scheme. For this I was able to locate
Condor Decals ‘s discontinued set 32044 for Argentinian Sabres.
My plan was to make this aircraft
as FAA’s Sabre C-110 in a camouflage scheme. For this I was able to locate
Condor Decals ‘s discontinued set 32044 for Argentinian Sabres.
The model was painted with Revell 87 Dark Earth, 79 Grey Blue and 40 Black Green for the upper surfaces, and Revell 05 Matt White for the lower surfaces. Slat bays were painted red. Then it was glossed and the decals were applied. The decals laid down nicely, and were brushed with some Mr. Mark Softer. The plane was then matt coated.
The landing gear was added, but I fought a bit with the main legs because the short mounting tabs didn’t allow for a proper and secure placement. In the end I added some epoxy, and that did the trick. Fuel tanks, wheels and wheel doors were glued, the model was turned upside down, and the gunsight was glued. Dry fitting the sliding canopy showed a conflict between the rear cockpit plug and the radio equipment of the clear part, so I removed the fuselage one and added the clear parts in the closed position.
| CONCLUSIONS |
I can’t say much because I don’t have the Hasegawa kit to compare it, but it is nice to finally have a 32nd scale Sabre in my hangar. Fit overall was nice, some difficulties here and there. I do plan to get the Hasegawa offering and use what remains of my decal set.
| REFERENCES |
https://amilarg.com.ar/north-american-sabre.html
https://amilarg.com.ar/f-86-faa.html
Francisco Santoro
28 May 2024
Copyright ModelingMadness.com. All rights reserved. No reproduction in part or in whole without express permission.
If you would like your product reviewed fairly and fairly quickly, please contact the editor or see other details in the Note to Contributors.