
Italeri 1/72 RF-84F Thunderflash
| KIT #: | 108 |
| PRICE: | 16.95 DM |
| DECALS: | One option |
| REVIEWER: | Nicolai Plesberg |
| NOTES: |
|
| HISTORY |
The Republic RF-84F Thunderflash came about as a replacement for the ageing RF-80s. Based on the F-84F Thunderstreak, the RF-84F featured wing root air intakes and a large nose section to house the camera equipment. External loads most usually consisted of drop tanks to extent its range, which is one of the most important features of a photographic reconnaissance aircraft. Weapons carriage was, as such, not considered important even though it actually had four Colt-Browning M-3 cal. 50 machineguns placed in the wing roots just outside of the intakes. The RF-84F was built in more than 700 examples, but the most intriguing part is that more than half of the production went to bolst other NATO air forces through MDAP such as Belgium, Denmark, the Netherlands, Italy, France and the Federal Republic of Germany.
 The Danish
acquisition of the Thunderflash was a consequence of the then equipments state;
three Spitfire PR.XIs had been used until June 1955 and as an interim solution
several modified F-84Gs with T-33 tip tanks (and cameras in the left tip tanks
nose plus the auto pilot’s compartment (the latter in a so-called French
Installation)) was used by the Royal Danish Air Force’s FR / PR flight (the
reconnaissance unit of the RDAF – it was not yet an operative unit with Squadron
status at this time). The first of eleven MDAP aircraft was delivered from May
1957 and with this new aircraft, the FR / PR flight had received a tool
constructed directly for the task.
The Danish
acquisition of the Thunderflash was a consequence of the then equipments state;
three Spitfire PR.XIs had been used until June 1955 and as an interim solution
several modified F-84Gs with T-33 tip tanks (and cameras in the left tip tanks
nose plus the auto pilot’s compartment (the latter in a so-called French
Installation)) was used by the Royal Danish Air Force’s FR / PR flight (the
reconnaissance unit of the RDAF – it was not yet an operative unit with Squadron
status at this time). The first of eleven MDAP aircraft was delivered from May
1957 and with this new aircraft, the FR / PR flight had received a tool
constructed directly for the task.
Several modifications were introduced in Danish service. In the beginning of the 1960s the obsolete US supplied camera equipment was replaced with modern British Vinten cameras; as were the Republic ejection seats – replaced with Martin-Baker Mk.DT5 / DT5A (depending of time of installation) seats. A more odd modification was that the splash guard on the nose gear was removed from 1960 onwards and a rod was added to the gear leg.
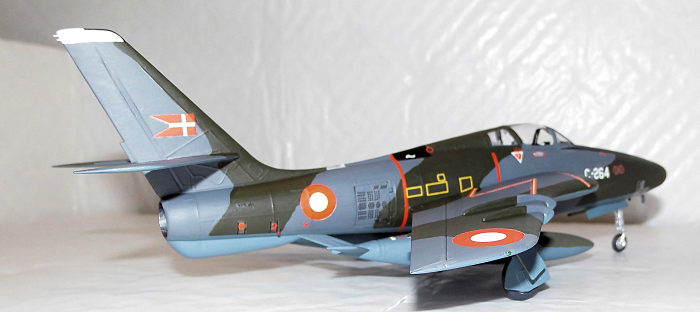
In the first year of operation the Thunderflash flew unpainted but often with colorful bands on the tail. In 1958 the aircraft got camouflaged; most likely using colors that was on stock from earlier aircraft. The sides / upper surfaces were painted Sea Grey / Dark Green while all under surfaces were almost certain PRU Blue.
In the beginning Danish Thunderflashes flew with the code letters “KA-“ – a heritage from the F-84 period. In 1960 they received the type letter “C-“ followed by the last three digits of their original US serial. It was also in 1960 the FR/PR flight got Squadron status as ESK 729 (Sqn 729) and received the nickname “Hawkeyes”. In 1962-64 the MDAP aircraft were supplied with 12 more planes bought used from the US (7) and France (5). The Thunderflash continued to serve until it was replaced by the Saab RF-35 Draken in 1971.
| THE KIT |
 The
Italeri kit stems from the early 1970s and features raised panel lines as well
as mediocre detailing; also a prominent feature from that time. The cockpit
consists of just a seat and an instrument panel coaming and not much else. The
included pilot can of course be employed to hide much of the emptiness of the
‘pit, but then a better looking one must be dug out from elsewhere, as the kit
pilot is not really something to write home about. The kit's
gear is somewhat better, but adequate to do the job. The clear parts, especially
the windscreen and canopy are the really bright spots of this kit; crystal clear
and with an excellent fit to the fuselage. The kit includes decals for a Belgian
and an Italian version, but since this is going to be a Danish build, I will not
mention them any further.
The
Italeri kit stems from the early 1970s and features raised panel lines as well
as mediocre detailing; also a prominent feature from that time. The cockpit
consists of just a seat and an instrument panel coaming and not much else. The
included pilot can of course be employed to hide much of the emptiness of the
‘pit, but then a better looking one must be dug out from elsewhere, as the kit
pilot is not really something to write home about. The kit's
gear is somewhat better, but adequate to do the job. The clear parts, especially
the windscreen and canopy are the really bright spots of this kit; crystal clear
and with an excellent fit to the fuselage. The kit includes decals for a Belgian
and an Italian version, but since this is going to be a Danish build, I will not
mention them any further.
I have actually built this kit twice – this build was done during the autumn of 2015, while the first one I commenced in 1987 but finally managed to finish in 2005 – we have all been there, haven’t we?!! The reason for me to build it a second time, was, that during my first build, I came across a review which stated the kit’s errors in full detail. The most prominent error is in the nose section, but I was unable to do anything about it at that time, since the fuselage had been completed when the review surfaced to my attention. Set to do it a second time and this time with implementing all the corrections needed to get a more accurately looking model, I went into Thunderflash correction mode!
| CONSTRUCTION |
Construction actually began by enlarging the holes for the camera windows as they are too small. Some sanding action with a flat needle file was used to get that done. I then modified the ejection seat so it could pass for a Martin-Baker by giving it a new headrest (query: is it just me or do Martin-Baker seats have that special looking headrest?!!) and a few other bits to do the job adequately for the scale. I also scratch built the missing interior parts, such as instrument and side panels, stick and floor to my best ability. I even had a decal for the instrument panel lying in the decal dungeon and just waiting to be used for this project.
 When the
interior parts had the fit inside the closed fuselage halves, I broke out some
paint; grey (Vallejo 991) for the general cockpit color and satin black for the
seat frames. Some minor coloring for the cushions and other details, such as
seat belts of Tamiya tape, were next but all got done to my satisfaction…. only
one prominent thing was missing; namely the firing handles of the seat. So a
thin (approx 0.2mm) copper wire piece was bend into shape and attached to the
head rest. I even tried to paint them (black and yellow stripes) as good as it
was possible to do so! The result was reasonable although not perfect – go on
figure why! The decal went on the instrument panel and after it had been secured
with some flat varnish, I assembled the interior parts to the fuselage inserting
the rear windows and finally gluing the fuselage together. However, I should
have raised the seat a couple of millimetres because it sits a bit low, but that
was apparent after things had been assembled.
When the
interior parts had the fit inside the closed fuselage halves, I broke out some
paint; grey (Vallejo 991) for the general cockpit color and satin black for the
seat frames. Some minor coloring for the cushions and other details, such as
seat belts of Tamiya tape, were next but all got done to my satisfaction…. only
one prominent thing was missing; namely the firing handles of the seat. So a
thin (approx 0.2mm) copper wire piece was bend into shape and attached to the
head rest. I even tried to paint them (black and yellow stripes) as good as it
was possible to do so! The result was reasonable although not perfect – go on
figure why! The decal went on the instrument panel and after it had been secured
with some flat varnish, I assembled the interior parts to the fuselage inserting
the rear windows and finally gluing the fuselage together. However, I should
have raised the seat a couple of millimetres because it sits a bit low, but that
was apparent after things had been assembled.
Some more corrections were next; the air intakes were sanded to a more realistic appearance; the lower lip needs to be sanded so it looks like the intake turns downwards. The locating holes for the pylons for the drop tanks were filled and new ones drilled 1,5 millimetres farther out of the wings. Then the wings were glued together and when dealing with the seams the corners of the intakes were rounded off as they are too square. The pylons themselves had their leading edge modified to match reality. The bathtub under the rear fuselage was shortened as it is too long and too deep; the arisen hole was filled with plastic bits and filler and the fuselage seam was dealt with as well at this stage. The fin was lengthened by 2,5 millimetres with some suitably cut out sheet pieces and smoothed in with filler / sanding. Related detail issues, such as lengthening of the rudder hinge line, were of course also done.
The nose
halves were next; I glued some sheet pieces over the camera port holes from the
inside to reduce the impact of the empty nose section. Before joining the nose
pieces, I glued a 1 millimetre shim to the very tip as the nose is too shallow
seen from above / below. The remaining gaps between the halves were filled with
plastic shims of various thicknesses to get a strong bond as possible. When set
the seams w ere
filled / sanded smooth and a little nose weight added before the nose was glued
to the fuselage (side note: I had from my first build omitted nose weight
because I had deemed it unnecessary, but later I discovered that the model could
as easy stand on its nose gear as well as its tail – so fine was the balance! A
single gram is all what I put in to insure nose sitting on the second build). I
also here inserted a shim of one millimetre at the top so the nose could get the
correct drooping altitude; surplus shims of various sizes were inserted in the
remaining gaps to strengthen the bond between the nose section and fuselage.
When set the seam was sanded / filled as necessary.
ere
filled / sanded smooth and a little nose weight added before the nose was glued
to the fuselage (side note: I had from my first build omitted nose weight
because I had deemed it unnecessary, but later I discovered that the model could
as easy stand on its nose gear as well as its tail – so fine was the balance! A
single gram is all what I put in to insure nose sitting on the second build). I
also here inserted a shim of one millimetre at the top so the nose could get the
correct drooping altitude; surplus shims of various sizes were inserted in the
remaining gaps to strengthen the bond between the nose section and fuselage.
When set the seam was sanded / filled as necessary.
The drop tanks are too short by 7 millimetres; they were lengthened in front of the tail were they begin to slope towards the rear tip. I found some suitable material to sandwich between the tanks and their sawn off tail sections – all things were smoothed in with filler and sanding. At the same time I finished up in the cockpit and attached the canopy and windscreen with clear gloss varnish and I also worked on the gear plus doors. Some nasty ejection pin marks, especially on the nose gear doors had to be dealt with, but that was easy; at least compared to the most complex thing of the gear, namely to remove the splashguard on the nose wheel, as they are molded in one piece plus adding of the rod in front of the nose gear leg itself. The tips of the horizontal tail planes were also modified in order to match reality. Then I added the intake splitter plates to the wings, before they were glued to the fuselage. The wing seams were filled and sanded as necessary before the tail planes were attached to the fin. They were also smoothed in with some glue / sanding.
The next step was to paint the gear bays, inner side of gear doors and the intakes with interior green (Humbrol 226) in a few coats. Airbrakes and wing fences were also attached at this stage; the outer ones must be moved 3,5 millimetres inwards, as they otherwise will sit too far out of the wings. The inner fences must be shortened, so their ends match that of the outer fences ends. The wing fences needs some glue filling, as their fit against the wings are not the best. I had also to correct a slight mistake, arisen from the widening of the nose, as the forward camera window was not quadratic as it should have been but rectangular in shape. This was corrected by gluing two shims of plastic at each end of the window frame; it was necessary to smooth things out a bit with filler afterwards, but the goal with a quadratic window frame was reached admirably. After cleaning the entire surface and painting the last details, such as the gear and canopy frames and mounting the gear the model went to the paint shop.
| COLORS & MARKINGS |
 All under
surfaces including on drop tanks as well as the outer side of gear doors were
painted PRU Blue (Humbrol 230) in two coats. After applying masking tape
appropriately all side and upper surfaces were painted Sea Grey (Humbrol 27)
again in two coats. The green (Humbrol 116) camouflage were applied freehand in
one coat (seemed enough). The masking tape was then removed and I let the paint
dry completely through. Thereafter followed the usual touch up session, but it
wasn’t that much fortunately. The fin tip was painted flat white as was the gun
port holes (marked with a needle head slightly dipped in the white paint) as
pictures of the real planes seems to confirm that “white stuff” was used to show
whether the guns were loaded or not (or something like that). Painting was
finished after applying the obligatory gloss coat.
All under
surfaces including on drop tanks as well as the outer side of gear doors were
painted PRU Blue (Humbrol 230) in two coats. After applying masking tape
appropriately all side and upper surfaces were painted Sea Grey (Humbrol 27)
again in two coats. The green (Humbrol 116) camouflage were applied freehand in
one coat (seemed enough). The masking tape was then removed and I let the paint
dry completely through. Thereafter followed the usual touch up session, but it
wasn’t that much fortunately. The fin tip was painted flat white as was the gun
port holes (marked with a needle head slightly dipped in the white paint) as
pictures of the real planes seems to confirm that “white stuff” was used to show
whether the guns were loaded or not (or something like that). Painting was
finished after applying the obligatory gloss coat.
The decals were applied uneventfully with the exception of the registration codes, as I should determine the exact style used for my chosen airframe (the numbers had several styles and could be either black or white). After that had been confirmed, I put on the registration codes plus the squadron badge, which came from an IPMS Denmark special anniversary sheet. When the decals had dried a gloss coat sealed everything in and after that had set the final flat coat was applied.
Final bits consisted of attaching the gear doors, the clear panel to the dorsal position in front of the fin and the new camera windows cut out from a clear sheet of acetate and fixed with clear gloss acrylic varnish (the window port holes interior had been painted black with a silver dot to simulate the camera lens). I also made a few other bits (antennas, fuel dumps etc) painting them and a few other necessary touch ups plus the marking of the position lights and the model was finished.
| CONCLUSIONS |
 Despite
the kits age it still is a pretty accurate rendition of the Thunderflash and can
be build by all modelers regardless their experience. However, some of the
modifications mentioned here requires skills and should only be attempted by
experienced modelers. I have, for comparison sake, included a photo of the new
and the old Thunderflash models together so you can decide whether the
modifications are worth it when comparing with photos of the real plane as well!
Despite
the kits age it still is a pretty accurate rendition of the Thunderflash and can
be build by all modelers regardless their experience. However, some of the
modifications mentioned here requires skills and should only be attempted by
experienced modelers. I have, for comparison sake, included a photo of the new
and the old Thunderflash models together so you can decide whether the
modifications are worth it when comparing with photos of the real plane as well!
| REFERENCES |
Halehjulet 1/1972 the then membership magazine of IPMS Denmark contains the review of Italeri’s Thunderflash kit that I used as basis for this build: www.ipms.dk/Halehjulet/Halehjulet_1_1972.pdf
12 June 2018
Copyright ModelingMadness.com
If you would like your product reviewed fairly and fairly quickly, please contact the editor or see other details in the Note to Contributors.
Back to the Main Page Back to the Review Index Page Back to the Previews Index Page