Academy 1/48 F-86E(M)
| KIT #: | 2162 |
| PRICE: | €20 “on offer” in 2007 |
| DECALS: | Two options |
| REVIEWER: | Spiros Pendedekas |
| NOTES: | Icarus Decals 48013 |
| HISTORY |
The Royal Hellenic Air
Force (EBA) started receiving F-86Es in 1954. These were surplus Canadair built
CL-13 Sabres, which were handed through the Military Assistance Program (MAP).
Prior to handling, they were overhauled and their wings were modified to larger,
unslatted ones (known as “hard”or 6-3 “wing”). The works took place in both
Canada by Canada Ltd. and in the UK by Bristol Aeroplane Ltd. with modification
kits provided from Canadair. The resulting Sabres were renamed F-86E(M), where
“M” stood for “Modified” and it is worth mentioning that the above general
maintenance (together with the one for similarly provided
 Turkish F-86Es) was
reportedly done at the expense of the UK, in exchange for US funding for
development of the Hunter, Javelin and Canberra.
Turkish F-86Es) was
reportedly done at the expense of the UK, in exchange for US funding for
development of the Hunter, Javelin and Canberra.
The official integration ceremony of the Hellenic Sabres took place on July 2, 1954, with the first examples having arrived a few days earlier at 112CW Elefsis AFB. Training of the first Greek teams would take place there soon after by RCAF personnel accompanied by Canadair and General Electric representatives, with the Greek teams receiving favorable comments regarding their overall skills and adaptivity to the type.
The plane undertook to equip the newly formed 341,342 and 343 MAH (Day Intercepting Squadrons). Initially based at 112CW, they were then moved to 114CW (Tanagra AFB) to complete their training. In May 1958, 343MAH moved to 111CW (Nea Anchialos AFB), followed in January 1960 by 341MAH, leaving only 342MAH in Tanagra. In 1961, 343MAH switched to F-86D Sabre Dogs, while in May 1962 342MAH switched to F-84Fs, assigning its Sabres to 341MAH, which, in turn, started switching to F-5As from June 1965.
Thus, 341MAH was the last Greek Squadron operating the Sabre, a formidable plane that effectively offered its services to the Hellenic Air Force for more than a decade.
| THE KIT |
 Academy came in 1998
with their very good new tool quarter scale unslatted F-86, two years after the
Hasegawa offering (Hasegawa offers also the slatted versions). By that time both
kits were considered state of the art, easily holding their own today (2024).
The Hasegawa possibly has a slight advantage in some areas (like the intake duct
innards, which are way less compromised), but the Academy offers, at a notably
lower price, a full engine that can be displayed with the fuselage split in
front and rear halves, with a very nice dolly holding the rear fuselage, making
an interesting display.
Academy came in 1998
with their very good new tool quarter scale unslatted F-86, two years after the
Hasegawa offering (Hasegawa offers also the slatted versions). By that time both
kits were considered state of the art, easily holding their own today (2024).
The Hasegawa possibly has a slight advantage in some areas (like the intake duct
innards, which are way less compromised), but the Academy offers, at a notably
lower price, a full engine that can be displayed with the fuselage split in
front and rear halves, with a very nice dolly holding the rear fuselage, making
an interesting display.
The specific copy was the 2004 reboxing, which was exactly the same as the initial release but with better printed decals and was bought from an Athens hobby shop in 2007, carrying “a price I couldn’t refuse”. For a look at its contents you might look no further than our Editor’s thorough review, found at the ever growing MM archives.
| CONSTRUCTION |
I started by assembling the intake duct, with the reasonably detailed cockpit on top of it. Having decided not to display the engine via splitting the fuselage, I only attached the engine fan at the end of the intake, with the whole subassembly, together with the rear engine duct, trapped between the fuselage halves. While instructions called for 15 grams of weight to avoid tail sitting, I secured, just to be sure, around 20 grams of fishing weight in the space fore of the cockpit, on top of the intake.
I took Tom’s word and went for black basic cockpit color, with the same shade used for the instrument panel, side consoles and stick grip. The stick body was painted medium gray. The instrument panel and side consoles were dry brushed with silver and had some knobs “pinned” with red, white and yellow paint. The intake duct innards were painted silver, while the exhaust Testors Burned Metal.
 The kit-provided seat is
on the plain side and, if you decide not to add the good looking pilot, it might
be a good idea to either replace it with an aftermarket or, at least, somehow
beef-up its looks. I went for the latter and added armrests from stretched
sprue, foot pans from styrene sheet, lower cushions from cardboard and seat
belts from masking tape. Basic seat frame color was medium gray, head cushion
and armrests were red, lower cushions were medium green and the quick release
handles were represented by painting the corresponding areas yellow/black. With
those “improvements” I deemed the seat passable under my “de rigeur” closed
canopy.
The kit-provided seat is
on the plain side and, if you decide not to add the good looking pilot, it might
be a good idea to either replace it with an aftermarket or, at least, somehow
beef-up its looks. I went for the latter and added armrests from stretched
sprue, foot pans from styrene sheet, lower cushions from cardboard and seat
belts from masking tape. Basic seat frame color was medium gray, head cushion
and armrests were red, lower cushions were medium green and the quick release
handles were represented by painting the corresponding areas yellow/black. With
those “improvements” I deemed the seat passable under my “de rigeur” closed
canopy.
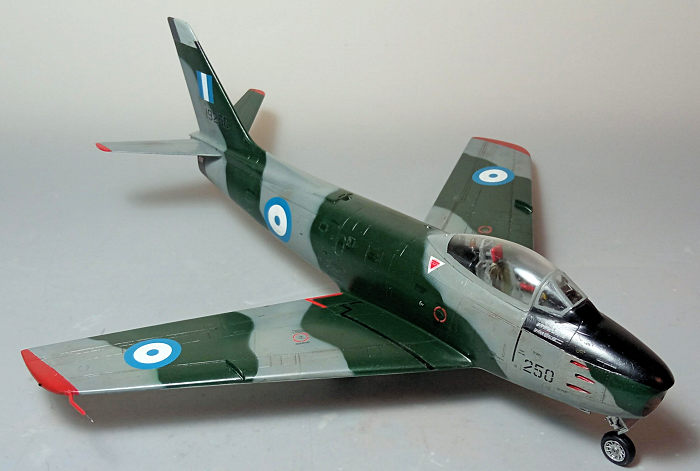
The main wing was next assembled and attached underneath the fuselage, followed by an insert right aft of the wing underside area. Two similar inserts were attached on top of the fuselage and a third one, which housed the dual front located lights, was affixed just fore of the nose bay. The intake lip was attached at this time, as well.
Mostly due to laziness, but also for cleaner looks, I decided to attach the ammo covers and speed brakes at “closed” position. The elevators were attached at their distinctive upwards angle (the head-on view provided by the instructions was very useful), followed by the wing fences.
This more or less concluded basic assembly with fit being generally good, but needing its attention in various areas (especially in attaching the various inserts/panels flush to the fuselage). I would also like both the intake and exhaust ducts to exhibit less discrepancies (like ejector pin marks). After filling and sanding, I took the bird to the paint shop!
| COLORS & MARKINGS |
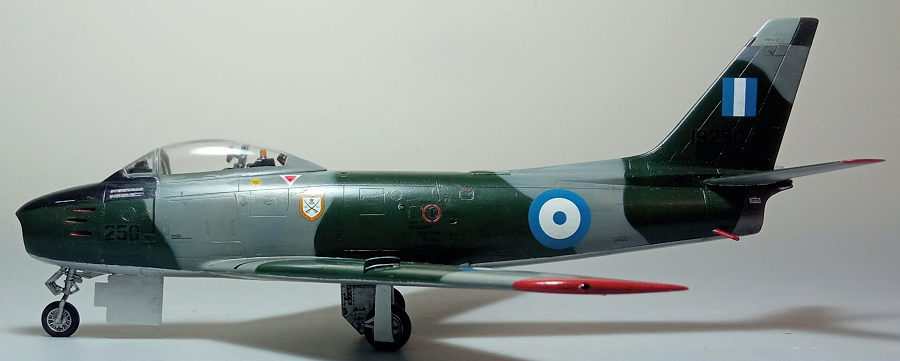
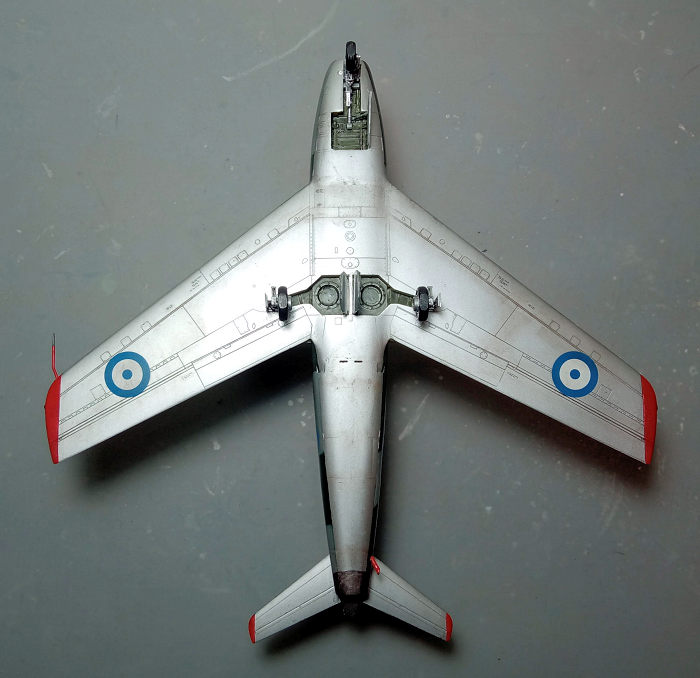
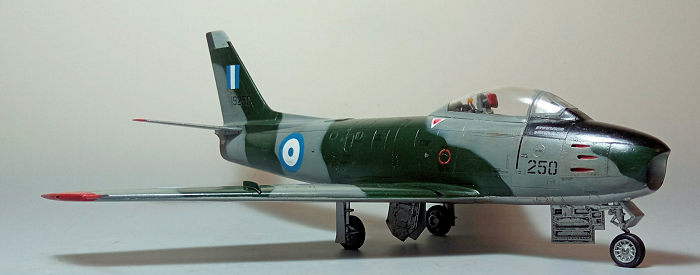
Hellenic Sabres sported Natural Metal Finish (NMF) during most of their career, however towards the end they received the NATO camo but kept their undersides NMF. They also had all wing and tail plane tips painted red. This scheme looked interesting enough to go for. To replicate it, I first applied a coat of my trusty (while stocks last…) Hu11 Silver at all undersides, including gear doors. After masking it off, I applied the topside camo, first using MM2116 and followed by Hu140 for the dark green and gray respectively. For the demarcation lines I used strings of tak, spraying the gray at more or less perpendicular angles, in order to obtain a tight but not dead hard result.
 After the necessary
masking, the front anti glare area was painted black and all wing and tail plane
tips red, with the latter color used for the six gun port exits bilaterally of
the fuselage. The exhaust area was painted Mr Color 61 Burnt Iron, while the fin
tip which housed the VHF/IFF antenna was painted light gray, dark gray and black
following the pattern that was observed at net available pics. A coat of Future
prepared the bird for decaling.
After the necessary
masking, the front anti glare area was painted black and all wing and tail plane
tips red, with the latter color used for the six gun port exits bilaterally of
the fuselage. The exhaust area was painted Mr Color 61 Burnt Iron, while the fin
tip which housed the VHF/IFF antenna was painted light gray, dark gray and black
following the pattern that was observed at net available pics. A coat of Future
prepared the bird for decaling.
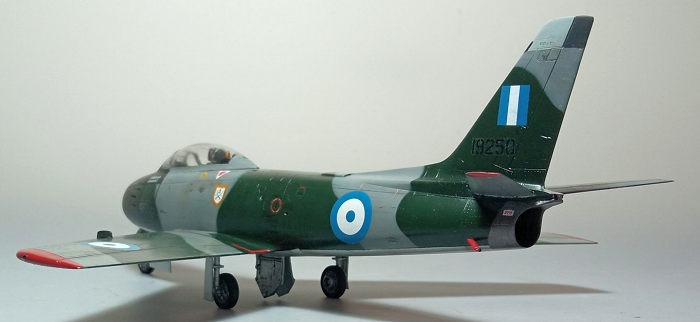
I decided to go for #19250 machine belonging to 342 Squadron and for that I used Icarus Decals 48013 “Hellenic Sabres” decal sheet. Thoroughly researched and superbly printed by Cartograf, it is out of production, but can still be found online with some effort. Though decals behaved very well in general, I experienced some silvering only at the green areas (meaning that it was more likely an operator error). Though the sheet contained stencils, I used the kit-provided ones just for the sake of it, which behaved equally well (no sign of temperamental behavior that some Academy decals exhibited in the past). A coat of Future sealed the decals.
Regarding camo accuracy, it is unclear if the specific machine ever made it to receive the NATO camo, let alone keeping its squadron emblem that was present on the port side of the fuselage during its NMF days. So, the specific scheme for the specific bird might be fictional.
| FINAL CONSTRUCTION |
The landing gear was
attached, with the bird proudly standing on its feet. In order to beef up
the looks, I added simplistic brake lines from stretched sprue to the main
gear legs. All landing gear parts, including door innards and wheel rims
were painted silver, wheel bays were painted with a home brew of interior
green and tires were painted black. The wheels were tad filed to look
weighted.
As a side note judging from net pics, all Sabre main doors were normally
“closed”, presumably opened from ground personnel for ground inspection, so
you may as well glue them shut, possibly opting for “cleaner” looks. Also,
Sabres usually carried wing tanks, but I decided not to install them, as, to
my view, the plane looks cleaner and sportier.
 The bird would
have no time to weather, so weathering was slight, consisting of a black wash,
mostly to the landing gear area (also, more subtly, to all engraved panel lines)
and light application of dark brown/black dry pastels to all areas where some
dirt would reside. A satin coat gave the bird its final hue.
The bird would
have no time to weather, so weathering was slight, consisting of a black wash,
mostly to the landing gear area (also, more subtly, to all engraved panel lines)
and light application of dark brown/black dry pastels to all areas where some
dirt would reside. A satin coat gave the bird its final hue.
Onto transparencies, where the canopy had a mold line that ran externally through its centerline: nothing too difficult to tackle, starting with carefully scraping the mold line with my hobby knife, then sanding he area with 400 grit sandpaper using progressively finer grades and, finally, polishing it with toothpaste and a soft rag. If you are faint of heart, you may skip the initial scraping with the hobby knife and just sand the mold line away, paying attention not to force/twist too much the canopy as you sand, as micro cracks might occur.
Upon feeling satisfied, both the windscreen and canopy had their well defined frames hand painted and attached, after mounting the gunsight and the clear part of the radio compass (the latter located aft of the headrest and painted clear orange). Fit of the windscreen was not that good, leaving some gaps that had to be faired with white glue. Also, one sprue gate penetrated the windscreen in a less than delicate manner, compromising the glass section.
The two underside located front light lenses were
also attached using Future as bonding agent. The fuel tank vent and the
distinctive pitot tube were also glued on. They were both painted red, with the
pitot tip painted Testors Burned Metal.
The wing tip, fin and aft located navigation/formation lights were accordingly
painted with red, green, orange and silver paint, before calling the Hellenic
Sabre done!
| CONCLUSIONS |
Despite being almost three decades old (as of 2024), this is still a very good kit of the iconic Sabre. Overall shape looks correct, molding is nice and crisp, detail at key areas will satisfy most of us and fit, while not perfect, is good. The transparencies will need some work, instructions are clear and decals are well done.
Out of the box a very nice unslatted Sabre can be built, with the relative easiness of construction deeming this kit suitable for anyone but the absolute beginner. Last reissued in 2011, but still not that difficult to find and offered at very sensible prices, this is definitely a kit worth tackling.
Happy Modeling!
14 June 2024
Copyright ModelingMadness.com. All rights reserved.
No reproduction in part or in whole without express permission. If you would like your product reviewed fairly and fairly quickly, please
contact
the editor
or see other details in the
Note to
Contributors.