Hasegawa 1/32 F-86E(M)
| KIT #: | 08060 (St 10) |
| PRICE: | €40 when new |
| DECALS: | Two options |
| REVIEWER: | Spiros Pendedekas |
| NOTES: |
| HISTORY |
Its success led to an extended production run of more than 7,800 aircraft
between 1949 and 1956, in the United States, Japan, and Italy. In addition, 738
carrier-modified versions were purchased by the US Navy as FJ-2s and -3s.
Variants were built in Canada and Australia. The Canadair Sabre
 added another
1,815 aircraft and the significantly redesigned CAC Sabre (sometimes known as
the Avon Sabre or CAC CA-27), had a production run of 112. The Sabre is by far
the most-produced Western jet fighter, with a total production of all variants
at 9,860 units.
added another
1,815 aircraft and the significantly redesigned CAC Sabre (sometimes known as
the Avon Sabre or CAC CA-27), had a production run of 112. The Sabre is by far
the most-produced Western jet fighter, with a total production of all variants
at 9,860 units.
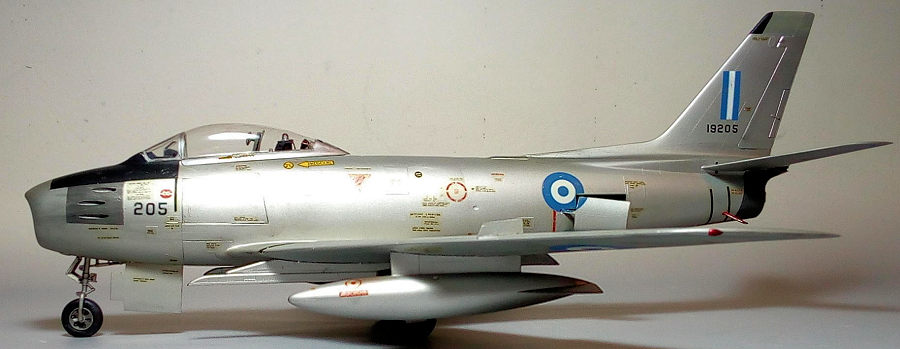
In 1954 Greece received the first F-86s, which were surplus ex-RCAF Canadair
Mk2s with their old wing modified to a larger unslatted one, also known as the
“hard” wing. This modification, as well as general maintenance of the aircraft
before handing them to Greece, was performed both in Canada by Canadair and in
England by Bristol Aeroplane, after the latter was first supplied with
modification packages by Canadair. These modified Sabres were renamed F-86E(M)
(M: Modified).
Around 110 machines were supplied to Greece in total, equipping the 341, 342 and
343 Squadrons and remaining in service till 1965, to be replaced by F-5As. The
Sabre was the first Greek aircraft that could break the sound barrier in a dive.
The most famous Greek Sabres were those used by the famous aerobatic team
“ΕΛΛΗΝΙΚΗ ΦΛΟΓΑ - Hellenic Flame” (1957-1965), vividly painted in red, white and
blue.
At least nine Greek Sabres survive to this day, the four of them being aircraft
of the “Hellenic Flame” team.
| THE KIT |
Hasegawa first issued this kit in 1972
as the long wing F40 version and has reboxed it totally unchanged another 19
times ever since, with occasionally different decals. No short wing version was
ever done, meaning you cannot directly model an earlier Sabre out of this kit,
unless you perform some surgery. My specific copy was the 2007 rebox.
Upon opening the box, I was greeted with 164 light gray styrene parts, arranged
in 9 sprues. Molding is expectedly old school, with raised detail allover, the
styrene itself being glossy and somehow hard with not too much flash.
 The cockpit
is acceptable, with instrument panel, seat, stick, rudder pedals, a convincing
headrest and good looking loop antennas and cockpit pressure regulator, the
latter two found aft of the headrest onto the rear anti-glare area. Instruments
are nicely molded “raised” onto the instrument and side panels and also onto the
sidewalls, promising to look good with proper painting. No seat belts are
provided. Finally, an acceptable pilot with separate hands is supplied.
The cockpit
is acceptable, with instrument panel, seat, stick, rudder pedals, a convincing
headrest and good looking loop antennas and cockpit pressure regulator, the
latter two found aft of the headrest onto the rear anti-glare area. Instruments
are nicely molded “raised” onto the instrument and side panels and also onto the
sidewalls, promising to look good with proper painting. No seat belts are
provided. Finally, an acceptable pilot with separate hands is supplied.
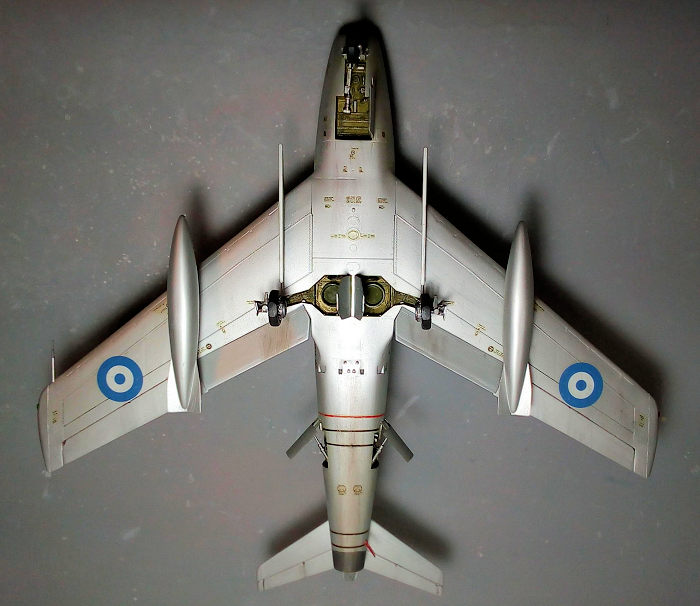
Landing gear is well executed, the bays featuring sufficient detail and depth,
with the exception of the total absence of the distinctive circular brake drum
housings, which are merely replicated by two uninspiring holes (since this is
too obvious of an omission, I keep my reservations on the possibility of some
Sabre versions featuring holes there). Some vinyl tubing is to be installed in
the bays, to replicate flexible lines, a nice touch. I would also not mind at
all having brake lines molded onto the main gear legs. The gun bays are also
nicely detailed, with their access panels optionally left unglued.The air brakes
can be posed “open”, with their housings also featuring good detailing. Flaps
and ailerons are separate, with the latter moveable.
A fully detailed engine is supplied, which is a nice mini model in itself, even
including vinyl tubing! In order to display it attached, the kit offers the
(commonly found in F-86 kits) option of a removable rear fuselage (but not a
dolly, on which the rear fuselage part could be placed). A 3-piece good looking
tripod jack is supposed to support the rear fuselage part once installed.
Finally, a nice full depth front intake is provided, as well as intake and tail
pipe covers.
Two types of auxiliary fuel tanks are supplied, as well as two Sidewinders.
Clear parts are well done, with the canopy also moveable. The canopy’s
supporting frame is separate, making its painting a breeze.
Instructions are the typical (excellent) Hasegawa pamphlet-style, including a
nice history, a parts list and 12 very clear construction steps, with sufficient
color callouts in Gunze Sangyo, Mr Color and generic naming. Two NMF similar
Japanese schemes are offered, with the decals looking well registered and
containing a good amount of maintenance stenciling.
| CONSTRUCTION |
I started by assembling the 3-piece
intake trunking (which contains the nose landing gear bay), then put together
the 6-piece cockpit, which I placed onto the trunking top. The whole subassembly
was subsequently trapped between the fuselage halves, followed by attaching the
intake lip. Having decided not to display the gun bays, I permanently attached
the respective panels. Basic cockpit color, including stick body, rudder pedals,
rear bulkhead and seat was Hu64 Light gray, with black instrument panel, side
consoles and stick grip, red seat arms and headrest
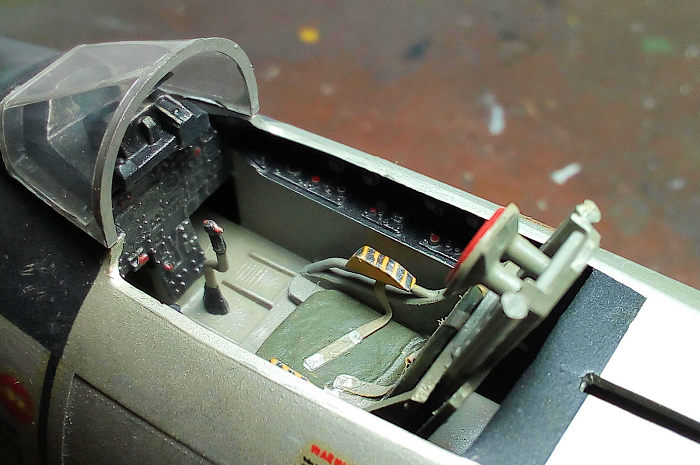 and
yellow/black emergency handle. Seat belts were fabricated out of masking tape.
and
yellow/black emergency handle. Seat belts were fabricated out of masking tape.
Next major subassembly was the rear fuselage, which is a 12 -piece affair,
including the tail planes, rudder and air brakes, which was assembled per the
instructions (the air brakes were left apart, to be attached “open” at later
stages). Having decided not to display the engine, I omitted installing the
fuselage bulkheads (which were supposed to support the engine) and went on
joining the front and rear fuselage parts, whereas I had beforehand made sure to
secure a good amount of fishing weight immediately aft of the rear cockpit
bulkhead.
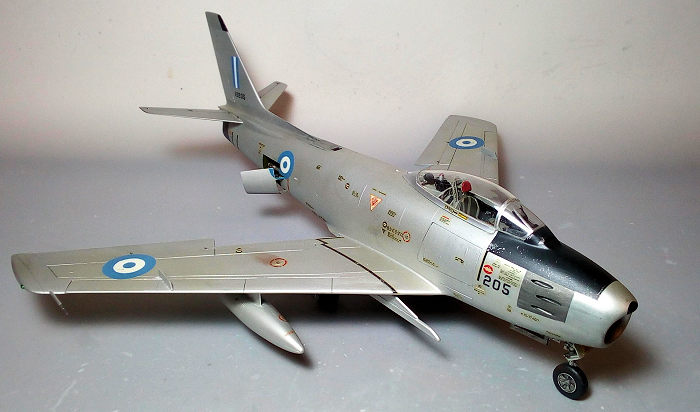
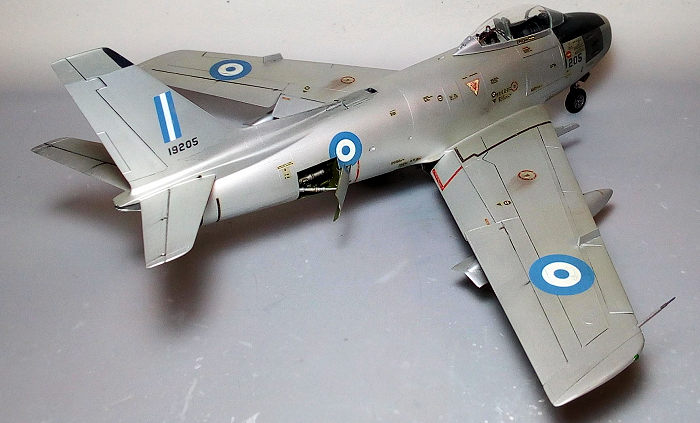
Continuing with subassemblies, it was time to assemble the wing, a 13-piece
affair. Since I wanted to depict a Greek bird (which had unslatted 6-3 wings), I
attached the slats permanently in “retracted” position and, by studying net
available drawings, added two appropriately shaped wing fences from sheet
styrene at the corresponding positions. Then the wing was attached to the
fuselage. Again, fit was good. Ailerons were finally attached “neutral” and
flaps “down”.
By studying net pics, I decided to make two circular housings, in order to cover
the holes present in the main landing gear bays. These were fabricated from
cylindrical sections of leftover wing tanks, with thin styrene sheet added at
one side. They were subsequently attached onto the holes, with the area then
looking closer to reality.
The correct for my version external tanks were also assembled at this point and
attached, as were also the missile pylons. After some filling and sanding (not
that much, actually, since fit was quite good), I took the Sabre to the paint
shop!
| COLORS & MARKINGS |
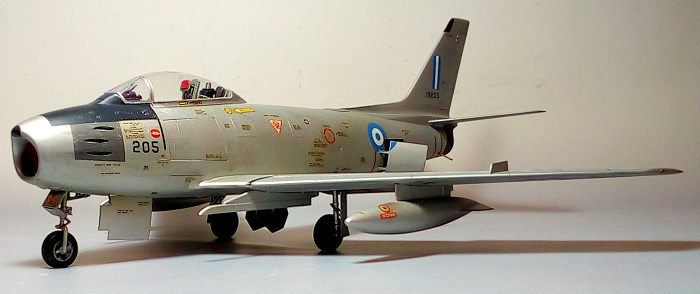 I first
applied a coat of matt black onto the front anti glare area, then masked it off.
Next I went on and applied a coat of Hu11 Silver allover, including doors,
landing gear parts and canopy base.. Upon drying, I carefully masked the fore
(gun) and aft (exhaust) areas and painted them Testors Burned Metal. After a
protective coat of Future, I proceeded to decaling.
I first
applied a coat of matt black onto the front anti glare area, then masked it off.
Next I went on and applied a coat of Hu11 Silver allover, including doors,
landing gear parts and canopy base.. Upon drying, I carefully masked the fore
(gun) and aft (exhaust) areas and painted them Testors Burned Metal. After a
protective coat of Future, I proceeded to decaling.
During their early days with the Hellenic Air Force, Greek Sabres featured light
blue roundels and fin flash, the latter being characteristically long. To
replicate them, I used suitably sized decals from an excellent generic “Plastimodelismo”
decal sheet (sadly, no longer in production). The codes were sourced from my
spares. The rest of the decals were maintenance stencils, for which I used the
kit supplied ones, which behaved equally excellently. A coat of Future sealed
them.
| FINAL CONSTRUCTION |
I
attached the gear legs, doors and all retraction arms in position, followed
by the nice looking wheels which were beforehand assembled. All landing gear
parts were painted silver (including doors innards), with the oleos
highlighted with a fine chrome pen. The air brakes were also attached
“open”. All bays were painted green zinc chromate, with internal detailing
picked up in silver, black and light gray accordingly.
 Since no
engine was installed, I decided to add the nicely rendered intake and
exhaust covers, which I painted red. Red was also the color of the
distinctive port aft fuel vent tube. The pitot tube was then added to the
starboard wing, its tip painted burned metal. Finally, the cockpit pressure
regulator and the distinctive radio-compass loop antenna were assembled and
attached at the rear base of the canopy frame.
Since no
engine was installed, I decided to add the nicely rendered intake and
exhaust covers, which I painted red. Red was also the color of the
distinctive port aft fuel vent tube. The pitot tube was then added to the
starboard wing, its tip painted burned metal. Finally, the cockpit pressure
regulator and the distinctive radio-compass loop antenna were assembled and
attached at the rear base of the canopy frame.
I decided to apply some weathering,namely black wash at the landing gear,
air brakes and hinges areas, scratches on the painted insignia and stencils
by silver dry brushing, fluid/grease leaks done with a fine brush using
brown and black temperas and finally some general “dirtying’, using dark
colored dry pastels. A final satin (towards matt) coat gave the Sabre its
final finish.
The windscreen had its well defined frames hand painted and was attached in
position. The canopy transparency was affixed onto its frame with Clearfix
and the complete assembly was attached “closed”. The navigation lights were
represented by blobs of red and green clear paints, before calling the
Hellenic Sabre done!
| CONCLUSIONS |
The best 1/32 Sabre is Kinetic’s offering (also reboxed by Italeri and Wolfpack). This kit’s design looks to have been based on the very good 1/48 Academy kit. All different-wing variants have been covered by various editions (Hasegawa only provides the long wing slatted version), whereas the normal retail prices the kit is offered are pleasantly low. Tom Cleaver stated that the Kinetic builds easily and results in an accurate and impressive model once completed. Kinetic has a winner here.
Despite its age, the Hasegawa offering is still a
decent kit of the iconic Sabre. Apart from cockpit size and canopy shape, its
general shape is accurate. Fit is good and detailing is acceptable. I am not
sure if the circular voids found in the main wheel wells are an over
simplification or a feature of som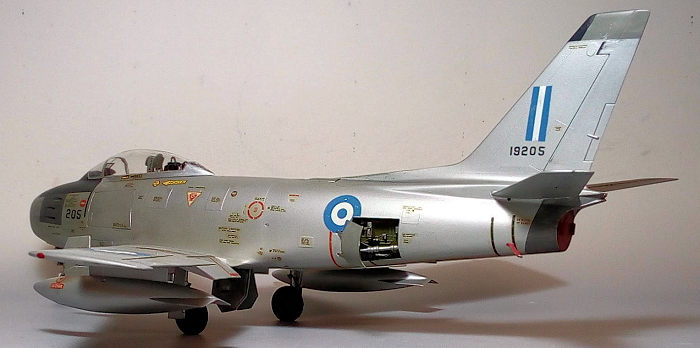 e
Sabre variants but, anyway, it is a fixable issue. Even out of the box, a good
model can be made, with its easy construction and relatively low parts count
deeming it suitable for everyone but the absolute beginner.
e
Sabre variants but, anyway, it is a fixable issue. Even out of the box, a good
model can be made, with its easy construction and relatively low parts count
deeming it suitable for everyone but the absolute beginner.
An interesting fact (especially for Hasegawa who is famous for maximizing
its molds potential) is that, since 1972 (where this kit was first issued), only
the slatted long wing version has been offered. Though a successful kit, I
believe that Hasegawa would have attained far better success should they have
offered all Sabre wings possibilities (with the endless attractive markings).
A good amount of aftermarket stuff seems to exist, addressing many of the kit’s
lesser areas. Everything comes at a price, though, with the modeler having to
decide upon spending extra money in order to improve the Hasegawa, or go for the
already great (and cheap) Kinetic, but please note that, as of 2022, both kits
are difficult to find and come at unnaturally high prices! Nevertheless, it can
be logically assumed that both Kinetic and Hasegawa will reissue their Sabres
not very far from this day at their normal retail prices.
If you have the Hasegawa kit in your stash, or find one at a good price, by all
means grab it and build it! You will not struggle to finish it and you will be
rewarded with a very good looking big Sabre to proudly display at your showcase.
Happy modeling!
26 July 2022 Copyright ModelingMadness.com. All rights reserved.
No reproduction in part or in whole without express permission. If you would like your product reviewed fairly and fairly quickly, please
contact
the editor
or see other details in the
Note to
Contributors.