Hasegawa 1/32 F-104C Starfighter
|
KIT #: |
01833 |
|
PRICE: |
$30.00 in 2005 |
|
DECALS: |
Two options |
|
REVIEWER: |
Spiros Pendedekas |
|
NOTES: |
|
The story of the Starfighter is well known: created as a day fighter
by Lockheed as one of the Century Series of fighter aircraft for the United
States Air Force (USAF), it was developed into an all-weather multirole
aircraft in the early 1960s. An iconic single-engine, supersonic interceptor
aircraft, it was extensively deployed as a fighter-bomber during the Cold
War. It was produced by several other nations, seeing widespread service
outside the United States.
 From October 1958 onwards the F-104 was re-equipping the 479 TFW, after the
F-100A struggled to meet the requirements of an effective air superiority
fighter. Primarily intended for a nuclear strike, the TAC wanted to use the
Starfighter for conventional ground attack missions, despite its lack of
range, endurance, all-weather capability, and offensive capability. As a
result, only 296 out of 722 initially ordered were delivered.
From October 1958 onwards the F-104 was re-equipping the 479 TFW, after the
F-100A struggled to meet the requirements of an effective air superiority
fighter. Primarily intended for a nuclear strike, the TAC wanted to use the
Starfighter for conventional ground attack missions, despite its lack of
range, endurance, all-weather capability, and offensive capability. As a
result, only 296 out of 722 initially ordered were delivered.
But the F-104 glory days were yet to come: modifications made to the F-104G
led to a large number of foreign sales, with the Starfighter metamorphosing
from a mediocre air-superiority day fighter into a highly capable multirole
all-weather strike fighter. The excellent flying weather in Southern
California gave the 479th a new mission to train F-104 pilots from West
Germany, Canada, the Netherlands and Italy during January 1962 – August 1963
as a result of the foreign-sale success of the G-model Starfighter.
The 479th was the only USAF wing to take the F-104C into combat when in
April 1965, the 476th TFS deployed to Kung Kuan Air Base, Taiwan. From its
base in Taiwan, the squadron began a regular rotation to Da Nang Air Base,
South Vietnam where its mission was to fly MiG combat air patrol (MiGCAP)
missions to protect USAF F-100 fighter bombers against attack by North
Vietnamese fighters. The effect of F-104 deployment upon NVN and PRC MiG
operations was immediate and dramatic. NVN MiGs soon learned to avoid
contact with USAF strikes being covered by the F-104s.
As the MiG threat abated, the F-104s were quite successfully tasked with
some weather reconnaissance and ground attack missions, but after four
losses, the 436th was rotated back to George in November 1965.
First appearing in 1975, as the “J/G” version and soon after as the “C”
(their only difference seemingly being the sprue containing the different
fin), this kit has been reboxed almost 20 times since then, covering
numerous Starfighter schemes from the “C” version and onwards. My copy is
the 2002 “C” version, coming in a very attractive top opening box, with a
“Master” Koike Shigeo boxart, portraying a flamboyant “C” retracting its
wheels upon takeoff. This boxart and the very reasonable price were the
prime factors that made me buy this kit.
 Upon opening the box, you are greeted with quite a bit of plastic. There are
5 sprues with that “old style” Hasegawa hard and shiny styrene with fine
raised detail, actually quite good, taking into account the 1975 kit
origins. Cockpit details are ok, including a nice canopy internal frame, but
could be more for that scale (not a massive problem for me, as I usually
close my canopies). Structural details are adequate, as is the landing gear,
with the exception of the MLG well walls, which are bland, crying for some
super detailing. Hope the tight tolerance gear doors will save the day and
little can be seen in there… The air intakes are also bland, but, being
relatively deep, the effect is not that obvious. I liked a lot the kit
supplied reinforcement rod that is to be sandwiched between the two MLG leg
halves, as well as the nice one piece wings, with their sharp leading and
trailing edges, a very prominent feature of the Starfighter.
Upon opening the box, you are greeted with quite a bit of plastic. There are
5 sprues with that “old style” Hasegawa hard and shiny styrene with fine
raised detail, actually quite good, taking into account the 1975 kit
origins. Cockpit details are ok, including a nice canopy internal frame, but
could be more for that scale (not a massive problem for me, as I usually
close my canopies). Structural details are adequate, as is the landing gear,
with the exception of the MLG well walls, which are bland, crying for some
super detailing. Hope the tight tolerance gear doors will save the day and
little can be seen in there… The air intakes are also bland, but, being
relatively deep, the effect is not that obvious. I liked a lot the kit
supplied reinforcement rod that is to be sandwiched between the two MLG leg
halves, as well as the nice one piece wings, with their sharp leading and
trailing edges, a very prominent feature of the Starfighter.
A full engine with basic detail is provided, and you may leave the aft
fuselage unglued and display it. In the same manner, a basic radar and a
nice Vulcan cannon are provided. The airbrakes can be displayed “open” too,
with adequate internal detail. Those “open” options are not “bad to have'';
however, the modeler should have in mind that such displays might require
some super detailing of the parts themselves and the surrounding areas. Good
thing (for me) is that the Starfighter’s normal posture was “all closed”, so
I can glue them shut!
 The “de rigueur” tip tanks (I find Starfighters odd-looking without them…)
and two sidewinders are the only external stores provided. I believe few
will resist the temptation to not install the Sidewinders at all, in order
to preserve the absolutely gorgeous Starfighter shape. A four-piece pilot is
supplied, too, if you want to place one to busy up the cockpit, which is not
that bad of an idea. Transparencies are nice and clear, as are the
instructions (in typical Hasegawa pamphlet-style).
The “de rigueur” tip tanks (I find Starfighters odd-looking without them…)
and two sidewinders are the only external stores provided. I believe few
will resist the temptation to not install the Sidewinders at all, in order
to preserve the absolutely gorgeous Starfighter shape. A four-piece pilot is
supplied, too, if you want to place one to busy up the cockpit, which is not
that bad of an idea. Transparencies are nice and clear, as are the
instructions (in typical Hasegawa pamphlet-style).
Two NMF schemes are provided, one depicting a flamboyant 1963 Wing
Commander’s Californian and one 1965 Vietnam bird (named “Fannie”). Decals
are quite extensive, including full maintenance stenciling, also
representing various flush levers, fuselage framings, even the six flush
fuselage lights. Indeed, the comprehensive decal sheet promises to boost the
kit’s simple looks a lot. Decals are of excellent quality, but yellowed due
to aging and with the “whites” actually being ivories….
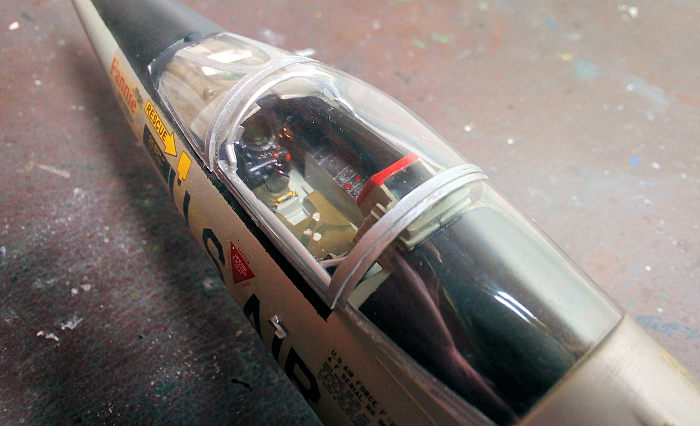
I started by assembling the cockpit, consisting of a mere 13 pieces,
including the seat, with the lower part of the seat molded onto the cockpit
floor. Basic cockpit color (including canopy internal structure and rear
anti-glare area, was Hu140 Gull Gray, with black instrument panel, stick and
throttle grips and red head cushion. The seat cushion, as well as the
characteristic front dashboard covering blanket were painted olive drab.
Raised instruments and switches were dry brushed with silver, with some
“knob” details picked up in red, yellow and white. The C-2 downward ejection
seat (oh, my! I would not like to eject upon takeoff…) had its ejector
handle painted yellow/black and received some seat belts from khaki doped
masking tape. As above stated, details are just adequate, with the cockpit
hoping to look acceptably busy under the closed canopy.
 The cockpit, including its rear bulkhead, NLG wheel well and front engine
mounting bulkhead were attached on the port fuselage half. The arresting
hook base was attached to the starboard half and the two fuselage halves
were glued together, followed by the two piece air intakes, the airbrakes,
NLG aft louver, Vulcan cannon cover and three piece nose cone, all glued
shut. Fit was nice. I have never recalled any Starfighter model needing nose
weight, so I did not add any. If deciding to fit under fuselage stores, you
should drill out the two partially drilled provided holes. Loving the clean
Starfighter looks, I omitted them.
The cockpit, including its rear bulkhead, NLG wheel well and front engine
mounting bulkhead were attached on the port fuselage half. The arresting
hook base was attached to the starboard half and the two fuselage halves
were glued together, followed by the two piece air intakes, the airbrakes,
NLG aft louver, Vulcan cannon cover and three piece nose cone, all glued
shut. Fit was nice. I have never recalled any Starfighter model needing nose
weight, so I did not add any. If deciding to fit under fuselage stores, you
should drill out the two partially drilled provided holes. Loving the clean
Starfighter looks, I omitted them.
Though I chose not to display it, the engine must be assembled and
installed, as its rear (afterburner) part is visible; so it was, with the
afterburner part, including the exhaust nozzle, painted Testors Burned
Metal. It was then attached at the fuselage mounting bulkhead.
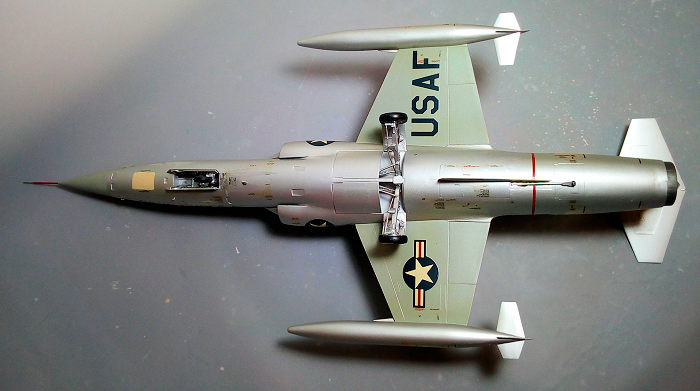
I assembled the 4-piece tail, painted its innards (AB housing) silver and
attached it at the main fuselage, trapping the engine in between. I then
attached the main wings. Fit was, again, nice, requiring the usual modeler’s
attention, as to obtain the characteristic anhedral wings posture of the
Starfighter. The pair of good looking 3-piece tip tanks was also assembled
and attached, with the whole basic model afterwards coarse sanded, filled
here and there, and finally smooth sanded.
I then assembled the 11-piece main and 3-piece nose landing gear legs and
attached them onto the main frame. The NLG locking device was attached into
the well, too. Since all landing gear components at that time period were
left NMF (or painted ‘”silver”?), the plan was to paint them together with
the “NMF” painting of the fuselage. I thus covered the cockpit with wet
tissue, masked the exhaust cone and headed to the paint shop!
 I first painted the radome anti glare area black, masked it, then gave the
radome and wing undersides a coat of Hu140 (for aircraft gray) and masked
them off as well. The tops of the wings were sprayed with Hu34 from a bottle
I had for many years, with the “white” looking more like “off white”, or
ivory….hold on! Did I say “ivory”? What a nice opportunity to match this
shade with the “ivorizing white” Hasegawa decals! Just for the pure fun of
it, and, of course meticulously complying to / never pushing my “El Cheapo”
tight envelope, I left that “evolved white” wing as is and masked it off.
I first painted the radome anti glare area black, masked it, then gave the
radome and wing undersides a coat of Hu140 (for aircraft gray) and masked
them off as well. The tops of the wings were sprayed with Hu34 from a bottle
I had for many years, with the “white” looking more like “off white”, or
ivory….hold on! Did I say “ivory”? What a nice opportunity to match this
shade with the “ivorizing white” Hasegawa decals! Just for the pure fun of
it, and, of course meticulously complying to / never pushing my “El Cheapo”
tight envelope, I left that “evolved white” wing as is and masked it off.
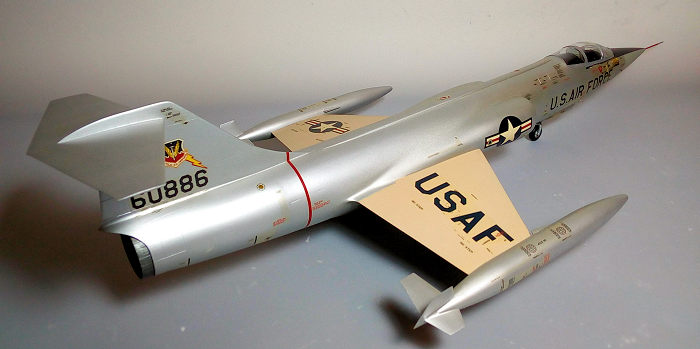
The whole model (including the landing gear doors, tip tanks, wheel rims and
arresting hook) was then given a coat of Hu191 Chrome Silver, which sprayed
nicely, its shade giving a rough representation of the then used polished
aluminum fuselage looks. Out of pure laziness, I elected not to replicate
the rear polished steel panels (this was regret #2, with #1 being not busy-ing
up the MLG wheel well walls). The underside ejection panel, as well as the
rear part of the ventral strake were painted Hu103 “cream”.
 As a note, some interesting coloring variations could be observed at those
relatively early Starfighter days, at areas like the fin (unpainted, gray),
intakes (unpainted, gray, black), ventral strake aft section (cream, gray,
black), pitot (unpainted, red, red/white) and so on. Thanks to the
Starfighter aficionados, a lot of valuable pictorial info exists at the net,
so you are strongly advised to check the specific pics of the specific bird
of the specific time. Amazingly, most of the time you will find sufficient
info! A coat of Future sealed the paint and prepared the model for decaling.
As a note, some interesting coloring variations could be observed at those
relatively early Starfighter days, at areas like the fin (unpainted, gray),
intakes (unpainted, gray, black), ventral strake aft section (cream, gray,
black), pitot (unpainted, red, red/white) and so on. Thanks to the
Starfighter aficionados, a lot of valuable pictorial info exists at the net,
so you are strongly advised to check the specific pics of the specific bird
of the specific time. Amazingly, most of the time you will find sufficient
info! A coat of Future sealed the paint and prepared the model for decaling.
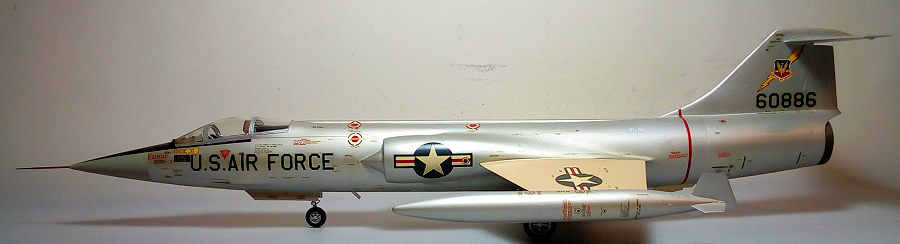
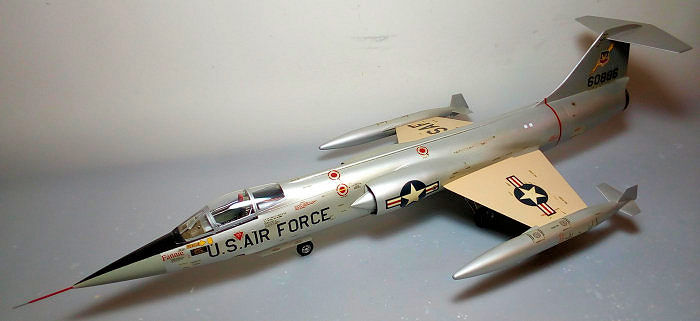
I used the comprehensive kit decal sheet, in order to represent #60886 bird,
named “Fannie”, as it stood in Vietnam, DaNang, 1965. Of the two offered kit
options, this is the less flamboyant scheme (and more to my liking, as the
Starfighter shape is flamboyant by itself and does not really need a lot
artistic “extras” to look gorgeous, although, I have to admit, I have seen
many truly fantastic artistic schemes on them). The decals, apart from the
irritating “ivorizing whites” and age yellowness, behaved beautifully, with
their extensive coverage really boosting the model looks. The six side
fuselage lights were supplied as decals and looked very nice! A coat of
Future sealed all decals.
The already silver painted wheels were assembled, had their tires painted
black and were attached, together with the landing gear doors. The pitot was
painted red (as it seemed to be a norm at those early stages, the red and
white pattern adopted soon after) with gunmetal tip and was attached. The
AOA sensor was attached as well (painted “steel”).
The three landing lights had their backs painted silver and attached to the
gear legs. The HUD glass and lens (with a drop of Humbrol clear green on it)
were attached, too. The transparencies had their well-defined frames painted
Hu191 and attached, the minimal gaps faired with white glue.
 I did not do any weathering, as I have always thought that NMF Starfighters
were kept in pristine condition. The only thing I did was a black wash to
accentuate the raised details on the landing gear parts, wheels and aft NLG
air exit louvers. I have to confess that I came across a pic of my schemed
plane, showing it with some (minimal) weathering, its fin painted gray
(though the next to it had it “silver”) and having a refueling probe
installed (not provided by the kit). Of course, this pic was discovered
after the model was finished. Well, my scenario is that those alterations
were field-performed, sometime after the aircraft’s arrival there in its
original shiny scheme.
I did not do any weathering, as I have always thought that NMF Starfighters
were kept in pristine condition. The only thing I did was a black wash to
accentuate the raised details on the landing gear parts, wheels and aft NLG
air exit louvers. I have to confess that I came across a pic of my schemed
plane, showing it with some (minimal) weathering, its fin painted gray
(though the next to it had it “silver”) and having a refueling probe
installed (not provided by the kit). Of course, this pic was discovered
after the model was finished. Well, my scenario is that those alterations
were field-performed, sometime after the aircraft’s arrival there in its
original shiny scheme.
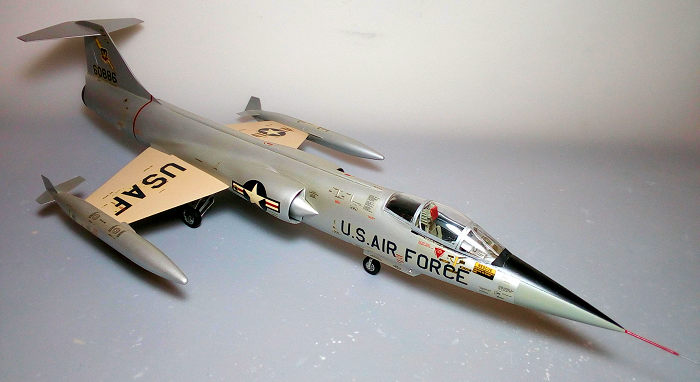
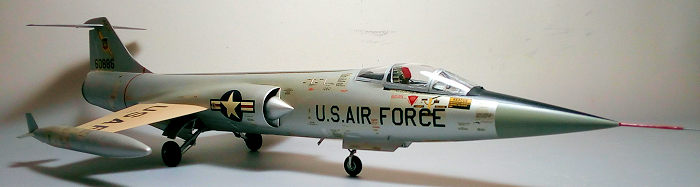
Hoping my scenario was plausible, and looking at the funny “off-white” wings
and insignia, I gave an almost gloss coat (90/10 gloss/matt), to give the
model its final shine and called this sleek beauty done!
If you want a detailed, modern (i.e. engraved panel lines etc) kit of the
iconic Starfighter, the Italeri kit is the way to go. Appearing in 2013, it
is reasonably offered at the $100 region. Frequently reboxed, covering many
variants and schemes, with rumored nice fit, it can be built into an
impressive model right Out Of the Box (OOB).
The Hasegawa is a “goodie but oldie” kit, with good overall shape, easiness
of construction, good fit and extensive, comprehensive decal sheet. On the
other hand, details are not that great at places (cockpit and especially MLG
wheel well walls). Additionally, panel lines are raised, which is a minus
for most modelers (not for me).
Offered at less than half the price of the Italeri kit, frequently reboxed,
as per the standard Hasegawa practice, with the latest edition decals not
suffering any more from the “ivorizing white” disease, it could be a viable
alternative to the Italeri, for a quicker and pleasant build, tackled by any
modeler, except from the purely novice. Aftermarket exists too, seemingly
common with the Italeri kit. If you decide to go that extra mile and super
detail the kit’s “simplistic” areas (a thing I regretfully did not do), an
amazing model will result.
So, if you come across one, especially if offered at a good price, do not
hesitate to grab it and build it. You will definitely be rewarded with the
pride of having a great looking 1/32 Starfighter in your showcase!
Happy modeling!
Wikipedia
Scalemates
916-Starfighter website
The net
Spiros
Pendedekas
5 October 2021
Copyright ModelingMadness.com. All rights reserved. No reproduction in part or
in whole without express permission.
If you would like your product reviewed fairly and fairly quickly, please
contact
the editor or see other details in the
Note to
Contributors.
Back to the Main Page
Back to the Review
Index Page
Back to the Previews Index Page