Atlantis 1/77 F-89D Scorpion
| KIT #: | H-221 |
| PRICE: | $21.9 SRP |
| DECALS: | One Option |
| REVIEWER: | Dan Lee |
| NOTES: | ex-Revell tooling |
| HISTORY |
The Northrop F-89 Scorpion was originally designed to be a high speed replacement for the Northrop P-61 Black Widow. It was supposed to carry bombs, rockets in pods as well as 20mm or 15mm cannon in two turrets, one in the nose and one in the rear. Jet power was not specified, but the new plane's specified speeds meant that jet engines were the only choice.
 However, the
changing design specs and mission meant that the straight winged plane would
eliminate the turrets as well as the bombs carrying capacity. It became a 20mm
cannon armed interceptor, but the USAF wanted something more powerful and longer
ranged than 20mm cannons so they went with the Mighty Mouse Fold Fin Aerial
Rockets (which were the forerunner of the 70mm Hydra air to ground rockets.)
However, the
changing design specs and mission meant that the straight winged plane would
eliminate the turrets as well as the bombs carrying capacity. It became a 20mm
cannon armed interceptor, but the USAF wanted something more powerful and longer
ranged than 20mm cannons so they went with the Mighty Mouse Fold Fin Aerial
Rockets (which were the forerunner of the 70mm Hydra air to ground rockets.)
The Scorpion had a lot of teething problems including a balky fire control system and issues with metal fatigue at the wing spar due to a new type of aluminum alloy that led to the grounding of the entire fleet for several months. The D model was the most produced version of the Scorpion as 650 were produced. The D carried 104 Mighty Mouse Rockets in two wingtip pods.
The Battle of Palmdale
The F-89's only actual combat experience occurred in August of 1956 when a Point Mugu US Navy Hellcat drone became a runaway during a Sparrow missile test. The USN didn't have any fighter stationed near the area so they called the USAF who had F-89Ds from the 437the Fighter Interceptor Squadron stationed at Oxnard AFB.
 A pair of
F-89Ds were scrambled to intercept the Hellcat over Los Angeles. The F-89Ds
waited for the Hellcat to fly over under/unpopulated areas to fire.
Unfortunately, their automated fire control systems failed forcing the pilots to
switch over to manual control. To make matters worse their F-89Ds recently had
their manual gunsights removed when the Hughes automatic fire control system was
installed on their planes, the same system that went belly up on them.
A pair of
F-89Ds were scrambled to intercept the Hellcat over Los Angeles. The F-89Ds
waited for the Hellcat to fly over under/unpopulated areas to fire.
Unfortunately, their automated fire control systems failed forcing the pilots to
switch over to manual control. To make matters worse their F-89Ds recently had
their manual gunsights removed when the Hughes automatic fire control system was
installed on their planes, the same system that went belly up on them.
Forced to use the Mark One Eyeball gunsight on a circling target, the pilots decided to fire their Mighty Mouse Rockets in three salvos at the turning Hellcat. Both planes aimed and fired off their salvos. The airborne comedy of errors continued as most of the rockets missed the errant Hellcat and the few that did hit bounced off the Grumman Ironworks product without exploding.
The city of Palmdale was hit by falling exploding ordinance. Fortunately no one was killed in the aerial farce as various buildings were damaged by exploding Mickey Mouse rockets. One truck exploded from a direct hit narrowly missing its crew who had decided to take their lunch break at a nearby tree. Several rockets started a fire that nearly reached an explosive factory. All in all, 1000 hectares of forest and brush were burned down which took 500 firefighters over two days to stop them.
Meanwhile the Hellcat drone crashed near the Palmdale regional airport after it ran out of fuel.
| THE KIT |
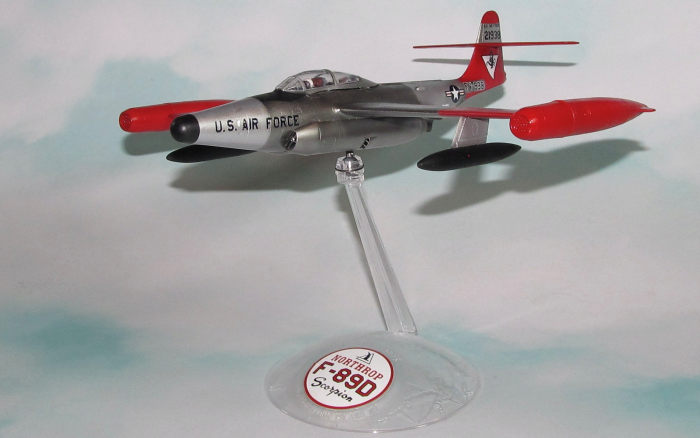
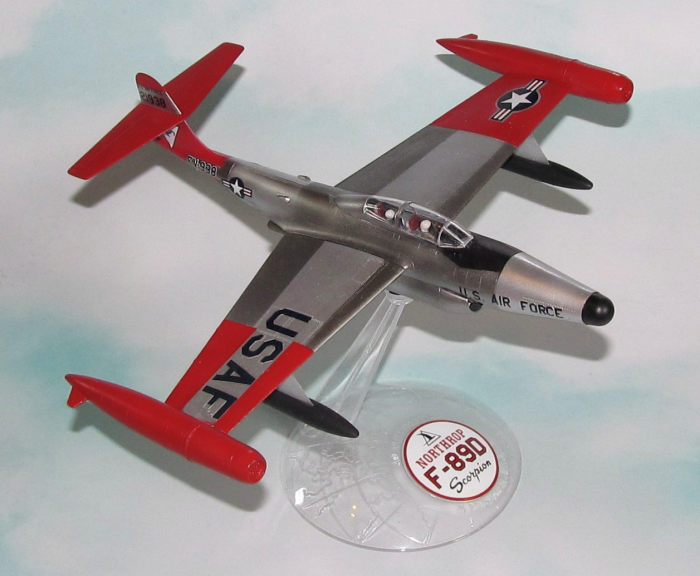
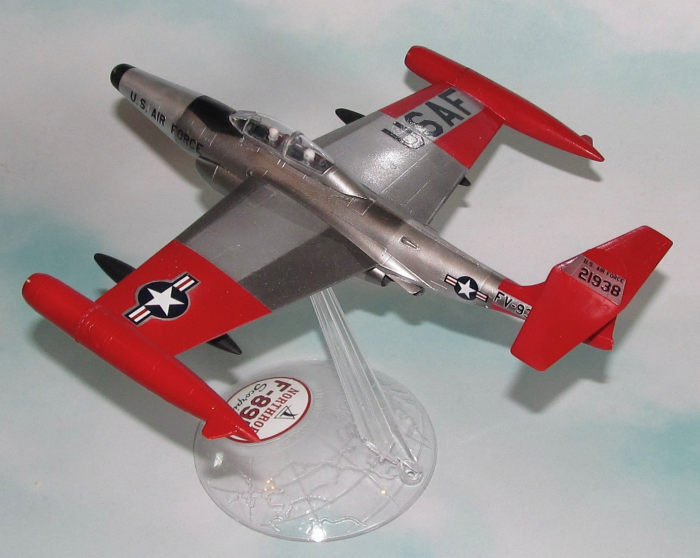
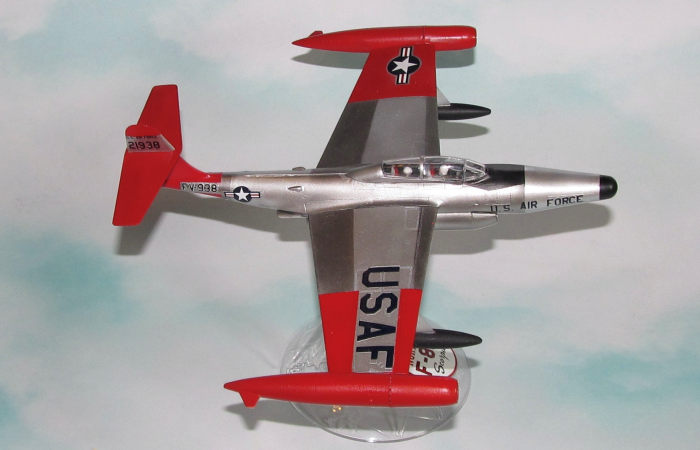
Atlantis bought molds for various Revell kits including this one. It is a fairly simple kit containing 44 grey and clear plastic including parts for the stand and the two piece canopy. There is no interior to speak of as the cockpit is basically one piece including pilots. The surface detail is nice for its time and includes recessed detail as well as raised lettering. There is a lot of flash on these parts so clean up is required.
The decals look decent and are based on the kit plane. There is only one set of markings as the raised detail where the decals go won't allow anything but. The instruction sheet is a copy of the original which came with the kit.
| CONSTRUCTION |
 The Wingtip
tanks were done first. The parts were glued together using CA glue which
required some additional filling with CA glue and sanding/polishing to clean up
the seams. Next I did the same with the underwing fuel tanks
and the wings. Once they were done, I started working on the fuselage.
The Wingtip
tanks were done first. The parts were glued together using CA glue which
required some additional filling with CA glue and sanding/polishing to clean up
the seams. Next I did the same with the underwing fuel tanks
and the wings. Once they were done, I started working on the fuselage.
The interior of the fuselage was sprayed dark grey Stynylrez primer as well as the one piece cockpit part which contains the two pilots. The cockpit piece was primed first with dark grey primer and when it was cured, brush painted using Vallejo and Tamiya paints. I jammed the cockpit piece into the right hand side fuselage piece and glued it in place. The fuselage was then glued together using CA glue. The seams on the underside and along the tail with the most difficult to deal with and required several sessions of gap filling CA glue and various grades of sandpaper.
I took a quick look at the landing gear and threw the parts into the spares box. I closed up the wheel bays and filled the gaps with Perfect Plastic Putty. The nose and exhausts were glued on and the seams filled before painting.
| COLORS & MARKINGS |
I sprayed on a primer coat of Stynylrez. After several polishing sessions with various grades of Micromesh polishing cloths, I sprayed on several partial coats of primer till I got a smooth uniform coat. Next I sprayed the wing tips flat white to provide a solid base for the red.
There was a lot of masking involved as I
sprayed on various metal shades (from the Vallejo Metal Colors line) and red. I
originally used Testors Insignia Red, but I found it too dark for my tastes and
went with a light c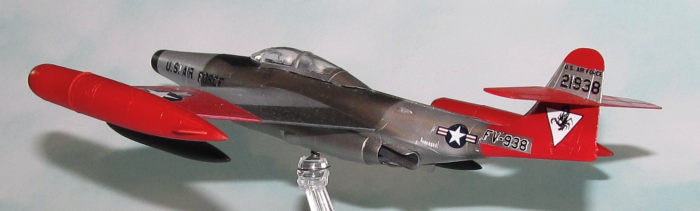 oat
of Tamiya Gloss Red. I ended up cutting masks for the USAF and the insignia in
the red portion of the wings that showed off the metallic areas between the red
and the insignia. Once the metal colors were done to my satisfaction, I sprayed
on a gloss coat for the decals.
oat
of Tamiya Gloss Red. I ended up cutting masks for the USAF and the insignia in
the red portion of the wings that showed off the metallic areas between the red
and the insignia. Once the metal colors were done to my satisfaction, I sprayed
on a gloss coat for the decals.
I left the raised details for the decals. One thing I discovered is that the raised letters did not match the decals. It wasn't bad for a pre CAD/CAM kit, but I had to cut the decals apart so the letters would fill in the raised details.
I only sprayed on a semigloss coat as the final coat with no weathering at all.
| FINAL BITS |
 I
tried to add the multi-piece canopy but it didn't fit properly. It was because
of the cockpit parts. I had to shave off a good part of the starboard side of
the two crewman's headrests to get the canopy to sit properly. Also had problems
with the canopy framing (before I built this kit I thought this was a good idea
to separate the frame from the glass and was maybe hoping to make this as an
aftermarket option, but in reality this kinda sucks.) I ended up cutting up
strips on thin plastic strip to create the frames that didn't fit.
I
tried to add the multi-piece canopy but it didn't fit properly. It was because
of the cockpit parts. I had to shave off a good part of the starboard side of
the two crewman's headrests to get the canopy to sit properly. Also had problems
with the canopy framing (before I built this kit I thought this was a good idea
to separate the frame from the glass and was maybe hoping to make this as an
aftermarket option, but in reality this kinda sucks.) I ended up cutting up
strips on thin plastic strip to create the frames that didn't fit.
The wings were glued in place, but kind of wobbly as the glue didn't hold as well as it could. The tail piece including the ailerons was glued in place. I sprayed a gloss coat on the clear stand and put the decal on it and was finished with my Scorpion.
| CONCLUSIONS |
It wasn't an easy build thanks to the NMF finish, but it was a fun build. Highly recommended for nostalgia builders, modellers who want to practice their Near Metal Finish skills or someone who wants a simple build using old school modeller skills. Forget accuracy or detail.
2 May 2023
Copyright ModelingMadness.com. All rights reserved. No reproduction in part or in whole without express permission.
If you would like your product reviewed fairly and fairly quickly, please contact the editor or see other details in the Note to Contributors.