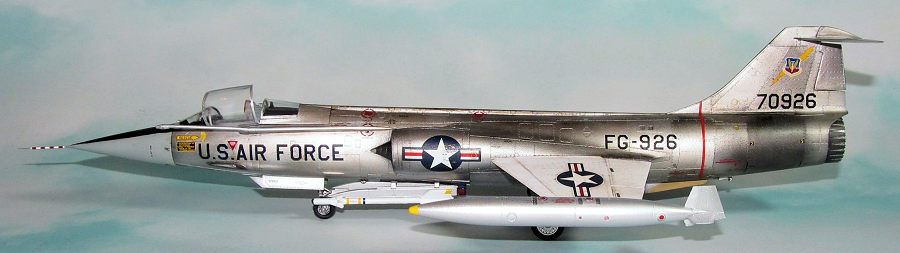
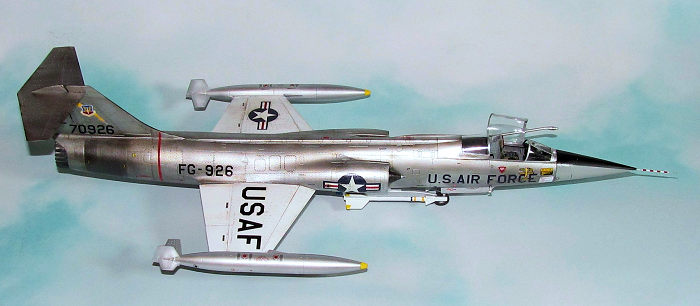
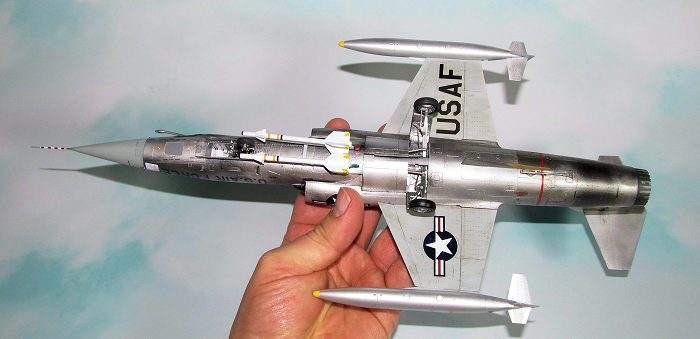
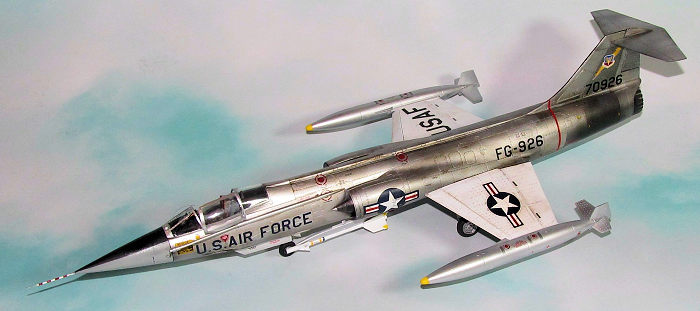
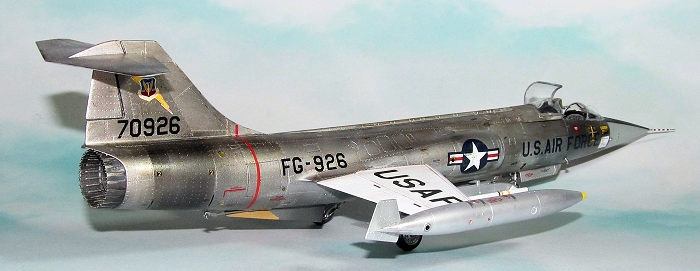
Hasegawa 1/48 F-104C Starfighter
| KIT #: | 7219 |
| PRICE: | $32.00 |
| DECALS: | Two options |
| REVIEWER: | Dan Lee |
| NOTES: | Various decals used to match that seen in the Star Trek TOS episode Tomorrow Is Yesterday. |
| HISTORY |
The Lockheed F-104 was one of the most controversial weapons systems ever produced. Described accurately as a “A Missile with a Man In It”, the Starfighter was originally designed to be a high speed point defence interceptor of limited range that became a multirole low level strike aircraft for NATO that ended up being many a pilot’s dream and nightmare. The Starfighter was a great energy fighter, but due to its very high wing loading because of its small wings, it was a terrible in a turning fight “It served in the USAF for around 10 years and with NATO and allied nations till the 1990s.
 The C
model was the first version modified to be a fighter bomber with air to air
refuelling probe and capability to carry tactical nuclear weapons as well as
conventional weapons. It served in Vietnam primarily with the 479th
Tactical Fighter Wing. The C’s provided air cover for the Lockheed
Constellation AWACS, as well as close air support. They would lose 14 due to
various causes including one that was shot down over Hainan Island by PLAAF
Chinese Migs.
The C
model was the first version modified to be a fighter bomber with air to air
refuelling probe and capability to carry tactical nuclear weapons as well as
conventional weapons. It served in Vietnam primarily with the 479th
Tactical Fighter Wing. The C’s provided air cover for the Lockheed
Constellation AWACS, as well as close air support. They would lose 14 due to
various causes including one that was shot down over Hainan Island by PLAAF
Chinese Migs.
57-926 was a F-104C who had one claim to fame that it was used in 1965 flight footage used in the originally broadcast Star Trek Episode: Tomorrow Is Yesterday where it was known as Blue Jay 4, a USAF ADC interceptor sent to shoot down the Starship Enterprise after a time travel accident sent it back to 1967 Earth. It would be changed in the updated SFX episode to 914. The real 914 was lost a few days after the episode aired in the jungles of Laos due to engine failure while FG-926 became a gate guard for Fargo University then moved to the Fargo Veterans Memorial.
| THE KIT |
See DaBoss’ long ago preview of the kit to see what comes with the kit.
| CONSTRUCTION |
Having built
a two of these already, I knew that first I had to CA glue the wingtip fuel
tanks together to eliminate the dreaded phantom seam while removing the Aires
Exhaust from its casting blocks and cleaning them. Next I painted the plastic
cockpit parts with Gunze ADC grey including the fuselage area while certain
details were brush painted and dry brushed with white paint. The few buttons
were painted using toothpicks dipped in paint with various colors.
I had an extra resin (from True Details) Lockheed C-2 seat so I used that instead of the kit seat especially because the seat had resin seat belts instead of using seatbelt decals. I brush painted the details to the, ahem, best of my abilities and put it back in the box. I also left off the painted control stick and throttle bits because they usually fall out during the sanding process.
Next I painted the Aires exhaust tube parts and glued them into the fuselage or each other. I then primed with black acrylic primer and painted the landing gear wheel wells Dark Aluminum and then with Vallejo Metal Colors. After the paint dried on the plastic parts I glued in the painted cockpit tub and the landing gear wells into one fuselage piece with Tamiya Extra Thin cement and the fuselage halves were glued together using CA glue.
 The nose
cone was glued together (using CA glue) and a small 1/8oz fishweight was added
to the nose (kept in place with some CA glue.)
The nose
cone was glued together (using CA glue) and a small 1/8oz fishweight was added
to the nose (kept in place with some CA glue.)
Afterwards, the various CA glued seams on the fuselage, nosecone and wingtip tanks were sanded using various grades of sanding paper and some finer grades of polishing cloths to eliminate the scratches before the parts would be primed while the other parts had various production markings removed with 600+ grit sandpaper. The missile racks were assembled and glued together along with the landing gear and various parts including the wheels, canopy, windscreen and canopy coaming.
| COLORS & MARKINGS |
The model was first primed with black primer to ensure that the seams were clean and smoothed down. Next the black primer coat had to be polished using 1800 to 6000 grit polishing cloths to remove as much of the grit and dust from the surface. I needed another coat of primer to get a uniform looking surface before I went to painting.
I wiped down the model of
grit before I painted the wings and tailplane white as per USAF paint scheme in
slightly blotchy pattern while I sprayed dull aluminum as the base metal color
for the F-104C. I w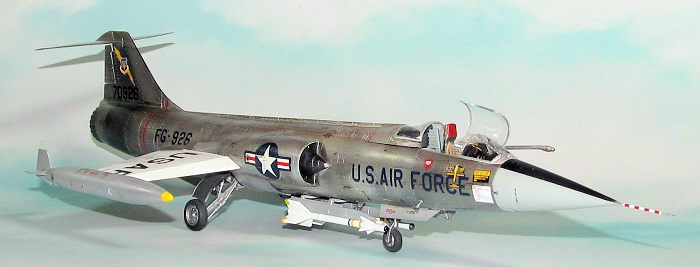 ould
mask off certain panels and spray on a different shade of aluminum to emulate
the metallic finish of the F-104. The nose cone was painted ADC grey, black and
white. Once satisfied with the paint scheme, I sprayed on the Vallejo Metal
Color Gloss coat in preparation for the decals.
ould
mask off certain panels and spray on a different shade of aluminum to emulate
the metallic finish of the F-104. The nose cone was painted ADC grey, black and
white. Once satisfied with the paint scheme, I sprayed on the Vallejo Metal
Color Gloss coat in preparation for the decals.
I ended up having to use various decal sheets to get the various serial numbers for 926 including Caracal and from Model Alliance as well as the Hasegawa decal sheet for the various stencils. I didn’t have too many issues with the decals or stencils when put MicroSet on them. Once they were dry, I wiped the model down and sealed the model using Vallejo flat coat.
I did a simple wash (I do not remember if it was oil based or water based) to make the details pop. I used a mix of clear gloss and semi gloss for the final coat.
| FINAL CONSTRUCTION |
 The various
external parts including the canopy were glued on to the main fuselage except
the wing tanks which were so snug that glue wasn’t needed. Internal parts for
the cockpit were added in including the throttle which nearly went on a flight
of its own thanks to squeezing my tweezers a little too hard. I managed to not
lose it and to glue it in place.
The various
external parts including the canopy were glued on to the main fuselage except
the wing tanks which were so snug that glue wasn’t needed. Internal parts for
the cockpit were added in including the throttle which nearly went on a flight
of its own thanks to squeezing my tweezers a little too hard. I managed to not
lose it and to glue it in place.
Last item was the pitot tube which was painted white and silver then carefully used the candy cane decal for the nose pitot tube which actually successfully clung to the pitot tube instead of wrapping up over itself thanks to my own ineptitude. I glued it to the nose with a drop of CA glue and pointed in a slightly downward angle. Voila, I finished my version of Blue Jay 4.
| CONCLUSIONS |
 I’ve built
three of the Hasegawa series of F-104s as of this review and really enjoy
building this kit. I’ve always been captivated by the “Missile With a Man In it”
F-104 since I was a kid despite its actual controversial history and weak
performance. This model is actually a number of firsts: my first USAF F-104
build, first F-104C, first real world Star Trek model and first NMF of the
F-104.
I’ve built
three of the Hasegawa series of F-104s as of this review and really enjoy
building this kit. I’ve always been captivated by the “Missile With a Man In it”
F-104 since I was a kid despite its actual controversial history and weak
performance. This model is actually a number of firsts: my first USAF F-104
build, first F-104C, first real world Star Trek model and first NMF of the
F-104.
I find this kit rather enjoyable to build and highly recommend it for all level of modeler. Aside from the dimple/rivets where there really shouldn’t be any, the Hasegawa F-104 is reasonably accurate (also relatively cheaper and simpler parts wise compared to the more accurate Kinetic F-104 kits released some 20 years after this one.)
16 June 2026 Copyright ModelingMadness.com.
All rights reserved. No reproduction in part or in whole without express
permission. If you would like your product reviewed fairly and
fairly quickly, please
contact
the editor or see other details in the
Note to
Contributors.