| KIT #: | CP 4824 |
| PRICE: | $80.00 |
| DECALS: | Three options |
| REVIEWER: | David C Jones |
| NOTES: | Not a fall together kit |
| HISTORY |
 The
North American F-86 Sabre family really doesn’t require a lot of introductions
as it was famous for the combat it saw over Korea against the MiG-15 and was
used all over the globe afterwards. The versions that I’m focusing on are the
Canadian built Canadair family of Sabres that were designated CL-13 Mk 1-Mk 6
and some had features unique to them compared to U.S. built North American
Sabres.
The
North American F-86 Sabre family really doesn’t require a lot of introductions
as it was famous for the combat it saw over Korea against the MiG-15 and was
used all over the globe afterwards. The versions that I’m focusing on are the
Canadian built Canadair family of Sabres that were designated CL-13 Mk 1-Mk 6
and some had features unique to them compared to U.S. built North American
Sabres.
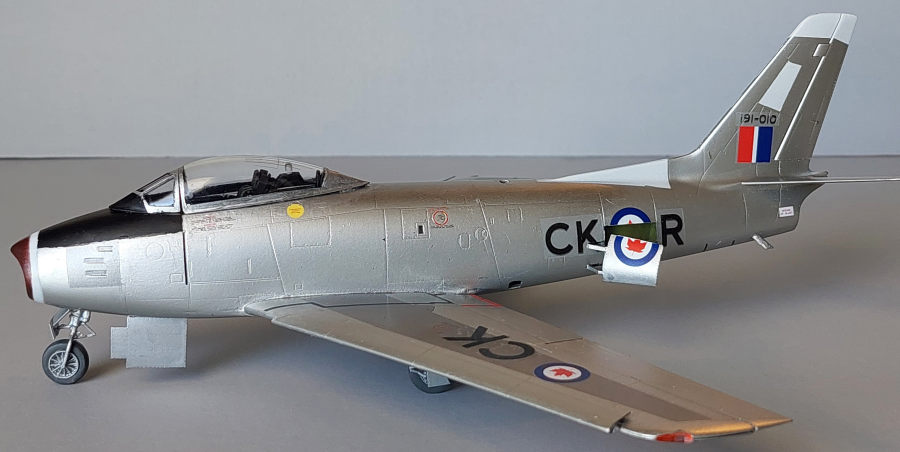
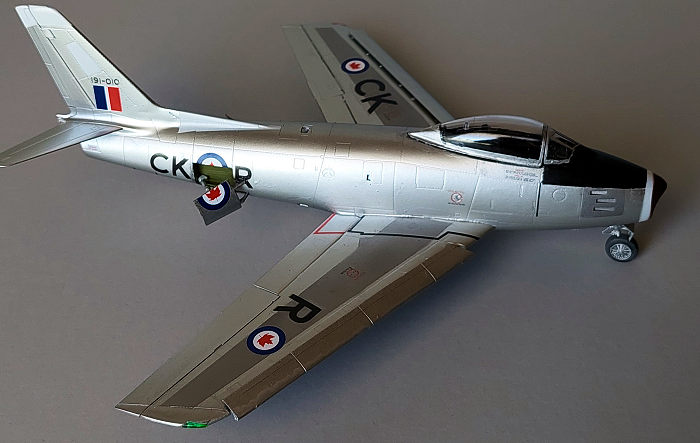
The subject of this build is the CL-13 Sabre Mk 1 which was assembled from North American Aviation F-86A-5-NA parts in Canada. It was a one-of-a-kind prototype as the first real production version was the Mk 2 which was analogous to an early F-86E. The model itself is an F-86A out the box except for the decals and detail sets from Eduard.
Interestingly, the Sabre Mk 1 still survives today and has been restored. It is in the Alberta Aviation Museum in Edmonton, Canada.
| THE KIT |
The 1/48 Clear Prop! F-86A Sabre comes in two versions (Early and Korean War) and first came out in 2024. It is the first injection molded F-86A since the Olin/Linberg kit first boxed in 1949. There are some of the parts necessary for the future release of their F-86E that was announced in 2025. The kit itself is molded in gray plastic with crisp details.
This model is a bit of an experiment for me as it is my first Clear Prop Kit, my first try with acrylic metallic finishes and my first homemade decals in well over a decade.
| CONSTRUCTION |
 The
construction of the Clear Prop! F-86A kit is mostly conventional. The cockpit
was overly complex for a single seat jet compared to other manufacturers. I used
the Eduard Zoom set to bring out the details given the only color is black. The
Eduard instrument panel looks nice, but the rest simply added to the
overcomplexity. I concluded that there is very little to gain with the Zoom set
by the time I was done.
The
construction of the Clear Prop! F-86A kit is mostly conventional. The cockpit
was overly complex for a single seat jet compared to other manufacturers. I used
the Eduard Zoom set to bring out the details given the only color is black. The
Eduard instrument panel looks nice, but the rest simply added to the
overcomplexity. I concluded that there is very little to gain with the Zoom set
by the time I was done.
Next came the air intake, exhaust and the forward wheel well. Upon seeing multiple reviews suggesting it, I fitted the nose to the intake at this time to ensure proper alignment when I was ready to close the fuselage halves. I also put in lead shot as ballast at this point.
The fit of the interior components was very loose and fought me the whole way. With the exception on the tailfin, it had a gap of 1/16th to 1/32nd of an inch all the way around. It took an entire evening of sanding and filling using superglue to fill the gaps. I apparently squeezed or jarred the fuselage in the process because some of the lead shot broke loose. It took some time to get the rattling shot out but at least my Sabre no longer sounds like a maraca…
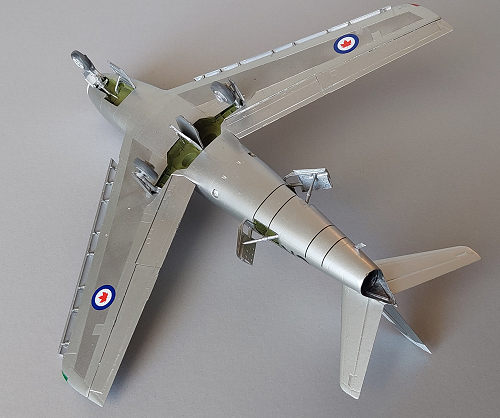
From there I moved to the main landing gear bay and the wings. To my shock, they mated up to the fuselage beautifully and clicked right into place. The front and rear lower fuselage pieces also fell into place without much fuss.
With the airframe finished, I moved onto the slats. Clear Prop! provides photo etched slat rails to mount the slats on. Having built model ships for years, I can say PE is great for detailing but not load bearing. So, I made a decision. Though it was time consuming, I widened the mounting slots and replaced the PE parts with slightly thicker white plastic to mount the slats.
After a final light sanding, the airframe was given a coat of Tamiya Gray Surface Primer and all the panel lines were carefully reengraved with an X-acto knife.
| COLORS & MARKINGS |
 As
I was doing the Mk 1 straight out of the factory, the model was depicted as a
spotless bare metal finish. Other than the reddish-brown nose and black
antiglare panel, there wasn’t much color to speak of.
As
I was doing the Mk 1 straight out of the factory, the model was depicted as a
spotless bare metal finish. Other than the reddish-brown nose and black
antiglare panel, there wasn’t much color to speak of.
Natural metal finishes have always been an Achilles Heel of mine. I experimented with Testors Metallizers and Alclad among others over the years but when I moved to my present location a few years ago, the smell of those paints was a little overwhelming to others in the house and I was forced to switch to acrylics. This is the first full NMF kit I’ve built in a decade and the first acrylic one ever.
I decided to try Vallejo Acrylics and started with their gloss black primer over my existing Tamiya Gray primer that I finish most kits in before painting. I followed the Vallejo instructions for the black to the letter on the airframe and slats, letting it cure for 12 hours before handling. I checked for surface flaws and corrected them before applying a second black coat. The finish dried to a high gloss and set me up for the next step.
I used Vallejo Pale Burnt Metal for the main color of the airframe. The color Aluminum was used on the duralumin panels on the wings. The rest of the airframe colors were picked out with Tamiya and Atom Acrylics. Although the finish isn’t perfect, I’d say the experiment with the Vallejo colors was generally a success.
Lastly, the Canadian national insignia were Xtradecals from my spares box and the codes were inkjet printed. The airframe stencils were from the kit. There was no real drama with the decals, and after a coat of Mr. Super Clear Gloss spray, I called it done.
| CONCLUSIONS |
If you want an F-86A or Canadair Sabre Mk 1, this is it. Clear Prop! makes a nice product but needs extra care and careful planning to make it just right. I would only recommend this kit to modelers with previous experience building limited run kits.
As for the slat modifications, I imagine the PE ones might work but I simply didn’t want to take the risk. Your mileage may vary.
| REFERENCES |
There aren’t that many comprehensive Sabre references out there considering the popularity of the subject. The main ones I used for this model are:
The Canadair Sabre by Larry Milberry
Koku-Fan Illustrated No. 2 F-86 Sabre
Modeler’s Guide to the Sabre & Fury by Jay Sherlock
Happy Modeling!
28 August 2025
Copyright ModelingMadness.com. All rights reserved. No reproduction in part or in whole without express permission.
If you would like your product reviewed fairly and fairly quickly, please contact the editor or see other details in the Note to Contributors.