Revell 1/72 F-105D Thunderchief
| KIT #: | 4363 |
| PRICE: | $20.00 'used' |
| DECALS: | One option |
| REVIEWER: | Joe Essid |
| NOTES: | Mods needed for earlier D-model. |
| HISTORY |
Our editor previewed and built this kit, and you can read the general history of the type here: https://modelingmadness.com/scott/viet/105dpreview.htm
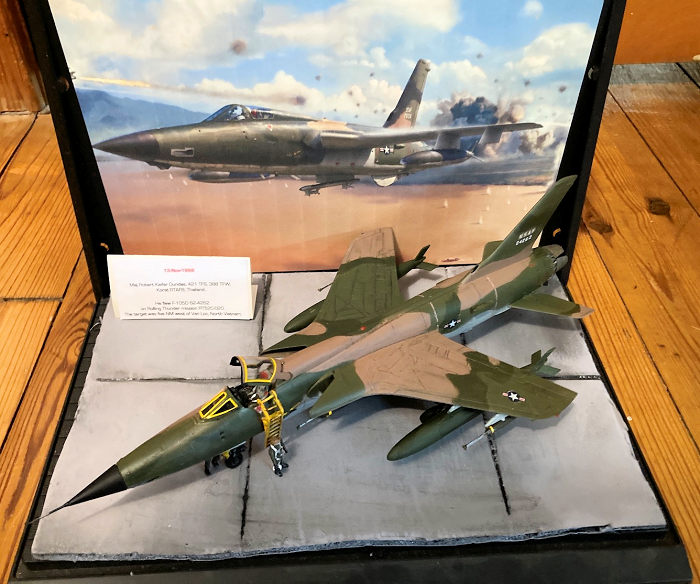
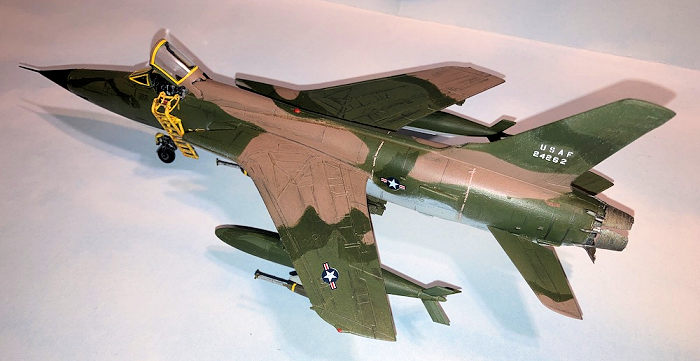
In my case, I want to focus on the father of a friend, Major Robert Kiefer Dundas and one F-105D he flew, aircraft number 62-4262. This Thud got named "Duck" later on.
Several years back, I was at our friend Robbie's house. I spotted a black & white photo of a USAF pilot in a cockpit, and I said "Hey, a Thud!" and Robbbie's face lit up. She told me and my wife about her dad and Thud Ridge, the Red River Valley, "going downtown," and a 100-mission tour during the years of the Rolling Thunder operations. Soon she produced other photos of Major Bob Dundas, post-retirement, leaning on an F-105 somewhere in a museum.
Months passed, until I asked "would you like me to build your dad's Thud?" The family then sent me photos, a link to a documentary about Rolling Thunder, as well as information from the Department of Defense. A story began to take shape.
Here's a selection of what I learned about one aircraft identified by number in the DoD documents.
 I had decided
to model it for a Nov. 1966 mission flown by Bob Dundas, before the plane earned
the nickname "Duck." This was painted in script on the fuselage below the
cockpit by Maj. Osborne, when he shot down a Mig-17 while flying the aircraft.
What follows attests to the durability and longevity of the F-105 under
difficult conditions and hard use.
I had decided
to model it for a Nov. 1966 mission flown by Bob Dundas, before the plane earned
the nickname "Duck." This was painted in script on the fuselage below the
cockpit by Maj. Osborne, when he shot down a Mig-17 while flying the aircraft.
What follows attests to the durability and longevity of the F-105 under
difficult conditions and hard use.
28 Feb 1963 -- Delivered to 18 TFW, Kadena AB, Okinawa.
13 Nov 1966 -- Maj Robert K. Dundas, 421 TFS, 388 TFW, flew a mission from Korat RTAFB, Thailand. He flew F-105D 62-4262 on Rolling Thunder mission RT52C-020. His target was located five NM west of Van Loc, North Vietnam, in RP-1 at coordinates 17-33N 106-26E. (National Archives Camera Shot List, Archive Control No. NWDNM(m)-342-USAF-41720B.)
13 May 1967 -- During a mission that lasted two hours and 45 minutes, Maj Carl Dean Osborne (333 TFS, 355 TFW) shot down a MiG-17. Call sign: "Random 03". "Maj Osborne, flying in aircraft position 3 in Rilling's flight, went after a second MiG. He had no trouble tracking the enemy aircraft. 'I rolled into a slight right bank and the tone on the AIM-9 peaked up normally. Only a 10 degree left bank was required to hold the reticle on the MiG the tone was holding good so I fired the missile and it began tracking and detonated at the MiG's 3-4 o'clock position.... He immediately turned left and began trailing smoke. My lead called that he had scored a hit also on the other MiG, and to go after them. I made a hard left turn and observed the MiG that I had fired at still trailing smoke and descending, heading south-southeast. ... My turn caused a great loss of airspeed and also allowed a third MiG-17 to turn inside me by the time I had completed 180 degrees of turn. This MiG was now at my 9 o'clock position and began firing. I didn't believe he was either in range of me or had any lead on me; however, my wingman was in a more vulnerable position, so I dropped the nose and unloaded the Gs and began accelerating to 550 - 600 knots. As I began to dive I saw the MiG stop firing and break to his right and away from my element. He would have had a good pass on myself and aircraft 4, but I saw Captain Seymour, who had lagged in the left climbing turn and stayed low, in a good firing position on this MiG. Seymour was firing, but I was unable to assess any damage by Seymour except that my attacker broke off and stopped firing.' " ("Aces & Aerial Victories", pages 53 & 54 & E-mail from Don McCarthy, 16 Feb 00).
 11
Aug 1967 -- While flying from 355 TFW, Takhli RTAFB, Thailand, during
bombing attack on Hanoi Rail and Highway bridge (the Paul Doumer Bridge),
aircraft had call sign Marlin 3. On pulling out of dive bomb run, while in
left turn jinking at 5,000 feet, the aircraft took a probable 57mm hit which
penetrated the aircraft's front and right windscreen. The shrapnel spent
itself out and landed on the instrument panel. The aircraft also received a
one inch hole in the right side of the nose during the same hit. The pilot
was not injured and recovered safely at Takhli. (355 TFW History, Jul - Sep
67, USAF microfilm NO463).
11
Aug 1967 -- While flying from 355 TFW, Takhli RTAFB, Thailand, during
bombing attack on Hanoi Rail and Highway bridge (the Paul Doumer Bridge),
aircraft had call sign Marlin 3. On pulling out of dive bomb run, while in
left turn jinking at 5,000 feet, the aircraft took a probable 57mm hit which
penetrated the aircraft's front and right windscreen. The shrapnel spent
itself out and landed on the instrument panel. The aircraft also received a
one inch hole in the right side of the nose during the same hit. The pilot
was not injured and recovered safely at Takhli. (355 TFW History, Jul - Sep
67, USAF microfilm NO463).
24 Oct 1967 -- Combat loss. Call sign: "Cheeta 02". An F-105 flown by Capt. Martin C. Scott was hit over Kep Airfield. The pilot flew without oil pressure for four minutes, reaching the Gulf of Tonkin where he ejected. The pilot was recovered by navy helicopter within 5 minutes after hitting the water. (355 TFW History, Oct - Dec 67, USAF microfilm NO463).
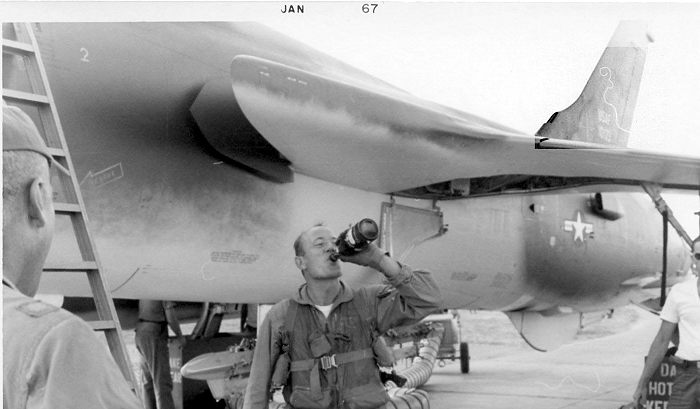
Bob "Moonstone" Dundas completed his mission 100 in an F-105 in January 1967, based upon a photograph shown of him downing champagne beside his Thud. Though he celebrated Mission 100 in May 1967, in ceremonies at Nellis AFB and the Pentagon, it seems that Major Dundas continued to fly F-105 combat missions as late as April 1967, when he made a dramatic finale:
"Lt Col Kenneth Hite, 421 TFS squadron commander, whose wingman was Major Robert K. Dundas. As they flew over Hanoi, the flight punched off empty bomb racks and pylons and then went into afterburner, reaching 1.2 Mach over downtown Hanoi and the 'Hanoi Hilton' POW prison. After they returned to Korat, they learned that their ejected stores landed in the front yard of the Russian Embassy."
Maj. Dundas spent a year at the Pentagon, but reportedly missed flying fighter-bombers. He returned to Vietnam in 1969 and completed over 200 missions from Tuy Hoa Air Base in South Vietnam in F-100D Super Sabres. He retired from the Air Force in 1974 and passed away to join his fallen brothers in arms in 2018. He often said that of all the planes he flew, the F-105 was by far his favorite.
You can see Bob Dundas in the documentary "There is a Way." He has a speaking part, too, about 5 minutes in, joking with a young pilot who had just finished his first mission. For Maj. Dundas, it was already mission 90. Robbie adds "He again shows up looking cool with his shades on at 24:55 min and again suiting up for a flight."
| THE KIT |
I first tried the old Monogram 1/72 Thud, a kit I already owned in my "display stash" of Monogram blue-boxes from the late 60s and early 70s. That model ended up wrong in many regards. As a very old kit, the molds cast when the 105 was a brand-new Cold Warrior, it combines aspects of an F-105B, such as the cannon position, even the A model (how the canopy attaches to the fuselage). So I finished that kit as an early D-model in silver paint (from the "Project Lookalike" years) that served in Vietnam. Meanwhile, I hunted for a reasonably priced D that could build up into Maj. Dundas' plane.
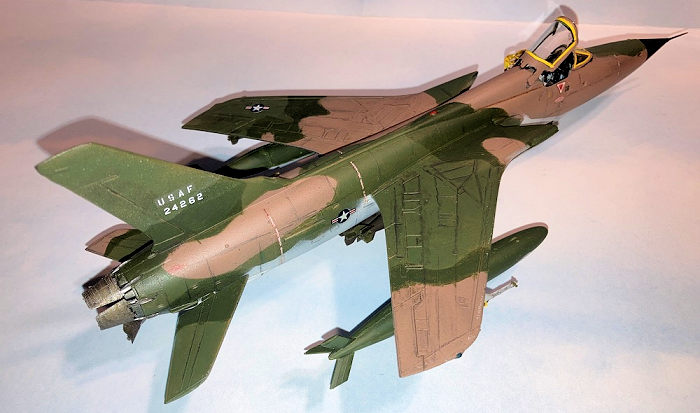
 Revell's kit
models a 105 from later in its life, with vented cannon doors and other features
not found on earlier Thunderchiefs. It has raised panel lines, a no-no for many
modelers today but of no concern to me, though some inevitably get lost during
filling and sanding. I didn't lose many, until I removed a few features not
found on Maj. Dundas' aircraft.
Revell's kit
models a 105 from later in its life, with vented cannon doors and other features
not found on earlier Thunderchiefs. It has raised panel lines, a no-no for many
modelers today but of no concern to me, though some inevitably get lost during
filling and sanding. I didn't lose many, until I removed a few features not
found on Maj. Dundas' aircraft.
The kit comes molded in dark green. I picked up a used, ostensibly incomplete kit with an offer on eBay. Turns out it was complete. The model has nice fitment and, for its time, excellent detail. To my eye the canopy is correct, the shape good, the tail-cone petals accurate. Monogram's ancient kit has a solid cone from the F-105A, which took a lot of cutting when I turned that kit into an early D model.
Revell's cockpit in particular impressed me. The fuselage incorporates later radar and gun cameras not found when Bob Dundas went downtown in his Thud, so I sanded them off the nose and tail, as well as reinforcement plates added to D models later in the war. We'll never know for sure what "Duck" looked like, as it resides now, in pieces, at the bottom of the Gulf of Tonkin.
As my example would be glued to a base, I did not sand down underwing plates that would never be visible.
Photos of mission 100 later in 1967 shows the fuselage intakes that Republic added to 105s starting in 1964, including older airframe retrofits. They stayed on my Revell kit.
| CONSTRUCTION |
 As always,
the cockpit started the build. I pre-painted it and used a Prismacolor silver
pencil and dry-brushing with Vallejo white to bring out details on the controls.
As always,
the cockpit started the build. I pre-painted it and used a Prismacolor silver
pencil and dry-brushing with Vallejo white to bring out details on the controls.
With this done, I worked on fuselage halves, filling with Tamiya putty, then sanding to remove the venting for the cannon, as well as vents on the Starboard side of the nose. Once the fuselage halves joined up and the glue dried, it was time to remove seams along with, inevitably, some of the raised panel lines. The seams required a good deal of putty and sanding, and the fault there may be mine and not the kit's.
When all looked decent I re-scribed some lines around the cannon doors and on the top and bottom of the fuselage with a sewing pin in a vise, using Dymo label tape to guide my scribing. Next wings and tail went on without drama, and I pre-painted the wheel wells interior green. When the paint dried, I filled the cockpit and wheel wells with damp tissue paper and toted the Thunderchief to the paint booth.
| COLORS & MARKINGS |
The Thud would wear SEA Camo, using Mission paints, but first I wiped the kit down with rubbing alcohol to remove finger oils; when dry I shot black Mission Primer over the entire aircraft. This let me see little imperfections that called for more sanding.
I shot the upper surfaces with SEA brown, sprayed rattle-can Krylon flat. I save my expensive Tamiya rattle-can stuff for the final coats when all would be done.
Using flat coats during camo painting keeps the
acrylic from coming up or being nicked; then with Silly Putty "sausages" at the
edges of shapes cut from printer paper I masked off the areas that would stay
brown. Next the airbrush laid down medium, finally dark green. I liked how the
putty allowed me to get an uneven demarcation between the colors, just enough
overspray in 1/72 to look right. Before moving to the undersides, I sprayed a
coat of Krylon gloss on the top so I could handle the plane for decals without
nicking the Mission Acrylics. For masking between top and bottom I used more
putty but also Yellow Frog Tape. This low-stick version appeared in an
art-supply store and amazed me with its low-tackiness. It masks
 well but does
not peel paint if one is patient enough to let the paint dry. I am hoarding it
for future jobs, as it costs more than the green variety I've used when masking
1/1 scale automobiles and farm tractors in my paint shop.
well but does
not peel paint if one is patient enough to let the paint dry. I am hoarding it
for future jobs, as it costs more than the green variety I've used when masking
1/1 scale automobiles and farm tractors in my paint shop.
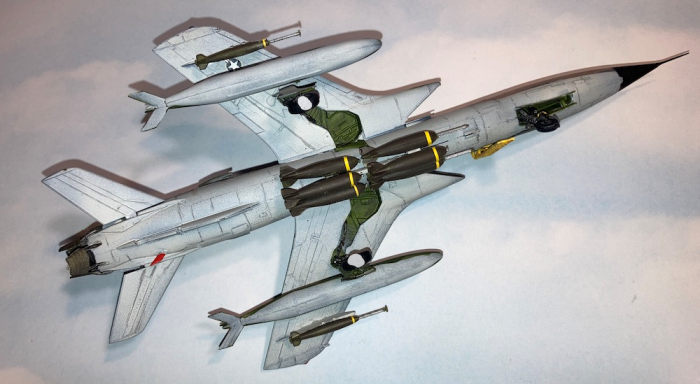
The bottom got painted Camo Gray and glossed without any trouble, so I decaled the kit using spare stencils and national markings from my decal dungeon and some USAF numerals I'd purchased. This part of the build proved time-consuming, as some decals were old and needed a lot of help separating from the backing, but with hot, soapy water first and Micro-Set later, everything worked out. I think I got all decals done in two sessions. With the decals settled down, I sprayed the kit with a couple of coats of Tamiya Flat. The underwing stores would be added near the very end, as I painted them separately.
The engine "petals" in back got brush-painted with Citadel gunmetal, then dry brushed silver. I did the same inside but with Model Master Jet Exhaust, a color I'll miss when it is gone forever (thanks, Rustoleum for buying and shutting down that line of paints).
I had some fancy soft-lead artists' pencils to accentuate the panel lines. Bad idea in 1/72! They smeared almost like charcoals, so I erased that mess without loss of paint (the top-coats of flat saved me there) and went back to my old technique of using a #2 mechanical pencil. It follows the raised lines well. With a blender stick from my artist's box, I got some nice contrast on major panels. I retained some smearing, always working backward with the airflow over wings and control surfaces. One more shot of flat and that part of the kit was done.
| CONSTRUCTION CONTINUES |
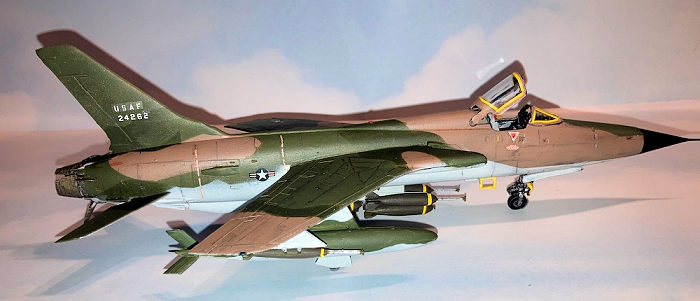
I built out bombs and other stores from the Revell box and dipped canopies in my last bottle of Future. It won't last forever, but art-store Acrylic gloss will take over for it in time.
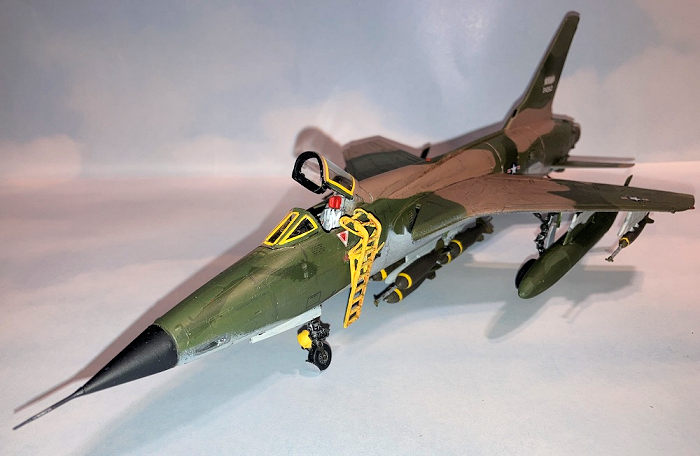
Once the wax dried I used a fresh blade in my X-acto knife and a metal engineer's ruler to cut thin strips of yellow Frog tape, brush-painted with a couple of coats of Mission paints.
With that in place, I repeated the process with yellow Tamiya tape. They come out large for scale but still look impressive on a camo bird. I was not sure if the Thud Bob Dundas flew had yellow accents around the canopy framing, but they look so distinctive on any F-105 that I decided to include them. The tape is tacky enough that I've never seen it peel up when applied to a part, so I simply pressed it down hard with a toothpick along the canopy. Where cut edges joined, I added a dot of flat clear paint, just in case. Tape strips added yellow bands to the bombs as well.
With the aircraft done, I built a boarding ladder by modifying an F-15 ladder that came with a vintage Hasegawa ground crew kit for 1980s USAF dioramas. It got brush-painted Tamiya Yellow, weathered with sepia ink, then Flory Grime Weathering Wash and Prismacolor silver pencil nicks.
 Then I
turned to the resin Aires Vietnam pilot for Maj. Dundas and a Hasegawa ground
crewman holding a large combination wrench. The Aires figure needed work, as one
arm reminded me of the Incredible Hulk while the other arm reminded me of, well,
my own. The Hulk's arm got sanded down. Painting the figures posed challenges,
to get the depth of color I wanted on the OD uniforms. So I started with a
medium OD, washed with a heavily thinned oil OD that is much darker, then dry
brushed with a faded OD acrylic. Both figures got a sepia ink wash over a
Vallejo medium flesh paint, then dry-brushing in a lighter flesh. At that scale
I didn't attempt dotting any eyeballs.
Then I
turned to the resin Aires Vietnam pilot for Maj. Dundas and a Hasegawa ground
crewman holding a large combination wrench. The Aires figure needed work, as one
arm reminded me of the Incredible Hulk while the other arm reminded me of, well,
my own. The Hulk's arm got sanded down. Painting the figures posed challenges,
to get the depth of color I wanted on the OD uniforms. So I started with a
medium OD, washed with a heavily thinned oil OD that is much darker, then dry
brushed with a faded OD acrylic. Both figures got a sepia ink wash over a
Vallejo medium flesh paint, then dry-brushing in a lighter flesh. At that scale
I didn't attempt dotting any eyeballs.
The famous Boonie hat worn by the squadron proved to be my final challenge. I opted to sand the crown on the USAF garrison cap down a bit, adding side-flaps of white printer paper wetted with white glue. when in all dried, I used Vallejo tan, then washed with burnt umber oils. The effect was not perfect but the hat looks close enough for my purposes. No, Maj. Dundas did not grow a mustache for good luck, like so many of his fellow pilots.
I used foam-core board, all black, for the runway surface, scoring lines with a pen. This got painted with gray auto primer and the joints in the tarmac painted black acrylic, which I promptly smeared around with a damp paper towel until I had a dirty-looking surface. The Thud and both figures got glued in place with CA gel. I waxed the top cover of the display with plastic wax for motorcycle windshields, then printed an aviation-art backdrop of Thuds on a bombing run. A little card about the mission got placed in the back. I secured the top by drilling holes so two panelboard nails, heads painted black, hold everything in place.
Including the display, I spent about 8 weeks on this project, an hour at a time every few days. It was worth every minute.
| CONCLUSIONS |
What began as one Thud turned into two. I have a Hasegawa F-105G to build, but I'm eager to score another Monogram to build an A model in natural metal with windows I'll cut open just behind the canopy.
This urge comes from my having had a "thing" for Thuds since Virginia's Air National Guard flew them when I was a teenager. I had the very cool experience of marching in a parade, with cadets in my military-school platoon, just as a flight of F-105s flew over the reviewing stand. It was loud and it was memorable. The US involvement in Vietnam had just ended; many of those pilots and planes had seen combat there.
Revell's 105 still holds up for modifying, if you can get past the raised panel-lines. The family is happy with the display and that's priceless to me.
In a small way, such projects honor heroes who came back, like Major Dundas, but also those whose lives were lost far from home.
| REFERENCES |
Neubeck, Ken. F-105 Thunderchief In Action. Aircraft No. 185. 2nd Ed. Squadron/Signal, 2002.
There is a Way. Periscope Films. https://www.youtube.com/watch?v=Vkh2jy5z9iQ&ab_channel=PeriscopeFilm
Special thanks to Robbie Dundas and her family.
4 July 2023
Copyright ModelingMadness.com. All rights reserved. No reproduction in part or in whole without express permission.
If you would like your product reviewed fairly and fairly quickly, please contact the editor or see other details in the Note to Contributors.