Revell 1/79 XF-89 Scorpion
| KIT #: | H-126 |
| PRICE: | ~$15.00 'used' |
| DECALS: | One option |
| REVIEWER: | Christopher Campbell |
| NOTES: | Easy Conversion |
| HISTORY |
At the end of W.W.II, the U.S.A.A.F. and it successor, the newly formed and independent United States Air Force, fund itself without a truly modern night fighter or all weather interceptor. While they had the Northrop P-61 that had proved its mettle during the War, the other night fighter, Lockheed P-38M. which was, almost from the onset, looking increasing like a “spit and bailing wire” lash-up conversion, neither was really suitable for the postwar all weather interceptor role.
The G model of the North America F-82 Twin Mustang was also just entering service and equipped with a huge radar pod for all weather service and night interceptions. However, with the dawn of the jet age readily apparent and in full swing, this was already outdated. An entirely new approach was needed.
Lockheed had their T-33 derived F-94 Starfire that would see U.S.A.F. service even see combat service in Korea. It was, however, always something of a temporary measure. What was needed was a new, purpose built plane, from the ground up.
Curtiss-Wright offered their potentially promising XP-87 Blackhawk, powered by four Westinghouse J34 engine in squarish twin pods mounted under each wing. While ultimately an “also ran,” in truth, this four-engine design had some potential. It was initially ordered by the Air Force, including a recon version. Still, when Northop unveiled their XF-89 Scorpion, the die was effectively cast. It was no world beater, as such, though it exhibited of superior design elements and potential for continued development that was lacking in the Curtiss offering.
After what had been something of a breakout success with the P-61 Black Widow, it was in many ways the Scorpion that carried Northrop into the modern era and established them as a front runner in aviation. While there is no denying the brilliance of Northrop’s flying wing designs, politics unquestionably conspired against them and it was in some ways the F-89 that saved the company in those frenetic, lean days after their decade long project to produce a flying wing bomber came to nought.
 While
fraught with some troubles of its own right, the F-89 was ultimately approved
for production. With its slim fuselage and broad wing area, the potential
existed for a fast climbing (for its day), though decidedly subsonic, long-range
interceptor.
While
fraught with some troubles of its own right, the F-89 was ultimately approved
for production. With its slim fuselage and broad wing area, the potential
existed for a fast climbing (for its day), though decidedly subsonic, long-range
interceptor.
It would be powered throughout all its variants by two Allison J-35 engines, though in ever improving forms. These were slung in pods low on the fuselage and blended into its form. This would lead to an uncomplimentary nickname – F.O.D. (foreign object and debris) vacuum, and unquestionably a fact of life for this aircraft. Starting with an early version producing only 4,000 pounds of thrust, later versions would have 5,600 pounds per engine. This was adequate, allowing for a rate of climb of nearly 7,500 feet per minute, a ceiling of just under 50,000 feet, and a top speed of 645mph.
The fuselage had room inside for an ever-improving electronics suite. Its initial radar was the AN/APG-33, allowing it to fulfill its role as a night and all weather interceptor. This was the same radar as carrier by the F-94 and was hardly more sophisticated than most of the simple radars used during World II. It could get the job done, however, and that was what was needed. Only starting with the D model and later would carry a true radar and fire control system. From that model on, it would carry the improved AN/APG-40 radar coupled to the AN/APA-84 computer.
Starting out as a 20mm cannon armed fighter, mounting six of these hard-hitting guns, it would continually evolve to become the first missile armed, U.S.A.F. interceptor, with improvements to its radar with each evolution, but that is another story. In its final form, the Scorpion would serve in in U.S.A.F. frontline units until 1959. My father, Billie Campbell, was a mechanic in one of these final units at Ladd Air Force base in Alaska that same year. It would continue on in Air Guard service until a decade later, finally retiring in 1969. Nearly two dozen survive, preserved at various museums and air parks throughout the United States.
| THE KIT |
First released in 1955, Revell’s venerable F-89D has been around for a long time. It has been through numerous rereleases and reboxings over the years by every Revell based label except, almost surprisingly, their Advent line in the late 1970’s. Last offered by them in 1987, it has just been released once again by Atlantis Models.
It is a simple, basic kit, typical of most of the box scale kits of this era. It depicts an F-89D with wingtip rocket pods and an average number of parts for a kit of this era. Scaling out at 1/79 scale (1/78 by some accounts) it has prominent decal locators and some raised panel lines. There are a few softball-sized rivets, though only in a few places, not being festooned with them as some kits of this era were.
 Crew
cockpit and crew are molded together in one simple drop in piece, featuring
Revell’s familiar “space jockey” figures. There is no other interior. By
contrast, the rocket pods are, especially for the period, very well done. Decals
are generic renderings of USAF markings and F-89 serials, with a triangular
decal of a scorpion poised to strike for the tail.
Crew
cockpit and crew are molded together in one simple drop in piece, featuring
Revell’s familiar “space jockey” figures. There is no other interior. By
contrast, the rocket pods are, especially for the period, very well done. Decals
are generic renderings of USAF markings and F-89 serials, with a triangular
decal of a scorpion poised to strike for the tail.
In 1991 Revell released and all new tool F-89D/J kit which was a scaled down version of their 1/48 kit and vastly superior to this long in the tooth mold. This, along with the Hobbycraft F-89 kits released the following year (Some now available as Academy releases) effectively consigned this venerable old kit to collectible status or those who like nostalgia builds.
I actually built this up for the first time in the late 1970’s. My uncle, Richard Cobb, a most exceptional modeler in his own right, gave me one as a Christmas present, He had most amusingly had wrapped and packed it with model boxes within model boxes, starting with an Aurora B-26, until, after opening around twenty or so, I was quite jubilant to find that I finally had a long unavailable F-89 kit in my possession. This was proud piece in my collection until sometime in high school, when my modeling interests waned and turned to race cars for a time.
However, as one of numerous bagged kits that I received from him in the late 2000’s, I gave some thought as to how to build this up into something presentable. Around 2020 or so, I hit upon the idea of a prototype. Thus, here it is.
| CONSTRUCTION |
As I mentioned nostalgia builds, that is, in some ways what this was, combined with some experimentation and just plain fun. When I was first heavily into modeling as a child in the 1970’s, I took great care to make it one of my best builds to date, and retained the model until sometime in my teenage years. I would say around a decade or more, which is pretty impressive considering the lifespan of most pre-teen builds.
Fast forward ten, then thirty years, while I have not seen the latest release of this mold from Atlantis Models in the box, the kits that I saw from the 1970’s on seem to have suffered from some general degradation of the molds over the years. I had built one in college in the late 1980’s and found that the molded parts were not quite what they had been in the vintage kit that I had built more than a decade earlier. While uncertain of the vintage of the bagged kit in this build, I would guess that it was one of the later Revell moldings, as the general fit was sloppier than I remembered and there would be some filling required.
 I started
with what passed for the cockpit on this kit, that being what I like to refer to
as the Revell “Space Jockeys” in their flight suits with their full face helmets
and oxygen mask with period flight suits. While there is little information on
it, in the late 1940’s that the U.S.A.F. experimented with a polyester flight
suit in a somewhat distinctive almost bright blue color, lighter than the fairly
commonly seen dark blue flight suits used for a time. After a few accidents that
resulted in this polyester flight suit becoming an expensive human oven bag if
fire entered into the equation, all of the remaining suits were not only
withdrawn, but mostly destroyed. My uncle seems to have run across one of the
few surviving examples at an estate sale around 2005-2010, now in a museum, as I
understand it.
I started
with what passed for the cockpit on this kit, that being what I like to refer to
as the Revell “Space Jockeys” in their flight suits with their full face helmets
and oxygen mask with period flight suits. While there is little information on
it, in the late 1940’s that the U.S.A.F. experimented with a polyester flight
suit in a somewhat distinctive almost bright blue color, lighter than the fairly
commonly seen dark blue flight suits used for a time. After a few accidents that
resulted in this polyester flight suit becoming an expensive human oven bag if
fire entered into the equation, all of the remaining suits were not only
withdrawn, but mostly destroyed. My uncle seems to have run across one of the
few surviving examples at an estate sale around 2005-2010, now in a museum, as I
understand it.
I chose a color from a Humbrol paint tin that I had that seemed to be about the right shade and decided to paint them to depict this suit, whether or not they were actually worn by the XF-89 crew at some point. I simply liked the idea. The rest of the “cockpit” was fairly standard, with Model Master Interior Green, Flat Black, Testors’ Flat Grey, gauges painted on the panels such as they are in white, Testor’s Rubber, and so on. One helmet was painted white and the other flat grey, with something painted on the white helmet to imply a U.S.A.F. emblem in the center.
Still, before this cockpit could be put into place and the fuselages closed there was a bit of surgery to do. First of all, the engine nacelles of the prototype lacked the ventral scoops of the production aircraft. This was solved by trimming everything external away with a heavy X-acto blade. These were then blocked off with plastic card and the external portion filled with thick CA glue and sanded smooth with 320 and 400 grit sandpaper followed by 0000 steel wool.
Additionally, the prototype did not feature the exhaust heat shields quite prominent on the production article. Thus, the opening in the fuselage aft of the exhausts would have to be filled as well. These were also backed with some plastic card, though would require more extensive filling. Squadron Green Putty was used here, followed by sealing with thin CA glue applied with a toothpick after sanding and smoothed out as with the previous fill.
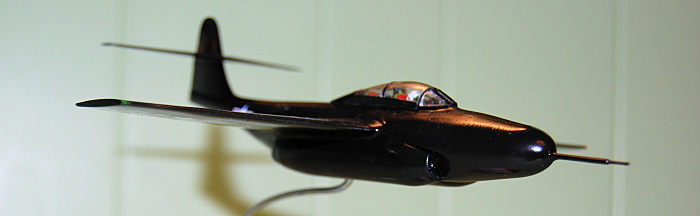
But wait! There’s more! The nose of the XF-89 looked nothing like either the early pointed cones of the A-C models or that familiar radome of the later D-J models, the D being what the kit was molded as.
The first order of business was looking for something in the parts bin that was close to the correct shape. I found it in the gun-nose cap from a 1/72 Airfix Mosquito. Still, I could not just stick it on the D model fuselage, as it was notably shorter on the prototype.
Not having any specific scale drawings for the XF-89 at hand, this was largely done with the Mk.I eyeball. I did find the purported dimensions of the XF-89 and scaled them vs. the F-89D. Based on this and the estimated scale length of the nose cap, I marked off a line on the each forward fuselage half and did a quick surgery with a razor saw, temporarily mating them together with rubber bands once finished and trimming with a No.11 X-acto until they were very close to even.
 Realizing
that the “cockpit” could be fitted after most of the assembly was completed, I
glued the two fuselage halves together with thick CA glue. The engine nacelles
intakes and exhausts were also fitted at this point, as well as the new nose cap
(gun ports filled with CA glue and sanded) and everything set aside to fry and
cure. Any gaps detected were filled with thin CA glue applied with a toothpick
and everything was sanded and finally polished with dryer sheet, several times
actually.
Realizing
that the “cockpit” could be fitted after most of the assembly was completed, I
glued the two fuselage halves together with thick CA glue. The engine nacelles
intakes and exhausts were also fitted at this point, as well as the new nose cap
(gun ports filled with CA glue and sanded) and everything set aside to fry and
cure. Any gaps detected were filled with thin CA glue applied with a toothpick
and everything was sanded and finally polished with dryer sheet, several times
actually.
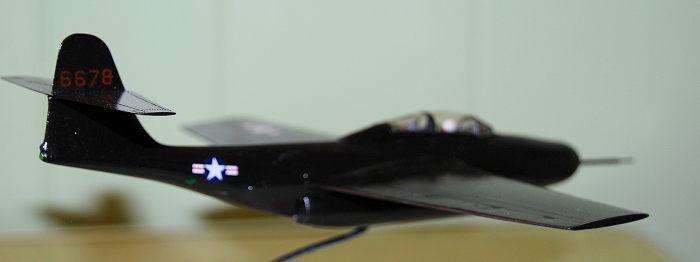
Special attention was given to the trailing edged of the vertical tail. Almost every one of these old Revell F-89 kits that I have seen had far less than perfect fit in this area, so I tend to think that it was an original mold fault. I actually had to build this up with judicious applications of CA glue, sand it down and shape it, as one side or the other will almost invariably look slightly short shot in my experience.
While I was sanding I decided to address the decal locators. Yep, this beastie has the dreaded decal locators, at least in the incarnation of the kit that I built. The only cure for this is a lot of sanding and polishing, and there was a lot of it indeed. While I had not yet assembled the wing halves, it seemed an appropriate time to take care of them as well.
These were addressed throughout the kit at this point with some significant sanding. It was a little tedious as the plastic used seemed leave a rather prevalent ghost of the locator. These were eventually removed using 320. 400, and 600 grit sandpaper followed by 0000 steel wool.
The wing halves were glued together, and the landing gear covers were glued in place with CA glue. Since this one was to be an early prototype, sans tanks, the tabs for the rocket pods were removed and sealed with CA glue. There was some minor sanding and reshaping needed, but no problems to speak of.
Once complete, the wings were attached with thick CA glue, which was also used to fill and smooth the wing join. There was some minor gapping, but nothing that could not be easily handled using as small amount of Squadron Putty and some more CA. Now I only had to install and finish the tail.
This is probably the most troublesome part of the kit, whether built from the box or not. It does not fit well. I fitted the top of the tail to the horizontal stabilizer with thick CA glue followed by some appropriate sanding until the join had been cleaned up. This was then glued into the slot on the tail, though with a little more filling and sanding. The fit of this part is probably the worst join of the kit. However, it is worthy to note that this is the only part of assembly in Revell’s excellent 1/48 Scorpion kits that I would call problematic. The nature of the design itself does not make for an exceptionally clean fit, no matter how well the kit is engineered. However, if you are aware of this and anticipating to a degree, it is mainly a time-consuming nuisance. Now, it was ready to paint at long last.
| COLORS AND MARKINGS |
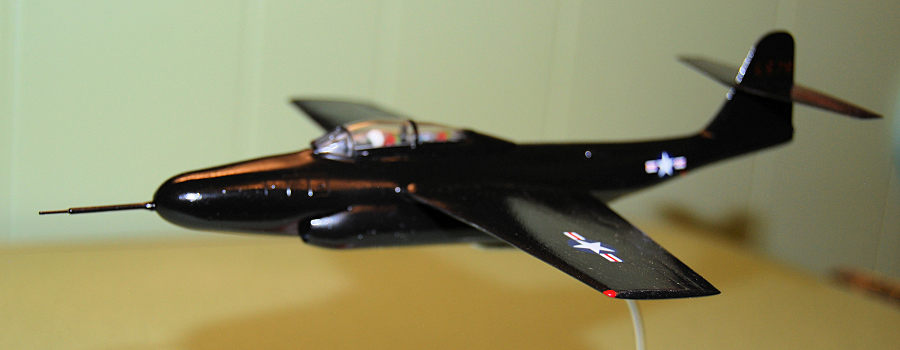
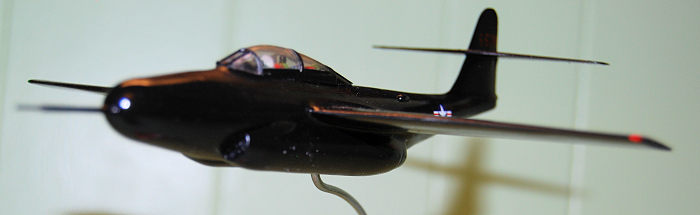
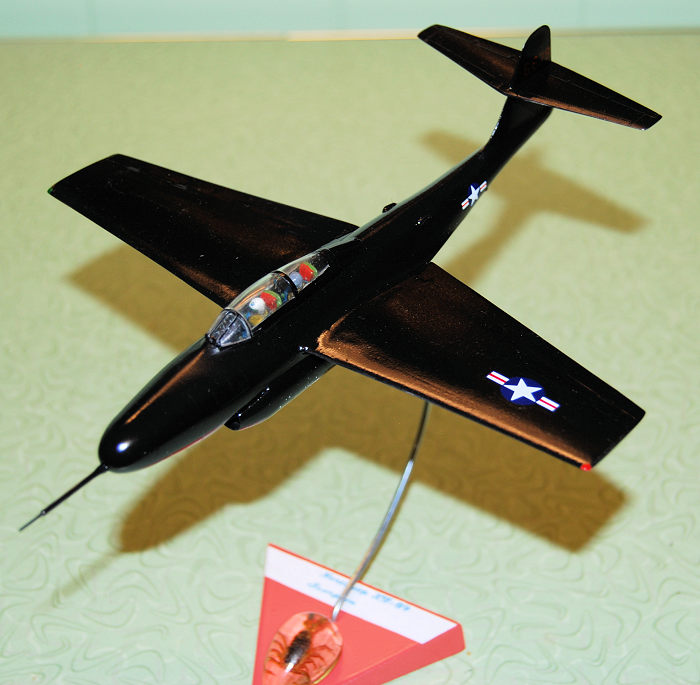
 The paint
job on this model was quite simple. It was all glossy black. I plugged the
cockpit with paper towel bits and sprayed it all in Testors Gloss Black. This
may have been the simplest paint job that I had done in years.
The paint
job on this model was quite simple. It was all glossy black. I plugged the
cockpit with paper towel bits and sprayed it all in Testors Gloss Black. This
may have been the simplest paint job that I had done in years.
The paint went on with no problems and was quite simple. Only the running lights needed to be picked out with Testors Flat Red and Flat Green. I generally use Tamiya clear paints for this but thought that it would not be well discernible against the overall black paint.
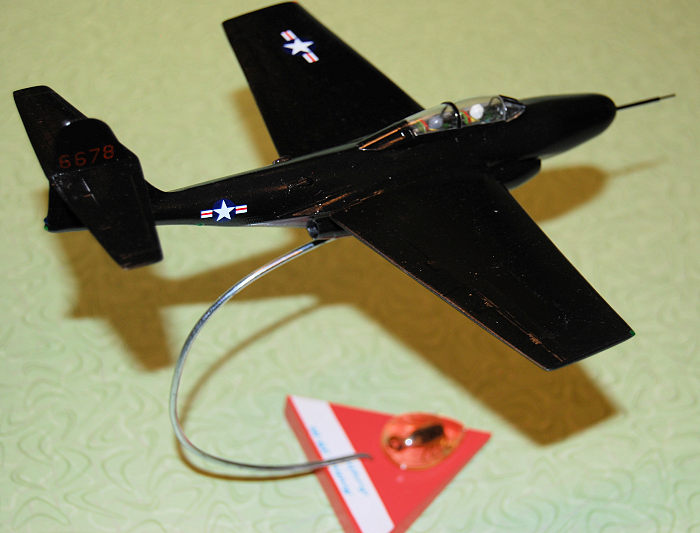
Decals for this one were simple, consisting of U.S.A.F. national insignia and some red tail numbers. All of these were gleaned from my decal stash and went on with no problems after I had given the model a coat of Future. A little Solvaset, my preferred setting fluid was used, and the decals were done in fairly short session. Once cured, the entire kit was given a light coat of Future for a semi-gloss finish.
| FINAL BITS |
The instrumentation/pitot
boom for the nose was cobbled together from various bits from the parts bin and
glued into place in a small hole drilled into the nose using a pin vise. Clear
parts were given a dunk in Future. The canopy and windscreen framing had been
sprayed in the same Gloss Black in advance. A worthy note is that this is the
only kit that I have ever built where the windscreen framing was separately
molded, injected part intended to be glued onto the clear piece. This went on
with minimal trouble using G-S Hypo watch crystal cement (This was also used on
the canop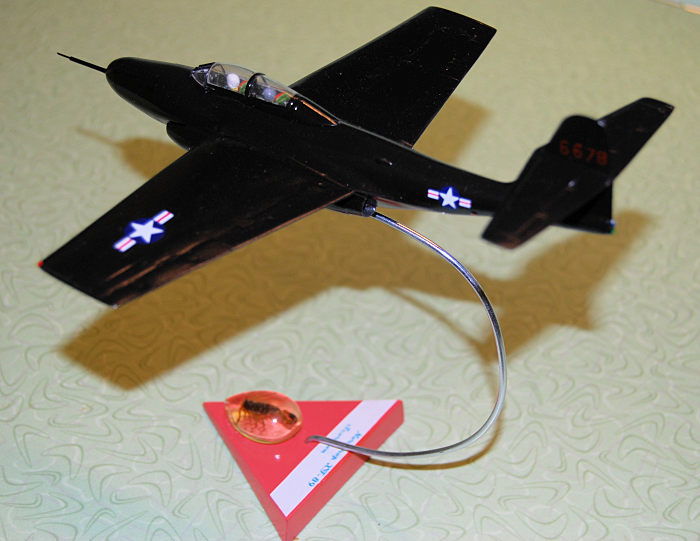 y framing, also molded as a sperate part.), but it is odd and I have
never figured out why Revell elected to mold this in such a manner. Keep in mind
that when this kit was released, modeling was in its near infancy, though and a
lot of things were being by quite literal trail and error.
y framing, also molded as a sperate part.), but it is odd and I have
never figured out why Revell elected to mold this in such a manner. Keep in mind
that when this kit was released, modeling was in its near infancy, though and a
lot of things were being by quite literal trail and error.
This was quite a small and delicate part to mold for its day. It is also quite easily broken in assembly. All of them that I have seen had flash to be trimmed. So, if you are building it, have fun with that.
The base for the stand was made from a hollow, triangular plastic piece that I had obtained from somewhere at some point. This was painted in a terra cotta/coral color from Krylon, wanting to emphasize a desert feel. For stability, it was filled with #9 copperplated birdshot secured with good old Elmer’s Glue All. A stand was fashioned from some wire that was on hand and the necessary holes drilled out in the base and the belly of the model with a pin vise once more.
A decal for the base was created and printed using the Testor’s Decal Maker program. This was printed on a newer white decal paper that I tried called Koala No Need Spray paper that, ostensibly requires no sealant. It did not require sealing in order to apply, making it quite nice to work with. However, my first use of it cracked and split after a few days. I printed another decal and applied it to the base, this time sealing it in Testors Rattle Can Semi-Gloss after it had dried and had no further problems. The final touch was a real scorpion preserved in clear resin glued to the base with a drop of CA glue for emphasis. With that, it was done. I now had a 1/72-ish XF-89 Scorpion ready for my shelves.
| CONCLUSIONS |
This build was nothing that I would call difficult. Most of the “issues” were a direct result of my having chosen to convert it to a prototype. To build this kit to a standard of later F-89 releases would take quite a lot of work. Subsequent 1/72 kits are unquestionably superior and actually on scale. However, if one wants a fun, somewhat nostalgic build, this kit is not a bad choice. It is currently available from Atlantis models. Almost any modeler with even minor experience should be able to complete it with ease. My conversion build took around fifteen hours.
Would I recommend this kit? Yes, though, again, mainly as a nostalgia build. Anything other than an F-89D model, such as my prototype conversion, will require some work, quite a lot of work really. For a really good conversion to an XF-89, I would recommend starting with the Hobbycraft/Academy mold.
I enjoyed it for what it was, an old kit that I was having some fun with and seeing what I could make of it. I do not expect it to be an award winner, but it is quite eye catching and I have shown it a couple of times just for the fun of it, as I am satisfied with what I created, given what I started with. I will end as I often do, saying, simply, have fun. Happy modeling to all.
| REFERENCES |
Northop F-89 Scorpion: A Photo Chronicle by Marty J. Isham & David R. McLaren; Schiffer Military Books, 1993
F-89 Scorpion in Action, Aircraft No. 104 by Larry Davis & Dave Menard; Squadron- Signal Publications, 1990
F-89 Scorpion- Walk Around by Dennis M. Savage, Col. U.S. Army (ret.); Squadron-Signal Publications, 2009
F-89 Scorpion in Detail & Scale, Vol. 41 by Bert Kinzey, Squadron-Signal Publications, 1992
https://en.wikipedia.org/wiki/Northrop_F-89_Scorpion
https://en.wikipedia.org/wiki/Battle_of_Palmdale
https://en.wikipedia.org/wiki/Operation_Plumbbob
https://en.wikipedia.org/wiki/Curtiss-Wright_XF-87_Blackhawk
5 October 2023
Copyright ModelingMadness.com. All rights reserved. No reproduction in part or in whole without express permission.
If you would like your product reviewed fairly and fairly quickly, please contact the editor or see other details in the Note to Contributors.