| HISTORY |
Monogram 1/48 F-84F Thunderstreak
| KIT #: | 5432 |
| PRICE: | $5.00 'used' |
| DECALS: | Two options |
| REVIEWER: | Christopher Campbell |
| NOTES: | An easy build of a classic Cold War aircraft |
| HISTORY |
The Republic F-84 Thunderjet was the third jet aircraft to see service with the U.S.A.A.F. which would become its own service as the U.S.A.F. nearly as soon as the first P-84B's were being delivered. Almost as quickly swept wing design variations offering higher performance began to grace the drafting tables at Republic in an effort to level the table with the rival North American F-86 Sabrejet.
However, things are rarely so simple as adding swept wings to an existing design. The F-84F (Initially designated as XF-96A) entered a protracted development lasting nearly four years before it was declared operational. The Wright J65 engine, while decidedly more powerful than the G.E. J35 that it was replacing was not without its problems. It was prone to flameouts in all but the best weather and was infamous for its long takeoff run. This earned the Thunderstreak the infamous moniker “Lead Sled.”
 Still,
it had longer range than the F-86 and offered a superior payload capability
if being utilized in a ground attack role. Additionally, it was air
refuellable, which the F-86 was not. However, by the time that it was
entering service newer, faster designs were becoming available in the form
of the F-100 Super Sabre and F-104 Starfighter. These would soon supplant
the Thunderstreak in U.S.A.F. frontline service with the F-84F rapidly
transitioning to Air National Guard Service where some would serve into the
early 1970’s.
Still,
it had longer range than the F-86 and offered a superior payload capability
if being utilized in a ground attack role. Additionally, it was air
refuellable, which the F-86 was not. However, by the time that it was
entering service newer, faster designs were becoming available in the form
of the F-100 Super Sabre and F-104 Starfighter. These would soon supplant
the Thunderstreak in U.S.A.F. frontline service with the F-84F rapidly
transitioning to Air National Guard Service where some would serve into the
early 1970’s.
It also spawned the successful RF-84F Thunderflash reconnaissance variant. These would be the final type still in Air National Guard service when finally retired in the United States. (The Alabama Air Guard post in Birmingham flew them long enough for the author to remember seeing one fly over Huntsville.)
Both the Thunderstreak and Thunderflash would see extensive service with N.A.T.O. and the air forces of other friendly powers. These would include Belgium, Denmark, France, Germany, Greece, Italy, Netherlands, Norway, Taiwan, and Turkey. Israel also operating eighteen aircraft on loan from France during the Suez Crisis. This was also the only time that Thunderstreaks would see combat, both French and Israeli aircraft flying sorties during that brief conflict. Greece was the last to retire the type, the final examples being withdrawn in 1991.
| THE KIT |
 First
released in 1984, Monogram’s F-84F is typical of their jet kits of this era.
Panel lines are raised, though nicely rendered. Cockpit detail is good for
the period and I would say adequate for most. Underwings stores have
included long range fuel tanks, JATO bottles, as well as both conventional
and nuclear weapons over the years in different releases.
First
released in 1984, Monogram’s F-84F is typical of their jet kits of this era.
Panel lines are raised, though nicely rendered. Cockpit detail is good for
the period and I would say adequate for most. Underwings stores have
included long range fuel tanks, JATO bottles, as well as both conventional
and nuclear weapons over the years in different releases.
Released in various boxings over decades, it has been offered with a variety of U.S. and foreign markings. It was most recently released in 2021 with decals for the Thunderbirds. There are also numerous aftermarket decal sheets that have been offered over the years with a wide variety of markings.
There has been criticism of the accuracy of the shape of this kit. I have personally never scaled it out or compared it against scale drawings. The kit that I built was an original 1984 release, and it had been in the stash almost that long. I will neither laud its accuracy nor deride its faults. Instead, I will simply say that for my purposes it looks like a Thunderstreak and it was what I had to work with at the time.
The parts count is not high, typical of most Monogram kits of this era. However, they are well molded and fit is generally good. Thus, like most Monogram kits from this period, it will provide a reasonably trouble-free build, even if there may be some discrepancy in the exact shape or dimensions.
| CONSTRUCTION |
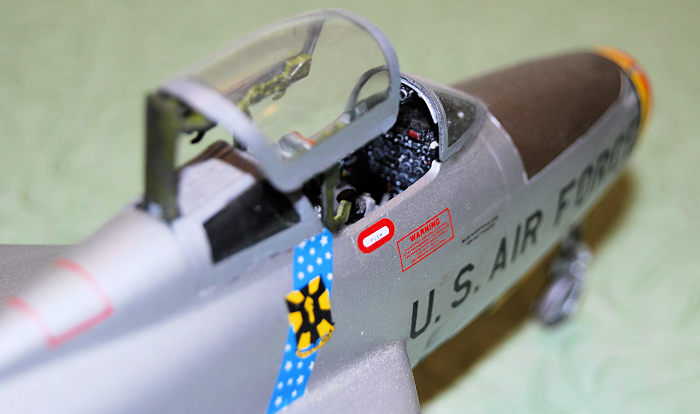
 As with
most kits, construction began with the cockpit. The cockpit tub, cockpit
walls, and ejection seat were all painted in Testors’ Flat Grey. The
instrument and side panels were all painted in Testors’ Flat Black, then dry
brushed in Testors’ Silver to bring out details. Various bits were accented
and picked out with Testors’ Flat Red and Flat Yellow.
As with
most kits, construction began with the cockpit. The cockpit tub, cockpit
walls, and ejection seat were all painted in Testors’ Flat Grey. The
instrument and side panels were all painted in Testors’ Flat Black, then dry
brushed in Testors’ Silver to bring out details. Various bits were accented
and picked out with Testors’ Flat Red and Flat Yellow.
Model Master Medium Green was used for the ejection seat belts while the head and arm rests were painted in Flat Red. Some light weathering was done by dry brushing with Flat Black and a light acrylic wash. Then everything was assembled and glued up in the fuselage using CA glue.
The intake splitter and nose gear components were glued up and sprayed in Testors’ Aluminum. This was also sprayed forward of the cockpit, inside the main intake. While this was drying, the tailpipe assembly was painted in Model Master Jet Exhaust inside and out and assembled. The aft fuselage interior was then given a interior coat of Model Master Dark Anodonic Grey.
Once these components were dry, the exhaust pipe and intake splitter were glued in place with CA glue. Before closing up the fuselage, weight was added beneath the cockpit to make certain that the model would not tail sit. Also, remember to glue the fuel dump in place before fitting the tail pipe. This is an easy detail to miss, as I nearly did so myself.
With all of the interior parts in place the fuselage was then closed up with Tamiya Liquid Cement being used. This was one of the first times that I had used this, especially on such a large area. However, I found that if applied carefully and gradually it produced a very nice weld that required very little filling and sanding.
 Quite
satisfied with these results, the wing halves were glued together in the
same fashion. Again, very little filling and sanding was required. This was
the beginning of my off and on relationship with liquid cements, having been
decidedly in the CA camp for many years. Since then, I have used several
varieties and now have come to appreciate the affinity that some modelers
have for them.
Quite
satisfied with these results, the wing halves were glued together in the
same fashion. Again, very little filling and sanding was required. This was
the beginning of my off and on relationship with liquid cements, having been
decidedly in the CA camp for many years. Since then, I have used several
varieties and now have come to appreciate the affinity that some modelers
have for them.
Once seams were cleaned up and basic sanding and polishing had been done, the wings and horizontal stabilizers were affixed to their appropriate locations on the fuselage. This was also done with liquid cement, again with very good results.
At this point I also decided what stores I want to depict the aircraft carrying, in this case simply the basic external fuel tanks on all four pylons. These were also assembled with Tamiya Liquid cement and presented no problems with only some simple sanding for seam cleanup once glued together.
Other parts such as the landing gear, landing gear bay doors, wheels and so on were removed from their sprues and cleaned up in preparation for painting. The tires were sprayed in Testors’ Rubber, then set aside to dry after which the wheel hubs themselves were painted in Model Master Dark Anodonic Grey. Now the real painting was about to begin.
| COLORS & MARKINGS |
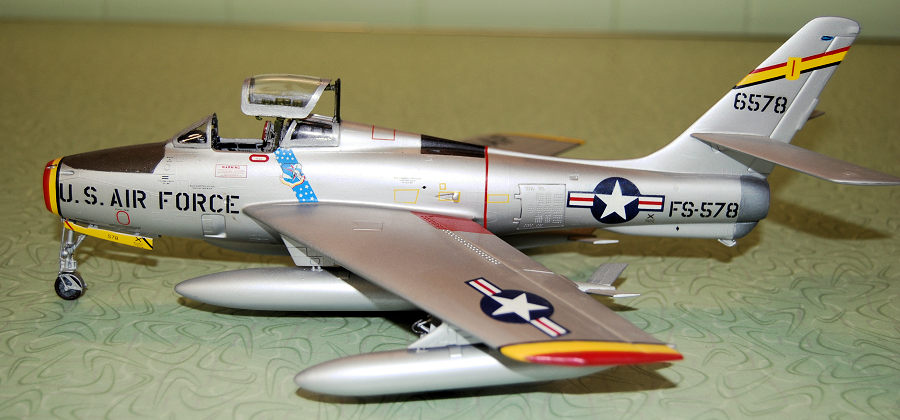
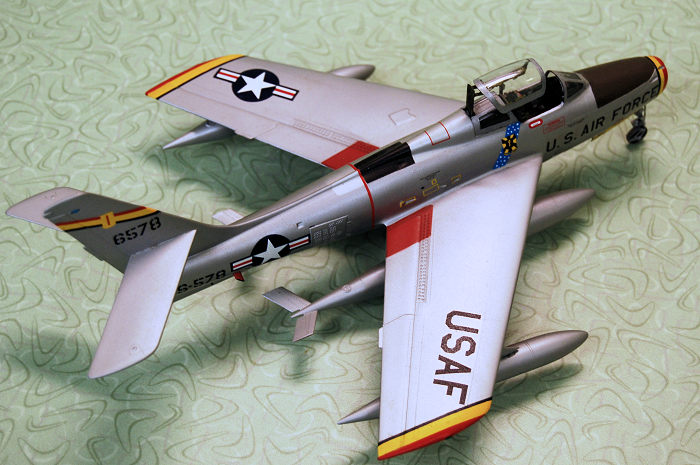
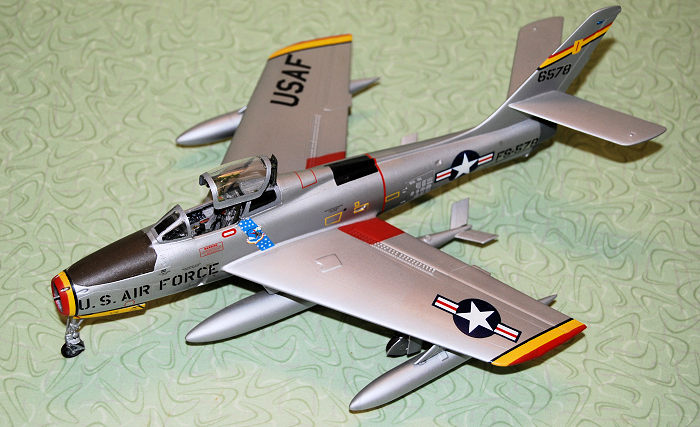
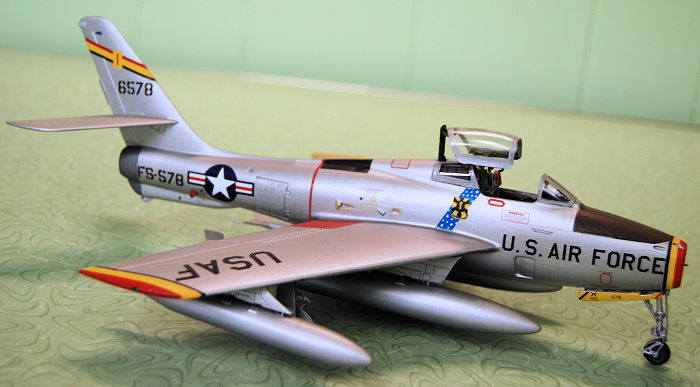
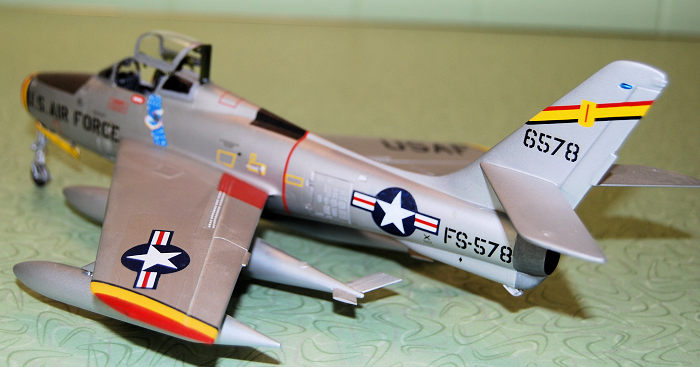
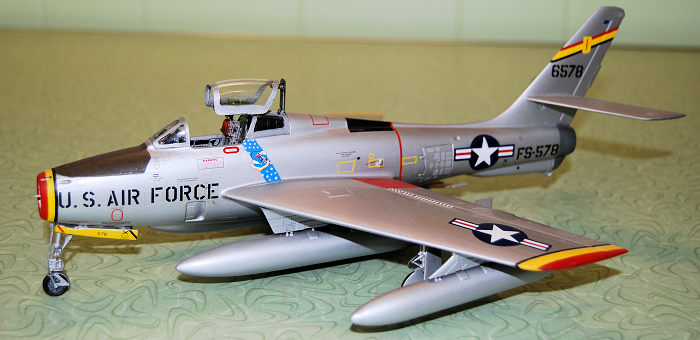
While the aircraft would wear a natural metal paint scheme of Model Master Aluminum, there were several areas that would need to be painted and masked off first. This included the olive antiglare panel as well as the black panel on the spine. Also, the yellow wing tips and nose band, along with the red inboard areas of the wings and so on.
This proved simple enough to paint, though masking took a little time as custom masks were cut from Tamiya tape. I had some concerns that the metalizer might bleed under the masking, as I had occasionally experienced this before. Only time would tell, though.
The cockpit and tailpipe were both stuffed with bits of damp paper towels. Then painting commenced in earnest using Model Master Aluminum. The entire aircraft was painted in this as well as the external fuel tanks, the landing gear, gear bay doors and so on.
 Once
dry, the paper towel plugs were removed as well as the masking. To my
pleasant surprise, there had been no bleed or overspray. The area at the
rear of the fuselage near the exhaust pipe was hand painted in Dark Anodonic
Grey and the fuel dump was painted in Testors’ Flat Red.
Once
dry, the paper towel plugs were removed as well as the masking. To my
pleasant surprise, there had been no bleed or overspray. The area at the
rear of the fuselage near the exhaust pipe was hand painted in Dark Anodonic
Grey and the fuel dump was painted in Testors’ Flat Red.
The landing gear were assembled and glued in place along with all gear bay doors and so on, all using CA Glue. Then everything was given a coat of Model Master rattle can Gloss in preparation for decaling.
I had long decided that I wanted to build this
aircraft as a Strategic Air Command Bird. Decals would come from Super Scale
Decal sheet 48-256. This sheet features markings for the 12th. Strategic
Fighter Wing and the 401st. Fighter Bomber Wing.
The 12th. Strategic Fighter Wing was selected and I had no trouble with the
decals, all responding to Micro Sol nicely. There are a great deal of
smaller decals for data, access panels, and so on, so be prepared to spend
some time on this. My decal session lasted one entire evening, totaling
around five hours.
The decals were allowed to cure overnight. It was then given a coat of Model Master Semi Gloss spray followed by a coat of Model Master Flat. With that done, there was only a little left to complete the model.
| FINAL CONSTRUCTION |
 The
external fuel tanks were glued in place using CA glue and presented no real
problems. Then the running lights were painted using Tamiya Clear Green,
Red, and Blue, as appropriate for their location.
The
external fuel tanks were glued in place using CA glue and presented no real
problems. Then the running lights were painted using Tamiya Clear Green,
Red, and Blue, as appropriate for their location.
The canopy and windscreen framing were hand painted in Model Master Aluminum. The windscreen was glued in place using carefully applied CA glue. I elected to mount the canopy in the raised and open position, which is rather unique on this aircraft, giving it a look like very few others. With this, the build was finished. I now have my first 1/48 scale Thunderstreak in my collection.
| CONCLUSIONS |
Not to debate the accuracy or inaccuracy of the kit, I would recommend it for its ease of assembly. There are so many aftermarket decal options available, allowing the modeler to build one from almost any country. The kits are readily available on e-Bay and from model show vendors. So, have fun and enjoy building one.
| REFERENCES |
https://en.wikipedia.org/wiki/Republic_F-84F_Thunderstreak
Aircam Aviation Series No.14 Republic F/RF-84F Thunderstreak/Thunderflash by Ernest R. McDowell; Osprey Publications Limited, England
F-84 Thunderjet in Action by Larry Davis & David Menard; Squadron/Signal Publications Aircraft Number 61; 1983
F-84 Thunderjet in Action by Larry Davis, Squadron/Signal Aircraft Number 1224; 2010
Republic F-84 Thunderjet,Thunderstreak, & Thunderflash: A Photo Chronicle by David R. McLaren, Schiffer Militray/Aviation History; 1998
5 May 2026
Copyright ModelingMadness.com. All rights reserved. No reproduction in part or in whole without express permission.
If you would like your product reviewed fairly and fairly quickly, please contact the editor or see other details in the Note to Contributors.