Revell 1/48 F-89D Scorpion
| KIT #: | 4548 |
| PRICE: | $30.00 when new |
| DECALS: | Two options |
| REVIEWER: | Christopher Campbell |
| NOTES: |
| HISTORY |
The F-89 had been something of the workhorse of the Air Defense Command throughout the 1950’s. The H variant had introduced mixed armament of GAR-1 and GAR-2 missiles. These were, respectively, semi-active radar guided and infrared homing variants of the Falcon missile. These were supplemented by forty-two of the Mighty Mouse 2.75” folding fin, unguided air to air rockets. All were carried in the wingtip pods, three missiles on retractable launchers concealed by doors in each.
Three-hundred-fifty D models would be rebuilt to F-89J standards, moving to missile armament exclusively. This would consist of two GAR-1 and two GAR-2 missiles on wing mounted pylons along with two MB-1 Genie nuclear tipped air to air rockets mounted outboard of these.
As an unguided nuclear rocket with a 1.5 kiloton W25 warhead, one could almost equate this to an aerial, atomic spray and pray weapon. On a timed detonation input from the onboard targeting computer, such as it was, it was intended to get with the general proximity of the bomber that would be its target and detonate. There was little doubt that it be brought down. If anything, it was overkill.
 The F-89 holds the distinction of
being the only aircraft ever to fire a live nuclear tipped Genie in the
Operation Plumbob test during 1957. Five Air Force officers volunteered to stand
beneath the blast as it detonated 20,000 feet above them to prove that aerial
use of such weapons could be “safe” above cities and other populated areas.
Radiation doses received by them were negligible.
The F-89 holds the distinction of
being the only aircraft ever to fire a live nuclear tipped Genie in the
Operation Plumbob test during 1957. Five Air Force officers volunteered to stand
beneath the blast as it detonated 20,000 feet above them to prove that aerial
use of such weapons could be “safe” above cities and other populated areas.
Radiation doses received by them were negligible.
Contrary to popular rumor, only one of the men died younger than age seventy. Don Lutrel died at age sixty-three in 1987. Maj. John Hughes passed at seventy-one in 1990. Lt. Col. Frank Ball lived to eighty-three, departing this world in 2003 at the age of eighty-three. Col. Sidney Bruce lived to age eight-six, passing in 2005. As of 2012, Maj. Norman Bodinger was thought to still be living.
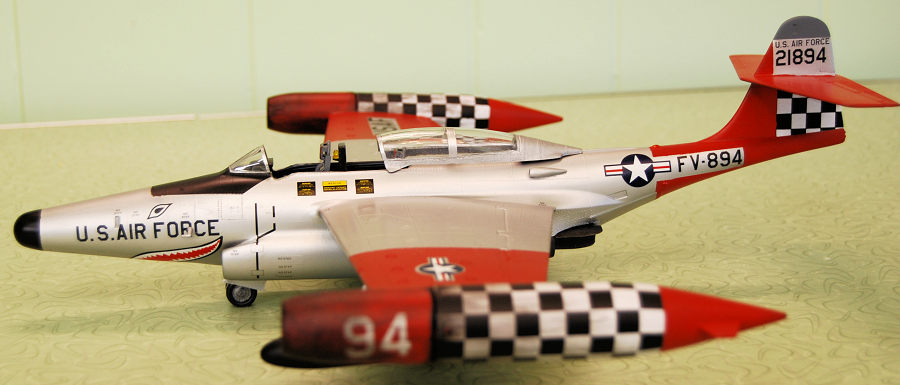
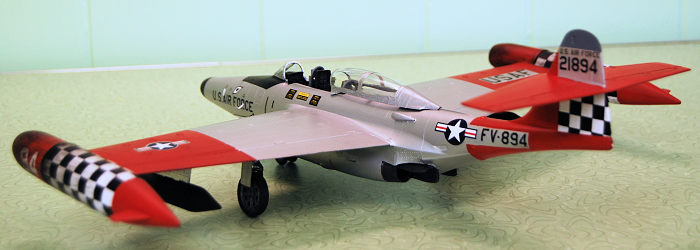
Along with new armament, the F-89J would carry the E-9 fire control system as used on the F-89 and the F-102. This would provide an actual radar scope for the weapons system operator. However, time was catching up with the Scorpion by this time. Newer, faster, and better designs were entering service, such as the aforementioned F-102. By the end of 1959 they would be phased out of services and handed off to Air National Guard units. My father, Billie L. Campbell was a mechanic with one of the final units to operate them, the 449 F.I.S. of the Alaskan Air Command at Ladd Air Force Base in 1959. Air Guard units would operate them for another ten years. Eleven J versions are preserved in museums and air parks throughout the United States.
| THE KIT |
 Released in 1990,
this was the first injection molded kit of the F-89. It comes out of the box
with all of the parts to build either a D or a J variant. Most parts are common
to both. There
are the rocket pods for the D model or the wingtip tanks for the J. There are
also the underwing fuel tanks for the D as well as the pylons for the
missiles carried by the J.
Released in 1990,
this was the first injection molded kit of the F-89. It comes out of the box
with all of the parts to build either a D or a J variant. Most parts are common
to both. There
are the rocket pods for the D model or the wingtip tanks for the J. There are
also the underwing fuel tanks for the D as well as the pylons for the
missiles carried by the J.
Clear parts are nicely molded. While there are resin cockpit sets out there, what you get out of the box is quite nice. Molding is crisp with a mix of raised and recessed details. Some aspects of the layout and assembly of some parts seem a little unconventional at first glance, but then so is the F-89. After all, this is a Northrop design.
Decals are provided for a regular U.S.A.F. D version and an Air National Guard J model. These looked well enough printed and may have been quite usable when new. However, all of these sheets that I have seen since around 2008 or so do not seem to have held up well in storage. There have been quite a number of aftermarket sheets for various versions of the Scorpion released, though no recent ones that I am aware of.
| CONSTRUCTION |
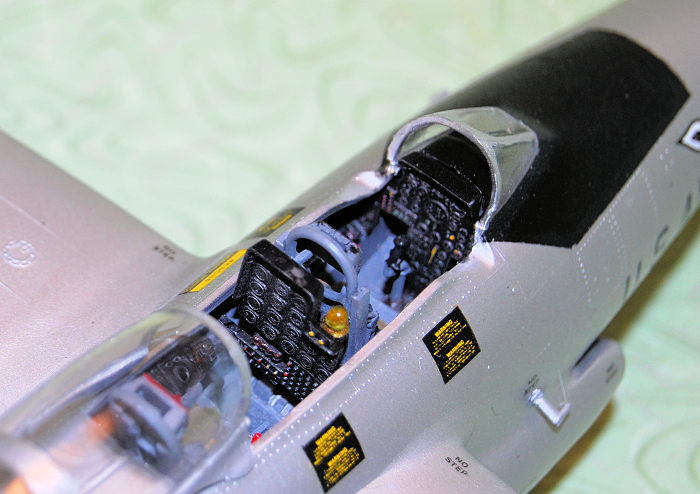
I started out by spraying everything on the inside of the fuselage and the cockpit components in Testor’s Flat Grey, which has always been close enough to Cockpit Grey to suit me. The instrument panels were painted in Tamiya Flat Black and accented by dry-brushing with Testor’s Silver, as well as the cockpit side panels. Various details were picked out with red, yellow, green, and rubber, as deemed appropriate and the gauges were each given a drop of Micro Kristal Clear.
The seats received much the same treatment, with the headrests painted in Testors Flat Red and ejection handles in Flat Yellow. Seatbelts are molded into the seats and were painted in Model Master Medium Green with the buckles dry-brushed in Testors Steel. Everything was given a light wash of Tamiya Flat Black thinned in alcohol to give it a used look, but not excessively so. The cockpit was then assembled with CA glue and set aside while I went to work on the fuselage. This version would carry the rear instrument panel with the radar scope. In assembling this, screen of the scope was given a drop of Tamiya Clear Yellow to give it that dull, dark amber look that such scopes often have when switched off.
A couple of larger egg style fishing sinkers were pressed into some modeling clay and placed in the somewhat cavernous nose section forward of the landing gear to assure I would have ample weight to keep its nose gear down. Then the fuselage halves were assembled with thick CA glue. The radome was glued in place as well.
Moving to the wings, the mounting holes for the underwing missile pylons were opened. After that only a little cleanup with an X-Acto blade was needed, and these were also assembled with the same glue. Any filling needed on either the fuselage or wings was minor, and accomplished by using CA glue, sanded smooth with 400 & 600 grit sandpaper followed by 0000 steel wool. Overall, this was very similar to my experience building the F-89C previously. Everything fit together with very little trouble.
 The fuselage is in three part
affair, with a separate ventral section. This is somewhat unorthodox but is
probably the best way that this somewhat unorthodox aircraft could be molded and
still present a decent level of detail along with relatively easy
assembly.
The fuselage is in three part
affair, with a separate ventral section. This is somewhat unorthodox but is
probably the best way that this somewhat unorthodox aircraft could be molded and
still present a decent level of detail along with relatively easy
assembly.
The cockpit is inserted through the bottom of the fuselage and fit well. It was glued in place with gap filling CA to make certain that I had a strong bond. I did not want this coming loose during further assembly. I would leave the ejection seats out until later, however.
Next comes part 21, listed as the “Intake Fans.” This is the part representing the front of the twin J-35 engines. I sprayed these in Testors Steel. Once dry, the blades themselves were given a light wash of Tamiya Flat Black thinned in denatured alcohol, helping to give the blades some shadow and depth, as well as a “used’ look. Satisfied with the results, they were also glued in place with thick CA glue.
While fit is mostly good throughout this kit, I do advise some test fitting and most definitely with the ventral fuselage. I did so, though I still came up with a few minor gap requring some CA glue fill. This, along with the engine air intakes and the tail seem to be the only trouble spots on the kit. If care is taken, they are reasonably easy to install. Even so, expect some minor filling and sanding in these areas.
The interiors of each of the intakes were sprayed with Testors Aluminum before installation. One of mine went on perfectly, requiring only a light finish sanding. They fit a little less cleanly than they had one the C that I built, both requiring some CA to fill the seam and a little more sanding that I would have liked.
The upper fuselage airscoops were assembled with CA glue and required little more than some smoothing with an X-Acto blade at the seem and some light sanding to clean up. They then went on nicely with a drop of CA glue. They are small and a little tricky to handle however, so be careful here.
The instructions would have you install the landing gear at this point, though almost no experienced modeler would. Instead, I installed the wings, which fit fairly well. They were attached with gap filling CA glue which was followed by some thin CA applied with a toothpick to fill the minor gap. All was sanded smooth by my usual methods of media and grits.
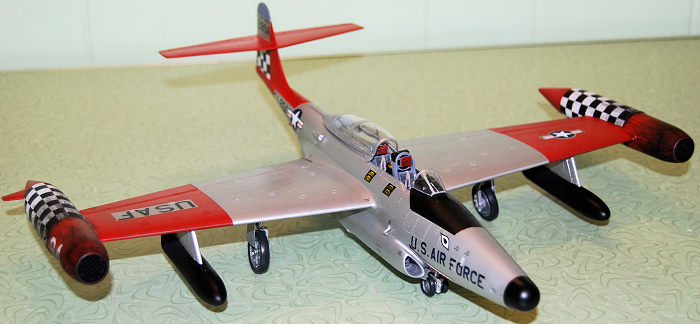
The wingtip fuel tanks were assembled and glued on with only a small amount of filling needed where they fit to the wings. Tail assembly went just as it had on my other Revell F-89's previously reviewed. It can be a bit dicey, though nothing that should deter a modeler with a little experience.
The nose landing gear doors were fitted. This might sound like something that would go on in final assembly. However, the way that this kit is designed, fitting them before painting works out quite nicely. They are molded as both the gear and the outside walls of the gear well itself. If correctly installed, it is a very positive fit and solid enough not to be damaged easily. The design also makes it almost impossible to install the nose gear incorrectly.
Now, satisfied that the model was nearly ready to paint, I began prepping. It was given a thorough buffing with dryer sheets to polish out scratches left from sanding. This was actually done several times until I was satisfied that it was smooth to my eyes and to my touch. Then the whole thing was blown off with the air compressor blower and all the openings plugged with damp paper towels and blown off once again.
| COLORS & MARKINGS |
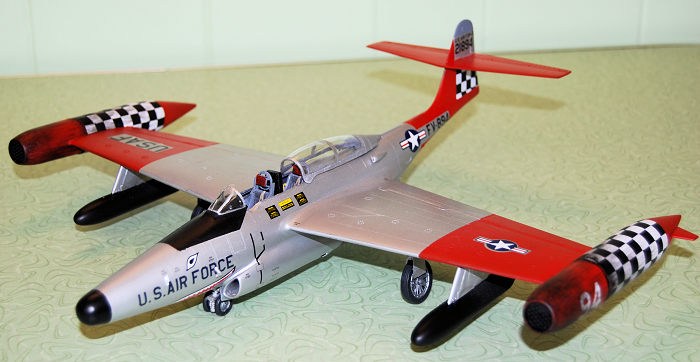
I had chosen to build this one as an aircraft that my father would have worked on in the 449th. at Ladd Air Force base in 1959. I had some questions about the paint scheme used on these aircraft, as I had not found any color photos of the F-89J's, only the D models that had preceded them in that squadron.
The specific question was whether or not they were natural metal or grey, as Air Defense aircraft were transitioning to this color during this period. I had asked my father about this around 2014, around two years before he passed. As he recalled, he they seemed to be grey, though did not remember specifically.
Many of the black and white photos do look grey, to include one that actually has my father in it and an F-102 (known to be grey) parked on the same tarmac in the background. It looked to be very much the same time. Still, the only F-89's that I definitively knew to be painted grey were in Air National Guard service during the 1960’s. If anything, I was only more confused by this point.
I emailed Modeling Madness regular Tom Cleaver on this to see if he might have some information or specific knowledge about the color in question. He suggested that these may have looked this way due to the natural aluminum finish having become weathered, reducing any perceivable shine and giving it a very dull, greyish cast. Alaska certainly has the climate to weather almost anything. Thank you, Mr. Cleaver, for the suggestion. I am now certain that this was the correct assessment of what I was seeing in the photos.
I decided that this was probably the case. With this in mind, I mixed up my own paint color that I would call Weathered Aluminum. It is a mix of mostly Testor’s Aluminum with a few splashes of Testor’s Flat White and Flat Grey until I got the tone that I liked. I tweaked this a few times until it was the shade that I liked when I let a few spots of it dry on my workbench.
I started by spraying the anti-glare panel ahead of the cockpit along with the wingtip tanks and radome in Tamiya Flat Black. Everything was preshaded as well. Once dry, all black areas were masked off with Tamiya tape. The fuselage glare shield on the F-89 is an odd shape and difficult to mask off. Take care here. The upper tip of the tail was sprayed in Testor’s Flat Grey and masked off with Tamiya tape once dry. Then the outer wing and tail sections were sprayed in Tamiya Flat Red. Then it was set aside to dry for a time.
 While I waited, I
assembled the wheels and tires, which went together easily and with only some
simple trimming and sanding. These were then sprayed in Tamiya Rubber Black and
set aside as I worked on the landing gear struts themselves. These were painted
in a 1:1 mix of Testor’s Steel and aluminum. Oleos were painted in Model Master
Chrome Silver and the brake lines in Testor’s Rubber. The wheels themselves were
hand painted in the same mix used for the landing gear.
While I waited, I
assembled the wheels and tires, which went together easily and with only some
simple trimming and sanding. These were then sprayed in Tamiya Rubber Black and
set aside as I worked on the landing gear struts themselves. These were painted
in a 1:1 mix of Testor’s Steel and aluminum. Oleos were painted in Model Master
Chrome Silver and the brake lines in Testor’s Rubber. The wheels themselves were
hand painted in the same mix used for the landing gear.
All of the red areas were masked off with low tack painter’s tape for larger areas and Tamiya tape used in the smaller ones or areas where it would border natural metal. This includes some more tricky mask cutting, especially as on the aft fuselage and the large panel that must be left open on the wings for the U.S.A.F. markings. The tip of the tail was painted in Testor’s Flast Grey and masked as well, once dry. Now it was time to grit my teeth and prepare for a natural metal session.
Everything was now sprayed with my Weathered Aluminum concoction. This went on well and looked the right shade to my eyes. It dried rather quickly, though I gave it some extra time to cure. The wing landing gear covers were been painted as well at this point.
Satisfied that it was dry enough, I removed all masks and found that there was enough flat in the paint to enable it to be handled more readily than most natural metal finishes. The landing gear was installed, and the wing gear covers were glued in place, all using carefully applied CA glue. Everything was then given a shot of Tamiya spray can Gloss in predation for decaling.
Decals were gleaned from several sources, including more than one aftermarket F-89 sheet. None exists for this specific aircraft. Some of the data and smaller decals came from the Revell sheet. The 449th. F.I.S. tail decal was a printed using Testor’s Decal Maker Program and Koala No Need Spray white decal paper for inkjet using and Epson printer. Everything went on without trouble using Solvaset.
| FINAL CONSTRUCTION |
The final bits were now installed. This included the dual pitots on the intake as well as the ejection seats. The exhaust was painted Model Master Anodonic Grey and glued in place with CA glue. This was followed by the heat shields which got a mix of Model Master Burnt Iron and Jet Exhaust. As with my previous F-89C, these are a little tricky to glue in place, as they do not have a very positive fit.
The nicely molded canopy was given a dunk in Future or Pledge, depending on the vintage of your bottle. This made it pleasantly clear and easy to attach with CA glue without the fogging that untreated clear parts often exhibit. Canopy and windscreen framing was hand painted in slightly thinned Testor’s Aluminum with no trouble. The sliding canopy base had already been painted in Tamiya Silver Leaf.
The ejections seats and control stick were glued in place using CA glue, followed by the canopy components. Everything went very well here. The trickiest part was painting the little molded on windscreen wiper.
Running lights were created using the appropriate color of Tamia Clear Red, Green, or Blue, as their locations dictated. The landing light lens was glued in place with Elmer’s Glue All.
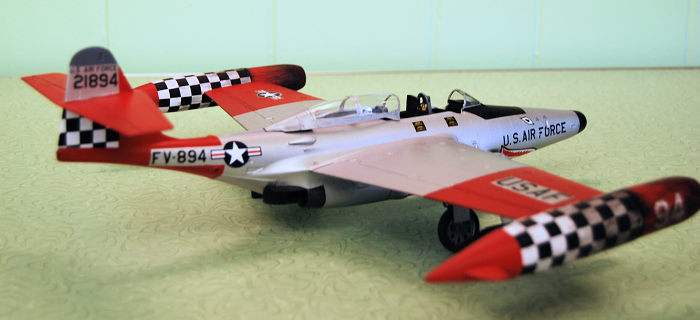 The missiles were assembled using
CA glue. The two-piece Falcons required some trimming and tweaking to get the
fins aligned correctly. The Genies requied some minor sanding along the seams. I
also chose to drill out “dimple” to represent the exhaust port that would be
obvious in the scale.
The missiles were assembled using
CA glue. The two-piece Falcons required some trimming and tweaking to get the
fins aligned correctly. The Genies requied some minor sanding along the seams. I
also chose to drill out “dimple” to represent the exhaust port that would be
obvious in the scale.
The Genies were painted in Tamiya Flat White along with the forward sections of the GAR/Falcons. The after portions were painted in Tamiya Flat Red. A drop of wash was given to the Genie exhaust port, though just enough to make it pop a little, since it clearly would not have been fired. Tamiya Clear Blue and Smoke was used to simulate the seeker caps on the Falcons. (An interesting note of these. My father noted that the heat seekers on the GAR-2 infrared Falcons were sensitive enough that they would respond to body heat of passing crewmen in the alert hanger. It could be a little unnerving to watch it follow people as they passed by, especially if you were the one it was following.)
The missile pylons were glued in their appropriate locations using CA glue. Then the missiles were glued in place using the same. Finally, it was given a shot of Tamiya Flat Clear and I pronounced done. I just wish Dad had been here so that I could have shown it to him.
| CONCLUSIONS |
As noted before on previous reviews of this mold, I definitely recommend this kit. It has a few quirks and minor problem areas, though nothing most modelers cannot handle. I spent around 20-22 hours on this one, a little less than others due to a slightly simpler scheme. It can quite easily be built up into a beautiful model of a somewhat unusual aircraft. It is large and impressive on the shelf or the show table, being approximately the size of a 1/32 P-51. Revell has recently rereleased their F-89C mold. Hopefully the F-89D/J version will follow, as it has not been available since it saw three releases in the early 1990’s. Give this one a try if you like Cold War jets. I think you will like it. As I often close with, enjoy your build and Happy Modeling!
| REFERENCES |
Northop F-89 Scorpion: A Photo Chronicle by Marty J. Isham & David R. McLaren; Schiffer Military Books, 1993
F-89 Scorpion in Action, Aircraft No. 104 by Larry Davis & Dave Menard; Squadron- Signal Publications, 1990
F-89 Scorpion- Walk Around by Dennis M. Savage, Col. U.S. Army (ret.); Squadron-Signal Publications, 2009
F-89 Scorpion in Detail & Scale, Vol. 41 by Bert Kinzey, Squadron-Signal Publications, 1992
https://en.wikipedia.org/wiki/Northrop_F-89_Scorpion
https://en.wikipedia.org/wiki/AIR-2_Genie
https://en.wikipedia.org/wiki/Operation_Plumbbob
https://www.scalemates.com/kits/revell-4548-f-89d-j-scorpion--140621
https://www.scalemates.com/kits/revell-4568-northrop-f-89-d-j-scorpion--143957
Christopher Campbell
24 February 2025
Copyright ModelingMadness.com. All rights reserved. No reproduction in part or in whole without express permission from the editor.
If you would like your product reviewed fairly and fairly quickly, please contact the editor or see other details in the Note to Contributors.