| KIT #: | 4825 |
| PRICE: | $28.00 when new |
| DECALS: | Two options |
| REVIEWER: | Christopher Campbell |
| NOTES: | Easy building kit of a classic early Cold war Jet |
| HISTORY |
At the end of W.W.II, the U.S.A.A.F. and it successor, the newly formed and independent United States Air Force, fund itself without a truly modern night fighter or all weather interceptor. While they had the Northrop P-61 that had proved its mettle during the War, the other night fighter, Lockheed P-38M. which was, almost from the onset, looking increasing like a “spit and bailing wire” lash-up conversion, neither was really suitable for the postwar all weather interceptor role.
The G model of the North America F-82 Twin Mustang was also just entering service and equipped with a huge radar pod for all weather service and night interceptions. However, with the dawn of the jet age readily apparent and in full swing, this was already outdated. An entirely new approach was needed.
Lockheed had their T-33 derived F-94 Starfire that would see U.S.A.F. service that would see combat service in Korea. It was, however, always something of a temporary measure. What was needed was a new, purpose built plane, from the ground up.
Curtiss-Wright offered their potentially promising XP-87 Blackhawk, powered by four Westinghouse J34 engine in squarish twin pods mounted under each wing. While ultimately an “also ran,” in truth, this four-engine design had some potential. It was initially ordered by the Air Force, including a recon version. Still, when Northop unveiled their XF-89 Scorpion, the die was effectively cast. It was no world beater, as such, though it exhibited of superior design elements and potential for continued development that was lacking in the Curtiss offering.
 The Scorpion
was declared the winner and a contract let. The XP-87 Blackhawk would be the
last gasp of a legendary company that had produce the legendary Hawk series for
both the U.S.A.A.C. and U.S. Navy. Yes, the company that had produced the P-36
and the legendary P-40, the fighters that had stood fast against the Axis in
every corner of the globe in the darkest days of W.W.II done for. There would be
no more Curtiss aircraft.
The Scorpion
was declared the winner and a contract let. The XP-87 Blackhawk would be the
last gasp of a legendary company that had produce the legendary Hawk series for
both the U.S.A.A.C. and U.S. Navy. Yes, the company that had produced the P-36
and the legendary P-40, the fighters that had stood fast against the Axis in
every corner of the globe in the darkest days of W.W.II done for. There would be
no more Curtiss aircraft.
As for Northop, after what had been something of a breakout success with the P-61 Black Widow, it was in many ways the Scorpion that carried them into the modern era and established them as a front runner in aviation. While there is no denying the brilliance of Northrop’s flying wing designs, politics unquestionably conspired against them and it was in some ways the F-89 that saved the company in those frenetic, lean days after their decade long project to produce a flying wing bomber came to nought.
While fraught with some troubles of its own right, the F-89 was ultimately approved for production. With its slim fuselage and broad wing area, the potential existed for a fast climbing, though decidedly subsonic, long-range interceptor.
It would be powered throughout all its variants by two Allison J-35 engines, though in ever improving forms. These were slung in pods low on the fuselage and blended into its form. This would lead to an uncomplimentary nickname – F.O.D. (foreign object and debris) vacuum, and unquestionably a fact of life for this aircraft.
Starting with an early version producing only 4,000 pounds of thrust This allowed for a rate of climb of over 7,000 feet per minute, a ceiling of just under 50,000 feet, and a top speed in excess of 600 mph. These aircraft was more agile than they looked with its very conventional planform, though it was still no dogfighter liked the F-86 or even the F-84, as it was still large and heavy aircraft.
The back-seater would operate an AN/APG-33 radar for all weather interception. Somewhat antiquated even by the time of its use in these aircraft, it was radar, nonetheless. Armament was a sextet of T31 20mm cannon with 200 rounds per gun. Up to sixteen rockets could be carried under the wings and there was even provision for bomb armament (though I have never seen one so fitted).
Entering service in 1951 with, the F-89A would be the first of the line, with eighteen service models produced (These are visually identifiable by their one-piece canopy, lacking the reinforcement between the fore and aft cockpits seen on all subsequent versions). This would lead to the B and C models, which incorporate various improvements.
Just under two hundred of these early models were produced. Their service lives were short, with engine troubles being common and structural issues found in the wings necessitating that all aircraft be grounded for extensive airframe repairs as the F-89D was coming into service. This led to a rapid phase out of the A-C models and transition to Air Guard service where they soldier on for a few more years. They themselves would in many cases be replaced by later model F-89’s as newer types replaced the Scorpions in frontline service.
Sadly, today only a single example of these early types remain. It is an F-89B on display at Lakeview Park in Nampa, Idaho.
| THE KIT |
 Released in
2000, the Revell F-89C kit is a modification of their earlier F-89D/J model.
There is a different fuselage with the slim, pointed nose of the early Scorpion
“gunfighters.” Wing tip tanks are the earlier, slimmer tip tanks. These are
notably without the fins seen on the majority of F-89C’s, so have a look at the
aircraft that you plan to model and see if you need to add these. Also included
are eight 5’ rockets that can be fitted under the wings. There are two decal
options for one U.S.A.F. aircraft, and seem well printed, though I only used
some of the data decals.
Released in
2000, the Revell F-89C kit is a modification of their earlier F-89D/J model.
There is a different fuselage with the slim, pointed nose of the early Scorpion
“gunfighters.” Wing tip tanks are the earlier, slimmer tip tanks. These are
notably without the fins seen on the majority of F-89C’s, so have a look at the
aircraft that you plan to model and see if you need to add these. Also included
are eight 5’ rockets that can be fitted under the wings. There are two decal
options for one U.S.A.F. aircraft, and seem well printed, though I only used
some of the data decals.
Clear parts are nicely molded. While there are resin cockpit sets out there, what you get out of the box is quite nice. Molding is crisp with a mix of raised and recessed details. Some aspects of the layout and assembly of some parts seem a little unconventional at first glance, but then so is the F-89. After all, this is a Northrop design.
| CONSTRUCTION |
I started out by spraying everything on the inside of the fuselage and the cockpit components in Testors Interior Green. Then, I almost immediately relented. While at the time of the introduction the of F-89, interior green was still being used in the F-86 and F-84 Thunderjets, this was the period during which the transition to grey in U.S.A.F. cockpits was underway.
I could find no color photos of a F-89 cockpit in green. Instead, I resprayed everything in Testors Flat Grey, which has always been close enough to Cockpit Grey to suit me. This may be in error. However, my gut instinct was to go with grey.
The instrument panels were painted in Tamiya Flat Black and accented by dry-brushing with Testors Silver, as well as the cockpit side panels. Various details were picked out with red, yellow, green, and rubber, as deemed appropriate and the gauges were each given a drop of Micro Kristal Clear.
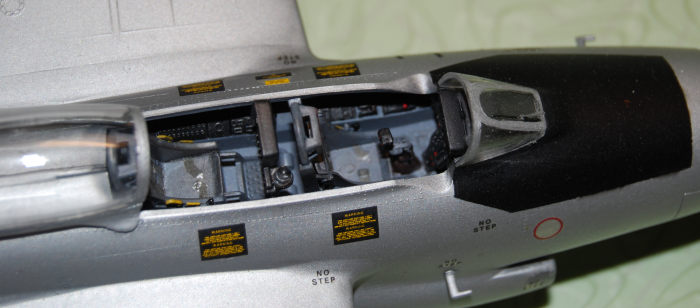 The
seats received much the same treatment, with the headrests painted in Testors
Flat Red and ejection handles in Flat Yellow. Seatbelts are molded into the
seats and were painted in Model Master Medium Green with the buckles dry-brushed
in Testors Steel. Everything was given a light wash of Tamiya Flat Black thinned
in alcohol to give it a used look, but not excessively so. The cockpit was then
assembled with CA glue and set aside while I went to work on the fuselage.
The
seats received much the same treatment, with the headrests painted in Testors
Flat Red and ejection handles in Flat Yellow. Seatbelts are molded into the
seats and were painted in Model Master Medium Green with the buckles dry-brushed
in Testors Steel. Everything was given a light wash of Tamiya Flat Black thinned
in alcohol to give it a used look, but not excessively so. The cockpit was then
assembled with CA glue and set aside while I went to work on the fuselage.
Knowing that this was going to be tail heavy, I kneaded some #9 lead shot into a wad of modeling clay and shoved it into the forward nose prior to assembly, assuring that I would have ample weight to keep it setting on its nose gear. Then the fuselage halves were assembled with Plastruct Liquid Weld. The instructions would have you install the radome at this point, but I elected to save that for last, or nearly so, not wanting to possibly damage it in subsequent work.
While this was setting, I prepared the wings for assembly. While not exceptionally common to see, I liked the idea of underwing rockets, so I would retain the rocket stubs. A little cleanup with an X-Acto blade was all that was needed, and these were also assembled with the same liquid cement. Any filling needed in either the fuselage or wings was minor, and accomplished by using CA glue, sanded smooth with 400 & 600 grit sandpaper followed by 0000 steel wool. Overall, the fit had been quite good to this point and I found it to be so throughout most of the kit with very little trouble anywhere. Then things began to get a little tricky, but only a little.
The fuselage is a three-piece affair, with the bottom a separate piece. This is somewhat unorthodox but is probably the best way that this somewhat unorthodox aircraft could be molded and still present a decent level of detail.
The cockpit is inserted through the bottom of the fuselage and fit well. It was glued in place with gap filling CA to make certain that I had a strong bond, as I have seen assemblies similar to this come loose during construction and are most difficult to realign and attach if they do. This is also the reason that I elected to leave the ejection seats out, knowing that there was still a great deal of work to be done.
Next comes part 21, listed as the Intake Fans. This is the part representing the front of the twin turbine engines. I sprayed these in Testors Steel. Once dry, the blades themselves were given a light wash of Tamiya Flat Black thinned in denatured alcohol, helping to give the blades some shadow and depth, as well as a “used’ look. Satisfied with the results, they were also glued in place with thick CA glue.
Then came the fuselage bottom. I most definitely advise testing fitting this well before installation. I did, and I still came up with a few spots that required some CA fill, though nothing that needed puttying. This, along with the engine air intakes and the tail seem to be the only trouble spots on the kit. If care is taken, they are reasonably easy to install, but may require some minor fill and cleanup.
The interiors of each of the intakes were sprayed with Testors Aluminum before installation. One of mine went on perfectly, requiring only a light finish sanding. The other, even after a judicious test fit, still did not go on quite as it should, leaving me to fill a small but noticeable gap with CA, then sand and polish it out.
 The upper
fuselage airscoops were assembled with CA glue and required little more than
some smoothing with an X-Acto blade at the seem and some light sanding to clean
up the seams. They then went on nicely with a drop of CA glue.
The upper
fuselage airscoops were assembled with CA glue and required little more than
some smoothing with an X-Acto blade at the seem and some light sanding to clean
up the seams. They then went on nicely with a drop of CA glue.
The instructions would have you install the landing gear at this point, though almost no experienced modeler would. Instead, I installed the wings, which fit fairly well. They were attached with gap filling CA glue which was followed by some thin CA applied with a toothpick to fill the minscule gap. All was sanding smooth by my usual methods of media and grits.
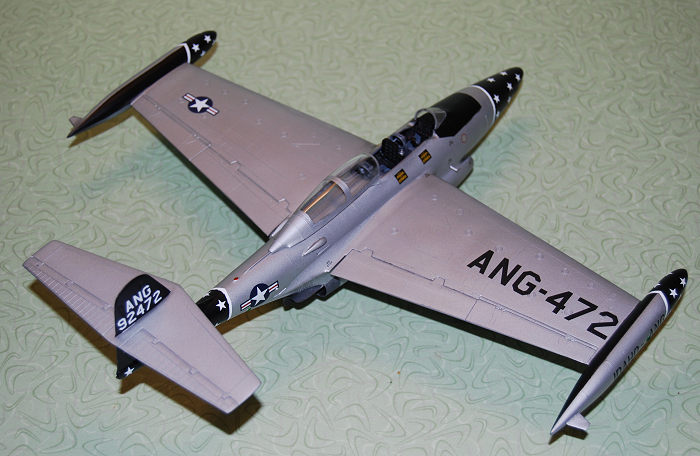
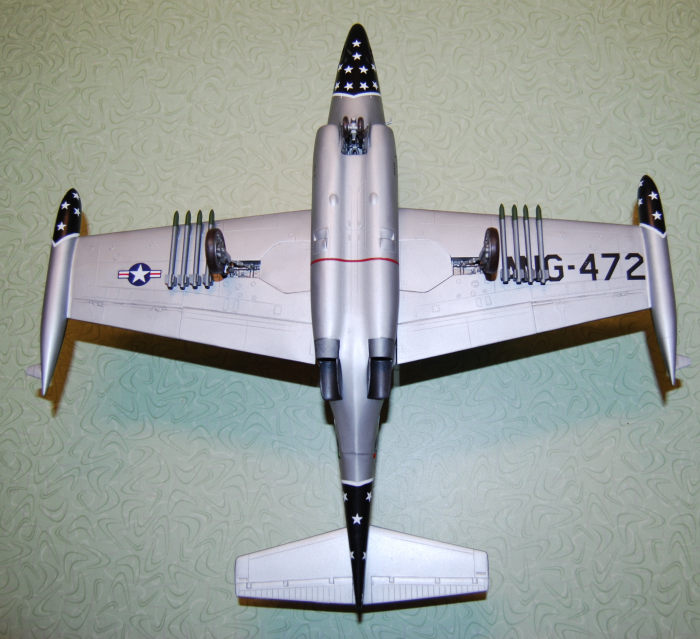
Now we encounter one of the odder bits about this kit. The wing tanks have no outward facing stabilizer fin. This is not necessarily wrong. I have not researched the exact details on this, but photos clearly show A through C models with out this little winglet. However, the majority, especially the C models show them in place. Research the aircraft that you are building to see which is correct.
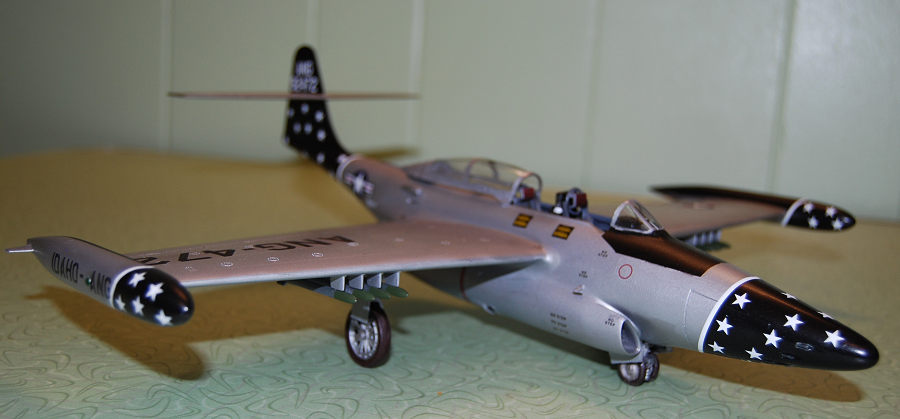
The aircraft that I had chosen to model was an Idaho Air National Guard Aircraft and all photos that I found of these clearly showed the fins on the tip tanks.
For some utterly unknown reason, I had a set of Revell 1/48 F-89D/J rocket pods and tip tanks in my parts bin. Why, I do not know. I have a pair of these kits, presently also under construction, one to be build as a D and the other a J. However, all parts are present in both. I may have had some extra sprues in one of them with these parts, though I do not recall that, nor have I ever parted out one of these kits.
In any case, I cut the fins from the F-89J tanks and glued them in place as I assembled the “neutered” tanks from the kit. I used thick CA for this and more than half expected to knock the fin off of at least one of them during subsequent sanding, fitting, and finishing. Yet I never did, which was a nice surprise. These too were glued in place without trouble and required only some simple filling with CA and sanding.
Now, the dreaded tail assembly, the most troublesome part of any F-89 build. To be fair, the way that the F-89 itself is build, about the only way mold and fit the tail is as Revell did with this kit. However, there is invariably going to be some fitting and filling needed.
I would advise trimming and test fitting until things seem as clean and ant as possible. Then, suck it up, grit your teeth, say a Hail Mary, and attach it as cleanly as you can with your adhesive of choice; preferably a quick setting one. I used thick CA for mine and I shot it with accelerator as soon as I was satisfied that it was straight. There is going to be some minor fill needed. Just accept it. But if you did it right, it is going be just that: minor. Mine was and it was cleaned up quickly.
Lastly, the nose cone was first installed, which required only a little minor sanding, as mine fit quite well. Then the nose landing gear doors were fitted. This might sound like something that would go on last. However, the way that this kit is designed, fitting them before painting works out quite nicely. The instructions would have them put on before even the wings, though I would say that this is premature. Still, they fit well and I think that Revell did something rather innovative in their kit design here, as they are molded as both the gear and the outside walls of the gear well itself. This may sound a little toyish if you have not seen or built the kit. In practice, it works very well.
Now, satisfied that the model was nearly ready to paint, I began prepping. It was given a thorough buffing with dryer sheets to polish out scratches left from sanding. This was actually done several times until I was satisfied that it was smooth to my eyes and to my touch. Then the whole thing was blown off with the air compressor blower and all the openings plugged with damp paper towels and blown off once again.
| COLORS & MARKINGS |
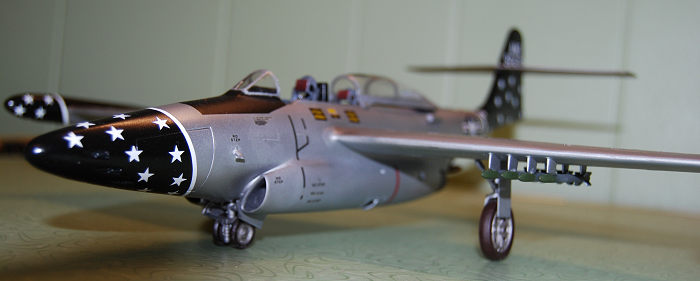
From the moment that I had decided on the Idaho Air Guard scheme, as attractive as it was, I knew that it was not going to be simple. Attractive schemes rarely are. This one was going to take a lot of masking and a lot of patience in the decal phase.
I started by spraying the anti-glare panel ahead of the cockpit as well as those on the inboard sections of the tip tanks in Tamiya Flat Black. Once dry, this was masked off with Tamiya tape. (Be warned, the fuselage glare shield on the F-89 is an odd shape, somewhat complex and compound trapezoidal shape. In layman’s terms, I would describe the process of cutting the mask to correctly fit this section as “funky,” or just plain weird. It took me two or three attempts to get it right. After the Flat Black sections were masked, I sprayed the nose, part of the tail, and the tips of the wing tanks in Testors Gloss black and set it aside to dry and cure.
 While I
waited, I assembled the wheels and tires, which went together easily and with
only some simple trimming and sanding. These were then sprayed in Testors Steel
and set aside as I worked on the landing gear struts themselves and finished
them color. Oleos were painted in Model Master Chrome Silver and the brake lines
in Testors Rubber.
While I
waited, I assembled the wheels and tires, which went together easily and with
only some simple trimming and sanding. These were then sprayed in Testors Steel
and set aside as I worked on the landing gear struts themselves and finished
them color. Oleos were painted in Model Master Chrome Silver and the brake lines
in Testors Rubber.
Once everything as dry, the tires themselves were hand painted in Testors Rubber and again set aside to dry while I busied myself with writing or smoking my pipe, or both to kill some time after which I gave them a wash in the same Tamiya Flat Black thinned in denatured alcohol to give them the look of a little grime from ordinary use.
After the Gloss Black on the aircraft was thoroughly dry (read: next day), I set about masking off those areas of the nose, tanks and tail. This is a fairly simple process and Tamiya tape served me quite well. The whole model was blown off once again and then sprayed in several coats of Testors Aluminum. Happily, when the masks were removed, I found that it had come out about as cleanly as I could have hoped for, and I had virtually no touchup to do.
The wing landing gear covers had been painted as well and I set about assembling and installing the gear. Folling the instructions, this went quickly and by the numbers. After just a few minutes, my Scorpion was poised on its tires and gear and awaiting its decals. This was a bit of an ordeal, though.
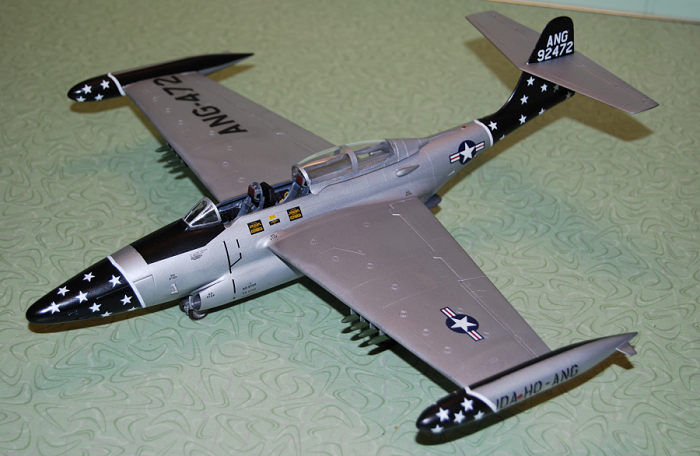
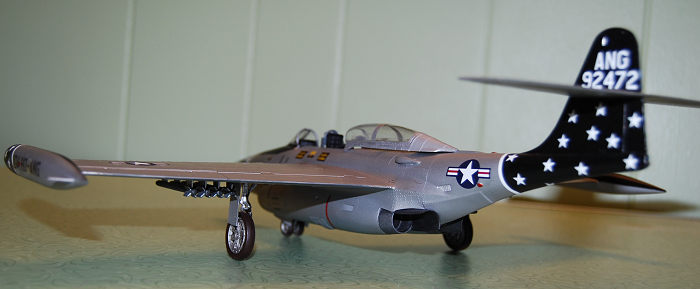
First, I will note that I was using the AeroMaster decal sheet 48-519 that features markings for the F-89C in Michigan, Idaho, and Montana ANG colors. This sheet is excellent, and I had no problems at all with the decals themselves. I was a bit torn, as I also rather liked the Montana ANG scheme. However, I recently got my hands on another 1/48 F-89C kit at my local show and a Montana bird with be forthcoming.
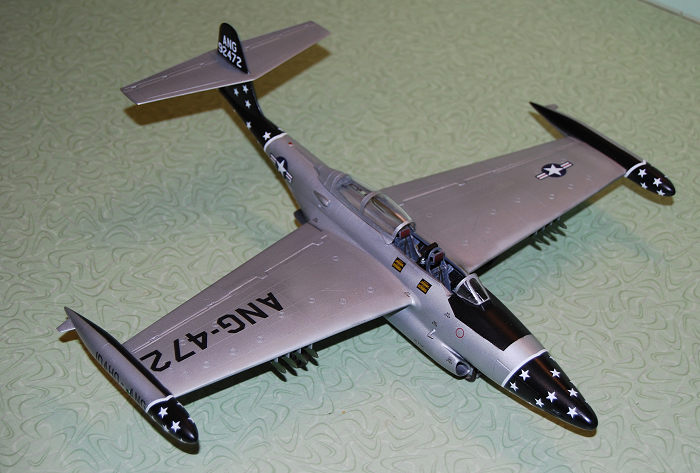 The Idaho
scheme was going to be no picnic, though. The aircraft was festooned with white
stars upon the glossy black, and these all have to be applied individually. If
you find yourself going this route, arm yourself with patience. It is an arduous
task. In preparation for this, I blew the model off once more and gave it a coat
of Testors Metalizer Sealer followed by their rattle can Gloss.
The Idaho
scheme was going to be no picnic, though. The aircraft was festooned with white
stars upon the glossy black, and these all have to be applied individually. If
you find yourself going this route, arm yourself with patience. It is an arduous
task. In preparation for this, I blew the model off once more and gave it a coat
of Testors Metalizer Sealer followed by their rattle can Gloss.
Interestingly, photos and illustrations of these aircraft as well as later F-89D’s that replaced the earlier types show the stars and cheat lines in both white and a mustardy yellow. Both colors seem to have been used at some point, to my analysis. Also, while have photos of a model finished in the scheme with the yellow, I am unaware of such a decal sheet. I would say that both are right and that the modeler is only limited in this by the year in which they may choose to depict the aircraft. For me, white, as supplied on the sheet was the way to go.
This was one of the most complicated decal projects that I have yet attempted. I would estimate that it took around nine hours to complete. Some of the decals were from the kit supplied sheet, such as the warning markings, data, and the national insignia. The rest is AeroMaster, though I would fault it on one most notable point. The Idaho ANG print that is to be displayed on the outer wing tanks has to cut unless it is to obscure the green and red running lights that all aircraft carried. No matter how you slice it, quite literally, it looks a little awkward and not quite like the photos.
Still, once the decals were on and settled down with Solvaset I gave the whole thing a light coat of Future. This would seal it as well a giving it a slightly semi-gloss sheen.
| FINAL CONSTRUCTION |
The final bits were now installed. This included the dual pitots on the intake as well as the ejection seats. The exhaust and heat shield were painted in Testors Aluminum and Model Master Anodonic Grey and glued in place with CA glue. The later seemed a little finicky in their fit, though this was easily enough sorted out with a few additional test fist.
Then there were the rockets. This should have been simple, yet proved to be one of the most tedious parts of the build. These were a disappointment in an otherwise nicely designed kit.
First, the 5” aerial rockets are overly squarish and had to smoothed out at the modeler’s discretion. Once this is done, any demarcation between the rocket body itself and its warhead were essentially gone, leaving the painting process largely a guessing game. This could easily have been avoided had Revell to add definitive attachment points and made the line of the warhead little more clearly defined.
 I chose to
paint the warheads in Model Master Medium Green. When this was dry, it was
masked and Testors Steel was applied, aft of a point that “looked right.” After
these had dried they were carefully glued to the rocket stubs with CA glue.
I chose to
paint the warheads in Model Master Medium Green. When this was dry, it was
masked and Testors Steel was applied, aft of a point that “looked right.” After
these had dried they were carefully glued to the rocket stubs with CA glue.
This was probably the worst part of the build. First, the rockets have no molded-in, positive attachment point. This makes it very difficult align and orient the properly. It took me nearly two hours until it seemed as it should be. The blocky, yet descending taper of the wings does nothing to help this matter. It can actually create something of an optical illusion during attempts to mount and align the rockets. Thus, be warned if you care to go this route. I will not be doing so on my Montana ANG F-89. Once was enough.
The nicely molded canopy was given a dunk in Future or Pledge, depending on the vintage of your bottle. This made it pleasantly clear and easy to attach with CA glue without the fogging that untreated clear parts often exhibit. Canopy framing was had painted in slightly thinned Testors Aluminum with no trouble. Running lights were created using appropriate color of Tamia Clear Red, Green, or Blue, as their locations dictated. The landing light lens was glued in place with Hypo Watch Crystal cement and low and behold it was actually done. I now had a 1/48 F-89C Scorpion in one of the most eye-catching paint schemes ever. This was something that two decade or so ago that I never thought that I would have. There is no doubt that the early Scorpion is an esoteric offering and I thank Revell for giving it to us, even it has been quite some time since it has been readily avaible.
| CONCLUSIONS |
First, would I recommend this kit? Absolutely so. It may take a little for, but it is well worth it if you like Cold War Aircraft, as I do. The kit builds up easily and with minimal tweaking and cleanup. It is not something of the “Shake and Bake” type kits that seem to garner all the attention these days. It is no dog either, not by a long shot. I spent around 25 hours on this build, though might have finished much sooner had I not chosen the complex paint scheme previously mention
To my eyes and experience, the only real faults that I find in this kit are the rather poorly engineered rockets and the mildly problematic tail assembly. Any modeler of moderate experience should find themselves easily able to produce a superb build with this kit straight out of the box.
As usual, I will conclude this by offering, whatever route that you may chose, most of all have fun and be happy with your work and enjoy your hobby.Happy modeling.
| REFERENCES |
Northop F-89 Scorpion: A Photo Chronicle by Marty J. Isham & David R. McLaren; Schiffer Military Books, 1993
F-89 Scorpion in Action, Aircraft No. 104 by Larry Davis & Dave Menard; Squadron- Signal Publications, 1990
F-89 Scorpion- Walk Around by Dennis M. Savage, Col. U.S. Army (ret.); Squadron-Signal Publications, 2009
F-89 Scorpion in Detail & Scale, Vol. 41 by Bert Kinzey, Squadron-Signal Publications, 1992
https://en.wikipedia.org/wiki/Northrop_F-89_Scorpion
https://en.wikipedia.org/wiki/Battle_of_Palmdale
https://en.wikipedia.org/wiki/Operation_Plumbbob
https://en.wikipedia.org/wiki/Curtiss-Wright_XF-87_Blackhawk
http://en.wikipedia.org/wiki/English_Electric_Lightning
22 November 2023
Copyright ModelingMadness.com. All rights reserved. No reproduction in part or in whole without express permission.
Thanks to me for picking this one up when it was on sale.
If you would like your product reviewed fairly and quickly, please contact the editor or see other details in the Note to Contributors.