Modelcraft 1/48 F-82G Twin Mustang
| KIT #: | ? |
| PRICE: | $30.00 |
| DECALS: | One option |
| REVIEWER: | Christopher Campbell |
| NOTES: | Be afraid; be very afraid |
| HISTORY |
It is no news to anyone that during late W.W.II an armada of B-29’s conducted an endless and highly effective bombing campaign on Japan. This utterly destroyed their industries and all but razed cities. Culminating in the nuclear strikes on Hiroshima and Nagasaki, Japan finally surrendered in 1945.
However, during this campaign, despite the long legs of the P-51D and K models and the exceptional P-47N, the U.S.A.A.F. was without a fighter that could truly escort this tsunami of B-29’s on the longest missions ever flown until that time. The Army Air Force issued a proposal for an ultra-long range escort fighter with a two man crew who could handle such long flights; the idea being that one pilot could relieve the other during the such grueling missions.
North American Aircraft responded with a design that was derivative, but nonetheless ingenious in form of two modified P-51H type fuselages mated to a common wing and tail plane. Thus the P-82 Twin Mustang was born, intended to have an unrefueled range in excess of 2000 miles. Six .50 Browning machineguns were mounted in the center section of the wing. Each wing had two outboard harpoints capable of carrying a variety of fuel tanks, bombs, or five-place outboard rocket launchers. There was additionally a center wing hardpoint capable of carrying similar loads, but most often left empty or replaced by a radar pod.
Originally powered by the venerable Packard-Merlin V-12, this was ultimately replaced with the Allison V-12 engine, a direct descendant of the powerplant at the dual hearts of the legendary P-38. Even though it was an improved design and the latest and greatest, it was already a dated engine in the dawn of the jet age. Still, it was what needed: a reliable powerplant that could meet the necessary range and speed requirements.
With the war winding down and ultimately coming to sharp conclusion, aircraft contracts were cancelled wholesale. The P-82 managed to avoid this nasty axe, as it provided the U.S.A.A.F. and soon to be U.S. Air Force with something that they needed, an long range escort aircraft that had potential to become a dedicated night fighter.
 Its long range potential was proven when one was
flown from Hawaii to New York nonstop in 1947. At more than 5000 miles, this
was quite substantial feat. Still, with P-80’s and their successors, the
F-84 and F-86 entering service, the F-82 seemed a bit archaic and was almost
cancelled more than once. Yet, for all of this jet age mania, the fledgling
Air Force was without anything that could be called a dedicated night
fighter. A modified P-82, soon to be designated F-82G with a radar pod
vulgarly dubbed the “dong,” would be the answer until the F-94 and F-89
could sort out their teething problems common to all jets of this era.
Its long range potential was proven when one was
flown from Hawaii to New York nonstop in 1947. At more than 5000 miles, this
was quite substantial feat. Still, with P-80’s and their successors, the
F-84 and F-86 entering service, the F-82 seemed a bit archaic and was almost
cancelled more than once. Yet, for all of this jet age mania, the fledgling
Air Force was without anything that could be called a dedicated night
fighter. A modified P-82, soon to be designated F-82G with a radar pod
vulgarly dubbed the “dong,” would be the answer until the F-94 and F-89
could sort out their teething problems common to all jets of this era.
Still the F-82 might have bene relegated to the dustier pages of aviation history had it not been for the unprovoked North Korean invasion of South Korea in 1950. There was a desperate shortage of military equipment and aircraft and the R.O.K. (Republic of South Korea) Army and what allied forces, mainly U.S., were in theater during that period dug in and made a desperate stand in the vicinity of Tegu (Deagu) in what would become known as the Pusan Perimeter. Virtually any available aircraft were rushed into the theater, with the F-82G being at the forefront.
The North Korean Air Force at this point was fielding mostly Yak-9 variants along with some LA-9 and La-11 fighters. IL-10 Sturmovick variants and Tu-2’s served as tactical bombers. A plethora of trainer types were used for harassment in the form of “Bed-Check or 5’o’clock Charlies” and even some older salvaged Japanese aircraft still took to the air. South Korea’s Air Force consisted of a handful of Piper Cubs, a few North American Harvards (T-6’s procured through Canada) and likewise some by now rather decrepit salvaged Japanese aircraft. Unfortunately, until Col. Dean Hess spearheaded the creation of a modern R.O.K. fighter arm, this Air Force would be largely impotent to counter the threat from the North. Though to their credit, the South Koreans made the most of what they had, even using L-4 Cubs and hand tossed bombs with some success against advancing T-34 tanks.
The F-82G Twin Mustang was rushed into theater and performed yeoman’s work in those chaotic days; flying not only from bases in Japan, but also from the Korean peninsula. It would not only help to equalize what was initially North Korean air superiority, but also hammer ground targets with rockets, bombs and napalm. Ultimately, the F-82 claimed at least three air to air kills and numerous ground targets destroyed.
As more aircraft and modern jet types began to appear in theater on both sides, the F-82’s were more often relegated to ground attack and interdiction duties. Some radars were damaged or became inoperable due to a lack of spares. An interesting side note is that a gun pod was developed for the F-82 that could be mounted in the place normally occupied by the radar. This does not seem to have entered production or ever been used operationally, though it with its eight.50 machine guns in addition to the six already mounted internally, it would have provide devastating firepower for strafing attacks, comparable to that of an A-26 Invader.
By late 1952, the Lockheed F-94B Starfire had replaced all Twin Mustangs in theater. Survivors were ultimately rotated back to Ladd and Warner Robbins Air Force bases until replaced by jet F-94’s or F-89’s stateside and retired. By 1953 the last had left service and almost all were scrapped and largely forgotten.
Only five are definitively known to survive. Two are at the U.S.A.F. Museum at Dayton. One is the F-82B Betty Joe that aforementioned record setting flight. The other is a former F-82B that was at one time operated by the Commemorative Air Force. It has been restored and marked as an F-82G, sans the radar pod, as none are known to exist.
Two F-82E’s exist. One is a gate guard at Lackland Air Force Base in Texas. The other is a survivor from the former Walter Soplata collection and is being restored to flying condition. The fifth aircraft is an XP-82 that has recently been restored to flying condition The B-25 Group in Douglas, Georgia.
| THE KIT |
I bought this kit from Squadron Mail Order shortly after its release in the late 1990’s. I also bought an earlier F-82B variant with hopes of building both into show pieces. I could not have been more wrong.
In the box, this kit does not look that bad. There are nice looking recessed rivets and panel lines. However when one takes a closer look, it goes downhill quickly. There are numerous mold marks and things that look almost like resin pour stubs on an injection molded kit. These are quite numerous in the cockpit and fuselage. Additionally, it is molded in very soft white plastic and easily damaged or warped.
Initially, I looked at it as something akin to an ordinary short run kit. However, it soon revealed itself to be something different. This was not a short run kit. It was a nightmare in plastic.
Test fitting of any parts showed that there would be serious fit issues almost everywhere. Very oddly, the top ¼” portion of the vertical tails are separate parts, for no reason whatsoever that I was able to fathom. Additionally, some parts were clearly short shot, including the radar pod. Other parts were covered in flash and poorly molded. It was painfully obvious that this was going to require the tenacity of a bulldog to complete.
| CONSTRUCTION |
I started this build in the unusual manner, with the cockpit. This, as almost every part of this kit is a mess, plain and simple. There are a pair of instrument panels that are reasonably accurate for the aircraft depicted and the scale, as well as passable control sticks and cockpit floor. The seats, however, were just a mess. They were poorly molded and barely qualified as poor representations of the real item, or any seats for that matter. I replaced mine with a pair of resin seats for a P-51D that I had on hand, which were essentially correct for this aircraft. However, before any work can be done, there are rather large injection stubs around 1/8” thick of various lengths festooned throughout the interior that I removed with a set of diagonal cutting pliers and a lot of sanding.
The instrument panels were painted black and drybrushed with Testors Aluminim to bring out details. The radar screens were painted a dull flat green, which would generally look correct for a switched off screen. Most of the cockpit aside from the controls and some seat details were painted in Testors Model Master Interior Green. Some details were accented in red and yellow and the seat were painted the appropriate colors and the whole interior was given a wash of Tamiya Smoke & Flat Black diluted in denature alcohol.
While this was all drying, I began the wing assembly, cementing all of the wing section halves together with gap filling CA glue. It was painfully obvious that more filling would be required, as there were noticeable gaps in the leading and trailing edges on every piece. Once this had set, thin CA glue was used to fill these gaps and once that had set there was an interminable sanding session to deal with the poor fit. Even with the wing seams filled and sanded to an acceptable finish, it was clear that the fit was going to be very bad.
 The engine cowl sections were assembled and went
together with few problems, which was a one of the only sections of the kit that
I can say this about. After this relatively trouble free part of the assembly, I
turned my attention back to the fuselages.
The engine cowl sections were assembled and went
together with few problems, which was a one of the only sections of the kit that
I can say this about. After this relatively trouble free part of the assembly, I
turned my attention back to the fuselages.
Fitting the cockpits and instrument panels was something of a matter of trial and error, as there were very little in the way of positive attachment points to be found due to the poor mold quality of what is there. This took a lot of eye-balling and finally a fitting them with quick setting glue boosted by accelerator to insure that they stayed were they were supposed to.
Testing the closure of the fuselage again revealed that nothing short of brute force was going to be needed to assemble it. I refrained from installing the ventral radiator exhausts at this time, as they could clearly be fitted once the fuselage was together and they would only complicate the assembly. Using thick, gap filling CA glue, I assembled each of the fuselages and clamped each together with five or six of the heaviest rubber bands that I had and left them to cure overnight. The next day it was revealed that most of the gaps were sealed by the CA glue, but some more was needed in spots for filling. Again, there was a lengthy sanding session involved.
When the sanding and finishing of the fuselage was mostly completed, the engine cowls were added, and matted to their respective fuselages better than either of the fuselage halves had with each other. While this was setting, I decided to take a look at the fuel tanks and other stores. At this point I discovered that the after section on one half of the radar pod was short shot. This was going to be a problem; not a catastrophic one, but definitely frustrating.
I tackled it by trimming both parts and gluing them together first. Then I gradually filled in missing section with Squadron Green Putty. While this cured, I went back to the fuselage and smoothed out the joints where the engine cowls mated to the fuselages, which was probably the best fit I encountered on any two major parts, and went quickly and easily.
I decided that since I was fitting out the fuselages, I had might as well install the rather oddly and poorly molded top sections of the vertical tails. I can see no logical reason for these being molded as separate parts. The halves were glued together and then attached to the tail sections where they predictably fit poorly. They were cemented in place with the same gap filling CA glue used throughout most of the build and given a shot of accelerator so that I could commence the sanding and shaping to attempt to make these look something like the tops of the vertical tails of an F-82.
With this completed as closely to anything that I could call satisfaction, I went back to the radar pod. A few gradual applications of putty fill had done the job. I shaped and smoothed it down, then gave it a thin coat of standard CA glue to fill any remaining seems and pinholes left from the fill, which was polished out with 0000 steel wool and gave me a complete radar pod at last.
The radiator intakes and exhausts were some of the better molded parts of the kit, though covered in flash. The plastic is so soft that one has to take a great deal of care in trimming and sanding as they are very easily damaged. The radiator exhausts were positioned where I wanted them set and glued in place easily. Then the intakes went on with a minimum of filling and sanding compared to the rest of the kit.
Thus, the moment of truth was at hand, assembling the wing and fuselage sub-assemblies. A test fit of the fuselages showed very poor fit on the leading edge of the wings. There was some trimming with a #11 X-Acto necessary to achieve anything close to a proper fit. That was the good part.
While the trailing edges of the wings fit more or less as they should, there were huge gaps evident where the wings should mate to the front of the fuselages. Worse yet, the wing had an overall anhedral cant to it rather than a proper dihedral. This was going to look God-awful if I could not correct it. However, I had come too far with this beast to give up on it.
I thought about possible solutions and there were not many good ones. Finally, I glued the fuselages onto the wings just as they were. Making no attempt to fill the gaps or correct the angles at first. When the thick, high strength CA glue had thoroughly cured after a full day, I returned to it to attempt my solution.
 To this end, I took several pieces of sprue and
shaved them down with an X-Acto knife until they would fit in the gaps leaving
around a millimeter or so to spare on either side. I then filled the gaps with
the slow cure gap filling CA glue. While this was still semi liquid, but
viscous, I took two large, heavy rubber bands and stretched them from wingtip to
wingtip, pulling them upwards in the center to set the tension and sliding a
Testors paint bottle under them to retain it. Any overflow from the fills was
wiped away with Q-tips, crossed my fingers, and I left the model alone to set
for another full day.
To this end, I took several pieces of sprue and
shaved them down with an X-Acto knife until they would fit in the gaps leaving
around a millimeter or so to spare on either side. I then filled the gaps with
the slow cure gap filling CA glue. While this was still semi liquid, but
viscous, I took two large, heavy rubber bands and stretched them from wingtip to
wingtip, pulling them upwards in the center to set the tension and sliding a
Testors paint bottle under them to retain it. Any overflow from the fills was
wiped away with Q-tips, crossed my fingers, and I left the model alone to set
for another full day.
When I removed the rubber bands the next day, the wing now had a proper dihedral and the wings and fuselages were mated very solidly. Of course, there was a great deal of sanding to do on the wing joints and some touchup filling, but I was very pleasantly surprised with how well my solution had worked.
With this done, the only major part left was the horizontal stabilizer between the fuselages. Here the worst of all problems arose. It was easily 3/16” to short to be mated to the tails as it should. Attempts with heavy rubber bands quickly proved fruitless and I was left with very few options. The solution to this was less than elegant.
Using two pieces of balsa wood to protect the plastic of the fuselage from being damaged, I ultimately resorted to an 8” C-clamp from my wood shop! Knowing that this was as likely to wreck everything as not, I proceeded very slowly in adding tension to it until the stabilizer was nearly in place. Then I applied some gap filling CA glue with a toothpick and gradually screwed it down. This process may have been the only real saving grace of the overly soft plastic, as most kits would have cracked or shattered at this point. However, the soft plastic allowed it to conform more or less as desired.
Again, it was set aside for a full day to cure. When I removed the clamp, I genuinely expected the glue to give way and the stabilizer to pop free. Amazingly, it did not, and has never showed any signs of doing so. Unfortunately, it also left the stabilizer with a slightly upwards bow that can be seen when viewed from behind. This has lessened slightly over time, though I doubt that it will ever go away entirely.
| COLORS & MARKINGS |
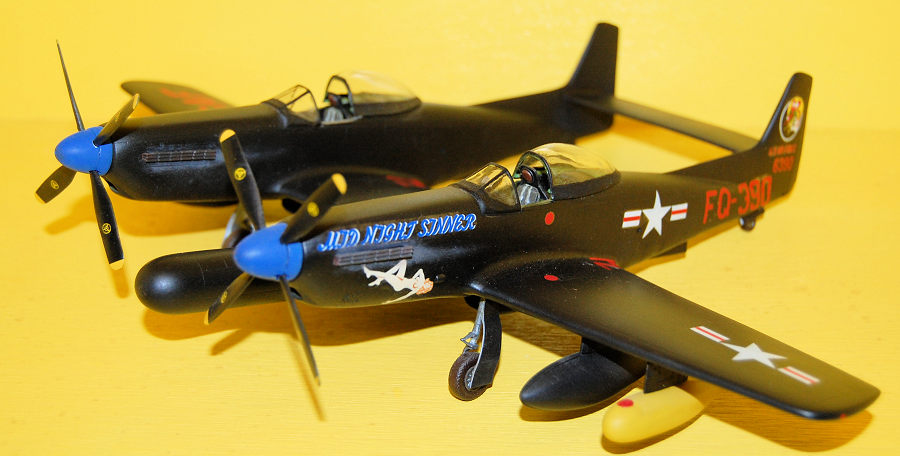
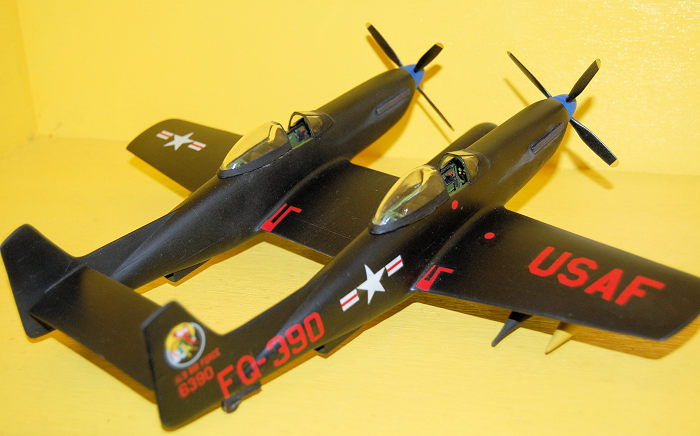
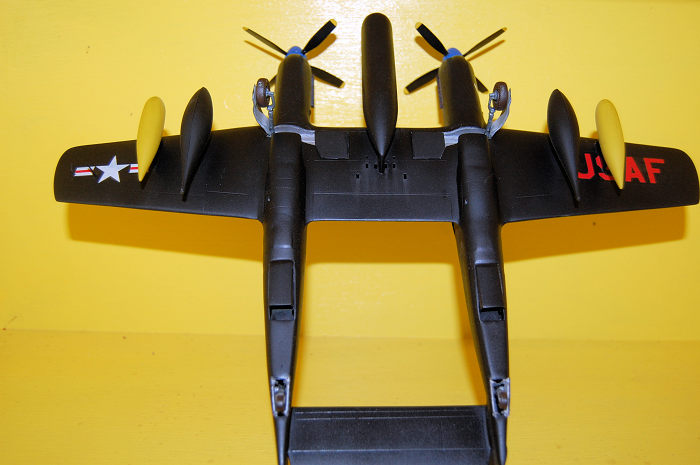
With everything sanded and smoothed and fitted as well as I could, it was time to paint it. I closed off the cockpits and radiator exhausts with damp paper towels and dusted everything thoroughly. It was then given a couple of coats of Testors Model Master Flat Black and set aside to dry while I went to work on the propellers, landing gear, and underwing stores.
Owing to the overall troubles with the build of this kit, I had long ago given up on having props that would be movable. I just wanted a 1/48 F-82G that looked decent on the shelf.
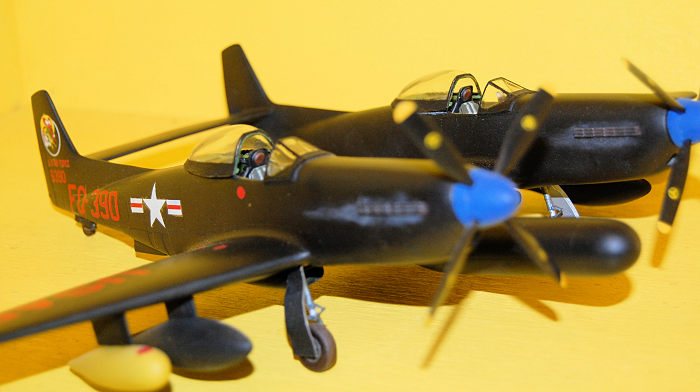
The spinners and propeller hubs were fairly well molded and cleaned up easily. There was, again, a lot of flash on the in individual propeller blades and the same care has to be taken in cleaning this up, as it is very easy to start cutting away at the actual parts. I painted the spinners and hubs in Testors Cobalt Blue to match the aircraft that I was building. The propeller blades were also painted flat black with the standard yellow tips.
When all of this was dry, I tested the fit of the propeller blades to the hub and found that if attached as the kit instructions showed, they would look too short and sit at a weird looking pitch. This was simple enough to correct, I moved them outboard by about 2-3mm and set them at a more reasonable looking pitch before gluing them in place. The spinners were then fitted and I had a decent looking set of propellers.
The landing gear and wheels were probably the best part of the kit. They were not good, but they were not especially bad. The gear required the same careful trimming as there was flash and noticeable mold lines. The wheels looked reasonably correct and presented no problems other than some simple sanding. The gear was painted in Tetsors Aluminum with the telescoping section painted in Testors Chrome. The tires were painted in Testors Rubber and the hubs in Testors Dark Anodonic Grey.
The underwing fuel tanks looked to be the wrong size and shape for those I saw photos of on F-82G’s. I opted for a set from a 1/48 Monogram P-61 instead. I believe that the larger kit tanks included are actually those for the release of the kit as a P-82B that made the record setting flight in 1947 and appropriate for that aircraft. There were two smaller tanks that looked appropriate for napalm tanks and these were used. The fuel tanks were painted flat black. (Photos of F-82’s in Korea show them with both natural metal and black tanks, so either is correct.) The napalm tanks were painted in Testors Yellow Chromate, as napalm tanks were often seen like this and it added splash of color to an otherwise very dark model.
 With this done, the landing gear and props were
attached to the model and glued in place securely. The exhaust stubs we painted
in Testors Rust and given some dry bushing with Testors Model Master Burnt Iron.
Now it was time for the decals.
With this done, the landing gear and props were
attached to the model and glued in place securely. The exhaust stubs we painted
in Testors Rust and given some dry bushing with Testors Model Master Burnt Iron.
Now it was time for the decals.
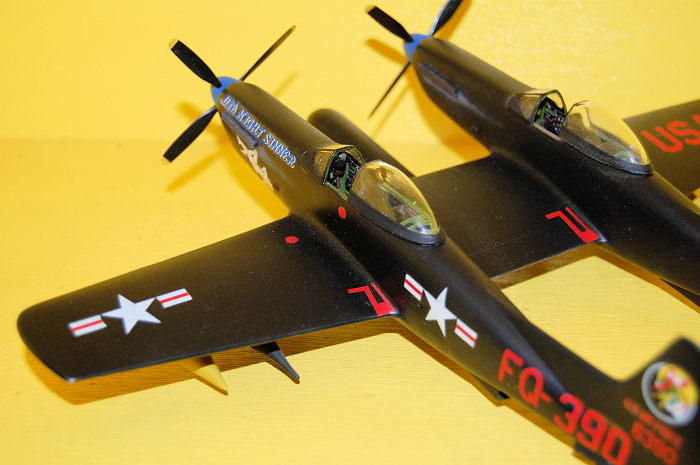
The kit decals had looked decent enough when the kit was purchased. However, several years of storage in the stash had not aged them well. This is not a problem that I often encounter and I attribute it more to the poor initial quality of the decals themselves. Fortunately, Print Scale had released sheet 48-064 which included the markings for the aircraft that I wanted to build “Midnight Sinner” as shown in the kit box art with a striking pin up painted on the nose of the port side fuselage.
After giving the model a coat of Testors spray Gloss, I applied the decals with relative ease. Due to the flat black finish, even with the gloss, there was some silvering to deal with and Solvaset helped a great deal. The Print Scale decals are quite good, though and I have never had any real problems with them.
Once they had dried and set properly, I give the model another coat of gloss to try and mute any residual silvering. This was followed with a coat of Testors Lusterless (Flat). After this had dried and cured overnight some drybrusing was with a mixture of Model Master Anodonic Grey and Testors Flat grey to simulate the exhaust staining and muzzle blast from the machine guns. Some other weathering was done in typical areas, such as where the crew would board the aircraft and so on. The propellers were given some dry brushing with Testors Aluminum to show some typical wear and tear.
The underwing fuel and napalm tanks went on without any problems. Only the canopy remained to be fitted. The sliding canopy was posed open and I had no problems with fitting it. The same cannot be said for the windscreens. I tacked them in place with G-S Hypo Watch Crystal cement and addressed the nasty gaps by filling them over several hours with Elmer’s Glue applied with a toothpick, touching it up with flat black once this was dry. I then covered the clear parts and gave it a light dusting coat of the Testors Flat spray to even out the finish there.
| CONCLUSIONS |
This is not a model kit that I would recommend for anybody, save the criminally insane or those who wish to become so. When first released, I had high hopes for building it to a high standard and turning it into a showpiece. However, the quality of the kit, or lack thereof, almost precludes this, unless you are among the most patient, determined, and skilled modelers. In all honesty, in a lifetime of modeling dating back to 1972 when I was five, I have never encountered a less buildable kit. That being said, I have seen a couple of very nicely done kits on the Internet, and my hat is off to the modelers who managed such fine results. I have also read a few nightmare stories about it as well and seen some that did not turn out so well.
I built it and I have an F-82G on the shelf that looks decent enough, which is something that I have wanted for a long time. That is about all that I can say in favor of it. There is basically nothing that could ever induce me to attempt to build another one of these kits in any form. I never expected it to be a show winner once I got deep into the build and saw just how bad it was. However, I have shown it several times and it generates a lot of interest just to see one of these built. From what other modelers have told me they have as often as not either abandoned this kit or thrown it in the trash outright.
The problem that I encountered with the horizontal stabilizer would seem to be endemic to the kit rather than anything erroneous that I did. The only other example that I have personally seen completed was an earlier variant in natural metal (that alone is an impressive achievement with this model!) that I saw displayed at the 2019 Nationals in Chattanooga, Tennessee. I did not get to speak with the modeler who built it, but I noticed the same slight bow in the stabilizer indicating that he had doubtless had the same trouble and arrived at a similar solution.
The good news is that all hope is not lost for one wanting to add a 1/48 F-82 to their collection. Modelsvit has announced an F-82 in 1/48 to be released this year. If their P-51H kit is to be considered as an example, it should be a rather nice kit. Let us hope that Modelsvit offers it in several variants of this somewhat odd bird.
However, if you cannot wait for a new mold kit and want to tackle one of these older Modelcraft kits, be prepared. It is going to take a tremendous amount of patience and preferably some aftermarket or parts box substitutes. It will not be a quick build. I did not track my time on this build, but I would estimate it to be over sixty hours at least, based on the number of sessions that I spent working on it.
I often look at an older or substandard kit as a challenge and enjoy seeing what I can do with it. There was little of that in this build, though, as it was mostly an exercise in frustration at every turn. In the end, I just wanted to get it over with and it was only my desire for this unique aircraft in 1/48 in my Korean War collection that allowed me to forge through it to the end. As the saying has it: to each his own. For modelers up for a real challenge, I offer you my best wishes that you may be able to finish this kit to a higher standard than I did and with less trouble.
| REFERENCES |
Squadron Signal F-82 Twin Mustang Mini in Action Number 8 by Larry Davis, 1996 Squadron/Signal Publications, Inc.
Squadron Signal Fighting Colors P-51 Mustang in Color by Larry Davis, 1982 Squadron/Signal Productions, Inc.
Images of War Twin Mustang: The North American F-82 At War by Alan C. Carey, 2014 Pen & Sword Books Ltd.
Scale Modeler Vol. 9, No 4 April, 1974
Squadron Signal P-51 Mustang in Action No.45 by Larry Davis 1984 Squadron/Signal Publications, Inc.
If you would like your product reviewed fairly and fairly quickly, please contact the editor or see other details in the Note to Contributors.
Back to the Main Page Back to the Review Index Page Back to the Previews Index Page