
Monogram 1/48 P-80A Shooting Star
| KIT #: | 5428 |
| PRICE: | $5.00 from a show vendor |
| DECALS: | Two options |
| REVIEWER: | Christopher Campbell |
| NOTES: | Still the best in this scale. |
| HISTORY |
The Lockheed P-80/F-80 Shooting Star has an interesting history. Lockheed was very much on the cutting edge of aviation both before and during World War II, as well as well into the Cold War and modern eras. As far back as 1939, the legendary Kelly Johnson, along with Willis Hawkins and Hal Hibbard proposed a jet design designated the Lockheed L-133.
This was a very futuristic looking, canard design that still looks modern today and almost stealthy. Proposed as a twin jet aircraft powered by Lockheed L-1000 axial flow turbojets, it was beyond state of the art. It bordered on science fiction. Even so, from some perspectives, it came tantalizingly close, yet so far from happening.
The Army Air Force considered the proposal, though it seemed to radical and advanced a design to pursue seriously. Still, Lockheed had the Fork Tailed Devil itself: the P-38 Lightning. Even as a twin piston engine design, it was cutting edge and when flown correctly could hold its own with the best single engine aircraft of the day and became the epitome of the heavy fighter concept that all others only hoped to emulate.
The Army Air Force wanted a jet fighter, to be certain, though of a simpler design. Bell submitted their P-59 Airacomet, a twin jet design with engines blended into the fuselage. This looked promising. However, testing soon showed that its performance was no better than existing convention designs.
Lockheed’s P-80 proposal was still a simple, straight wing design with a single centrifugal flow jet. Rendered from drawing board to metal in only 143 days, it was initially powered by a Halford H-1 engine slated for the De Havilland Vampire. After a few stumbles, including the air intakes collapsing and being sucked into the engine upon being run up to full throttle, the first prototype dubbed both Lulu-Belle and the Green Hornet took to the air in January of 1944. It would exceed 500 mph. in level flight and paved the way for an improved XP-80A to follow.
This was a larger and heavier aircraft powered by what would eventually become the Allison J-33, though at this time was the General Electric I-40. The development program would prove to be a steep learning curve for pilots accustomed to piston-engine aircraft, and costly at times. Multiple very experienced pilots were injured or killed. Most notable was the American ace of aces, Richard I. Bong, who crashed fatally in August of 1945 upon take off. Tragically, this may have been dure to an error in not switching on a backup fuel pump, effectively resulting in a flameout.
 Things had
gone to far to abandon the project, though. Experienced pilots were brought on
to wring out the aircraft, find, and fix its faults. Among them was legendary
ace and test pilot Chuck Yeager. Even as things were still being worked out, the
aircraft had entered service in limited numbers in late 1944.
Things had
gone to far to abandon the project, though. Experienced pilots were brought on
to wring out the aircraft, find, and fix its faults. Among them was legendary
ace and test pilot Chuck Yeager. Even as things were still being worked out, the
aircraft had entered service in limited numbers in late 1944.
Four of these pre-production aircraft were sent to Europe in 1945. Two would be sent to Italy where they would see service in a reconnaissance role prior to the end. There would be no actual combat for the P-80 prior to the end of hostilities. Still, the Shooting Star was beginning to show its potential.
In February of 1945, an order was let for more than three hundred aircraft. By the end of hostilities, more than eighty had been delivered to Muroc Army Airfield, later to known as Edwards Air Force Base. While not quite a world beater, the P-80 was proving itself. While evaluations of it versus captured exampled of the Messerschmitt Me.262 showed it to be in some ways inferior to the German fighter, it was laying the groundwork for a better version and more, improved, U.S. jets to come.
In June of 1947, Col. Albert Boyd set a world air speed record in a modified P-80B of 623 mph. Previously, a nonstop, transcontinental jet flight had been completed by Col. William Council had been completed at an average speed of 584 mph. Naval variants were tested beginning in 1945, though none formally adopted. Still, the U.S. Navy would acquire fifty early F-80C variants, designated TO-1, to be used for transition training for the forthcoming purely naval designs from Grumman and McDonnell in the form of the F9F Panther and F2H Banshee.
The F-80C would be the definitive production version. It would be blooded in combat in the Korean war and would serve throughout that bitter, brutal conflict. It would become the first jet to be shot down in air to air combat by another when Lieutenant Semyon F. Khominich downed one in 1950. One week later, U.S.A.F. Lt. Russell J. Brown would claim a MiG-15 in air to air combat, though this claim has since been called into question as is disrupted.
Soon the more advanced and capable F-86 Sabre Jet would soon supplant it in the air superiority role in that theater. The F-80 would spend much of the war operating in the strike role. It would also sometimes serve in a reconnaissance role, as well as forward air control. Even if already outdated as a fighter, its contributions during the Korean War cannot be understated.
It was finally retired from U.S Air Force and Air Guard service in 1959. It would also give birth to the two-seat T-33 jet trainer, also designated Shooting Star, though sometimes colloquially called T-Bird. This, in turn would, would also give birth to the two-seat F-94 Starfire, the first dedicated, jet powered night fighter, some of which would see action in Korea and go on in U.S. service until 1959.
In the trainer guise, it would serve with numerous air forces worldwide as a primary jet trainer. This included the U.S Navy TV-2 version and later, carrier capable T2V SeaStar. (I personally saw this variant still in service at Pensacola in the 1970’s when I was a boy on my first pilgrimage to the Museum of Naval Aviation.) The final U.S. service examples were NT-33’s, retired by the Tactical Air Command in 1997. However, the last T-33’s in service would soldier on in Bolivia until 2017, sixty-nine years after the first one rolled off the Lockheed production line. That is quite an impressive career.
After passing from U.S. Air Force service, the Lockheed P-80 would go on to serve with the air forced of Brazil, Chile, Columbia, Ecuador, Peru, and Uruguay. Many of these would sport T-33 style wingtip fuel tanks, offering improved range. All but Columbia and Ecuador would operate them into the 1970’s, with Chile being the last to retire their aircraft in 1974. While quickly surpassed by more modern designs, there is no denying that the P-80 left an indelible mark in history. T-33’s can still be seen flying at air shows today. Let us hope that they continue to grace the skies for many years come.
| THE KIT |
As noted by frequent contributor Tom Cleaver, there have been newer kits of the Lockheed F-80 Shooting Star in this scale, though none have equaled Monogram’s offering from 1977. This one is still the most accurate with the best shape. It has some fit issues here and there, though nothing that any modeler with a little experience cannot handle.
Originally molded in silver plastic, newer releases my be found in the grey that is becoming somewhat standard. The older silver plastic tends to be a little harder, though rarely what I would call actually brittle. Having built kits of both types over the years, I have never noted significant issues or differences in in either.
While the Shooting Star was operated by multiple South American air forces, I do not recall ever seeing a kit offered with anything other than U.S.A.F. markings in one form or another. That is what you will find in the any boxing of this kit. Older kits will have those somewhat horrific Monogram decals that resemble something that would happen decal film and mylar had a baby. They look nice enough on the sheet, though do not conform or stick well.
 This kit was
released a number of times over the years by Monogram, and like some of their
kits was even boxed and released by Hasegawa at one point. Revell presumably
still retains the molds, though it has not been reissued in this century.
This kit was
released a number of times over the years by Monogram, and like some of their
kits was even boxed and released by Hasegawa at one point. Revell presumably
still retains the molds, though it has not been reissued in this century.
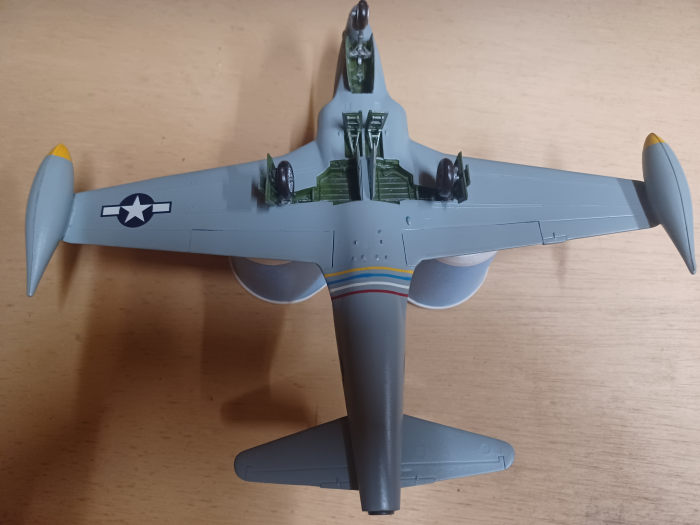
Out of the box you get a good, basic kit, which includes a reasonably accurate engine than can be displayed with the tail section removed. Both standard and Misawa tanks are offered along bombs or napalm tanks. Like most Monogram kits of this period and later, the cockpit may not be 100%, but it provides a decent representation of what the real thing looks like. There is also a gun bay door that can be positioned open, if desired, to show off a trio of .50 caliber machine guns on the left side. Speed brakes can be positioned opened or closed.
Overall, this is a very buildable older kit, and part of what I consider the dawn of Monogram entering its modern era that really helped to put 1/48 scale kits on the map as serious kits. Sure, 1/48 had been around practically since the beginning. However, most of those kits were toylike with gimmicky working parts and starkly lacking in detail, including many of Monogram’s earlier offerings.
From my perspective, this dawning of Monogram’s 1/48 “super kits,” as such, began with their P-61 Black Widow three years earlier, which was highly detailed for its day. Then came their B-17G, B-24J, B-25H, B-26, as well as their F-86F, MiG-15, and of course, this kit, the F-80. A plethora of Cold War and modern jets were soon to come, as well as more World War II aircraft. All of these were essentially state of the art for their day and offered a level of detail never before seen in most 1/48 scale kits. Sure, many have been surpassed by more modern releases, though many have stood the test of time well.
The kit as it comes out of the box is an F-80C, and as such, it is pretty accurate, even if not up to par fit wise with more modern shake the box and it falls together kits. It has what I like to see in any kit, what I often refer to as good bones to work with and can be built up into a fine representation of the aircraft with a little work. This is a somewhat older build of mine, dating to around 2001, though it has held up nicely. I made a couple of errors that still need to be corrected and probably will be, as they nag at me now that I am aware of them.
| CONSTRUCTION |
My fascination with P/F-80 dates to around 1977 or 1978. I was home from school with a stomach bug and tuned in WTCG, now known as TBS. There I found a film called Air Cadet from 1951 featuring a young Rock Hudson along with Stephen McNally Gairl Russell, Alex Nicol. It also has very extensive footage of the early P-80/F-80 Shooting Star. I had some general knowledge of the Lockheed F-80 up until that time. This was the first time that I had seen footage of these early jets in flight. I was hooked immediately.
Sure, they were rapidly superseded by superior designs, even some variants of the Gloster Meteor that had flown before it. Yet, there was some undeniable purity of this early jet machine that I have never been able to shake. I have always loved the F-80, or as I often thing of it, the P-80, from those transitional years when the U.S. Air Force was not yet its own service.
My father, Billie Campbell, who served twelve years in the U.S. Air Force, and a few more in the Alabama Air National Guard, noted how he had seen one at the Birmingham Airshow in 1946 or 1947. It was painted dove grey, he recalled, and was the fastest thing that he had ever seen. For a boy of eleven, as he was then, it truly must have been like something from Rocketeer comics come to life. This was the future, alive and screaming through the heavens for him to behold; science fiction come to life. I can imagine what it must have been like. Yet, oh, to have been there and seen it for myself! That kind of thrill is something that I can only imagine.
Like myself, most reading this have seen jets all of their life. Try and put yourself in my father’s shoes, though. He was a boy from very rural Blount County, Alabama, where the nearest town was a small place called Hayden. There the first school that attended had two rooms.
He had dreamed of airplanes and working on them. (He told me as much in his waning years.) Then he saw this machine streak through the skies like a manmade meteor! What a true thrill that must have been. Even as we look at vintage jet machines at airshows today, it can never compare to what he saw and felt on that day, not all so long ago in the scope of things. As he noted, it seemed like the fastest thing in the world when it at flown over, which it very nearly was.
I started the kit with the cockpit, as usual. Unfortunately, I made a mistake right off the bat and used the kit ejection seat, correct for an F-80C, though not for an early A model which had a conventional seat. I have since obtained a correct resin seat yet have not quite been able to bring myself to try and pop the old on out and retrofit it appropriately for fear of damaging the model. I should and probably will, eventually.
The rest of the cockpit, to my later reading, is more or less as it should be. I painted it in Model Master Interior Green with the instrument and switch panels painted in Testors Flat black and drybrushed with Testors Silver to bring out details. Various switches and details were picked out with red or yellow using a toothpick or fine brush as deemed appropriate. Everything was then given a light oil wash.
The gun bay can be displayed open, and I might do this on a F-80 sometime. However, I always thought that the Shooting Star had such lovely lines that I did not want to ruin them by posing the access door open. This was glued in place with CA glue and sanded with some 400 grit until it looked right enough to me.
Weight is definitely needed in the nose so that it sits correctly on its landing gear. I added a few small fishing sinkers to the nose and glued them in place as far forward as possible. The nose gear bay and the cockpit were then glued in place with thick CA glue along with the intake splitters. Then the fuselage was sealed up with more of the same. I found it to have a very clean fit and only some minor sanding to smooth out the seam was needed.
 The after
fuselage is a separate piece that comes with a nice cart so that it can be
displayed detached from the aircraft. This allows showing off what was, for its
time, a nicely detailed engine and exhaust assembly. This can still be built up
quite nicely in this fashion with a little old fashioned scratchbuilding work to
add a few details to the engine.
The after
fuselage is a separate piece that comes with a nice cart so that it can be
displayed detached from the aircraft. This allows showing off what was, for its
time, a nicely detailed engine and exhaust assembly. This can still be built up
quite nicely in this fashion with a little old fashioned scratchbuilding work to
add a few details to the engine.
This was not the route I wanted to go, though. As mentioned before, I wanted to display the P-80A in all of its beauty, ready to take to the air, as it would be. Thus, the aft fuselage was prepared with a section of the tail pipe being fitted and blanked off plastic card at the innermost point. The exhaust, its interior, and the surrounding interior of the after fuselage was painted in Model Master Jet Exhaust prior to assembly. Everything was then glued up with CA glue. This again proved to be a good fit, with only minor sanding needed with 400 grit paper.
Once this was completed the wings were assembled. The kit comes with flaps that can be positioned up or down. Again, wanting a clean looking aircraft, I elected to position them up. All of the wing seams again only requiring minor cleanup.
The wings were then fitted to the forward fuselage with gap filling CA glue. This included some minor gapping at the upper wing joint that was filled with more of the same. This was then set aside to dry while my attention went elsewhere.
The wingtip tanks were glued up and fit very nicely with only some light sanding required. At this point I went about cleaning up the landing gear and painting them in Testors Steel. The tires were painted in Testors Rubber and the wheels themselves also in Testors Steel. Once they had dried the gear was assembled and set aside. Now it was time to get back to the main assembly.
The wing joint was first addressed, being sanded down with 320 & 400 grit paper, with some minor pitting in the seam touched up with some thin CA glue and buffed out until it was a clean, smooth join. The after fuselage was then glued in place, again using thick CA glue. This showed some minor gapping and a somewhat imperfect fit, though nothing that could not be addressed in the same manner of the wing joint.
Finally, the horizontal stabilizers were glued in place and fit nicely. Only some very minor sanding was required here. All of the seams were then buffed out with 0000 steel wool and any minor pits in the seams were filled with thin CA glue applied with a toothpick followed by some final finish sanding and buffing. Now it was time to paint.
| COLORS & MARKINGS |
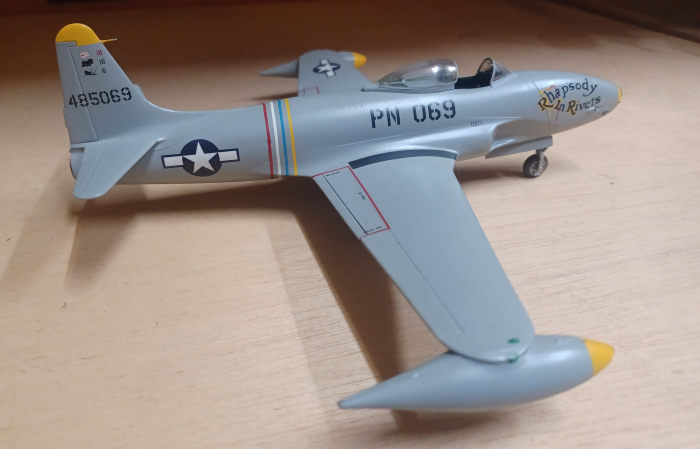
First the tip of the nose, the tail, and the wing tanks were painted in Testors Flat Yellow and set aside while I looked in to the correct color for the grey. References indicated that this was FS 36622, which was Model Master Camouflage Grey. I tested some of this and decided it was slightly darker then I liked and added a splash of Flat White to it until it showed the tone that I liked.
The landing gear and speed brake bays were sprayed in Model Master Chromate Green. Once dry, the yellow areas were masked off and the bays were stuffed with bits of moist paper towels. A handle of sorts was made from a piece of wooden dowel wrapped in some blue masking tape until it fit snugly enough in the exhaust pipe to enable it to be handled with one hand while spraying it with the other.
The model was then given several coats of my roll your own pearl/ghost grey with a Pasche airbrush. Once this was completed, I clamped the dowl in a bench vice at a 45-ish degree angle and left it there to dry for a couple of days.
 The masks
and paper towels were removed. Then the gear bays and speed brake wells were
given some dry brushing in Testors Silver. I did not use any wash to simulate
any significant weathering, as this was in many respects a factory fresh
aircraft. It was then given a coat of Future and left for another day to cure.
The masks
and paper towels were removed. Then the gear bays and speed brake wells were
given some dry brushing in Testors Silver. I did not use any wash to simulate
any significant weathering, as this was in many respects a factory fresh
aircraft. It was then given a coat of Future and left for another day to cure.
Microscale/Superscale released two rather nice decal sheets for these early P-80A’s ‘back in the day” as some say. One was sheet 48-035, which including markings for “Rhapsody in Rivets” of the 94th. F.S. The other was sheet 48-107, featuring decals for the well known “Minimum Goose” and “Maximum Goose.” I had a bit of trouble choosing, though ultimately opted for “Rhapsody in Rivets” as it was the most colorful.
I have quite an extensive stash of decals stored in a file cabinet, some of which are decades old, as do many of us. I must say that I find the older Microscale/Superscale sheets seem to “age” better than some newer offerings from other manufacturers do. These were bought in the late 1980’s, or at latest, 1992. So, they were at least a decade old when I used them and went on with no problems whatsoever.
MicroSet was used for setting fluid, as this was still my fluid of choice at the time. The only tricky part was set of quadruple multicolor bands on the aft fuselage. This requires quite a bit of patience and care in handling, as it must conform to multiple complex angles and curves in the trailing wing root. Ultimately, I still had some very minor alignment issues where the two sides connect near the centerline of the ventral fuselage. I was content enough with what I had though, deciding to stop monkeying with it while I was ahead. A close as it was, botching it was the last thing that I wanted to do.
Once they had cured thoroughly, I have the whole thing another shot of Future and set it aside to dry again. This my first, or one of the first times successfully using Future as a gloss coat. (My first was on a PR Spitfire where I learned my lesson the hard way by spraying it on too heavy, though thankfully before any decaling was done.) Once dry, it was really starting to look like one of those sleek, pale grey machines that I had admired in photos so many times.
| FINAL CONSTRUCTION |
The landing gear was first glued into place using thick CA glue, following by the gear bay doors and extenders, the latter painted in Testors Aluminum, using regular CA. The gear mounted landing gear light was omitted, as the P-80A did not have this, though that resulted in another error to be corrected later.
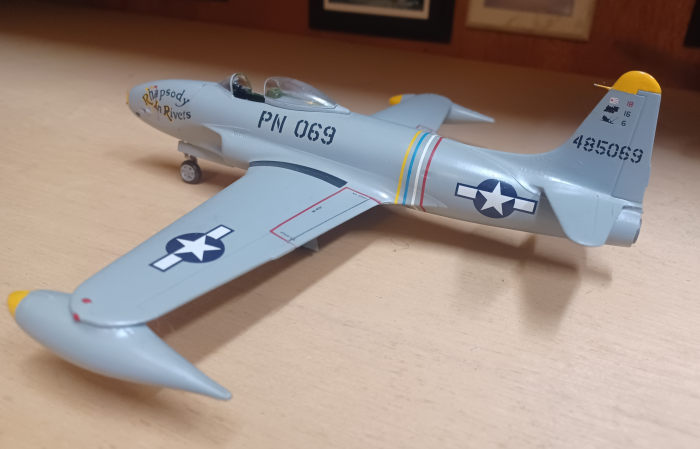
The pitot tube on these early P-80A’s was near the top of the vertical tail. This was created with a thin piece of music wire glued into a small hole drilled with a fine bit in a pin-vise. This was glued in place with a drop of CA and painted Testors Flat Yellow, then tipped in Model Master Chrome Silver.
The canopy framing was painted hand painted in the same grey used on the aircraft and glued in place with old fashioned Testors Tube glue. Here I now see that I made another error that I need to correct, as there is some small gapping on the forward windscreen. Lastly, the wingtip tanks were glued in place. Then the running lights were picked out in Testors Gloss Green and Gloss Red. The final bit was to paint the protruding gun barrels in the nose with some Testors Gunmetal. Or, at least, so I thought.
 Only as I was
looking at the completed aircraft did I now notice a glaring error. I had
omitted cutting out a space for and adding the landing light lens originally
fitted to the nose. What to do? It was such an obvious error that I simply could
not let it pass. I had to correct it. That would be quite tricky at this stage,
though.
Only as I was
looking at the completed aircraft did I now notice a glaring error. I had
omitted cutting out a space for and adding the landing light lens originally
fitted to the nose. What to do? It was such an obvious error that I simply could
not let it pass. I had to correct it. That would be quite tricky at this stage,
though.
First, I found something in the clear parts drawer of my spares bin that looked just about right. I trimmed it slightly until it seemed to be more or less the right shape and curve, then polished it up with 1000 grit followed by dryer sheet. This was followed by some very judicious cutting and shaving on the spot where it would be affixed with a sharp #11 X-acto blade.
When it seemed to fit as well as could be expected, I painted the flat of the surface with some Model Master Chrome Silver. Then I glued my landing light lens in place with a small amount of CA glue. It was not a perfect as I would have liked, though it looked far better than if I had left it as it was. I will probably address this some when I correct the windscreen gap and the seat issue.
Still, goofs aside, I had nice looking P-80A at last. This was something that I had wanted to build for around twenty-five years and I was happy enough with the results. Was it perfect? No. Still it is a very attractive model of a very attractive aircraft.
| CONCLUSIONS |
As noted, the Monogram F-80 kit has its issues, mainly dating from the period in which the molds were created. It can easily be built into a fine representation of a beautiful aircraft. Had I built this just a few years later, I would have done a better job. Now, upon writing this, I will probably suck it up and set about correcting my goofs.
As noted before, there have been newer 1/48 F-80 releases, though none capture the shape of the F-80 quite as well. While they might be easier to build, they will not look as accurate. I would recommend the Monogram F-80 to any modeler who is not afraid of a little work. It can also easily be converted to an earlier P-80A if one thinks it out a little better than I did at the time. With the addition of T-33 style wing tanks gleaned from a Hawk/Testors or Academy kit, one could easily build this into one of myriad South American versions, which I may at some point (probably Chile). I will doubtless do one more P-80A conversion, probably as “Maximum Goose.” I also have an XP-80 conversion in the works from, of all things, an original mold Lindberg F-80 that came to me as a basket case build up. That is a story for another time, though.
I would recommend this kit to any modeler who wants a Shooting Star in 1/48. It is not perfect, though it is hardly any worse than some of the quasi-mass produced, essentially short run kits of any subject that you might care to name. As always, first and foremost, have fun and be happy with what you build.
| REFERENCES |
Scale Aviation Modeler magazine, Volume 10, Issue 5, SAM productions, 2004
Lockheed P-80/F-80 Shooting Star by David R. McLaren, Schiffer Military History Book, 1996
P/F-80 Shooting Star in Action No.213 by Larry Davis, Squadron Signal Publications, 2008
P-80 Shooting Star, T-33/F-94 in Action No.40by Larry Davis, Squadron Signal Publications, 1980
https://en.wikipedia.org/wiki/Lockheed_P-80_Shooting_Star
https://en.wikipedia.org/wiki/Lockheed_L-133
Christopher Campbell
10 October 2024
Copyright ModelingMadness.com. All rights reserved. No reproduction in part or in whole without express permission.
If you would like your product reviewed fairly and fairly quickly, please contact the editor or see other details in the Note to Contributors.