Revell 1/111 XB-47 Stratojet
| KIT #: | H-206 |
| PRICE: | Free from Uncle Richard |
| DECALS: | One option |
| REVIEWER: | Christopher Campbell |
| NOTES: | Another Blast from the Past and fun trip back to the Cold War |
| HISTORY |
In 1943, while jet aviation was still in its infancy, the United States Army Air Force proposed a requirement for a jet propelled bomber. Even before the formal proposal was fielded the following year, Boeing went to work on designs. Ultimately, prototypes would be ordered from Boeing, Convair, Martin and North American.
Convair and North American designed four-engine aircraft while Martin and Boeing submitted six-engine designs. The former were orthodox straight win designs, while the later were quite radical for their day, each in its own way. Despite being a beautiful, sleek design for a straight wing jet bomber, it ultimately lost out to the North American XB-45 that would go on to be produced as the first American jet bomber, serving from 1948 to 1959. It was quickly overshadowed by newer designs but proved to be a most efficient reconnaissance platform, seeing action in direct overflights over Soviet airspace and in combat in Korea.
The Martin design was also straight wing but featured six jet engines in three closely mounted angular pods on either wing, giving it a downright bizarre look. Its landing gear was of bicycle configuration with wing outriggers. Still, it was a dated design when it first flew. Boeing, on the other hand, had clearly designed a true world beater.
It featured long, gracefully swept wings at a 35 degree angle. The pilot and co-pilot/gunner sat beneath a fighter type sliding bubble canopy while the navigator/bombardier had a compartment in the nose. It was equipped with radar for true all weather operation and could carry a variety of nuclear and conventional weapons. Defensive armament was in the form of a remote control turret in the tail mounting twin 20mm cannon.
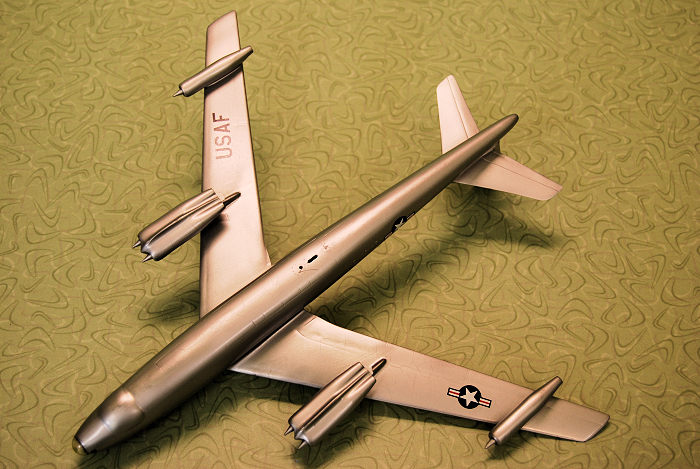
Powered by six General Electric J-47 engines, it was the fastest, highest flying bomber of its day. These were mounted in pairs on an inboard pylon beneath the wings and a single engine in and outboard pod flush with the wing. Like the Martin design, it featured bicycle landing gear with outriggers in the dual engine pods.
Its cruise speed exceeded five-hundred-fifty miles per hour with a top speed just over six hundred. A service ceiling of just over forty-thousand feet put it out of reach of many fighters, including jets. It was also capable of maneuvers most bombers could not dream of performing. One bomb approach for releasing nuclear weapons was to put the aircraft into an Immelmann turn, lobbing the nuke at its target from its zenith in order to allow the Stratojet to safely clear the blast. With in flight refueling, it had global reach and was the cutting edge of the Strategic Air Command until its big brother the B-52 would begin to supplant it.
It was, to my knowledge, the first aircraft to be equipped with R.A.T.O. ports built into the fuselage to reduce takeoff run, boost takeoff time, and conserve valuable fuel for its thirsty jets. This gave its after fuselage a very distinct “cheese grater” look and their use has been captured in some very iconic photos.
More than two thousand would be built with the majority of production being the B-47E variant, which dispensed with the windows in the nose compartment and incorporated multiple improvements over the early B variant. There were various experimental versions tested, including one with turboprops on the inboard pylons, a tanker variant, and even a missile equipped variant testing the Rascal air launched cruise missile that would help pave the way for the Hound Dog that would be fielded on the B-52. Reconnaissance, electronics, weather, and training variants were all built or converted from existing airframes.
 It was in
front line service as a nuclear deterrent bomber and in the air constantly
somewhere through 1969, usually with nuclear weapons aboard. There were a few
incidents involving these having to be jettisoned or lost with the aircraft, two
of which have never been located or recovered.
It was in
front line service as a nuclear deterrent bomber and in the air constantly
somewhere through 1969, usually with nuclear weapons aboard. There were a few
incidents involving these having to be jettisoned or lost with the aircraft, two
of which have never been located or recovered.
Due to the high performance of the aircraft and being at the cutting edge of the technology of its day, there were inevitable losses. To call it a widow maker is somewhat unfair. However, two-hundred-three aircraft were lost over its career, most in accidents, though a few in combat during reconnaissance flights. Out of these losses, more than four hundred aircrew were killed. When one looks at loss numbers and fatalities of many aircraft of this era, these numbers start to look fairly normal. F-100’s suffered a staggering 40% loss rate compared to 10% for the B-47. F-104 losses were even higher, also exceeding 40% in some air forces.
The B-47 may have found its true calling as reconnaissance platform. Fitted with a special three-man pod in the bomb bay and plethora of cameras and electronic sensors, several variants were produced. Increased fuel capacity, as well as jammers, chaff and flare dispensers improved its ability to enter hostile airspace, though not with impunity. RB-47E’s were engaged by Soviet MiG’s on more than one occasion with several losses occurring. The RB-47H would be the ultimate development of this version as well as the ELINT variant EB-47E’s would serve into the 1970’s.
During the Vietnam War the B-47 was considered for service as a conventional bomber. Ultimately, the improved systems, in particular the countermeasures systems of the B-52 were deemed to be superior and the B-47 never saw combat in its intended role. A very unusual proposal was considered in which a minigun or Vulcan cannon would be mounted in the bomb bay on a flexible, remote-controlled mount, allowing the B-47 to be used as a gunship alongside AC-47’s, AC-119’s, and AC-130’s. With modern, precision targeting as was already being developed on the AC-119 and AC-130 of this era, this might have made for one wicked gunship. This never progressed beyond a proposal, however, though some illustrations of the proposed aircraft can still be found in some sources.
It also found use as a testbed for various engines and avionics. One was even loaned to Canada where it would be used to test the Orenda Iroquois engine being developed for the cancelled Avro CF-105 Arrow interceptor. Two were given to the United States Navy on indefinite loan where they were used to develop and test ECM systems. One of these made the final flight of B-47 in 1977.
Thus ended the career of magnificent and beautiful Boeing B-47 Stratojet. It was an extraordinary aircraft and had an extraordinary career that spanned nearly three decades. While we will never again see one in the air, twenty-three are preserved in museums across the United States. Today, whenever I visit a museum where one is on display, it is one of, if not the first aircraft I am drawn to marvel at its clean lines purity of function given form. It is the Cadillac of jet bombers of its era, and just as stylish and sleek.
| THE KIT |
 Revell’s
B-47 Stratojet was first released in 1954 as the aircraft was first entering
service. It is a fit the box scale kit at 1/111, and basically represents the
prototype or a very early A model with the windows in the nose for the
navigator/bombardier and no tail armament. It has been through numerous releases
since that time, though fell into “mold hibernation” after 1970 and was not
released again until 2006.
Revell’s
B-47 Stratojet was first released in 1954 as the aircraft was first entering
service. It is a fit the box scale kit at 1/111, and basically represents the
prototype or a very early A model with the windows in the nose for the
navigator/bombardier and no tail armament. It has been through numerous releases
since that time, though fell into “mold hibernation” after 1970 and was not
released again until 2006.
The kit features both raised and recessed panel lines and had decal locators (ugh!!). The raised panel lines are overdone and have to be toned down or removed outright. The wing assembly is a little odd, featuring upper wing central panels rather than true upper and lower wing halves. There are two shaped stubs to represent the pilot and co-pilot beneath the clear canopy. A solid nose piece is featured, as is correct for service models, though mine would be replaced with a clear piece to represent the XB-47 prototype.
It has no tail turret, or stinger, which was present on all production models from the B variant on, and even some prototypes. There are no wing tanks, as were common on most service models. This leaves one with the limited options of building a prototype or a very early service model, or one of the very few WB-47’s, if one builds mostly out of the box.
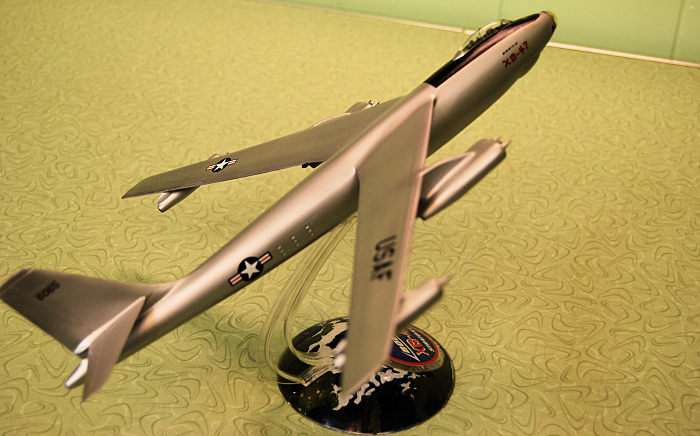
Additionally, there are no landing gear. This is an inflight only model. This is typical of many kits of this era, though. Still, the B-47 looks quite dramatic in flight with its swept wings and dynamic shape
My Uncle Richard, who is an avid modeler with the most impressive collection of Spitfires that I have ever seen, gave me this kit in Zipock bag with no instructions or decals, but complete. I know that he had an original 1961 release in the box, acquired from a yard sale in the 1970’s that I tried to get my hands on numerous times as in my near adolescent years, as I have always loved the looks of the B-47. (I also have a well-known fondness for the B-36 and watched “Strategic Air Command” every time that it was on WTBS in my childhood.) I am not certain if this was that same kit or another that he acquired at some point. While it had the same type of rudimentary stand molded in silver, rather than the well-known clear plastic “Revelling” stand, I tend to think that the example built here was a later release, possibly even from 1970. The molds seemed to be showing their age and it did not look as sharp and crisp as I recalled from the days when I all but drooled over that I looked at in the box. The plastic seemed almost degraded, to a degree, possibly having been stored where it incurred U.V. damage. Additionally, the boxed kit that he had included decals and instructions, and I cannot imagine that he would have discarded them. While I have not asked him specifically, it tends to lead me to think that it was not the same kit.
I will note that I have looked at the 2006 release, and while there were no changes to the details of the model itself, it looked to me as though it was a little more cleanly molded than the kit that I had. This leads me to believe that Revell did some general refurbishment to the molds prior to this most recent incarnation.
| CONSTRUCTION |
As mention, my uncle gave me this kit when I was visiting him around 2008 or so. When I decided to build this kit in early 2020, I had just completed the 1/72 Hasegawa B-47E. I have often, in my adult years, remarked that the B-47, along with the Vickers Valiant, were the sleekest, downright “sexiest” looking conventional jet bombers ever produced. Since I already had the kit, I was basically looking for an excuse to build it as well. I soon had one.
Due to the early style features of the kit, my options were somewhat limited unless I wanted to fabricate a tail stinger and modify it. During a slightly later visit to my Uncle Richard while I was still building the Hasegawa B-47, he showed me a vintage Aurora 1/180 scale B-47 kit that he had built up quite beautifully as the XB-47 prototype and I was inspired. This was the perfect subject to build with my bagged Revell kit.
I started this one by addressing the decal locators
and the rather odd, raised rectangle expressed on the fuselage surrounding the
where the aft fuselage RATO rocket ports are located. These definitely had to
go. I will admit that when I first began modeling in the 1970’s and I came
across 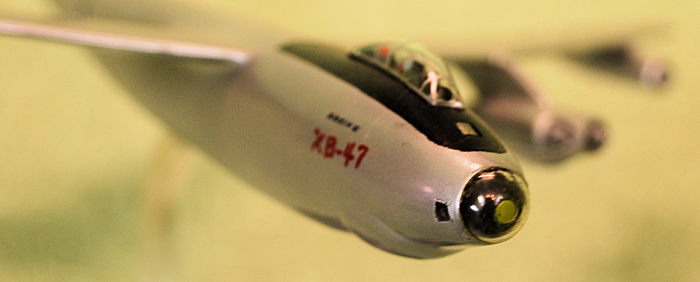 Revell,
Hawk, and Aurora kits that featured raised decal locators, I thought that this
was really cool. Of course, I was also around seven or eight years old. So,
factor that in before judging me. I’m certain I am not the only person reading
this who thought so as well during their formative years as a modeler.
Revell,
Hawk, and Aurora kits that featured raised decal locators, I thought that this
was really cool. Of course, I was also around seven or eight years old. So,
factor that in before judging me. I’m certain I am not the only person reading
this who thought so as well during their formative years as a modeler.
I attacked these and that weird rectangle in earnest with 220 grit sandpaper. This was followed by 320, 400, and eventually 0000 steel wool and ultimately polishing it with a dryer sheet until I was satisfied that they were utterly obliterated. With these removed, I could address actually building the model.
I started out by painting the interior of the nose in flat black. There was nothing to show through these windows in the nose, and I wanted nothing to show there, thus my choice. Once dry, the clear windows for the compartment were installed. Since there was no cockpit or interior to build, I then glued the fuselage halves together with thick, gap filling CA glue.
It was not a perfect fit. There seemed to be some mild warpage in the fuselage halves, though nothing, nor any gaps that could not addressed with more gap filling CA glue. Sanding was gone with 320 grit paper, followed by 0000 steel wool. I also fitted the tail cone at this point and treated it in much the same manner.
The wings were then assembled, and this was where I would start to have trouble. The fit of the upper wing panels left a great deal to be desired. There were, for the scale, some huge gaps to fill. This was again done with thick CA glue followed by several more filling and sanding sessions until it actually looked like a wing instead some cobbled together plastic mess. This proved to be the theme with much of the build.
After painting the insides of the engine pods black, they were assembled and required the same sort of filling and sanding in much the same manner. The fit was not all that bad. However, there were “steps” in some areas and gaps in others. It was nothing that could not be solved. It was not frustrating, as I somewhat expected it. It was, however, time consuming. (I spent almost as much time on this kit as on the 1/72 Hasegawa B-47, and that had landing gear and a real cockpit!)
Satisfied that the wings were as good as they were going to get, I decided to glue them in place on the fuselage. While there is a “positive location” slot for these in the fuselage, this proved to be the most severe fit problem in the kit.
Care has to be taken to fit the wings at a correct angle, at least with my kit. This was addressed on my build by attaching them with a hefty amount of thick, gap filling CA glue and then zapping with accelerator when I was satisfied with the angle. There was still gap a plenty, though.
I initially filled this with Squadron Green Putty smoothed out with a Q-tip soaked in nail polish remover. Once this had been sanded down there were imperfections clearly evident and these were sealed and filled with CA glue. Overall, it required several filling and sanding sessions until I was satisfied with the wing joint.
At this point, I turned my attention to the engine pods. None of these had what I would call optimum fit. There was a very noticeable step in the forward cap of the dual engine pod and there was a very significant seam on the single pods (one seemed to have been overtrimmed at some point, with what could only be described as a slice taken out of it along one of longitudinal edges). All of these areas were filled with CA glue and required more filling and sanding sessions until they were at least acceptable.
I was fearing how well the pods would fit on the wings, especially the dual inboard housings with their pylons. These were fitted to the pods themselves first, though there proved to be no significant issue there. This might have been the best fit that I encountered on this model. Subsequent fitting of both the inboard and outboard engine nacelles to the wings required only minimal filling with some CA glue and a light sanding to smooth them out.
Since the XB-47 was fitted with a clear nose cone rather than a solid nose, the kit nose cap would not be used. The mounting stub for this was sliced off with a heavy X-acto blade and everything was smoothed out with a file and some sanding. For the nose bubble, I searched through the clear parts drawer of my spares box, looking for anything that I thought might work. What I settled on, I think, was the astrogation dome from a 1/48 B-29. This fit with only a small amount of trimming and looked as though it would have the right look. Now it was time to paint my creation.
| COLORS & MARKINGS |
Painting this one was going to be simple, or so I thought. First, I sprayed the anti-glare panel area around the cockpit in Tamiya Flack Black and masked it off. That was where the fun ended.
 While
generally air brush everything, I have occasionally used spray cans generally
with good results. (Not this time). I had some on hand that I thought would
work, so I thought that I would give it a shot. Model Master rattle can German
Metallic Silver seemed a good choice, so I shook it up and went to work. Only
far too much came out, making my B-47 look like it had been dunked in some weird
silver cake icing.
While
generally air brush everything, I have occasionally used spray cans generally
with good results. (Not this time). I had some on hand that I thought would
work, so I thought that I would give it a shot. Model Master rattle can German
Metallic Silver seemed a good choice, so I shook it up and went to work. Only
far too much came out, making my B-47 look like it had been dunked in some weird
silver cake icing.
I immediately set about cleaning this off, in this
case using brake fluid, and prepared to start all over. This of course included
repainting and masking the glare shield. This time I decided to try a different
can, choosing Testors Chrome. And….. better results, but I was still not happy
with what I saw.
I cleaned it off again, this time with mineral spirits and started over once
more. This time I broke out the airbrush and sprayed it in Testors Aluminum.
Happily, there were no surprises. This was then given a coat of Model Master
spray gloss.
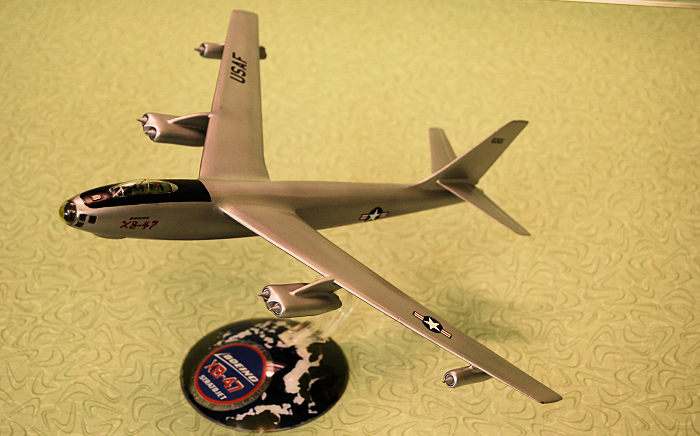
Decals mostly consisted of a tail serial, USAF wing insignia, and national insignia. These were sourced from various sheets in the decal drawer and all went on with no problems using Micro Set. I happened to find a set of Boeing markings from a 1/144 sheet for the YB-52 that were used and then the XB-47 lettering was brushed on by hand in Testors Dark Gloss Red. After this it was given a coat of Model Master spray Semi Gloss.
| THE REST OF IT |
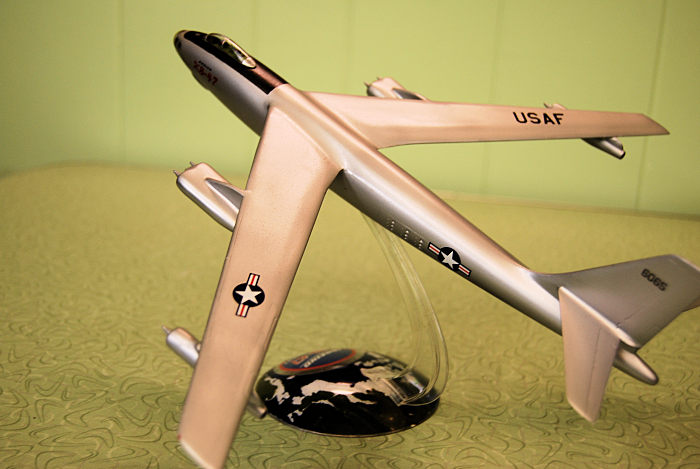
I had already decided to modify the stand using the Revell base, but the stand support arm from a Frog B.A.C. Lightning prototype kit. I liked the look and the sweep of it. I modified the tab with a little trimming until it fit the slot opening in the model. Additionally, I added a thick copper wire pin to fit in a corresponding hole drilled in the fuselage that would help to stabilize it.
 The Revell
base itself was painted with various colors so that the continents and oceans
could be seen. An e-Bay vendor who supplies vintage reproduction kit decals
kindly modified a B-47 decal to read XB-47 at my request and this gave me the
perfect kit stand.
The Revell
base itself was painted with various colors so that the continents and oceans
could be seen. An e-Bay vendor who supplies vintage reproduction kit decals
kindly modified a B-47 decal to read XB-47 at my request and this gave me the
perfect kit stand.
The nose area that would appear under the clear portion was painted in Tamiya Flat black while the cockpit area was painted in Model Master Interior Green. The tiny pilot figures were painted to simulate flight suits, helmets, and oxygen masks and seat detail, as much as could be done with such tiny parts.
Color photos of the XB-47 show that there was a Chromate Green center to the transparent nose. This was simple enough to create using a single drop of paint on a brush applied to the inside of the clear dome. Meanwhile the canopy framing was done in Testors Aluminum. Then both parts were given a dunk in Future and glued in place using G-S Hypo Cement for watch crystals. Lastly, a small brush was used the paint the insides of the exhausts with some flat black and it was done.
| CONCLUSIONS |
This kit is a relic, no doubt. It was not the easiest build even given the very simple nature of the kit. However, I chalk some of this up to the kit having been bagged for years and suffering some warpage in the wings and fuselage. In that this is the only one of these kits that I have built or test fitted, I am not certain about poor fit at the wing joint being typical. I have built a lot of vintage Revell kits, including many of their box scale kits over the years, but never found a wing joint quite as “gappy” and sloppy as this one. I think that this particular kit had something of a hard life in storage over the years before I got my hands on it.
Overall, I had fun building the kit. There are definitely better options out there for a Stratojet. For smaller scale, the 1/144 Hobbycraft/Academy B-47 and RB-47 kits are far superior and have full landing gear. Additionally, B-47b, B-47E and RB-47H versions have all been offered, so that most any version can be built. The Hasegawa 1/72 kit is very good as well. It is an older mold and has some fit issues and is a little quirky in a few places (more about that in a future review). However, it can easily be built up into an excellent model.
This kit is basically relegated to being nostalgia or fun build. I wanted to build it mainly because I had it and I knew it would be a fairly easy conversion to an XB-47. It could be built up into a nice desk model, though. I am still thinking about building another one into a WB-47 ever since it crossed my mind.
Warped parts and deterioration aside, it still built up pretty quickly. Minus the time for my paint snafus, I only spent around twelve hours on it. The painting problems nearly doubled this, though. I never planned to try and build a true showpiece out of it. I just wanted an XB-47 on my shelf and I am quite content with what I got. I think that the next time that I see one of these at a reasonable price, a WB-47 is in the offing.
| REFERENCES |
B-47 Stratojet by Lindsay Peacock, 1987, Osprey Publications, Ltd.
B-47 Stratojet in Action,by Lou Drendel & Tom Y’Blood, Squadron Signal Publication No.28, 1976 Squadron Signal Publications, Inc.
U.S. Bombers 1928 to 1980’s by Lloyd S. Jones, 1980, Aero Publishers, Inc.
https://www.scalemates.com/kits/revell-h-206-boeing-b-47--132701
https://en.wikipedia.org/wiki/Boeing_B-47_Stratojet
1 November 2022
Copyright ModelingMadness.com. All rights reserved. No reproduction in part or in whole without express permission.
If you would like your product reviewed fairly and fairly quickly, please contact the editor or see other details in the Note to Contributors.