| KIT #: | 5707 |
| PRICE: | $50.00 from the second hand market |
| DECALS: | Two options |
| REVIEWER: | Emmett Baker |
| NOTES: | Nose conversion |
| HISTORY |
The B-36 started its life in the late 30’s and early 40’s when the United States Army Air Corps (USAAC), fearing the loss of Great Britain, with airfields for allied bombers, to the Germans, decided that a bomber with larger range and payload was needed. Fortunately the Collapse never occured, and existing Allied bombers were able to operate from Great Britain for the duration of the war. The competitors for the new bomber were primarily Consolidated and Boeing. Consolidated entered two designs, the XB-35 and XB-36. (interestingly the XB-35 designation would later be given to the famed Northrop flying wing). The USAAC picked the XB-36 design and had Consolidated begin a mockup of the bomber. Though all of this happened in about 1940-41, the bomber would make its maiden flight on Aug. 8, 1946. The XB-36 would be powered by six Pratt & Whitney R-4360 Radial engines, each driving a three bladed 19 foot diameter pusher propeller. It also used a single 110 inch diameter tire for each of the main landing gear, enough so, that most runway’s concrete would crack from the pressure! The 230 ft wing was actually longer than the Wright Brothers first flight!
 The
B-36 would retain the same basic shape throughout its lifetime, though there
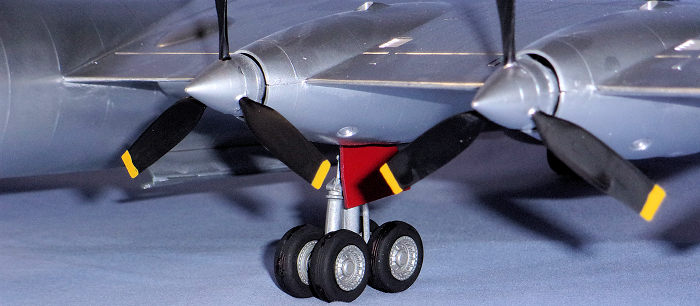
were also many changes. The original 110 in main gear would be replaced by a 4
wheel bogey style main gear(to spread out the weight better). Starting with the
B-36D, would also employ 2 jet engines slung under each wing in pods. The
cockpit went from the “airliner” style cockpit arrangement to the “bubble” style
cockpit that most of us are familiar with. The bomb bay doors would go from a
sliding type (similar to that on the B-24) to the “snap-action” type as seen on
later -36’s
The
B-36 would retain the same basic shape throughout its lifetime, though there
were also many changes. The original 110 in main gear would be replaced by a 4
wheel bogey style main gear(to spread out the weight better). Starting with the
B-36D, would also employ 2 jet engines slung under each wing in pods. The
cockpit went from the “airliner” style cockpit arrangement to the “bubble” style
cockpit that most of us are familiar with. The bomb bay doors would go from a
sliding type (similar to that on the B-24) to the “snap-action” type as seen on
later -36’s
The variants of the B-36 were just as diverse as the changes to the B-36, having versions A-J (no C or I model), each with their own differences. The B-36D was the first to employ the Jet pods (a design taken from the Boeing B-47, without Boeing’s consent) After the B-36D came out, all of the prior B-36A/Bs were converted to RB-36Es (there were RB-36Ds, and the RB-36Ds and Es were identical, except the Es were converted from A/Bs). There were EB-36s, used for electronic calibration, RBs used for reconnaissance, GRBs used in the parasite tests, and many more.
Currently, there are six B-36s that survive, the USAF Museum B-36J, Pima A&S Museum B-36J (the last one off the production line), the Castle air Museum RB-36H, the Strategic A&S Museum B-36J. Walter Soplata’s RB-36E (the original YB-36) and the XC-99, the one off cargo version of the B-36A, in storage for restoration in the USAF Museum inventory.
| THE KIT |
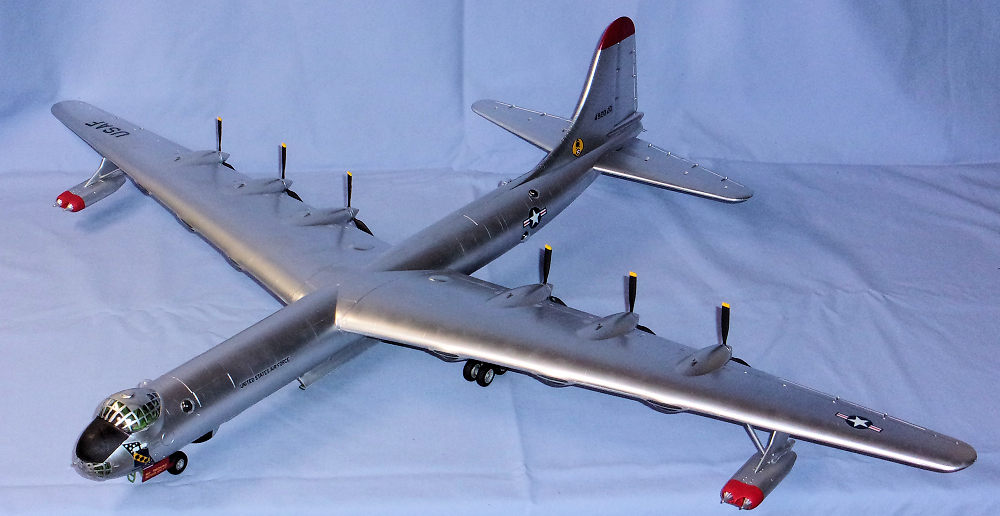
 First
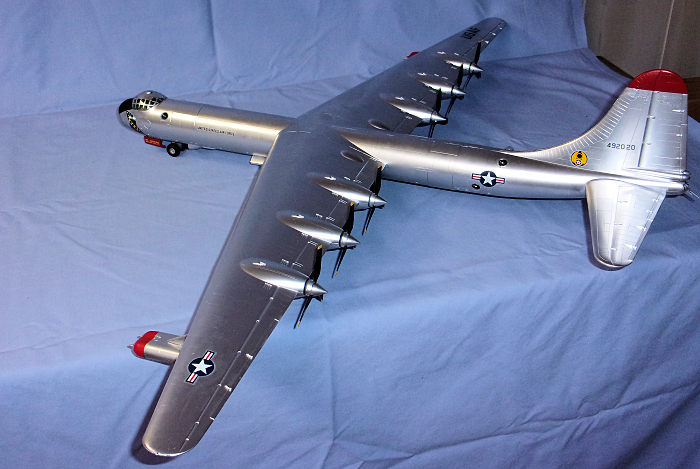
released in 1980, this kit is massive. With a wingspan that stretches over 36
inches, and a fuselage that is 28 inches long, the kit was advertised as “The
world's largest kit” for a long time. My kit was released in 1991, and I bought
it second hand & slightly damaged. Quite a few of the pieces and had been broken
off the sprues, one propeller had a blade broken off, and the nose had some
damage I will get to later.
First
released in 1980, this kit is massive. With a wingspan that stretches over 36
inches, and a fuselage that is 28 inches long, the kit was advertised as “The
world's largest kit” for a long time. My kit was released in 1991, and I bought
it second hand & slightly damaged. Quite a few of the pieces and had been broken
off the sprues, one propeller had a blade broken off, and the nose had some
damage I will get to later.
As far as I can tell, this kit was based off an RB-36D. You can tell this by 2 things: The lower part of the cockpit has 4 chairs in the frontal part of this, which was only correct for the RB-36 types. The Bomb bay doors have three sets: one for bomb bay #1, one for bomb bays #2 and #3, and one for bomb bay #4. This bomb bay arrangement was only correct for the RB-36D. The kit, interestingly enough is advertised as a R/B-38H.
| CONSTRUCTION |
 With
the B-36 being my favorite aircraft, I searched for this kit and after a couple
of years, finally found my B-36. Though I had read several horror stories about
the kit, I went into building it blindly, thinking those reviewers were too
picky and had no clue what they were talking about. I now realise I was wrong
about the horror stories, but I am still happy with the kit.
With
the B-36 being my favorite aircraft, I searched for this kit and after a couple
of years, finally found my B-36. Though I had read several horror stories about
the kit, I went into building it blindly, thinking those reviewers were too
picky and had no clue what they were talking about. I now realise I was wrong
about the horror stories, but I am still happy with the kit.
I started the build by airbrushing all the interior bits zinc-chromate
and used the kit supplied decals for the instrument panel. The bomb bay racks
(not with the flash bombs) were glued into the fuselage halves. The cockpit deck
details were then brush painted as were the seats and other bits. I also used a
Sharpie marker to highlight some of the details on the pieces. The wings were
then carefully glued together, as were the elevators and jet pods. The wheels
were painted black and steel and assembled. The landing gear legs were painted
aluminum for contrast against the wheels . After gluing in a very generous
amount of nose weight, I glued the cockpit, the tail antenna (above the tail
turret, used for aiming the turret) and other miscellaneous gear into the
fuselage halv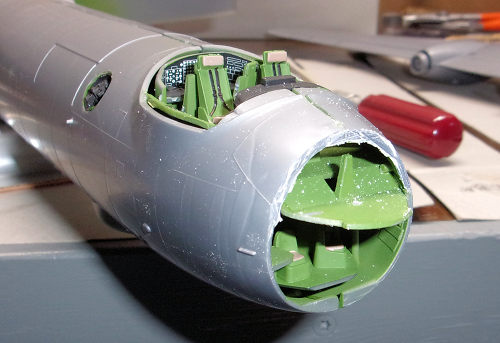 es.
I then glued the fuselage halves together.
es.
I then glued the fuselage halves together.
Once the fuselage had dried, I searched it for areas of concern, and found one major area: the nose. With how the kit is engineered, the nose turret fits onto the cockpit floor and is located between two “ears” from the fuselage halves. Unfortunately, in my kit’s many years, the “ears” had been bent inwards, leaving an large gap between the turret and the “ears”. For this reason I decided to build a Featherweight III aircraft, as I could give the bomber a “nose-job” and not have to worry about reattaching the turret later. I was not thinking about markings at that point, and sadly the markings do not match any Featherweight III aircraft. This conversion was accomplished by cutting the “ears” off with a razor saw, and then simply lifting the turret up and out of the nose. The “ears” were then bent (roughly) back to shape and glued back into position and the center area was filled with auto body filler.
After the nose was filled, I filled the rest of the seams and began sanding. I used 320 grit sandpaper to work down the large fuselage seam and nose, then used 600 grit sandpaper to smooth everything out for paint.
| COLORS & MARKINGS |
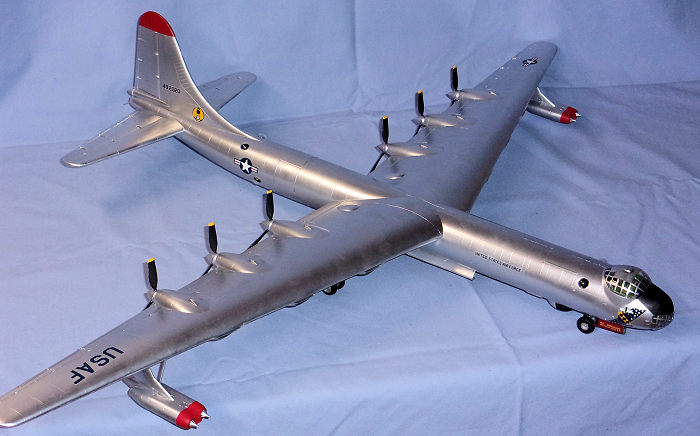
 I
did not use normal model paint for the exterior of the model, instead using
Valspar paint for the red on the tail and landing gear doors, and Glidden
aluminum paint (old fence post paint) for the main surfaces. I did not have much
hope for the paint, as I have never been too good at masking (The paint always
seems to seep under the tape). After pulling the masking off, I was fairly
impressed with the job I had achieved, except for some “orange peeling” on some
of the tail surfaces.
I
did not use normal model paint for the exterior of the model, instead using
Valspar paint for the red on the tail and landing gear doors, and Glidden
aluminum paint (old fence post paint) for the main surfaces. I did not have much
hope for the paint, as I have never been too good at masking (The paint always
seems to seep under the tape). After pulling the masking off, I was fairly
impressed with the job I had achieved, except for some “orange peeling” on some
of the tail surfaces.
I used the kit decals from both my kit, and left over decals from a kit my father had built 30 years ago. I was originally going to use the triangle J decals on the tail, but after struggling to place on the USAF wing decals, I decided that the smaller serial # would be much easier and still look the part. With the array of decals on the aircraft, the markings are not correct for any actual B-36. One recommendation: buy new decals!
| FINAL CONSTRUCTION |
 One
thing I noticed with this kit is that it feels like every time you take three
steps forward, you have to take two back. Before attaching the jet pods to the
wings, I decided the red color on the front was too light, so I painted a second
coat using a brush. After I laid that coat on, the first coat on it began to
peel off(!?!?). I then had to wait for both coats to dry, sand off both coats,
and repaint.
One
thing I noticed with this kit is that it feels like every time you take three
steps forward, you have to take two back. Before attaching the jet pods to the
wings, I decided the red color on the front was too light, so I painted a second
coat using a brush. After I laid that coat on, the first coat on it began to
peel off(!?!?). I then had to wait for both coats to dry, sand off both coats,
and repaint.
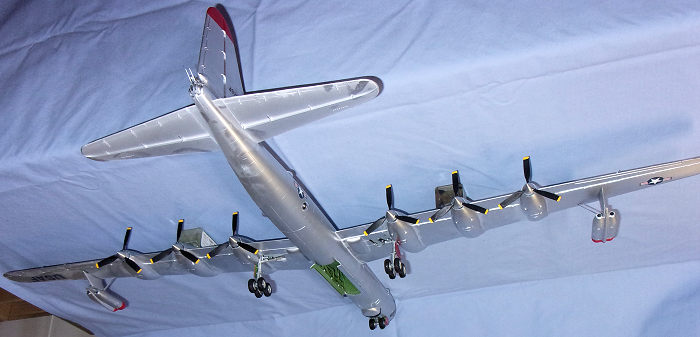
The landing gear assemblies (wheels, gear doors, and landing gear legs) went together without trouble , and, after some fudging around, I managed to get the landing gear to fit into the aircraft as well. I also then attached the retraction struts to the nose gear doors. After those had dried, I attached the Nose gear doors and the bomb bay doors, after “snapping” them to the open position. The canopy glass was hand painted with a Testors silver enamel marker, and unfortunately I went a bit heavy handed with it. After the enamel had dried, the canopies and the rest of the glass was attached. The jet pod assemblies, previously having been painted, were glued to the wings at this time. I then flipped the bomber over onto its landing gear, and carefully glued all six propellers onto the back of the wing, and the B-36 was finished
| CONCLUSIONS |
No, this kit is not perfect. The fit is off in some places, details in others. I would like to see a new tool 1/72 B-36 that would be more accurate for say a B-36H or J, but I doubt that will happen as most companies do not mold large kits such as this anymore.
The main thing I would say about this kit is that you need to be patient with it and deal with the challenges presented as they come. One thing you have to understand is that this is not a easy month long build. Mine took me somewhere around eight months on and off to finish. With a bit of TLC, this kit can really shine. Would I build another one? Probably, but not anytime soon.
| REFERENCES |
Magnesium overcast by Dennis R Jenkins
Wikipedia
Google images
Goleta Air and space museum
NMUSAF
Copyright ModelingMadness.com
If you would like your product reviewed fairly and fairly quickly, please contact the editor or see other details in the Note to Contributors.
Back to the Main Page Back to the Review Index Page Back to the Previews Index Page