Gallery Models 1/48 H-34
| KIT #: | 64101 |
| PRICE: | $35.00 |
| DECALS: | Three options |
| REVIEWER: | Blair Stewart |
| NOTES: | Lots of parts. Photo etch. |
| HISTORY |
The Sikorsky S-58 was developed as a lengthened and more powerful version of the Sikorsky Model S-55, or UH-19 Chickasaw, with a similar nose, but with a tail-dragger rear fuselage and landing gear, rather than the high-tail, 4-post pattern. It retained the nose-mounted radial reciprocating engine with the drive shaft passing through the cockpit placed high above the cargo compartment.
The aircraft first flew on 8 March 1954. The first production aircraft was ready in September and entered in service for the United States Navy, initially designated as the HSS-1 Seabat (in its anti-submarine configuration) and the HUS-1 Seahorse (in its utility transport configuration). The U.S. Army and Marine Corps, respectively, ordered it in 1955 and 1957. Under the United States Army's aircraft designation system, also used by the United States Air Force, the helicopter was designated H-34. The U.S. Army also applied the name “Choctaw” to the helicopter. In 1962, under the new unified DoD aircraft designation system, the Seabat was redesignated SH-34, the Seahorse as the UH-34, and the Choctaw as the CH-34.
 The helicopter served
in a variety of roles, including utility transport, anti-submarine
warfare, search and rescue, and VIP transport. In its standard
configuration, transport versions could carry 12 to 16 troops, or
eight stretcher cases if utilized in the MedEvac role, while VIP transports
carried significantly fewer people in much greater comfort.
The helicopter served
in a variety of roles, including utility transport, anti-submarine
warfare, search and rescue, and VIP transport. In its standard
configuration, transport versions could carry 12 to 16 troops, or
eight stretcher cases if utilized in the MedEvac role, while VIP transports
carried significantly fewer people in much greater comfort.
A total of 135 H-34s were built in the US and assembled by Sud-Aviation in France, 166 were produced under license in France by Sud-Aviation for the French Air Force, Navy and Army Aviation (ALAT).
French evaluations on the reported ground fire vulnerabilities of the CH-34 may have influenced the U.S. Army's decision to deploy the CH-21 Shawnee to Vietnam instead of the CH-34, pending the introduction into widespread service of the Bell UH-1 Iroquois. U.S. Army H-34s did not participate in Vietnam, and did not fly in the assault helicopter role, but some were supplied to the Republic of Vietnam Air Force (RVNAF). These saw little use due to a lack of spare parts and maintenance.
Its higher availability and reliability due to its simplicity compared to the newer helicopters led US Marines to ask for it by name. The phrases "give me a HUS", "get me a HUS" and "cut me a HUS" entered the U.S. Marine Corps vernacular, being used even after the type was no longer in use to mean "help me out".
USMC H-34s were also among the first helicopter gunships tried in theater, being fitted with the Temporary Kit-1 (TK-1), comprising two M60C machine guns and two 19-shot 2.75-inch rocket pods. The operations were met with mixed enthusiasm, and the armed H-34s, known as "Stingers" were quickly phased out. The TK-1 kit would form the basis of the TK-2 kit used on USMC UH-1E helicopters.
| THE KIT |
 I haven’t built a helicopter model in years, and this one has been languishing
in the stash for at least a decade. After opening the box and seeing the
numerous and finely molded parts, I was drawn to giving it a shot. The parts are
molded in light gray plastic and come on 9 sprues. The detail is excellent.
There is one sprue of clear plastic for lights, windows and lenses, and the
canopy comes separately surrounded by foam packaging to avoid damage. There are
two sets of photo etch (PE) included in the kit. The kit also includes a nicely
printed decal sheet with markings for three difference USMC aircraft. The kit
supplies a nicely detailed cockpit, interior cargo compartment, and a detailed
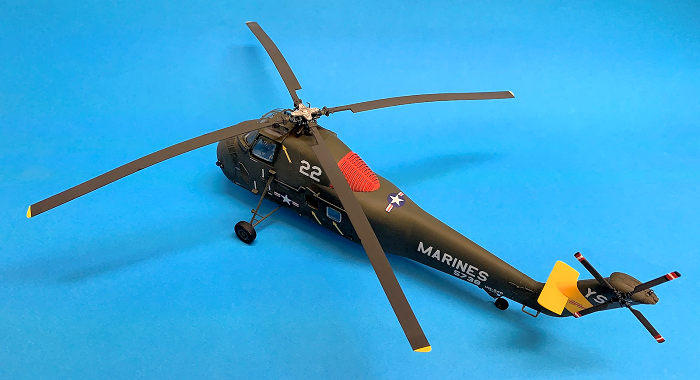
engine. One nice touch is the main rotor blades are molded in a “sagging”
position, which is the normal rotor configuration for this helo when on the
ground. The kit also includes parts for an M60 machine gun and a shielded M2
Browning .50 cal. (Note: the M2 may not have been part of the armament kit used
on some of the USMC H-34 “gunships,” so it may not be totally accurate.
Nevertheless, I chose to include it in my build). The 12-page instruction
booklet is more than adequate to guide the complex assembly process. There is
also a nice color sheet showing the color and marking schemes for all three
helicopters.
I haven’t built a helicopter model in years, and this one has been languishing
in the stash for at least a decade. After opening the box and seeing the
numerous and finely molded parts, I was drawn to giving it a shot. The parts are
molded in light gray plastic and come on 9 sprues. The detail is excellent.
There is one sprue of clear plastic for lights, windows and lenses, and the
canopy comes separately surrounded by foam packaging to avoid damage. There are
two sets of photo etch (PE) included in the kit. The kit also includes a nicely
printed decal sheet with markings for three difference USMC aircraft. The kit
supplies a nicely detailed cockpit, interior cargo compartment, and a detailed
engine. One nice touch is the main rotor blades are molded in a “sagging”
position, which is the normal rotor configuration for this helo when on the
ground. The kit also includes parts for an M60 machine gun and a shielded M2
Browning .50 cal. (Note: the M2 may not have been part of the armament kit used
on some of the USMC H-34 “gunships,” so it may not be totally accurate.
Nevertheless, I chose to include it in my build). The 12-page instruction
booklet is more than adequate to guide the complex assembly process. There is
also a nice color sheet showing the color and marking schemes for all three
helicopters.
| CONSTRUCTION |
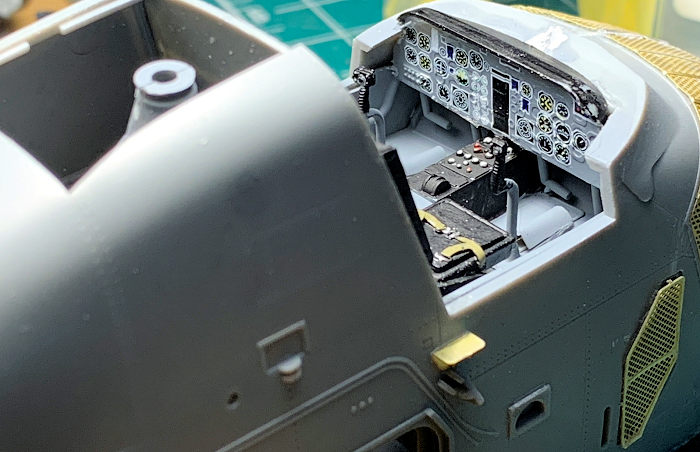 The cockpit interior includes PE harnesses for the seats and rudder pedals, as
well as a nice decal for the instrument panel. The instruction booklet provides
detailed painting guidelines for the instrument panels alongside the cockpit
assembly instructions. Per the kit instructions, I painted the crew cushions
flat black, and this may have been one of many mistakes I made: a perusal of
pictures of the H-34 once displayed (I couldn’t find it in their current display
list on the web) at the National Air and Space Museum’s (NASM) Steven F. Udvar-Hazy
Center revealed the cushions were flat red, and I would have to trust NASM over
Gallery Models to get this right.
The cockpit interior includes PE harnesses for the seats and rudder pedals, as
well as a nice decal for the instrument panel. The instruction booklet provides
detailed painting guidelines for the instrument panels alongside the cockpit
assembly instructions. Per the kit instructions, I painted the crew cushions
flat black, and this may have been one of many mistakes I made: a perusal of
pictures of the H-34 once displayed (I couldn’t find it in their current display
list on the web) at the National Air and Space Museum’s (NASM) Steven F. Udvar-Hazy
Center revealed the cushions were flat red, and I would have to trust NASM over
Gallery Models to get this right.
The next assembly was for the cargo compartment web seats, which included PE seatbelts. Next, I moved to the engine. This is a very well-detailed engine comprised of some 31 parts. After assembly, I hand-painted the engine following the kit instructions and set it aside for later assembly into the helo.
Step 4 involved assembling the cargo compartment and then attaching the engine to the front of it and the cockpit to the top front. An additional subassembly is the base for the rotor assembly, which is glued to the aft top of the cargo compartment. At this point, I glued on the cargo compartment sides, which are not molded into the helicopter fuselage halves. This later proved to be a big issue for me!
I then moved to the attachment of several PE parts to the outside of each fuselage half, and here I made my second mistake: I forgot to attach the clear windows (one on each half) to the insides of the fuselage halves.
Once the fuselage halves were finished, I was ready to glue them together and capture the cargo compartment/cockpit/engine assembly between them. At this stage, I was literally stunned to find out that things were grossly out of alignment and there were going to be major fit problems with this build. With a considerable amount of difficulty, I finally got the two halves to line up at least to a point where I could use putty to close some gaps and sand the seams to be somewhat smooth.
Step E of the cockpit assembly calls for gluing the forward fuselage halves together with the cockpit/nose gear well sandwiched between the halves. Although not called for in the instructions, I decided to include some weight in the nose in the event the model would be a tail sitter (it turns out this is not needed). I left off the nose gear doors for later.
 I then moved to the fuselage and wing assembly. I assembled the intake duct with
their compressor blades and set them aside. Step B calls for opening 8 holes in
the fuselage bottom to accommodate attaching the under-wing/under-fuselage
pylons. I then glued the intake ducts to the fuselage bottom and then attached
the fuselage top to that assembly. The final step here was to glue the left- and
right-wing panel halves together and attach them to the wing assembly. I also
attached the forward fuselage at this point.
I then moved to the fuselage and wing assembly. I assembled the intake duct with
their compressor blades and set them aside. Step B calls for opening 8 holes in
the fuselage bottom to accommodate attaching the under-wing/under-fuselage
pylons. I then glued the intake ducts to the fuselage bottom and then attached
the fuselage top to that assembly. The final step here was to glue the left- and
right-wing panel halves together and attach them to the wing assembly. I also
attached the forward fuselage at this point.
I then encountered my next problem: an ill-fitting bottom cover and almost impossible-to-fit engine doors. The bottom cover would not line up with the seam where the doors would meet it, and the doors couldn’t be attached to cover the engine. I could have displayed the model with the engine covers open, but that had not been my plan from the start. At this stage, I just about chucked the whole project into the trash can, but after thinking about the fit problems (and desperately wanting a helicopter in my collection), I opted for some drastic measures. First, I removed the engine (actually, I broke it off from the front of the model) and then proceeded to use copious amounts of super glue, accelerator and clamps to attach the clamshell engine doors to the front of the model. After allowing plenty of time for the superglue to dry, I then used Perfect Plastic Putty to fill the seams as best I could. (What I love about this putty is it’s water-soluble, so you can practically get very close to a smooth surface just by using a wet Q-tip or with a wet fingertip).
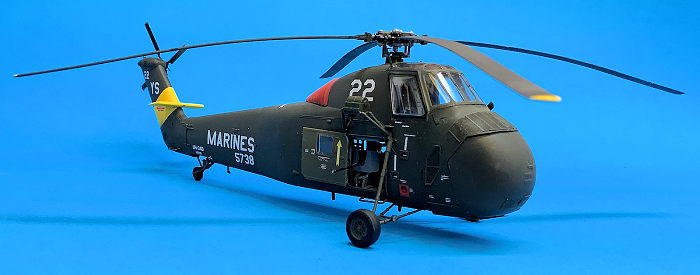
Next, I covered the various window panels on the cockpit canopy with Tamiya tape and cut around each panel to reveal the canopy framing that would be painted the fuselage color. I attached the canopy to the fuselage using Gleargel Tacky Glue. I then assembled the winch and mounted it to the right side of the fuselage.
I then moved to assembling the undercarriage gear and the tail wheel, plus attaching several PE antennas that would be painted the same color as the fuselage. Next, I assembled the rear tail, which can be displayed “folded” if one chooses to do so. I then glued the tail assembly to the helo’s fuselage. I also assembled the tail rotor and set it aside for painting.
The final subassembly was the main rotor assembly, which includes four PE parts. I left off the main rotor blades in preparation for painting the entire model.
| COLORS & MARKINGS |
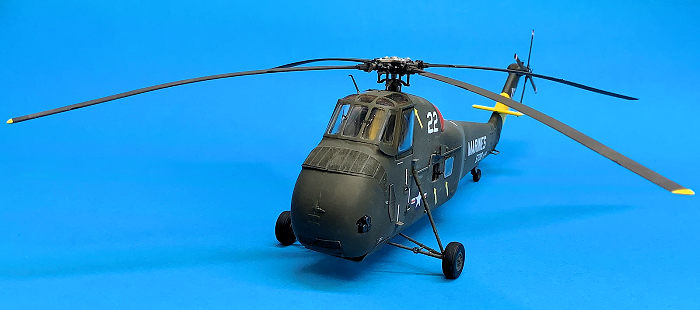
 I
stuffed the door openings with wet tissue paper and then started the painting
process by spraying the entire model with Rustoleum flat white paint out of a
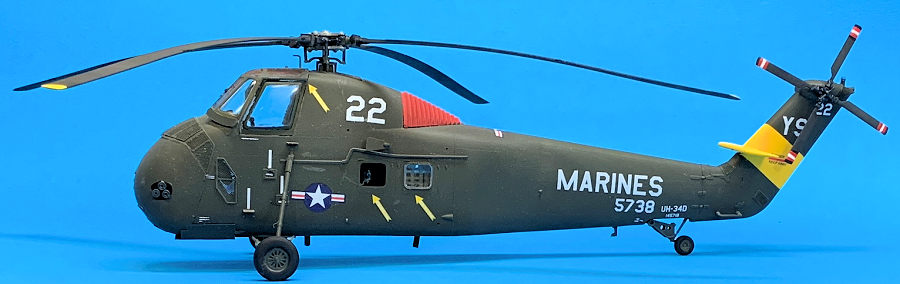
rattle can. Once dry, I used Tamiya XF-62 Olive Drab to paint the entire model.
Once this was dry, I masked off the rotor assembly grill and, per the color
scheme I had chosen, painted it with Model Master Guards Red. I also masked off
the tail horizontal stabilizer and painted it with Tamiya XF-3 Flat Yellow.
After the paints had dried, I sprayed a clear coat of Future over the entire
model in preparation for decaling.
I
stuffed the door openings with wet tissue paper and then started the painting
process by spraying the entire model with Rustoleum flat white paint out of a
rattle can. Once dry, I used Tamiya XF-62 Olive Drab to paint the entire model.
Once this was dry, I masked off the rotor assembly grill and, per the color
scheme I had chosen, painted it with Model Master Guards Red. I also masked off
the tail horizontal stabilizer and painted it with Tamiya XF-3 Flat Yellow.
After the paints had dried, I sprayed a clear coat of Future over the entire
model in preparation for decaling.
The decals were thin and very good to work with. My only problem was the red and white “wing” decal for the engine cowls. Too late, I realized I had not laid this decal down along the cowl centerline, so I finally opted to lift the decal off using Scotch Magic Tape and just forgo that marking (hey: at one time or another, the real helo might not have had this marking applied to it! Right???).
The tail rotor blade markings required a somewhat small band of red outlined by white bands. Some kit manufacturers (e.g., Tamiya) often include decals for these blade markings, but not Gallery. Thus, I spent a great deal of time masking these off, painting them and then touching them up where I messed up with the masking.
Once the decals were dried, I attached the tail and main rotor blades and then “de-glossed” the model using Testors Dullcote. I had painted and decaled the main door separately, and at this stage it dawned on me that I had forgotten to attach the two fuselage windows to the inside fuselage halves. I decided to just glue them on from the outside, despite of the fact that upon close examination they are clearly incorrect!
| CONCLUSIONS |
This is a highly detailed, multi-part kit. I experienced numerous fit problems with the fuselage, but I am not sure whether this was due to my ineptness or warpage in the kit parts. These required many hours and struggles to correct (or at least tone down their visual impact). In the end, I have a nice model of an historic USMC helicopter to view amongst my model collection. This kit is NOT for the faint of heart, but if you want a nice 1/48 scale H-34, it’s the only way to go.
| REFERENCES |
“Sikorsky H-34”, Wikipedia, Worldwide Web, February 2025.
20 February 2025
Copyright ModelingMadness.com. All rights reserved. No reproduction in part or in whole without express permission from the editor.
If you would like your product reviewed fairly and fairly quickly, please contact the editor or see other details in the Note to Contributors.