
| KIT #: | 05201 |
| PRICE: | $25.00 om 2005 |
| DECALS: | One option |
| REVIEWER: | Spiros Pendedekas |
| NOTES: | 1959 Tooling |
| HISTORY |
The origins of the unconventional XV-1 can be traced back in the early 50s, when aviation designers tried to figure out ways to increase the contemporary helicopters’ airspeeds. By that time, the Air Force collaborated with the Army, in order to research the possibilities of producing such a machine that would take off and land vertically, yet fly faster than a typical helicopter. In summer 1951, out of the three companies submissions (Bell, Boeing and McDonnel) the latter was awarded to develop its proposal.
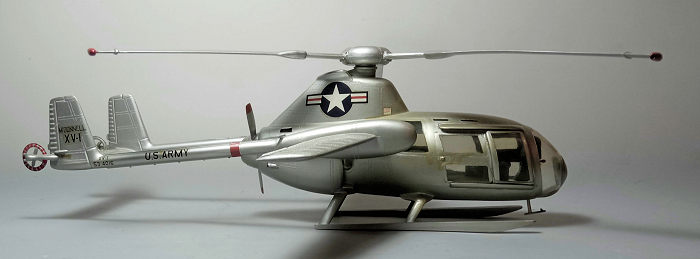
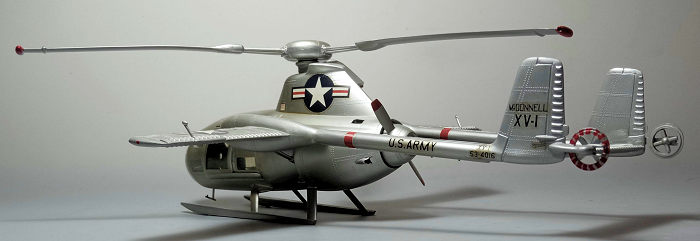
Designated as XV-1 Convertiplane, that bizarre looking machine was built mostly of aluminum. The fuselage was a streamlined tube with a rear-mounted piston engine and a pusher propeller. The unorthodox design featured tapered stub wings with tail booms mounted on them and twin vertical surfaces, interconnected by a horizontal stabilizer.
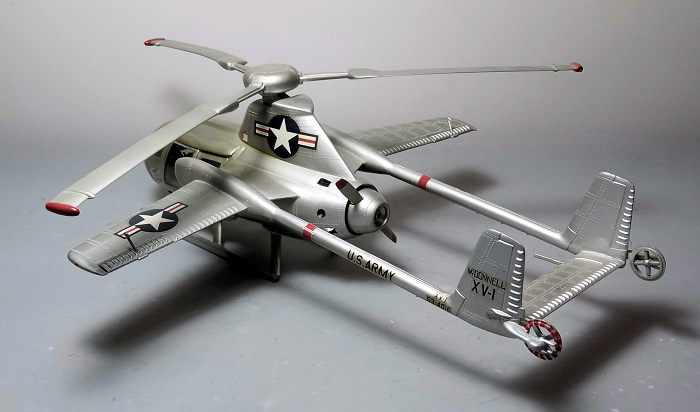 The
three-bladed main rotor was radically powered by blade tip pressure jets which
were air-fed from twin air compressors driven by an R-975 nine-cylinder,
air-cooled, radial engine. Amazingly, each rotor tip additionally featured a
combustion chamber where fuel was burned, in order to increase thrust and allow
the XV-1 to fly like a helicopter. In horizontal flight, the engine was
disconnected from the compressors and drove the two-bladed pusher propeller
instead, with the wings providing 80% of the lift and the remainder generated by
the now auto-rotating main rotor. Landing gear was of a ski helicopter type.
The
three-bladed main rotor was radically powered by blade tip pressure jets which
were air-fed from twin air compressors driven by an R-975 nine-cylinder,
air-cooled, radial engine. Amazingly, each rotor tip additionally featured a
combustion chamber where fuel was burned, in order to increase thrust and allow
the XV-1 to fly like a helicopter. In horizontal flight, the engine was
disconnected from the compressors and drove the two-bladed pusher propeller
instead, with the wings providing 80% of the lift and the remainder generated by
the now auto-rotating main rotor. Landing gear was of a ski helicopter type.
The prototype began tethered hovering tests in February 1954, with the first free hovering flight taking place the following summer. By that time the second prototype was nearing completion, being a somewhat refined design, with better aerodynamics, stronger undercarriage and, most importantly, two small tail rotors at the end of each tailboom to boost yaw authority, which was previously relying only on rudders. The latter modification was also applied to the first prototype.
By spring 1955, transition from vertical to horizontal flight took place, with the 200-mile airspeed barrier broken the following October, nearly 45 mph faster than the helicopter speed record of that time. However, a number of concerns were raised: the machine was too complex, too noisy and vastly underpowered, with the latter issue not allowing it to exhibit its full design potential. Meanwhile, conventional helicopter design was also leaping forward, not deleting but certainly solidly reducing the performance margin the XV-1 offered. As a combination of the above, it came as no surprise that a decision to terminate the XV-1 project came by 1957, with around 600 flight hours accumulated.
Luckily, both prototypes survived, now proudly residing at the United States Army Aviation Museum at Fort Novosel, Alabama and Smithsonian Institution's National Air and Space Museum, Washington, D.C. respectively.
The XV-1 was an interesting design that sounded attractive on paper, yet its complexity and lack of power did not allow it to show its design potential. Perhaps a similar, less unorthodox design that would delete the main rotor air feeding and link it mechanically to a more powerful engine would have been more viable.
| THE KIT |
 It sounds
quite incredible that by 1959, two years after the XV-1 program had been
terminated and only two prototypes were built, a 1/32 mainstream model became
available by ITC. Glencoe, used to treat us with reboxes of older/odder molds,
accompanied with great decals (Scalemaster in most, if not all of the time) and
somewhat refined instructions. This is the exact case here, with the kit being a
1998 rebox of this elderly 1959 ITC mold, with nice but yellowed Scalemaster
decals and for a look at its contents, you may read its preview,
found at the ever growing MM archives.
It sounds
quite incredible that by 1959, two years after the XV-1 program had been
terminated and only two prototypes were built, a 1/32 mainstream model became
available by ITC. Glencoe, used to treat us with reboxes of older/odder molds,
accompanied with great decals (Scalemaster in most, if not all of the time) and
somewhat refined instructions. This is the exact case here, with the kit being a
1998 rebox of this elderly 1959 ITC mold, with nice but yellowed Scalemaster
decals and for a look at its contents, you may read its preview,
found at the ever growing MM archives.
| CONSTRUCTION |
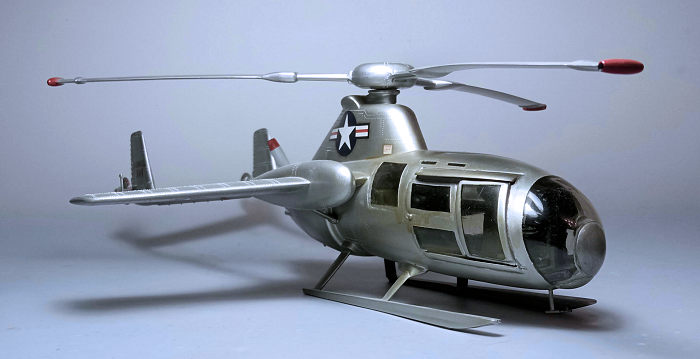
I started by attaching the windows from the fuselage innards. The sliding doors are supplied as one piece transparencies, which are supposed to slide on rails attached to the fuselage. I went for the easier option to permanently attach everything “closed”. The simplistic interior was then assembled and trapped between the fuselage halves, together with around 30 grams of flattened (with a hammer) lead weight under the floor, to avoid tail sitting.
Basic interior color was Hu226 Interior green (instructions called for light blue, but I chickened out and went “safe” - which might very well be wrong), while the instrument panel and console faces were black, dry brushed with silver and some knobs randomly “pinned” with white and red paint. A leftover stick was added, together with seat belts made from masking tape. To my relief, the spartanic cockpit became a blurred busy-ish looking interior when viewed from the ultra thick transparencies.
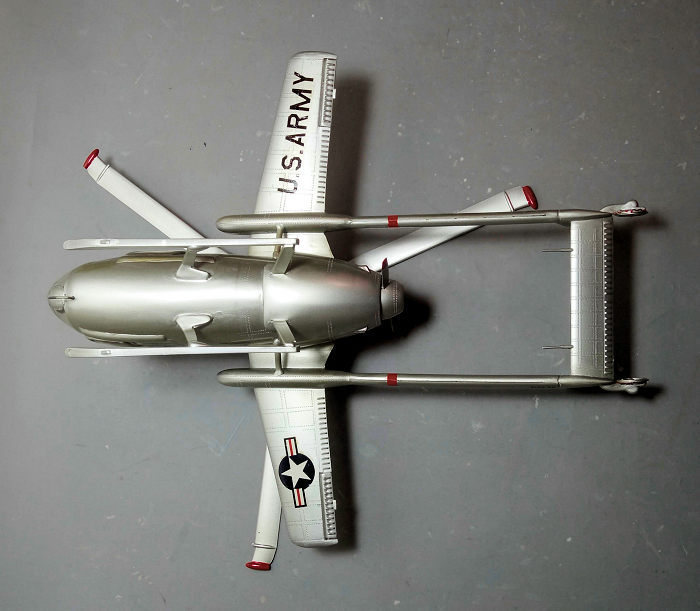 The main
wings were next assembled and attached, followed by the 2-piece booms. The
horizontal stabilizer was trapped between them, with alignment not being as
difficult as originally envisaged. The petite but somehow crude looking tail
rotors were attached at this time, as well.
The main
wings were next assembled and attached, followed by the 2-piece booms. The
horizontal stabilizer was trapped between them, with alignment not being as
difficult as originally envisaged. The petite but somehow crude looking tail
rotors were attached at this time, as well.
Moving downwards, the two skis were attached, followed by the dome transparency and the two solid discs on it, one in front and one underneath. The main rotor and pusher prop were also assembled but not attached, as were the wing support struts, to facilitate filling and sanding.
This more or less concluded basic assembly, which, truth be told, was easier than initially anticipated, as, having cleaned the parts from flash, I was able to put everything together and obtain good alignment and reasonable fit. The most challenging area of basic construction proved to be that of the transparencies: since their fit was average, I elected to sand them all flush to the fuselage, then fill the gaps and sand/polish them using successively finer grades of sandpaper and, finally, polishing compound. Upon polishing it became apparent that I had done a less than perfect job there, as marring or even micro cracking had taken place at a few edges. My “solution” (to my dismay) would be to paint the frames wider at the offending places, to sort of mask the discrepancies. This would mean that the framing would look wider than in reality (and I take full responsibility for my transparencies goof, as I have seen other completed models looking way better).
All remaining gaps were first treated with liquefied styrene and then with "normal" filler. After some sanding, I masked all transparencies and took the Convertiplane to the paint shop!
| COLORS & MARKINGS |
 I gave the
bird a coat of Hu11 Silver, including the rotor and pusher prop. Upon
drying, I went on applying the sharply printed Scalemaster decals, which,
despite their age, behaved well, easily detaching from their backing paper and
nicely adhering to the silver painted surfaces. Of note is that their base
material had been yellowed and, to somehow lessen the effect, I had placed the
decal sheet behind a window facing the string sun, something that to a degree
worked. A coat of Future sealed the decals.
I gave the
bird a coat of Hu11 Silver, including the rotor and pusher prop. Upon
drying, I went on applying the sharply printed Scalemaster decals, which,
despite their age, behaved well, easily detaching from their backing paper and
nicely adhering to the silver painted surfaces. Of note is that their base
material had been yellowed and, to somehow lessen the effect, I had placed the
decal sheet behind a window facing the string sun, something that to a degree
worked. A coat of Future sealed the decals.
The pitot and all mass balances were painted silver and attached. The rotor and prop tips were painted red and were affixed in position, as well. The red areas of the tiny tail rotors were carefully painted with a fine brush and the exhaust cutouts were painted black.
No weathering was applied on this one, as there was no sign of it at the actual machine, with a satin (towards gloss) coat giving the bird its final hue. I could not locate any wing tip lights at net available pics, so I did not apply any and called the interesting looking Convertiplane done!
| CONCLUSIONS |
 While not
up to today's standards, this is a decent kit of the unconventional XV-1, with
its ups and downs. General shape looks correct, external details are acceptable,
as are the transparencies. On the other hand, molding is average with a lot of
flash that has to be cleaned up, interior is sparse and decals, while being
superb when new, have now yellowed with age. The build itself was not too
complex and the kit can be easily tackled by anyone but the novice.
While not
up to today's standards, this is a decent kit of the unconventional XV-1, with
its ups and downs. General shape looks correct, external details are acceptable,
as are the transparencies. On the other hand, molding is average with a lot of
flash that has to be cleaned up, interior is sparse and decals, while being
superb when new, have now yellowed with age. The build itself was not too
complex and the kit can be easily tackled by anyone but the novice.
It is very interesting indeed that this kit, which was not issued in such high numbers by Glencoe, can still (2024) be found with some effort at very reasonable prices. Since your only other possibility for an XV-1 is the small, discontinued and extremely hard to find 1/72 Anigrand resin offering, the big Glencoe is your only practical option. If you are not an absolute beginner and have such a kit or find one, go on and build it: your friends will scratch their heads upon seeing the Convertiplane side by side with your other 1/32 models in your showcase, wondering what exactly this distinctively looking machine really is!
Happy Modeling!
Spiros Pendedekas
8 April 2024
Copyright ModelingMadness.com. All rights reserved. No reproduction in
part or in whole without express permission from the editor.
If you would like your product reviewed fairly and fairly quickly, please
contact
the editor or see other details in the
Note to
Contributors. Back to the Main Page
Back to the Review
Index Page
Back to the Previews Index Page