Monogram 1/24 UH-1B
| KIT #: | 73014 |
| PRICE: | €25 when new |
| DECALS: | Two options |
| REVIEWER: | Spiros Pendedekas |
| NOTES: |
| HISTORY |
Determining that current helicopters were too large, underpowered, or too complex to maintain, the U.S. Army, in 1952, identified a requirement for a new helicopter to serve as medical evacuation (MEDEVAC), instrument trainer, and general utility aircraft. In early 1955, Bell was selected to build three copies of the Model 204 for evaluation, thus starting the Huey helicopter family.
The UH-1B was an improved model over the original, with a more powerful engine, revised main rotor blades and a longer cabin that could accommodate seven passengers. Its Army testing started in November 1960 with first production aircraft arriving in March 1961. A total of 1010 "Bravo" models were delivered to the US Army. First deployment was in November 1963 when eleven were sent to Vietnam to join the "Alpha" models already in use by the Utility Tactical Transport Helicopter Company (UTTCO).
 Later on, as the long cabin Hueys supplanted the Bravo in the transport
role, the UH-1B became increasingly used in a gunship role equipped with machine
guns and rockets. However, its insufficient power to maintain full capability
when used with the heaviest armament subsystems, lead to the more powerful
UH-1C.
Later on, as the long cabin Hueys supplanted the Bravo in the transport
role, the UH-1B became increasingly used in a gunship role equipped with machine
guns and rockets. However, its insufficient power to maintain full capability
when used with the heaviest armament subsystems, lead to the more powerful
UH-1C.
Bell certified a civil version of the UH-1B, incorporating some minor safety improvements, such as improved door locks. The aircraft was marketed as the Bell 204B. It was also licensed by Italian Agusta (with a Rolls Royce Gnome engine in place of the Lycoming T-53) and by the Japanese Fuji-Bell.
The Hellenic Army Aviation (ΑΕΡΟΠΟΡΙΑ ΣΤΡΑΤΟΥ) is the army aviation branch of the Hellenic Armed Forces. It was originally established in 1947 with light artillery spotter and liaison aircraft, with the acquisition of transport helicopters from 1969 and especially of the AH-64 Apache attack helicopters in the early 1990s changing the role of the service, leading to its recognition as the sixth arm of the Hellenic Army in 1996. It comprises the Army Aviation School and the 1st Army Aviation Brigade (1η ΤΑΞΑΣ).
The Hellenic Army Aviation started receiving its UH-1D/Hs and Agusta built AB-205s from 1969 onwards. Some vague info mentioned the existence of three UH-1Bs, which should have been received just prior to the above
| THE KIT |
Introduced back in 1969 and reboxed nine times since then, this is a very
interesting kit: the first two issues (1969 & 1973) featured a transparent
fuselage (so the viewer could admire the cabin innards and power plant), a
battery operated remote controlled electric motor that powered the rotors and an
“authentic chop-chop sound” display base! Those features seemed to disappear at
the following reissues, thus becoming a “conventional” kit.
My copy was the 1992 reissue, found “abandoned” in 2003 in my usual hometown
toy/hobby shop at “an offer I couldn’t refuse”. It came at the well-known,
tad flimsy big Revell box, with an attractive boxart of a Heliswiss Huey. Upon
opening the box, I was greeted with a lot of plastic (it is a 1/24 model,
anyway).
First thing that catches the eye are the two big, impressive fuselage halves,
molded in silver-gray styrene. Detail is generally raised and very realistic
(engraved where “needed”, i.e. door railings), with a good number of rivets. The
rest of the non-clear parts are contained i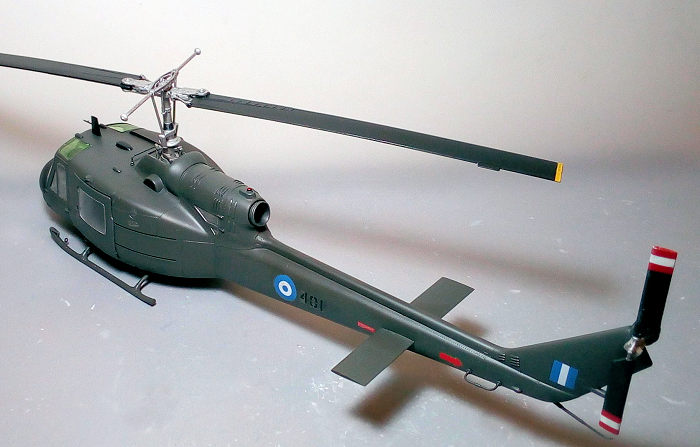 n 6 sprues. Since it is a 1969 mold,
it comes as no surprise that not only detail is on the soft side, but also that
there is some flash and a lot of ejector pin marks at places you do not want
them to be (rotor blades, skis etc.), with a number of them looking very
difficult to remove.
n 6 sprues. Since it is a 1969 mold,
it comes as no surprise that not only detail is on the soft side, but also that
there is some flash and a lot of ejector pin marks at places you do not want
them to be (rotor blades, skis etc.), with a number of them looking very
difficult to remove.
Cockpit and cabin detailing (a key factor for a 1/24 helo) is just average, the
seats have molded on belts, the instrument panel is flat with the instruments
represented by a decal, something not very convincing for the scale. The central
console has raised dials and looks passable. Two good looking pilots are
provided, the only “disadvantage” being that they are totally identical: if
using them, you might consider performing some “surgery” to one of them, in
order to look different from the other. Rest of the key areas detailing (hubs,
gearbox, visible part of the engine and so on) is also average.
Transparencies are crystal clear but quite thick and do not look very precisely
molded. Instructions are the classic Revell b/w ones, with the construction
spread in 40 clear steps.
Two very interesting marking options are provided, one for a beautiful Heliswiss
and one for a specially decorated Austrian Air Force bird. It must be stressed,
though, that both Heliswiss and the Austrian Air Force used the Agusta built
AB-204, which featured a different engine and, most importantly, a totally
different exhaust and surrounding area. This provision is not included in the
kit, meaning you either have to scratch build it (which looks like a lot of
work), or go for a UH-1B scheme. Decals are the early 90’s era Revell ones:
while they seem well registered, they are matt, with their backing paper totally
yellowed. Revell decals did not endure well with time and these 30 year old
decals are expected to be unusable.
| CONSTRUCTION |
I started with the cabin assembly: on the cabin floor, I attached the passenger
seat bottom, the rear bulkhead, the three piece seats, collectives, sticks and
instrument panel. The front structure that contains the foot pedals and various
boxes was a lovely 11-piece subassembly that was attached at the main cabin
floor. The internal rib-style framing is provided as four pieces that have to be
attached onto the cabin floor. While it looks quite interesting, in reality it
was covered by insulation blankets (apart from the front equipment bay part).
Anyways, since I would close all doors, I deemed the kit looks passable and
attached the framing as provided.
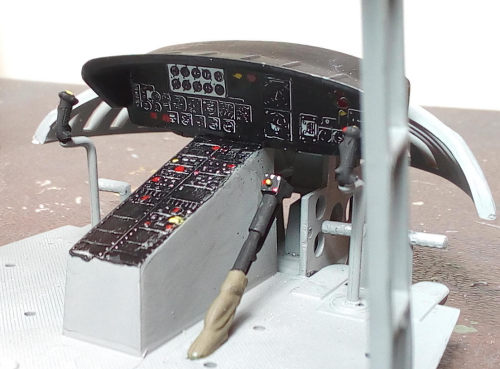 Basic cockpit color was Hu140 Gull Gray, with black instrument panel, console
face, grips and collectives. To add some interest, I painted all seat frames
Hu86 light olive (as was noticed at many Hueys) with olive drab cushions. Seat
belts were fabricated from khaki doped masking tape and were affixed on top of
the existing molded-on ones. The collectives had their gaiter boots painted
olive drab and had some red and yellow knobs added onto their faces. The central
console was dry brushed with silver and had similar “knobbing” added. Upon
trying to affix the instrument decal onto the IP, it partially disintegrated, so
I resorted to using leftover instrument decal pieces from my decal dungeon.
Basic cockpit color was Hu140 Gull Gray, with black instrument panel, console
face, grips and collectives. To add some interest, I painted all seat frames
Hu86 light olive (as was noticed at many Hueys) with olive drab cushions. Seat
belts were fabricated from khaki doped masking tape and were affixed on top of
the existing molded-on ones. The collectives had their gaiter boots painted
olive drab and had some red and yellow knobs added onto their faces. The central
console was dry brushed with silver and had similar “knobbing” added. Upon
trying to affix the instrument decal onto the IP, it partially disintegrated, so
I resorted to using leftover instrument decal pieces from my decal dungeon.
I proceeded by attaching the 6-piece engine supporting structure aft of the
cabin area, then flipped the cabin over and attached the two fortifying spars.
To make sure that no annoying tail sitting would commence, I secured, with
liquefied styrene, a hefty amount of weight into the console hollow area. All
visible framing innards were painted cockpit color.
I then went on and joyfully put together 10-piece the main gearbox, which was
subsequently cleaned of seams, painted steel and attached onto its base. The
main rotor, including the pair of blades, is a 10-piece affair that was also
assembled. The main hub had its heavy seams cleaned and the whole assembly was
filled and sanded smooth (a not extremely easy task, as it included numerous
ejector pin marks, some at nasty places). The pitch mechanism was attached at
the tail rotor which was also sanded smooth.
The engine is provided in two halves. Only its front (inlet) and rear (exhaust)
parts are visible on the completed model. The inlet looks good, but the exhaust
not only is thick, but also unrealistically hollow. To kind of remedy things,
upon joining the engine halves, I sawed off the exhaust, thinned it to scale
thickness and attached a leftover turbine face at its inner end. It was then
painted burned metal and left aside, to be attached at later stages. The main
engine had its front (visible) part sanded smooth and then painted steel. After
receiving a black wash that nicely brought out the mesh looking inlet, it was
attached in position and secured with its two supporting struts. The main
gearbox was attached at this stage, as well.
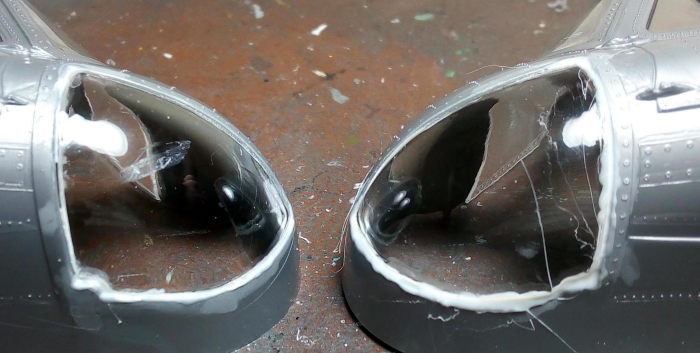 It was then fuselage time: I started by affixing the transparencies from the
fuselage and passenger doors innards. All more or less fitted adequately into
the molded in recessions (I did a less than perfect job at some of them...),
with the exception of the front bulbous ones that could not fit correctly,
leaving quite a few very nasty and at places big gaps. To remedy things, I took
a deep breath and first bravely sanded down the windows flush to the fuselage,
then applied liquefied styrene to the big gaps and sanded them smooth, followed
by putty application, progressive sanding with finer grit and finally polishing
of the complete transparencies with Plexiglas polishing agent.
It was then fuselage time: I started by affixing the transparencies from the
fuselage and passenger doors innards. All more or less fitted adequately into
the molded in recessions (I did a less than perfect job at some of them...),
with the exception of the front bulbous ones that could not fit correctly,
leaving quite a few very nasty and at places big gaps. To remedy things, I took
a deep breath and first bravely sanded down the windows flush to the fuselage,
then applied liquefied styrene to the big gaps and sanded them smooth, followed
by putty application, progressive sanding with finer grit and finally polishing
of the complete transparencies with Plexiglas polishing agent.
Upon feeling that the transparencies looked passable, I tinted the upward view
transparencies by applying a coat of Humbrol clear green from their inner side,
then gave all fuselage innards a coat of Hu140 gray. Upon drying, I joined the
two fuselage halves with the cabin trapped between them. To my joy, fit was very
nice and the cabin was firmly trapped without any glue required. The cooling air
intake in front of the gearbox was attached afterwards: its fit was not that
positive, leaving two sizable bilateral gaps that were treated with liquefied
styrene.
The model was then initially coarse sanded, with “normal” filling and sanding
following afterwards. Upon having a smooth basic frame, I went on adding the
various “bits and pieces”, including the four roof fresh air inlets, the upper
and lower cabin strakes, the annular air intake aft of the main gearbox, the
tail planes and tailskid, the three VHF aerials (one on the roof, two at the
tail) and the four door handles.
The landing skids had the cockpit steps affixed, and, after being cleaned of the
excess flash, were attached underneath. A problem immediately arose, due to the
model’s weight inflicting excessive stress to the scale thickness skids, leading
to their definite deformation over time. To counteract this, I reinforced the
skid-to-fuselage joints by adding small amounts of liquefied styrene between the
skid struts and the fuselage. A general 1500grit sanding took then place, all
transparencies were masked with masking tape and the model headed to the paint
shop!
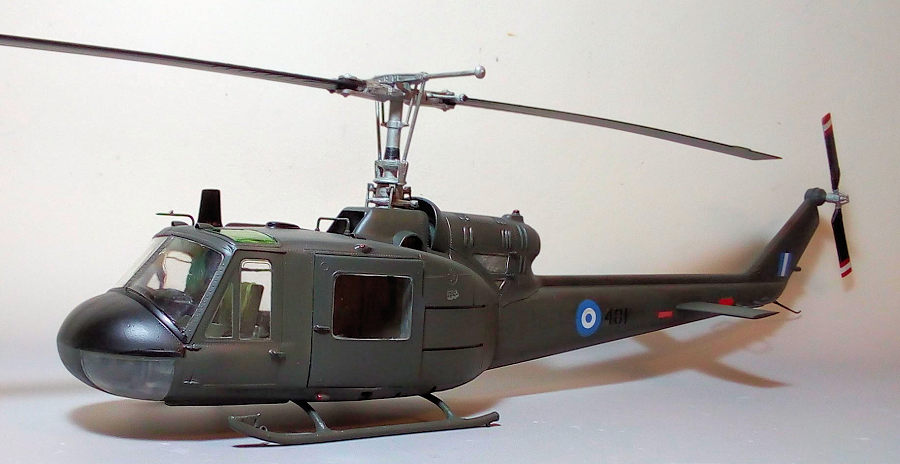
| COLORS & MARKINGS |
 Apart from three serial numbers, no further info is available regarding the
Greek “Bravo” Hueys, so I assumed that those machines arrived in Greece by the
end of the 60s in “used” condition and were field repainted at more or less the
same camo that were received, but with Hellenic insignia applied. I thus first
gave the front anti-glare panel a coat of flat black and masked it off, then
gave the whole chopper a coat of Hu66 Dark Drab, that actually comes very close
to the dark green shade the Hellenic Army used by that time.
Apart from three serial numbers, no further info is available regarding the
Greek “Bravo” Hueys, so I assumed that those machines arrived in Greece by the
end of the 60s in “used” condition and were field repainted at more or less the
same camo that were received, but with Hellenic insignia applied. I thus first
gave the front anti-glare panel a coat of flat black and masked it off, then
gave the whole chopper a coat of Hu66 Dark Drab, that actually comes very close
to the dark green shade the Hellenic Army used by that time.
After a coat of Future, I went on and applied the decals, which mainly consisted
or two Greek roundels, serial numbers and some minimal stenciling (assuming that
during field repainting not a lot of stencils would have been applied), all
coming from my decal spares. A coat of Future sealed the decals.
| FINAL CONSTRUCTION |
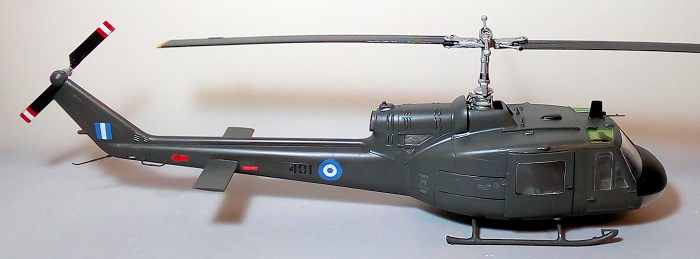
Both rotors had their blades painted flat black and their hubs steel. The main
rotor had its tips painted yellow, whereas the rear had its tips decaled by
using leftover red/white/red striped decal (the kit provided ones disintegrated
upon contact with water). Both rotors were then affixed in position.
 The roof mounted VHF antenna was painted flat black and attached, followed by
what looks to be a pitot tube, that was painted fuselage color with gunmetal tip
and attached a tad on the right. The molded on DF loop immediately aft was
carefully painted flat black, as well. The distinctive fin mounted rod-type
antenna was fabricated from stretched sprue, painted gunmetal and attached in
position.
The roof mounted VHF antenna was painted flat black and attached, followed by
what looks to be a pitot tube, that was painted fuselage color with gunmetal tip
and attached a tad on the right. The molded on DF loop immediately aft was
carefully painted flat black, as well. The distinctive fin mounted rod-type
antenna was fabricated from stretched sprue, painted gunmetal and attached in
position.
The fuselage- molded anti-collision and the six navigation lights were initially
touched with my fine tip silver pen and then had tiny blobs of red or green
Humbrol clear applied onto them. The mesh panels bilaterally of the engine area
were highlighted by silver dry-brushing at this time, as well.
I assumed that this was a relatively freshly painted bird, so I was not too
heavy in weathering. This consisted of a good black wash to the gearbox and
hubs, silver dry-brushing at all places where paint would rub-off (i.e. skids
steps) and, finally, application of dark brown/black pastels aft of the engine,
to simulate the inevitable engine soot.
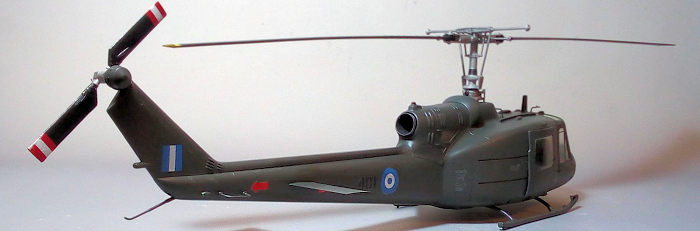
I then went on and gave the model its final satin (towards matt) final coat,
before calling it done!
| CONCLUSIONS |
This is a big, old mold kit with correct general shape. Fit is generally good,
with the exception of the downward vision windows, where some serious blending
job will be necessary. Surface detailing looks good and the fact that it is of
the raised variety might actually be more correct for Huey of this scale. Rest
of the detailing is not that much at key places like the main gearbox and,
especially the cockpit, where more should be expected at this scale.
Minimal aftermarket seems to be available, so if you want to super detail it,
the only way is scratch building. Decals were (understandably) unusable at my
1992 copy let alone the fact that they were actually correct for an AB-204 and
not a UH-1B, but newer reissues decals seem to endure well with time.
Apart from the downward looking windows challenging fit, putting the kit
together was not that difficult and I really had a great time building it.
However, due to its size, a novice modeler should accumulate some experience
before deciding to tackle it. Revell periodically reissues it at reasonable
prices with good decals.
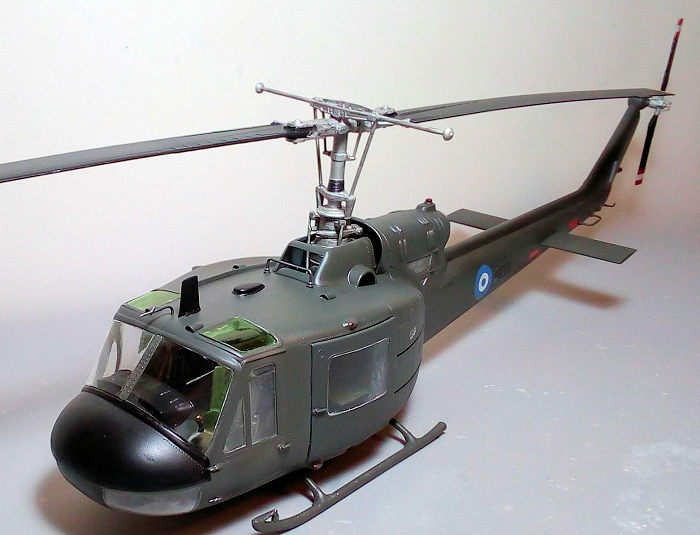
If you want a big, imposing chopper model with good general shape and can either
live with its plain detailing or be determined to super detail it, then you
might consider tackling it. The result will be a most impressive big scale Huey,
a definite eye-catcher in your showcase.
Happy modeling!
21 June 2022 Copyright ModelingMadness.com. All rights reserved. No
reproduction in part or in whole without express permission. If you would like your product reviewed fairly and
fairly quickly, please
contact
the editor
or see other details in the
Note to
Contributors.