| KIT #: | 01058 |
| PRICE: | $5.00 'used' |
| DECALS: | Two options |
| REVIEWER: | Christopher Campbell |
| NOTES: | Dated kit, though quite buildable |

| HISTORY |
The Cessna L-19 was essentially an evolution of the Cessna 170 civil aircraft built to a military requirement for a more modern, all metal liaison and spotter aircraft. During World War II the Taylorcraft L-2 Grasshopper, Piper L-3 & L-4 Cub, as well as the Stinson L-5 Sentinel had seen service around the globe in a variety of roles from artillery spotter to aerial ambulance and even light strike in form of the famous bazooka carrying L-4 dubbed “Rosie the Rocketer”. Despite such sterling service, a newer, all metal design was sought.
 All of these types had been of mixed metal and fabric
construction, decidedly dated as the jet age dawned. The mixed construction was
also prone to damage more readily than an all metal airframe. There was no
denying a continued need for such types, though. A more durable, more modern,
and more powerful replacement was needed. Cessna brought forth an excellent
design that fit the requirements nicely.
Of all metal construction, it was powered by a Continental opposed flat-6 O-470-11 air cooled engine producing 213 horsepower. This initially drove a fixed two-blade propeller, though later versions would sport a constant speed type. Seating was in tandem and it could accommodate a stretcher if needed, still allowing for it to operate in the air ambulance mode.
Visibility was excellent, including panels in the roof of the cabin known as Omni View allowing for upward visibility. Unlike previous types, it had excellent rearward visibility as well. Angled side windows for ground observation completed the package.
First flying in December of 1949, it was selected over submissions from Taylorcraft, Stinson, Piper, and Temco with orders coming in from the U.S. Army, Air Force, and Marine Corps. By the time production ended a decade later, more than 3,400 had been built.
Stinson had produced a somewhat similar type in the form of the L-13 which would see service with the U.S. Army starting in 1947, though never in the numbers of the L-19. Additionally, the Piper L-18 & L-21 Super Cub would see both Army and Air Force service as well. Both were very capable aircraft, though less powerful.
L-19’s would see extensive use in the Korean War in the spotter role for which they had been designed. Later redesignated as O-1 in 1962 under the Tri-Service designation system, their most well-known service would come later in Vietnam. There they proved to be an excellent forward air control aircraft, spotting and marking targets for fast movers until supplanted by another Cessna product, the twin-engine O-2 Skymaster.
 The name Bird Dog originated from a contest within the
Cessna company to select a name by which it would be known in military service.
An industrial photographer by the name of Jack Swayze submitted the name. This
was approved by the Army, as it largely described the function of the aircraft,
to find and spot targets.
Even as it was replaced by the O-2 and in some cases OV-10 Bronco above the battlefield, the Bird Dog was so capable that it would soldier on until the end of the U.S. involvement in the Vietnam conflict, especially in the artillery spotter role.
Many aircraft were passed to the V.N.A.F. Perhaps the most famous of these was the one used by South Vietnamese Air Force Major Bung-Ly to evacuate his wife and five children from Con Son island to the aircraft carrier U.S.S. Midway the day before the fall of Saigon. This aircraft can be seen today at the National Museum of Naval Aviation in Pensacola, Florida.
After the U.S. withdrawal from Vietnam, the Bird Dog vanished rather quickly from U.S. service. The last one was retired by the U.S. Army in 1974. They would operate in Civil Air Patrol service for a time afterwards. One C.A.P. pilot whom I knew recounted to me that his unit once had one and that it was the darling of the pilots.
Aside from its U.S. service, the Bird Dog had numerous foreign operators throughout Europe, Asia, and South America. At least twenty-five nations operated it over the years. Today, they can still be seen flying in private hands, often as a war bird in vintage military markings. Perhaps the most unexpected one that I have personally seen was in Laotian insignia at an airshow in Tennessee around the year 2001. Had I the means, I would love to have one for myself.
| THE KIT |
 First released by Airfix in 1973, the kit originally
came in a bag or blister pack with a cardboard header, like many basic Airfix
kits of this era. Markings have, to my knowledge, always been for one U.S.A.F.
and one V.N.A.F. aircraft.
Every example that I have seen was molded in grey plastic and it is a basic kit, though quite typical of 1/72 kits of this era. There is a basic cockpit and components that one would expect, as well as underwing rockets used for marking targets. However, as a very basic aircraft, there is actually very little to fault the kit on for the era in which it was first offered.
Airfix kept the kit in more or less continuous release. The packaging was revised frequently, though much like the O-1 itself, the kit would soldier on, largely unchanged. The last release that Scalemates notes is in 2008.
This is a subject that I had expected to see Airfix retool, though no new kit has yet appeared or even been announced. A new kit has come forth from Avi Models in 2021 and is now being issued by LF Models. I have not actually seen this kit myself, so I cannot say if it is an improvement, though suspect this maybe the case. Still, the old Airfix kit builds up easily enough, so it is not to be discounted.
| CONSTRUCTION |
I have always liked the Bird Dog. I personally would like to add the 1/48 and 1/32 Roden kits to my collection, as I would enjoy having a couple in larger scale. When I chose to build this one, the only 1/48 kit was the Model U.S.A. release, which is not a truly bad kit, though decidedly short run.
While I have never flown in one, I did fly in a T-6 with a former Bird Dog F.A.C. pilot. He delighted in showing me how they would fly to mark targets. Being something of an adrenalin junkie, I loved it.
I happened upon one of the 1980’s releases on a vendor table at an I.P.M.S. show around 2010 and picked it up for $5.00. Then it just sort of languished in my stash for a while. I kept hoping for a bigger scale kit, 1/32 preferably, this was a few years off.
I have always liked the lines of the O-1 and consider it practically a legendary aircraft. Yet, I wanted to build a larger scale model as a F.A.C. aircraft. Thus, this was a model awaiting the right subject for its inspiration.
After meeting my wife, Sunny, in 2010, who hails from Taegu, South Korea, I built a number of South Korean subjects. Several of these have already been featured here. This is one of my favorites, though, which I happened upon by accident.
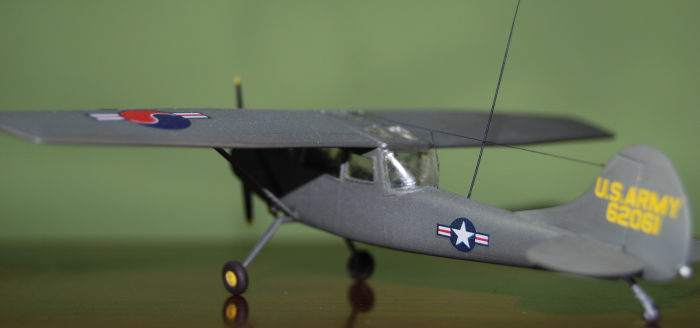
Looking through the Squadron/Signal book Air War Over Korea by Larry Davis from 1982, I noticed a photo of an L-19. It wore interesting mixed markings with South Korean insignia on the wings and U.S. markings on the fuselage and tail. This was truly unique and something that I simply had to build.
Construction started with the very basic cockpit. There is little more here than a pair of seats and joy sticks with a decal for the instrument panel. I painted the cockpit in Model Master Interior Green with the seats being painted in Model Master Faded Olive. I added some canopy bracing made from fine brass tubing bent to shape and painted in the same interior green as seen in the Squadron/Signal O-1 Bird Dog in Action book. A pair of generic control sticks were gleaned from the spares bin and added as well.
Aside from that, there was little more to be done here. An acrylic wash based on Tamiya Flat Black diluted in denatured alcohol was added to give the interior a somewhat worn look. Unfortunately, little can be seen through the somewhat thick clear parts.
Prior to closing up the fuselage, I painted part of the exterior in the Model Master Olvie Drab, then dusted with Model Master Faded Olive. This was due to the side windows having to be glued in place before the fuselage is assembled.
These transparencies were given a dunk in Future. Once dry they were glued in place with CA glue applied with a toothpick. Then the fuselage was closed up with good, old fashioned Testors tube glue.
The wings were then glued together in the same manner with no issues. The center, which is the roof of the cockpit was painted in the same interior green with outer section being sprayed in Model Master Olive and Faded Olive followed by installing the Omni View panes in the same manner.
 This assembly was then joined to the fuselage with
some very carefully applied CA glue so as not to haze any of the clear parts.
Test fitting is advised here so as to get as clean a join as possible. Sanding
is tricky with the side windows. Fortunately, mine came out fairly neat and
there was only a minimum of touchup needed.
The vertical and horizontal tail parts were added, again glued up with CA. Any filling needed was accomplished with some more CA and a toothpick. This cleaned up nicely with 400 grit sandpaper and a buffing with 0000 steel wool.
The nose cowl was glued up as well, though I did not install the propeller. Knowing that I would never manage to keep the tiny and fragile propeller intact through the rest of the assembly, I opted to keep this off until last. It would have to be glued in place in a fixed position that I liked. (I had enough trouble just keeping the tail wheel in one piece!)
A little sanding was needed with the cowl, though only a little, in part due to the soft plastic. The plastic was typical of most Airfix kits that I have encountered. As such, it is easy to sand off detail by accident, or intentionally if needed. I suspect most reading this have already experienced this, for good or bad. However, it is worth noting and being aware of.
The wing supports were now added. These had a visible mold line which was cleaned up with a sharp X-acto blade, then buffed with steel wool. They proved a little finicky, though finally were secured in place with a drop of thick CA glue and a shot of accelerator.
Finally, the landing gear was attached in the same manner and proved to be the most troublesome part of the build. The attachment is a bit iffy, and they were so thin and soft that they had warped. Once I had what I deemed to be a sufficient alignment they were glued in place as the wing support struts had been. Then, some very careful bending got them into more or less the right shape.
| COLORS & MARKINGS |
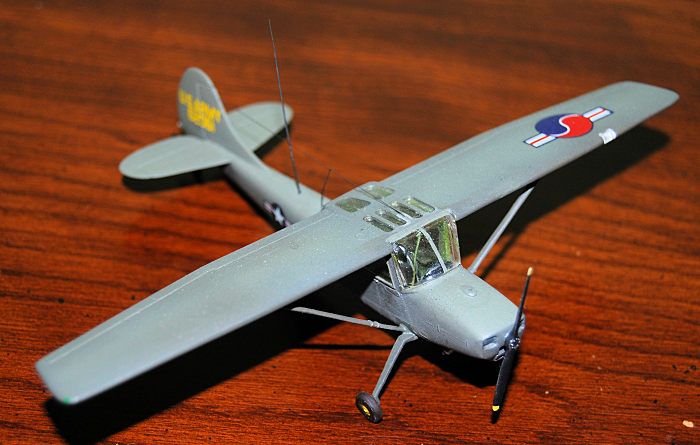 Everything was blown off and given a final clean up.
Then all of the clear parts were carefully masked in Tamiya tape. This is a bit
tedious on the side windows, though I finally managed it. The model was then
shot in Model Master Olive drab. Once dry this was followed by some shading with
some Model Master Faded Olive, especially on the upper surfaces to give it the
somewhat war weary look that the aircraft in the photo had to my eyes.
The tires were painted in Testors rubber all around. The hubs of the main gear wheels were painted in Testors Flat Yellow while the tail gear was painted in Model Master Dark Anodonic Grey. Once they were dry, I glued the former in place with a drop of CA, the tail gear and wheel having been molded with the fuselage. The exhaust assembly was painted in Testors Rust, then dry brushed with some Model Master Burnt Iron and glued in place as well. Then the entire model was given a shot of Model Master Gloss and set aside to dry while I searched for decals.
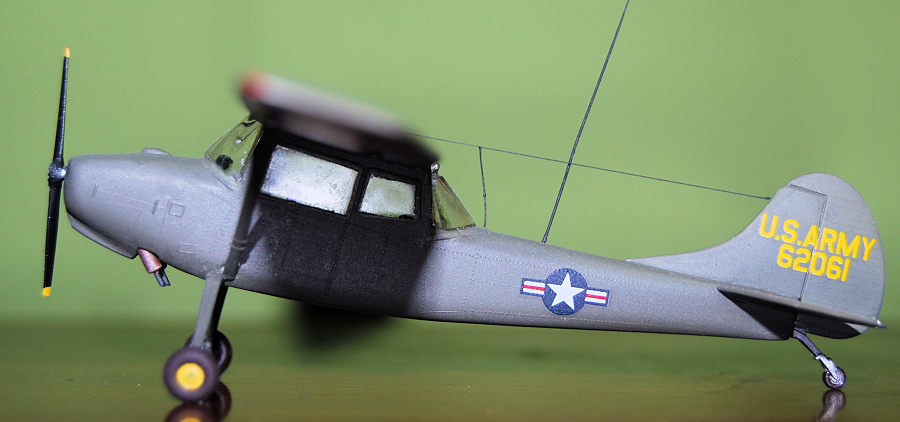
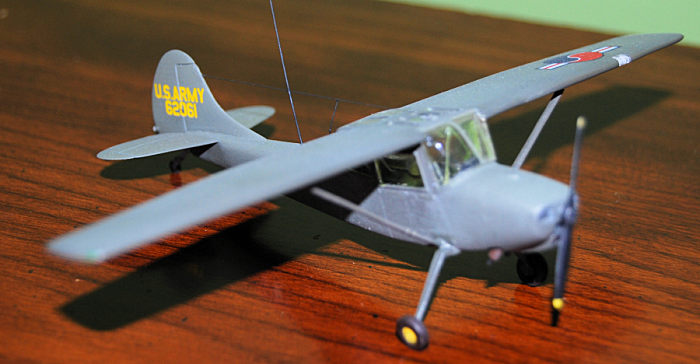
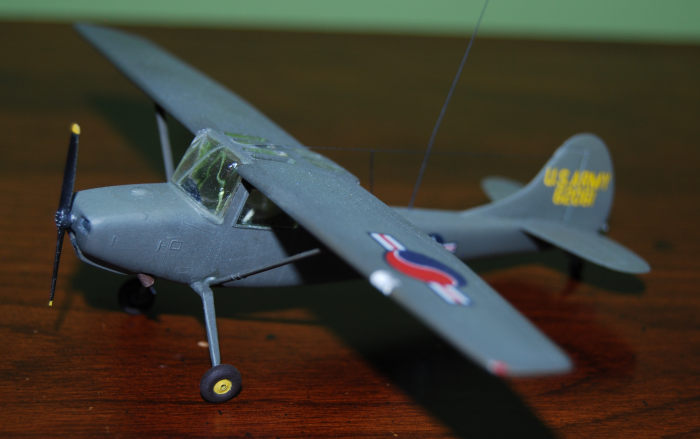
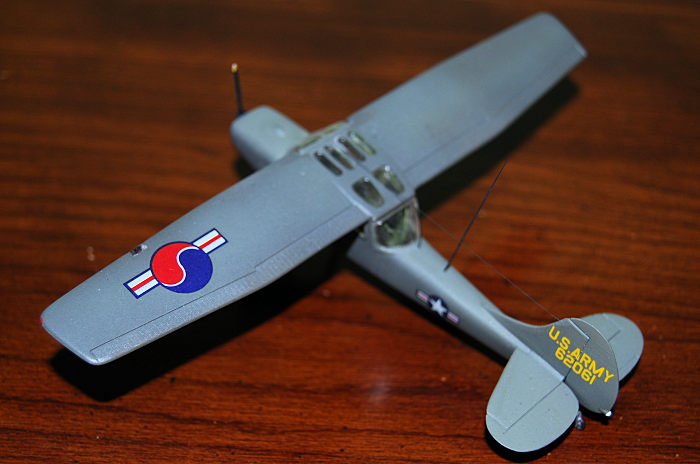
This one was mainly sourced from numerous remnant sheets in my decal files until I had all of the insignia that I needed. The aircraft features South Korean insignia on the wings and U.S. insignia on the fuselage. This, along with the yellow U.S. Army insignia and serial on the tail are all of the markings.
All went on and settled down with a little Solvaset. Once thoroughly dry it was dusted with more Gloss. This was followed with Model Master Dullcoat and set aside to dry again. There was some slight silvering on the starboard fuselage insignia, though no other problems of note.
| CONSTRUCTION CONTINUES |
 The propeller was carefully trimmed of any flash and
then painted in Testors Flat Black with Flat Yellow on the tips. Model Master
Dark Anodonic Grey was used on the hub. Once dry, a very light dry brushing was
given to the edges with Testor’s silver to imply wear. Then it was secured in
place with a drop of CA glue.
The clear landing light for the wing required a little trimming, though fit in place easily enough and was secured with some Testors tube glue applied with a toothpick. Then the running lights were picked out in Testors Green, Red, and white.
The blade antenna was not used and the slot for it had been filled in when the fuselage was being sanded. This type of antenna was not in use on L-19’s during the Korean War to my knowledge and did not appear in the photo. Instead, a long, whip antenna was made from stretched sprue as well as the basic wires running from the tail to the cockpit and fuselage. These were glued in place with CA glue and secured with a shot of accelerator. Tamiya flat black was then applied to them with a fine brush.
Now it was finished and I had one of the most uniquely marked aircraft that I had ever built. Today it occupies a spot in my display case next to a 1/72 South Korean F-51D, flanked on either side by my South Korean AT-6G and Harvard.
| CONCLUSIONS |
The Airfix kit is dated and lacking in cockpit detail, even for a 1/72 scale kit. The fit is good enough, though and it was a fairly quick and easy build. I would estimate that it took me only about four or five hours working time in total with the entire project being completed over a weekend.
For a more detailed, larger kit of the subject, the 1/48 or 1/32 Roden kits would obviously be the way to go. For a 1/72 kit, this is definitely the budget option. The LF Models kit tends to go for about twice the price of the Airfix kit, from what I have seen.
I saw some AVI Models kits of the Bird Dog for sale online, though at prices that were so astronomical for a kit in this scale that I could only call them absurd. I cannot imagine that the kit could possibly be that phenomenal as to justify that sort of expense. This must be collector driven, as I believe that it is the same mold used by LF. As noted, I have not seen either of these kits outside of the box, so I cannot speak for the quality of them.
Despite its low parts count, assembling the cockpit and wing windows can be a bit of a challenge. To something of a lesser degree, the same could be said of the wing supports and main gear. While I would recommend it to any modeler wanting a 1/72 Bird Dog for a minimum of expense, I would also recommend it to modelers with a little experience.
As always, have fun. Enjoy the build and be happy with what you did.
| REFERENCES |
O-1 Bird Dog in Action by Al Adcock, Aircraft #87, Squadron/Signal Publications, 1988
Air War Over Korea, by Larry Davis, # 6035, by Larry Davis, Squadron/Signal Publications 1982
https://en.wikipedia.org/wiki/Cessna_O-1_Bird_Dog
Christopher Campbell
18 November 2024
Copyright ModelingMadness.com. All rights reserved. No reproduction in part or in whole without express permission from the editor.
If you would like your product reviewed fairly and fairly quickly, please contact the editor or see other details in the Note to Contributors.