Hobby Boss
1/48 FJ-4B Fury
|
KIT # |
80313 |
|
PRICE: |
$28 MSRP |
|
DECALS: |
2 options: Navy CAG A/C from VA-214; USMC VMF-323 |
|
REVIEWER: |
|
|
NOTES: |
|
|
HISTORY |
The North American FJ-2/-3/-4
Fury was a series of swept-wing carrier-capable fighters for the
 The final
versions of the Fury were the FJ-4 and FJ-4B, which some argue was the best of
the entire F-86/FJ Fury series. While the FJ-4 initially appears to an observer
as a modified F-86, it has many differences and only the family ancestry is
apparent. The most significant difference was the thinner wing with a much
broader chord at the root. Internal fuel tanks within the larger wing increased
the FJ-4’s internal fuel capacity by 50%. In addition, the earlier Furies and
Sabres used leading edge slats that were actuated aerodynamically. The FJ-4
incorporated a drooping wing leading edge, which provided additional lift during
landing and improved low speed handling. The tail surfaces were also almost
completely new, and the tail was taller than previous versions. The horizontal
tail surfaces had no dihedral and had a smaller span and a larger chord than
previous Furies and Sabres. In addition, internal fuel capacity was increased,
necessitating a distinctive, taller "razorback" rear deck, and the landing gear
was widened. Later
FJ-4s were equipped with an in-flight refueling probe that was permanently
mounted underneath the left wing.
The final
versions of the Fury were the FJ-4 and FJ-4B, which some argue was the best of
the entire F-86/FJ Fury series. While the FJ-4 initially appears to an observer
as a modified F-86, it has many differences and only the family ancestry is
apparent. The most significant difference was the thinner wing with a much
broader chord at the root. Internal fuel tanks within the larger wing increased
the FJ-4’s internal fuel capacity by 50%. In addition, the earlier Furies and
Sabres used leading edge slats that were actuated aerodynamically. The FJ-4
incorporated a drooping wing leading edge, which provided additional lift during
landing and improved low speed handling. The tail surfaces were also almost
completely new, and the tail was taller than previous versions. The horizontal
tail surfaces had no dihedral and had a smaller span and a larger chord than
previous Furies and Sabres. In addition, internal fuel capacity was increased,
necessitating a distinctive, taller "razorback" rear deck, and the landing gear
was widened. Later
FJ-4s were equipped with an in-flight refueling probe that was permanently
mounted underneath the left wing.
The
FJ-4’s performance included a max speed of 680 mph and a service ceiling of
46,800 feet. Its range was 2,020 mi with 2-200 gal drop tanks and a combat load
of 2 AIM-9 missiles. Internal armament consisted of 4-20mm cannons mounted in
the nose.
 The FJ-4’s
first flight was on October 28, 1954. It was powered by a 7,650 lb. thrust
Wright J-65-W-4 engine, the same engine in the FJ-3. Delivery of FJ-4s began in
February 1955, and except for one squadron that trained Navy FJ-4B pilots, FJ-4s
were used exclusively by the Marine Corps.
The FJ-4’s
first flight was on October 28, 1954. It was powered by a 7,650 lb. thrust
Wright J-65-W-4 engine, the same engine in the FJ-3. Delivery of FJ-4s began in
February 1955, and except for one squadron that trained Navy FJ-4B pilots, FJ-4s
were used exclusively by the Marine Corps.
The
FJ-4B was a fighter-bomber version, capable of carrying an increased under-wing
weapons load of 3,000 lbs., including nuclear weapons on a single station. A
total of 152 FJ-4s and 222 FJ-4Bs were produced. The FJ-4B had a set of flight
spoilers just ahead of the trailing-edge flaps. These were used at low altitudes
and high mach numbers to improve overall control. The FJ-4B also had an extra
pair of speed brakes underneath the fuselage near the tail. The B model was
equipped to deliver the Martin ASM-N-7 Bullpup air-to-surface missile. The
Bullpup carried a 250 lb. high explosive warhead and flew at about Mach 1.7 out
to a range of about 4 miles.
The
FJ-4B’s final operational cruise was aboard the USS Hancock in 1962. After that,
the surviving aircraft were transferred to reserve units. The final FJ-4B was
withdrawn from the Naval Air Reserves in the mid 1960s.
|
THE KIT |
This is my first Hobby Boss kit, so I was anxious to
see how the kit compared with other manufacturers’ products. While the kit does
not have an overly extensive number of parts, those that it does have are c risply
and cleanly molded. There are a few optional parts, so as usual, one needs to
decide up front what parts will be used.
risply
and cleanly molded. There are a few optional parts, so as usual, one needs to
decide up front what parts will be used.
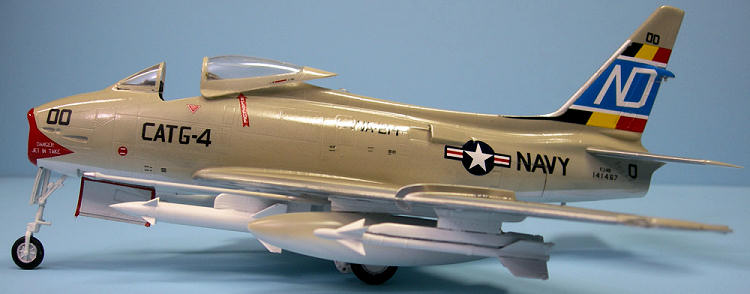
The decals, while beautifully done, are inaccurate, according to Will
Riepl in his March 2008 Internet Modeler Review. Will says the Navy CAG aircraft
markings have several flaws. First, the tail stripes, which are depicted as
black, yellow and red, should be red, yellow and orange. He further adds that
the ND tail code is shown at an angle to the other trim, when it should be
parallel to the white stripes. The CATG-4 text is also the wrong shape, and the
nose numbers are less than half the size they need to be. Lastly, the intake
warning decal says “Danger In Take” instead of “Danger Intake.” The decals for
the USMC have some color inaccuracies, too.
Not wanting to purchase
aftermarket decals for this kit, I opted to model the Navy aircraft as I felt it
was more colorful (even in its inaccuracies).
|
CONSTRUCTION |
 Following
the assembly instructions, I started with the cockpit, which is not overly
detailed, but looks reasonable.
The
ejection seat could use a harness and lap belt, but I opted to stick with the
OOB build. Once I assembled the cockpit and painted it, I glued it to the top of
the intake. I mounted the intake and cockpit to the right fuselage side, and
then placed a good bit of weight around the intake so that the model would sit
on its nose gear. I then glued the left fuselage to the right, and here is where
I encountered my first problem.
Following
the assembly instructions, I started with the cockpit, which is not overly
detailed, but looks reasonable.
The
ejection seat could use a harness and lap belt, but I opted to stick with the
OOB build. Once I assembled the cockpit and painted it, I glued it to the top of
the intake. I mounted the intake and cockpit to the right fuselage side, and
then placed a good bit of weight around the intake so that the model would sit
on its nose gear. I then glued the left fuselage to the right, and here is where
I encountered my first problem.
The intake was not centered in the nose, and I had to fiddle with it to get it
straight. The solution was to shim it with plastic sprue pieces on one side to
center it in the nose. Once I did this, I glued part A24, the intake nose, onto
the intake tube. This a lso
did not quite match up, so I applied generous amounts of putty to fill the gaps.
After careful wet sanding, I was able to contour the surfaces into the nose in
an acceptable manner.
lso
did not quite match up, so I applied generous amounts of putty to fill the gaps.
After careful wet sanding, I was able to contour the surfaces into the nose in
an acceptable manner.
The next assembly was the wings and main gear wells. Since I was going to hang
ordnance on the wings, I made sure I opened up the mounting holes in the lower
wings before gluing the top wing halves to the lower uni-wing half. I then glued
the horizontal stabilizers to the fuselage and the rudder to the tail. I also
glued the three piece nozzle and tail cone into the aft fuselage.
Since I was choosing for the gull gray over white undersurfaces paint scheme,
and, according to my references, just about everything on the underside of these
aircraft was painted white, I decided to glue all under-wing parts, including
the landing gear, to the model rather than wait until after I had applied the
main color scheme. I assembled the landing gear and then attached these and the
gear well doors to the model. As usual, Murphy raised his ugly head: during the
painting, I managed to snap off the nose gear strut (now I remember why I don’t
attach landing gear and other parts to a model until AFTER I finish the main
paint scheme). Out came the trusty pin vise, and after drilling a small hole in
each section of the broken strut, I super-glued a length of paper clip wire into
both holes to secure the strut. After this experience, I was very careful not to
break anything else.
The kit provides the option of open or closed speed brakes, but I opted for the
closed position, as this seems to be the normal attitude of these doors when the
aircraft is on the ground. I also opted for the stowed tail hook assembly, which
I glued into its recessed position on the aft fuselage.
 The final
assemblies were the under-wing ordnance pieces. I decided to arm my Fury with
Bullpup missiles and Sidewinders. Unfortunately, the Bullpup guidance pod, which
was usually carried on one of the inside pylons, is not included in the kit, so
my decision to hang Bullpups on my model was not the most accurate one I could
make. But, again, like the decals, I thought the model would look cooler with
these air-to-ground missiles hanging from the wing pylons, especially since this
was one of the features that distinguished the FJ-4B from the FJ-4. Finally, I
opted to complete my model’s loadout with the two kit-provided drop tanks. One
drawback here is that the kit does not provide any stenciling or marking decals
for the ordnance.
The final
assemblies were the under-wing ordnance pieces. I decided to arm my Fury with
Bullpup missiles and Sidewinders. Unfortunately, the Bullpup guidance pod, which
was usually carried on one of the inside pylons, is not included in the kit, so
my decision to hang Bullpups on my model was not the most accurate one I could
make. But, again, like the decals, I thought the model would look cooler with
these air-to-ground missiles hanging from the wing pylons, especially since this
was one of the features that distinguished the FJ-4B from the FJ-4. Finally, I
opted to complete my model’s loadout with the two kit-provided drop tanks. One
drawback here is that the kit does not provide any stenciling or marking decals
for the ordnance.
At this point, I noticed
another minor flaw in the kit. The landing gear is represented as being in
complete compression, which gives the model a somewhat lower stance than it
should have when compared to the real thing. This, of course, can be corrected
by the experienced modeler, but I opted to leave it be (too many kits to build
and not enough time to do so).
|
COLORS & MARKINGS |
In
preparation for painting, I masked the canopy with 3M magic tape, and glued it
to the fuselage with white glue. I shot the bottom of the model with Testors
flat white. Once dry, I masked a rough demarcation line along the fuselage
sides, masked the undersides of the wings and horizontal tail, and then sprayed
the upper surfaces Model Master gull gray. I also painted the upper
 surfaces
of the drop tanks with Gull Gray and the lower surfaces flat white.
surfaces
of the drop tanks with Gull Gray and the lower surfaces flat white.
Once the paint was dry, I gave the entire model a coat of Testors Gloscote in
preparation for the decals. I popped the canopy off the fuselage, since I wanted
to display the model with the canopy open. During the process, I managed to
crack the canopy. Oh well: live and learn (again, I could have vacu-formed a new
canopy, but I decided to press on without fixing this).
I next applied the decals. With generous amounts of
Solvaset, these went on very well, including the tail decal, which has to fit
over several difficult contours. I was a little concerned about the intake
decals, but they lined up fairly well and, with ample Solvaset, they laid down
perfectly. I then hand-painted the gloss red inside of the intake, and the
warning outlines around the landing gear door edges. I decided to leave the
model with a high gloss finish, as this appeared to be normal for newer aircraft
with this scheme on-board carriers.
|
CONCLUSIONS |
This is a nice, reasonably priced Hobby Boss kit, and, in spite of a few fit problems, was a pleasure to assemble and paint. The model looks great when completed. I highly recommend it to those needing a Fury in their collection of naval aircraft.
|
REFERENCES |