| KIT: | Hasegawa 1/72 A-4E/F Skyhawk |
| KIT #: | B9 |
| PRICE: | $9.25 |
| DECALS: | Two options |
| REVIEWER: | Tim Cromartie |
| NOTES: | Great kit, recommend using Hasegawa's Weapons Sets |
| HISTORY |
The Skyhawk first flew on June 22, 1954. Intended to fill the U.S. Navy’s need for a jet-powered light attack bomber that could replace the Douglas AD-1 Skyraider, the Skyhawk was a departure from the prevailing “bigger is better” design trend in naval aviation in the 1950’s, being smaller and more nimble than many of its contemporaries. The brainchild of designer Ed Heinemann, the Skyhawk was designed to meet rigid Navy specifications: 2000 lb. bomb load, maximum speed of 500 mph, and a 460-mile operating radius, at a cost of no more than $1 million each. Upon delivery, it was under budget at $860,000 each, and during October 1955 speed tests it clocked 695 mph; later versions of the Skyhawk could carry over 8,000 lbs. of ordnance.
Under the initial designation
A4D-1, it entered service with front-line Navy squadrons on October 26, 1956
starting with VA-62. The first Marine squadron to take delivery was VMA-224 in
January 1957. Both squadrons had previously operated in Grumman F9F Panthers.
The A-4 had many nicknames over the course of its career, some reflecting its
diminutive size: “Tinker Toy,” “Scooter,” “Heinemann’s Hot Rod (in a nod to its
designer),” and for the later –E and –F versions featuring the avionics hump,
“Camel.”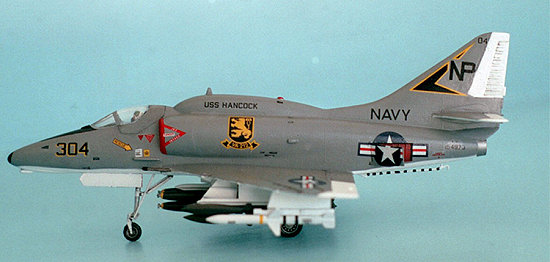
Almost from the very beginning, the Skyhawk saw extensive action in the Vietnam War. On August 5, 1965, several A-4’s took part in retaliatory air attacks against North Vietnamese torpedo boat bases at Loc Chao and Quang Khe in response to the Gulf of Tonkin incident. One week later, A-4’s were dispatched on the first “Iron Hand” air attacks using Shrike anti-radiation missiles against North Vietnamese surface-to-air missile sites. During subsequent escalation in 1967, A-4’s bombed targets such as powerplants in Hanoi. Although adaptable to the fighter role in a pinch and equipped with two 20mm cannon as defensive armament, there is only one recorded incident of an air-to-air kill by a Skyhawk over Vietnam. On May 1, 1967, during an attack on Kep airfield in North Vietnam, Lieutenant Commander Theodore R. Schwartz of VA-76 off the U.S.S. Bon Homme Richard, shot down a MiG-17 using Zuni air-to-ground rockets. In 1970, an Israeli Skyhawk shot down a Syrian MiG-19 over Lebanon with the same type of weapon, and at least one A-4 in Israeli service brought town a MiG-17 using a 30mm DEFA cannon, which replaced the two 20mm. The A-4H version of the Skyhawk was quite useful to the Israelis, having double the bomb load (8,200 lbs) of the type previously flown by IAF, the French Dassault Mirage IIIC.
Having sufficient speed and maneuverability to be employed as a MiG adversary at the U.S. Navy’s Fighter Weapons School, the nimble A-4 has given pilots seeking to hone their air combat maneuver skills a run for their money. A cheap, easy to maintain and reliable attack aircraft, the Skyhawk had a fairly long service life, operating with U.S. Navy units for a total of 47 years. The last Marine Corps units reportedly decommissioned the type in 1994, but the last Navy unit to fly the Skyhawk, VC-8 based at NAS Roosevelt Roads in Puerto Rico, laid the A-4 to rest after a final flight on May 3, 2003. In addition to serving the U.S. military, Skyhawks also flew for the air forces of Argentina (seeing action in the 1982 Falklands War), Australia, Indonesia, Israel, Kuwait, New Zealand, and Singapore.
| THE KIT |
 This is my first Hasegawa kit, and
it fell together beautifully. The copyright date on the box is 2003, but it may
actually be older -- most of the panel lines are raised and there is no cockpit
detail, just three decals for the main and side instrument panels. Shape and
fit are quite good and the landing gear and wheel wells offer fairly good detail
for 1/72 scale. The kit comes with a pilot figure, 12 250-lb. bombs, and 6
500-lb. bombs on three triple ejector racks, plus centerline and underwing fuel
tanks. Also there is a choice between two Sparrow or two Bullpup missiles, and
straight or angled refueling probes on the right side of the fuselage. The 20mm
guns are a little disappointing as they are molded into the wings and are not
particularly detailed. For decals, there is a choice between Navy and Marine
Corps versions. The Navy version represents the markings of the Commander of
the Air Group for CVW-21 (USS Hancock) VA-55 “War Horses,” and features a
multi-colored rudder. The Marine Corps version is for VMAT-102 “Hawks,” and is
a 1/72 version of the red markings offered in the old 1/48 Monogram A-4E Skyhawk
kit.
This is my first Hasegawa kit, and
it fell together beautifully. The copyright date on the box is 2003, but it may
actually be older -- most of the panel lines are raised and there is no cockpit
detail, just three decals for the main and side instrument panels. Shape and
fit are quite good and the landing gear and wheel wells offer fairly good detail
for 1/72 scale. The kit comes with a pilot figure, 12 250-lb. bombs, and 6
500-lb. bombs on three triple ejector racks, plus centerline and underwing fuel
tanks. Also there is a choice between two Sparrow or two Bullpup missiles, and
straight or angled refueling probes on the right side of the fuselage. The 20mm
guns are a little disappointing as they are molded into the wings and are not
particularly detailed. For decals, there is a choice between Navy and Marine
Corps versions. The Navy version represents the markings of the Commander of
the Air Group for CVW-21 (USS Hancock) VA-55 “War Horses,” and features a
multi-colored rudder. The Marine Corps version is for VMAT-102 “Hawks,” and is
a 1/72 version of the red markings offered in the old 1/48 Monogram A-4E Skyhawk
kit.
| CONSTRUCTION |
The cockpit is basic with a seat, pilot figure, and a small tab for the instrument panel. The fuselage is a standard two halves with the exception of the dorsal avionics hump aft of the cockpit, a separately molded piece that fits on well, requiring filler and sanding to hide the resulting seam. The 20mm guns lack detail and are located in the wing roots, molded as part of the wings, and when you attach the wings to the fuselage the clearance for the guns is a bit tight. The only serious construction challenge is the separately molded engine intakes. They require putty and a terrific amount of sanding to get them to fit flush with the rest of the fuselage.
The modeler has choices, as
all the ordnance included cannot be carried simultaneously. I did some research
and ruled out using both missile types provided. The Sparrow had a ten percent
success rate in Vietnam, so poor that fighter p ilots
“ripple-fired” them at least two at a time to increase the chances of a hit.
The Bullpup air-to-ground missile was not much better. Designed to be a
stand-off weapon to minimize the time pilots were exposed to ground fire, the
Bullpup was a line-of-sight missile requiring pilots to “paint” the target with
a radio beam which the missile rode to its point of impact. Since the pilot had
to keep his aircraft pointed at the target after firing a Bullpup, flying a very
predictable straight line and remaining exposed to ground fire the entire time,
the method of delivery defeated the very purpose of the Bullpup program, i.e. to
allow pilots to “fire and forget.” Like the Sparrow, the AGM-12 Bullpup was
widely used but not always effective.
ilots
“ripple-fired” them at least two at a time to increase the chances of a hit.
The Bullpup air-to-ground missile was not much better. Designed to be a
stand-off weapon to minimize the time pilots were exposed to ground fire, the
Bullpup was a line-of-sight missile requiring pilots to “paint” the target with
a radio beam which the missile rode to its point of impact. Since the pilot had
to keep his aircraft pointed at the target after firing a Bullpup, flying a very
predictable straight line and remaining exposed to ground fire the entire time,
the method of delivery defeated the very purpose of the Bullpup program, i.e. to
allow pilots to “fire and forget.” Like the Sparrow, the AGM-12 Bullpup was
widely used but not always effective.
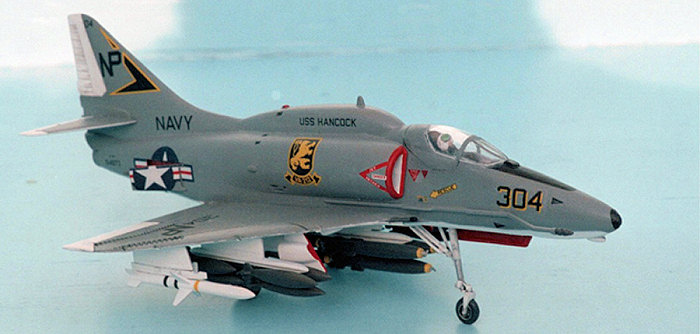
I decided to outfit my Skyhawk for an “Iron Hand” strike against a SAM missile site, and selected ordnance accordingly. I picked up a couple of Hasegawa’s Aircraft Weapons Sets for different and more detailed ordnance than that provided in the kit. One of the weapons configurations the kit provides is a full complement of bombs on triple ejector racks on the Skyhawk’s centerline and inboard wing hardpoints, with Bullpup or Sparrow missiles on the outboard wing stations. I modified this by using Shrike missiles instead, which had a better track record against surface-to-air missile (SAM) sites in North Vietnam. The beauty of Hasegawa’s aftermarket missiles is that they all come with plenty of decals for fine detail that you don’t have to paint on, and I used every available decal for the Shrikes. Finally, I replaced the kit’s six 500-lb. standard free-fall bombs with a few low-drag Mk. 82 Snakeye 500 lb. bombs for the centerline station. Snakeyes were a popular close air support weapon in Vietnam, facilitating low-level, precision attacks with a reduced danger to pilot and plane from bomb fragments.
| COLORS & MARKINGS |
Painting
First, I began with a coat of Model Masters Gray Primer. I used the standard Navy paint scheme for the Vietnam era, gray over white, using Model Master’s enamel Dark Gull Grey (which may be a bit too dark), painted by hand, and airbrushed the ailerons, elevators, missiles and under surfaces with Tamiya’s X-2 acrylic gloss white. Where appropriate, I masked the plane for painting. All bombs are painted in Humbrol Dark Olive Drab. The intakes, dive brake door interiors and edges of the landing gears doors are acrylic Model Master Navy Red, an excellent paint that works equally well whether airbrushed or painted by hand.
Decals
 I wasn’t sold on the decals
provided, but initially I couldn’t decide what I wanted in the way of
aftermarket replacements, partly because there is so much too choose from. Then
I discovered an Italeri A-4E Skyhawk in 1/72 scale, and I liked the box art so
much I bought the kit. I used the Italeri decals for VA-212 (“Rampant Raiders”)
operating off the U.S.S. Hancock. In a word, the Italeri decals are
outstanding. Actually from Italy, rather than the American Microscale type often
seen in Italeri kits, they are the finest I’ve ever worked with. Thin, almost
too thin but very responsive to even mild decal solvent, flawlessly, perfectly
in register, and zero filmy residue. If you want to build the Skyhawk with its
dive brakes open, the tricky part with the decals is cutting each of the
national insignia that go onto the fuselage into five separate pieces (Note: if
you want the dive brakes open but would rather avoid decal surgery altogether,
early versions of the A-4 had the national insignia directly below the
cockpit).
I wasn’t sold on the decals
provided, but initially I couldn’t decide what I wanted in the way of
aftermarket replacements, partly because there is so much too choose from. Then
I discovered an Italeri A-4E Skyhawk in 1/72 scale, and I liked the box art so
much I bought the kit. I used the Italeri decals for VA-212 (“Rampant Raiders”)
operating off the U.S.S. Hancock. In a word, the Italeri decals are
outstanding. Actually from Italy, rather than the American Microscale type often
seen in Italeri kits, they are the finest I’ve ever worked with. Thin, almost
too thin but very responsive to even mild decal solvent, flawlessly, perfectly
in register, and zero filmy residue. If you want to build the Skyhawk with its
dive brakes open, the tricky part with the decals is cutting each of the
national insignia that go onto the fuselage into five separate pieces (Note: if
you want the dive brakes open but would rather avoid decal surgery altogether,
early versions of the A-4 had the national insignia directly below the
cockpit).
Although they’re thin and delicate, I managed to cut the decals cleanly with an Xacto blade after tracing the dive brake outline over them with a mechanical pencil. Fortunately my cuts were accurate, and the decals straddle the dive brake doors just as on the actual plane. I prepped the Skyhawk for decals with three light coats of Microscale Micro Gloss, letting it dry overnight. Using Microscale’s MicroSet before and after application, and sparing applications of MicroSol on the part of the national insignia decal fitting over the dive brakes and the rib on the port wing, the decal process alone took close to five hours, but with excellent results. I put down one light coat of clear gloss afterward, let that dry overnight finished up with a coat of Micro Flat to bring the high sheen down.
| CONCLUSIONS |
 This is a great kit for Skyhawk
fans who want a relatively quick, easy build for under $10.00. It’s not
especially detailed but has excellent fit, and if you want to upgrade you can
always resort to a detail set or aftermarket ordnance as I did. In the case of
my particular example, the VA-212 markings may make the kit more interesting to
some, as they are identical to those featured in the new Tamiya 1/72 A-4E
Skyhawk. One wonders if the Tamiya kit isn’t actually a re-box of the Italeri
kit I accidentally stumbled upon… (it is. Ed)
This is a great kit for Skyhawk
fans who want a relatively quick, easy build for under $10.00. It’s not
especially detailed but has excellent fit, and if you want to upgrade you can
always resort to a detail set or aftermarket ordnance as I did. In the case of
my particular example, the VA-212 markings may make the kit more interesting to
some, as they are identical to those featured in the new Tamiya 1/72 A-4E
Skyhawk. One wonders if the Tamiya kit isn’t actually a re-box of the Italeri
kit I accidentally stumbled upon… (it is. Ed)
| REFERENCES |
The Encyclopedia of World Air
Power, Crescent Books, 1980;
Douglas A-4 Skyhawk by Peter Kilduff, Osprey Publishing Limited, 1983 (Osprey
Air Combat Series);
Walk Around: A-4 Skyhawk, Squadron Signal Publications, 2006.
May 2007
If you would like your product reviewed fairly and quickly by a site that has over 350,000 visitors a month, please contact me or see other details in the Note to Contributors.