Classic Airframes 1/48 B-57B Canberra
| KIT #: | 4130 |
| PRICE: | $65.00 MSRP |
| DECALS: | Four options |
| REVIEWER: | Ben Brown |
| NOTES: | short run mulitimedia kit. |
| HISTORY |
Martin’s B-57 Canberra was the first foreign-designed aircraft to be used by the US military since the World War I-vintage S.E.5 and DH-4 biplanes. The winner of a fly-off with the Martin XB-51, North American B-45 Tornado, and the North American AJ Savage, the B-57A was mostly identical to the RAF’s Canberra B.2, except for more powerful engines, a slightly revised cockpit with only two crew members, and a rotary bomb bay developed for the XB-51. English Electric was unable to produce Canberras in sufficient quantity, so Martin was contracted to produce the U.S. version. The B-57A performed well, but it had some deficiencies which the USAF wanted addressed, which led to the B-57B.
The cockpit layout was the most obvious of the changes made. The original B-57A looked like its British counterparts, with its fishbowl canopy. One of the problems with this canopy design was that it tended to flex and distort with changes in temperature and pressure. The navigator was situated next to the pilot, literally down in a hole, with little visibility. For the B-57B, a new fighter-style canopy was added, which gave the designers a flat glass panel to put the gunsight behind, and the navigator was moved behind the pilot. Eight .50 cal. machine guns were added to the wings, outboard of the engines. Later aircraft were fitted with four 20mm cannon instead. In addition to the internal bomb bay, four hard points were added to each wing. The B-model was also fitted with speed brakes on the sides of the fuselage, since the original wing-mounted spoilers proved less than effective during dive-bombing runs. They also made letdown from high altitude difficult, since cruise speeds were close to the maximum Mach speed allowed for the wing. The B-57C was a trainer version of the B-model, with a second set of flight controls in the rear cockpit.
 The
B-57B first flew on June 18, 1954, with the first operational examples going to
the 345th Bomb Group at Langley AFB, Virginia. The 38th
Bomb Group at Laon
Air Base, France traded
their B-26 Invaders for B-57Bs in 1956, and the 3rd Bomb Group in the
Far East swapped their B-26s for jets in 1957.
The
B-57B first flew on June 18, 1954, with the first operational examples going to
the 345th Bomb Group at Langley AFB, Virginia. The 38th
Bomb Group at Laon
Air Base, France traded
their B-26 Invaders for B-57Bs in 1956, and the 3rd Bomb Group in the
Far East swapped their B-26s for jets in 1957.
From 1955 to 1958, the 38th Bomb Wing demonstrated the B-57B’s capabilities by forming the Black Knights aerobatic team. The black jets, with Thunderbirds-style scallops painted on the tail surfaces, demonstrated the maneuverability of the Canberra while flying in a four-ship formation with a fifth jet as a solo performer. They were the only tactical bomber show team in the world.
TAC didn’t keep the B-57B very long, with planned phase-out beginning in April 1958 and was to be finished by June 1959. PACAF (Pacific Air Forces) was allowed to keep their B-57Bs, so the 8th and 13th Bomber Squadrons remained at Johnson AB, Japan until 1965. These two squadrons were then moved to Clark AB, Philippines for possible deployment to Southeast Asia.
B-57s were some of the first jet aircraft the Air Force committed to Vietnam. Originally deployed to Bien Hoa as show of force, they sat for seven months without being able to fire a shot because 1954 Geneva Accords prevented the use of jet aircraft in combat in Vietnam. The Canberras were limited to unarmed reconnaissance patrols along the roads leading out of Saigon, where they would report enemy road blocks only to have nothing done about them. During this time, the B-57s were parked on the small East Ramp, lined up in rows, with no sandbags or blast fences to protect them. On November 1, 1964, the Viet Cong snuck up to the perimeter of the field, and fired 60-80 mortar rounds into the base before escaping untouched. They destroyed five of the 20 B-57s, killed four Americans, and wounded another 72. Nothing was done to prevent a repeat of this disaster, other than to reduce the number of Canberras on base to lessen the potential damage of another attack!
By February 1965, the North Vietnamese were constantly violating the 1954 Geneva Accords with incursions into the South. The South Vietnamese asked the US government for assistance, and Gen. Westmorland was finally allowed to turn the B-57s loose. The first American jet bomber to drop bombs in Vietnam was B-57B 53-3888 from the 13th Bomb Squadron. The Canberras joined F-100 Super Sabres in providing close air support in South Vietnam. Soon, the Canberras were order North. With F-105s providing flak suppression, the B-57s attacked enemy positions outside Hue. By the time the bombers got to the target area, three of the Thuds had already been shot down, but the B-57 crews managed to put 96 tons of bombs on-target without loss to themselves.
 For night
intruder missions, a pair of B-57s (call sign Yellowbird or Redbird) teamed with
a C-130 (Blind Bat), which would drop flares on the target, an EF-10B Skyknight
(Willy the Whale), which would warn of SAM missile launches, and an all-black,
thimble-nosed “Patricia Lynn” RB-57E bringing up the rear to take photos. These
groups would patrol the Ho Chi Minh Trail in an attempt to disrupt Communist
supply lines to the south. Later, these missions were also flown into North
Vietnam, but the B-57s had to carry their own flares because the C-130s were not
cleared to fly “up North.”
For night
intruder missions, a pair of B-57s (call sign Yellowbird or Redbird) teamed with
a C-130 (Blind Bat), which would drop flares on the target, an EF-10B Skyknight
(Willy the Whale), which would warn of SAM missile launches, and an all-black,
thimble-nosed “Patricia Lynn” RB-57E bringing up the rear to take photos. These
groups would patrol the Ho Chi Minh Trail in an attempt to disrupt Communist
supply lines to the south. Later, these missions were also flown into North
Vietnam, but the B-57s had to carry their own flares because the C-130s were not
cleared to fly “up North.”
PACAF deactivated the 13th BS in January 1968, leaving only the 8th BS in Vietnam. Finally, in September, 1969, crews began ferrying the few surviving B-57s back to the US. Aircraft 551 was the last US jet bomber to leave Vietnam, in October. The 13th was later reactivated to fly B-57Gs, which were heavily-modified Bs and Cs. The Air National Guard continued to operate B-57s into the early 1980s with the 134 DSES, Vermont ANG retiring its last EB-57Es in that time frame.
| THE KIT |
Classic Airframes’ B-57B is molded in grey plastic with resin parts for the cockpit and landing gear wells, and a clear sprue containing the canopy and wing tip lights. There are also a few left-overs from the bubble-top versions of the kit. Classic has corrected the wing tip tanks, which were too short on the earlier versions. You also get four napalm canisters and four 750-lb bombs for the underwing pylons.
Decals are printed by Microscale, with their usual high quality, and provide markings for four jets. A camouflaged 13th TBS jet based in Vietnam in 1966, an all-black 498th BS jet circa 1957, a natural metal 501st BG jet circa 1954, and an Aircraft Grey and International Orange EB-57B from the 117 DSEG circa 1978. Unfortunately, the larger generator cooling air intakes below the engine inlets are not provided for this version, but I’ve seen mentioned on another forum that a conversion might be in the works. This kit can easily be modified into a B-57E target tug by deleting the guns and adding a set of flight controls to the rear cockpit and fairings under the tail for the aerial targets. These aircraft didn’t have the enlarged generator cooling intakes like the EB-57B. It would make for an impressive model, with its acres of orange paint on the upper surfaces and a silver lacquer belly! This kit is molded with gun muzzle holes for four 20mm cannon, and all three B-57Bs on the decal sheet are correct for this set-up. If you decide on building a different aircraft, note that B-57Bs from 52-1493 through 52-1575 carried eight 50-cal. machine guns in the wings.
| CONSTRUCTION |
I started by cleaning up the casting blocks on the resin parts and removing the raised ejector pin bumps from the larger parts. For the larger casting blocks, I like to use a coarse grinding bit in my Dremel tool. I duct tape the nozzle of my Shop Vac to the work bench, then hold the part so the resin thrown off by the Dremel is directed at the nozzle’s opening. A static charge builds up on the plastic nozzle, so what little resin dust that doesn’t go down the nozzle ends up on the outside. So far, I haven’t lost a part down the vac, but I’m always sure to empty the can before I start grinding, just in case.
 The instructions give the choice
of gluing the nose halves to the aft fuselage halves first, or waiting until
later in the construction to add the assembled nose to the assembled aft
fuselage. I chose to go ahead and add the nose halves first because I thought
it would be easier to clean up seams then, rather than try to mate two round
sections later.
The instructions give the choice
of gluing the nose halves to the aft fuselage halves first, or waiting until
later in the construction to add the assembled nose to the assembled aft
fuselage. I chose to go ahead and add the nose halves first because I thought
it would be easier to clean up seams then, rather than try to mate two round
sections later.
The detail on the cockpit parts is excellent. The raised knobs and switches were easy to paint. My only complaint involves the instrument panels. They are cast with raised instrument bezels, but nothing inside the dials. I wish Classic had included a decal with the black bezels and full-color instrument face detail to lay over the panel. Tamiya does this in some of their newer kits, and after a little Solvaset, the decal disappears and the instrument faces look like someone has spent hours painting them under an electron microscope. I used instrument decals from Mike Grant to dress up my panels, sprayed the panels with clear flat, then finally put a drop of clear gloss in each instrument face. While time-consuming, the effect was very realistic.
Once the cockpit parts were painted, I glued the cockpit tub to the plastic cockpit sill, then added the sidewalls to the front cockpit. These fit well, but the upturned parts of the front ends of the sidewalls interfered with the sills. I had to remove about .5mm from the resin parts to get everything to fit. I later found that the entire raised section at the forward ends of the sidewalls interfered with the instrument panel glare shield, but we’ll get to that a little later in this saga. There is very little clearance between the top of the nose wheel well and the bottom of the cockpit, so you’ll have to remove part of the casting block from both parts. The fit of the cockpit sill to the forward fuselage is a little fiddly, since there are no locator tabs to hold everything in place. I managed to let mine slip a little while the glue was setting, so I have a ridge going down the right side of the cockpit sill.
There is a tab on the nose gear well to help locate it in the fuselage. The instructions say to paint the gear wells aluminum, but I think only the B-57A may have had silver wells. I’ve only found photos of B-57Bs with Interior Green gear door interiors and gear wells. At least one unit painted the door interiors and gear wells the same light grey as the belly of the jet when they first received the original Southeast Asia camouflage scheme.
Classic Airframes suggests adding 6oz of weight behind the cockpit, so I erred to the side of caution and added 8oz, plus a few more for good measure. I glued fishing sinkers into every nook and cranny using five-minute epoxy. I also took the opportunity to reinforce the joint between the front and rear sections of the fuselage. I had visions of picking the model up by the aft fuselage and having the nose section fall off under the weight of all of those fishing weights. So far, so good, but I keep expecting the nose gear strut to collapse or the nose gear well and cockpit to pop out through the top of the fuselage at any time. The fuselage halves fit together with little fuss. I just glued and clamped the tail, then worked my way forward.
At this point, I discovered the
afore-mentioned problem with the cockpit sidewalls. The front instrument panel
is supposed to rest on the raised portions of the sidewalls, but they caused the
glare shield to sit too high, interfering with the windscreen. It would be a
big time-saver to just remove the entire raised section on each sidewall. After
several attempts to trim the tops of the sidewalls, I finally (accidentally)
broke the offending bits off and the instrument panel dropped right in where it
was supposed to. The only problem was this solution left some unsightly holes
on both sides of the instrument panel, and Mike Grant’s instrument decals
 would
instantly draw people in for a closer look. I fished a couple of pieces of
styrene into the holes, added the little boxes I had cut off of the broken resin
bits, then painted everything Dark Gull Grey. In all fairness to Classic
Airframes, and given the way most of my models go, there is an extremely good
chance the problems I had with the cockpit were caused by Operator Error.
would
instantly draw people in for a closer look. I fished a couple of pieces of
styrene into the holes, added the little boxes I had cut off of the broken resin
bits, then painted everything Dark Gull Grey. In all fairness to Classic
Airframes, and given the way most of my models go, there is an extremely good
chance the problems I had with the cockpit were caused by Operator Error.
The main gear wells fit inside the lower wing halves without any modification, but you do have to remove the casting blocks so they don’t interfere with the upper wing. If you get on a roll while removing casting blocks from the other resin parts, there is a groove in each exhaust pipe that looks like a great place to put your razor saw. If you do cut there, you’ll go right through the turbine detail inside. The pipes fit just fine without removing anything. There was an ejector pin mark inside one intake that had to be removed. While I was cleaning up the intakes, I took the time to open up the small intakes just below the engine inlets. The fit between the upper and lower wing halves was such that only a little putty here and there was needed to clean up the joints. The exhaust fairings on the trailing edge of the wing were a little finicky. They are tapered but not perfectly symmetrical, so it took a little experimenting to get them to where they looked right. I still had to do some work with putty and sandpaper to blend them into the wings, but I never did get them to the point where I was 100% happy with them.
Two plastic pins are provided for wing spars. I replaced them with some brass tubes, cutting the tubes a little long, so they went out into the wing past the engines and pressed against the inside of the wings there. This added some strength to the wing, which I was afraid would fold due to the heavy nose weights. In order to get the wing halves to fit well at the engines and wing tips, I had to settle for a little bit of a fit problem at the wing roots. I filled these gaps with putty, then used a Q-tip dipped in fingernail polish remover to blend the putty into the wing. I initially wasn’t too thrilled with the two-piece wingtip light lenses. They didn’t fit very well, but after flooding the gaps with super glue and polishing the area with fine sandpaper, they turned out looking pretty good after all.
The horizontal stabilizers were a little thicker than their mating surfaces on the fuselage, so I sanded them down a little to make them thinner. I also made mounting pins for them with brass rod, so they would have a stronger attachment to the fuselage. I drilled out the attachment holes for the two inboard pylons on each wing and added the pylons there. I added the pylons at this point since they would be painted black along with the rest of the undersides of the model.
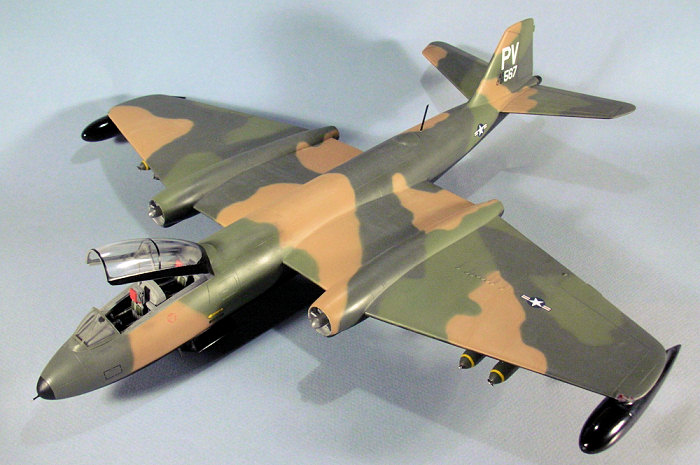
Some B-57Bs had a small tab on the rudder, just above the trim tab. It looks like 567 had this, so I made one with a small rectangle of .010 styrene.
All of the seams required a little sanding, and the wings needed just a touch of filler, but since there is really not a lot to this model outside of the cockpit, I was ready to paint it in a fairly short time.
| COLORS & MARKINGS |
I decided
on the Southeast Asia camouflage scheme, since that has been one of my favorites
for a long time. B-57s originally arrived in Vietnam in natural metal, but were
later painted in the standard SEA camouflage colors of FS34079 Dark Green,
FS34102 Medium Green, FS30219 Tan, with FS36622 Light Grey on the belly. Crews
flying night intruder missions didn’t like the light grey undersides, so the
bellies of the jets were repainted gloss black. Aircraft 567 has often been
depicted as having a red rudder, but
 there is a good color photo of it in both Mikesh’s book and Wings of Fame that clearly shows a camouflaged rudder. I’ve
also yet to find any photos of SEA-camouflaged B-57Bs with rudders painted in
squadron colors.
there is a good color photo of it in both Mikesh’s book and Wings of Fame that clearly shows a camouflaged rudder. I’ve
also yet to find any photos of SEA-camouflaged B-57Bs with rudders painted in
squadron colors.
I started by priming the model with Tamiya’s grey primer. After fixing a few flaws, I then sprayed Gunze tan, followed by the two greens. During the painting session, I noticed that the top view camouflage pattern didn’t match the side views very well. I dug out an old Italeri B-57B instruction sheet, which is the same as the pattern shown in the original USAF Tech Order 1-1-4. It turns out that Classic’s paint diagram has some problems, often substituting dark green for medium green in spots, and as mentioned before, color patterns in the top view not corresponding to those in the side views. Obviously, there could have been a B-57 or three painted like Classic’s camouflage pattern, since the T.O. was more or less a suggestion, but the photos I checked seem to match the T.O. very closely. Fortunately, the panel lines on the model were deep enough and Gunze paint covers well enough that I didn’t have to strip the model and start over. After the repainted upper surfaces had dried, I painted the belly and wing tip tanks Tamiya gloss black. The Gunze paint dried with a semi-gloss finish, so a clear coat wasn’t necessary. As is usually the case with my model projects, I found a couple of great color photos of the subject airplane I was building after I had already put the decals on the model. While still following the T.O., 567 had a slightly different pattern on the left side of the nose, with the tan going forward to meet the black radome, and the border of the Medium Green going almost straight down from the rear instrument panel. I couldn’t repaint over the decals, so I just left it alone.
The decals mainly consisted of national insignia and tail codes. These planes were camouflaged at the depot, they didn’t carry very many stencils. 567 had its serial number stenciled in grey on its right wing tip tank, but I didn’t have any small number decals to do this on my model. It also had its data stencil, with the serial number and “Service this aircraft with JP-4...” in white under the windscreen and some rescue stencils under the canopy. Classic’s decal sheet only includes a data stencil in black, so I used that instead. The ejection seat triangles on 567 were the red stencil-type, which barely show up in photos. I robbed a couple from an F-100 decal sheet, along with the black armament box stenciled on the left side of the nose. I let the decals dry for a couple of days, then sprayed the upper surfaces of the model with Polly Scale clear flat. I used pastels to weather the model slightly. The photos of 567 show it to be pretty clean, so they were probably taken soon after the jet was painted.
| FINAL CONSTRUCTION |
Final assembly mainly consisted of adding the landing gear, doors, wing tip tanks, antennae, and bombs. There is no positive placement for the tip tanks, you just stick them where you hope is the right spot. I flipped the model on its back and laid it down on a box to keep it steady, then glued the tanks in place with gel super glue. The first one went on straight, but the second tank took several tries, resulting in damage to the paint from the super glue.
The nose gear strut is too long, so I cut the top of the strut down so the tops of the nose wheels were almost inside the gear well. This gives the model the proper nose-down posture. I drilled out the strut and inserted a short length of brass tube to add some strength to the strut.
I had left off the engine
compressor faces until this point, so I wouldn’t have to worry about masking
them when I was painting the rest of the model. Classic Airframes left off the
prominent exhaust tube for the starter cartridge, which is housed inside the
bullet fairing inside the intake and spools up the engine by igniting an
eight-pound cake of black powder. It exhausts out the right (starboard) side of
the intake on both engines. I made the starter exhaust tube using some
airfoil-shaped styrene strut I had
 picked up from somewhere many years ago, and
a small exhaust port was shaped using lead foil, which I glued in place on each
engine. There are also four vanes that form an X inside each intake, which I
made using strips of .005 styrene, painted silver.
picked up from somewhere many years ago, and
a small exhaust port was shaped using lead foil, which I glued in place on each
engine. There are also four vanes that form an X inside each intake, which I
made using strips of .005 styrene, painted silver.
The bombs provided in the kit are not too bad, but the fins on a couple were short-shot, and every one had large gaps around the fin where the two halves meet. A Monogram F-105D donated four of its bombs, which only required filling of the slots used to mount them on the Thud’s pylons.
The only truly aggravating part of this kit is the canopy. I toyed with the idea of closing it since an open canopy interrupts the clean lines of the jet, but the canopy just doesn’t fit very well. It is too narrow, and the plastic insert interferes with the rear instrument panel glare shield. The cockpit detail is too nice to cover anyway. The insert provided for the heavy framework inside the canopy doesn’t fit and also interferes with the rear seatback when the canopy is opened. I ended up filing the rear part of the insert down by about 1mm so it cleared the rear seat. The inverted V-shaped part also causes problems if it is glued in the spot marked on the insert. I trimmed it so it fit on the inside edges of the insert. I’m glad a manufacturer has finally provided some on the heavy structure often found inside a jet’s canopy, something glaringly missing from kits such as Hasegawa’s F-4s, but it would have been nice if said structure had actually fit.
After I posted some in-progress
photos on Modeling Madness’ forum, a couple of kind souls pointed out that the
canopy frames looked a bit heavy. I went back through my references, and
sure enough, they did look a little on the thick side. I stripped the
paint and Future off, sanded the frames off of the canopy and windscreen, then
repainted them about half their original width. The canopy frames on most
SEA-camouflaged B-57Bs were painted the same green and tan as the rest of the
airplane, but 567’s canopy frames were gloss black, which saved me the trouble
of trying to match the camouflage pattern when I repainted it. A resin actuator
is provided to support the canopy, but mine seems to have been eaten by the
Carpet Monster. I made a new one using brass tube. There are no locator
pins or anything to positively mount the canopy to the fuselage, so I just put a
little drop of  super glue on the
back side of the frame and stuck the canopy where it looked right. Looking
back, I think I would have been better off just gluing the canopy in the closed
position, then taking advantage of the heavy framework on the sides to blend
everything into the fuselage with putty. Would have saved a lot of time.
super glue on the
back side of the frame and stuck the canopy where it looked right. Looking
back, I think I would have been better off just gluing the canopy in the closed
position, then taking advantage of the heavy framework on the sides to blend
everything into the fuselage with putty. Would have saved a lot of time.
There are a couple of ARC-34 antennae that should go under the nose, just forward of the nose gear well. I made these using .010 styrene strip. After gluing the pitot tube in place under the nose (and knocking it off several times), I noticed in the photos that 567’s pitot tube protrudes from the center of the nose. I’ve since found several photos of B-57B’s with this style of pitot tube, but it doesn’t appear to have been very common. I made the new pitot tube from brass tube, and glued it and a couple of fuel tank vents to the model, and I was done!
The final trial in this saga was photographing the model. The B-57 sort of hung over the edges of the large sheet of paper I use as a backdrop, which is why a lot of the photos are cropped a little close and bits of my desk are visible. Perhaps I should have just gone with the little 1/144 kit from Ozmods instead!
| CONCLUSIONS |
Except for the Battle of the Canopy, I enjoyed building my B-57B. It really stands out in my display case, with it’s bat-like shape and acres of tan, green, and black paint. A previous excursion into Classic Airframes World (their Meteor F.8) involved a lot of profanity, putty, carving, profanity, beer, and profanity. Not so with this one. It’s like adding resin details to one of Monogram’s better jet kits from the 1980s. I’m having more fit issues and using a lot more putty on the Hasegawa P-38F I’m currently building. Classic Airframes has never intended its kits to be for beginners, but their B-57B is definitely one that someone with a little experience adding resin aftermarket details to models would have a good time building. Highly recommended, but if you think you might want one, get it now. They have been selling fast.
| REFERENCES |
Martin B-57 Canberra, The Complete Story, Robert Mikesh, Schiffer Publishing
B-57 Canberra In Action, Squadron Signal Publications
International Airpower Review, Vol. 20, Dec. 2006
Wings Of Fame, Vol. 19, 2000
Blind Bat, Two Yellowbirds, and Willy the Whale http://www.talkingproud.us/Military121504.html
http://www.geocities.com/yamahaxv920rh/TOfiles/
May 2007
Copyright ModelingMadness.com.
If you would like your product reviewed fairly and fairly quickly , please contact the editor or see other details in the Note to Contributors.
Back to the Review Index Page 2020