Airfix 1/72 DC-3/C-47
| KIT #: | 05031 |
| PRICE: | $? |
| DECALS: | Two options |
| REVIEWER: | Alwin Broeckelmann |
| NOTES: | Reissue |
| HISTORY |
Although an un-armed transport, the Douglas DC-3 can claim to be one of the greatest civilian and military aircraft ever built. It was been manufactured in the thousands, and has served from the 1930s to the present day. Modified by both the Japanese and Russian air forces to suit their own needs.
The DC-3 was
conceived in 1934 as an extended version of the Douglas DC-2 airliner. The DC-3
really came into its own in World
 War 2, when there was a crying need for a
long-range transport aircraft that could be used for general haulage, transport,
and communications. Although outwardly very similar to the DC-3, the C-47 Skytrain (the military version of the DC-3) had more powerful engines, internal
strengthening of the airframe, and most noticeable to the outside observer,
provision of large cargo doors on the port fuselage. The seating arrangements
were modified for various roles in the DC-3C-47.
War 2, when there was a crying need for a
long-range transport aircraft that could be used for general haulage, transport,
and communications. Although outwardly very similar to the DC-3, the C-47 Skytrain (the military version of the DC-3) had more powerful engines, internal
strengthening of the airframe, and most noticeable to the outside observer,
provision of large cargo doors on the port fuselage. The seating arrangements
were modified for various roles in the DC-3C-47.
There were a
large number of DC-3 sub-variants used for navigation training, reconnaissance,
and air-sea rescue, among many other roles. There was even a gunship version
that fought in Vietnam know as “Spooky”, and there was even a floatplane version
of the DC-3. An impressive array of functionalities that would take up far too
much space to list, never mind discuss in such a short space. The particular
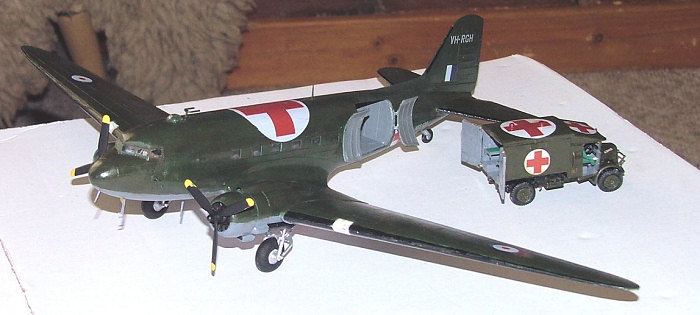
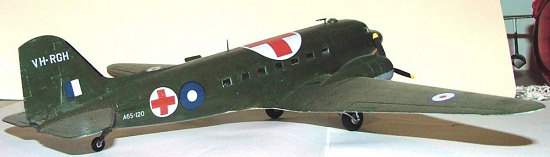
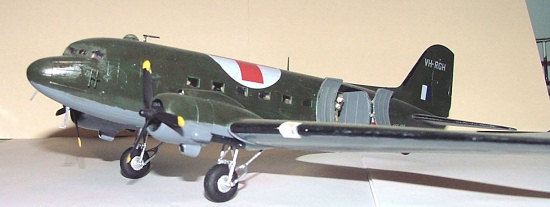
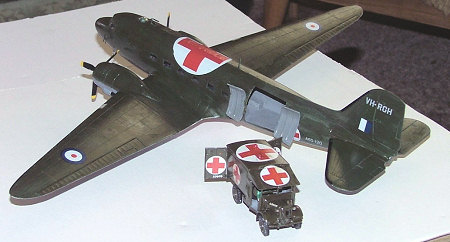
aircraft in this review is an RAAF air ambulance A65-120, No 36 Squadron, Labuan,
1945, this aircraft was used to ferry home our troops from Burma and Singapore
for repatriation after WW2
| THE KIT |
This is an old kit that has been repeatedly updated and reissued by Airfix over the years.The DC-3 has had such a wide usage base that I feel Airfix can keep doing this for sometime yet. (Editor's note: From input by readers, it appears that this is an Italeri kit reboxed by Airfix and not an original Airfix issue) The kit comprises of 62 parts cast in white plastic on large sprues. In the current guise, Airfix have issued parts covering a civilian DC-3 airliner from the 1950s, and a non-combatant military Air/ sea Rescue DC-3 from Canada. Not all the parts on the sprues are used, and so there will be many items for the spares box, or if wished, another variant of the DC-3 can be easily modelled from a reference profile and your own decals.
The instructions are spread across ten A4 pages, and show well spaced large clear assembly stages, which are easy for the modeller to follow.
| CONSTRUCTION |
 Assembly
begins by taking the internal cabin floor, which runs along the entire fuselage
from the cockpit to the rear of the aircraft, and cementing the following
components into the appropriate slots: the front instrument panel, two control
levers, two seats, two pilots, and either a rear cockpit bulkhead and a rear
fuselage bulkhead, or a rear cockpit bulkhead a middle cabin bulkhead, and a
rear fuselage bulkhead. Airfix suggests painting the control sticks, instrument
panel, cockpit floor, and seats in the RCAF version black (H33), with the
fuselage interior dark grey (H27) and the pilots in grey (H64) for the RCAF and
blue (H96) for the BEA version. I chose to use Tamiya XF 53 neutral grey for the
entire interior, and XF 49 Khaki for the seats as reference from the AWM. Not
that the cockpit interior can be seen as the cockpit windows are tiny.
Assembly
begins by taking the internal cabin floor, which runs along the entire fuselage
from the cockpit to the rear of the aircraft, and cementing the following
components into the appropriate slots: the front instrument panel, two control
levers, two seats, two pilots, and either a rear cockpit bulkhead and a rear
fuselage bulkhead, or a rear cockpit bulkhead a middle cabin bulkhead, and a
rear fuselage bulkhead. Airfix suggests painting the control sticks, instrument
panel, cockpit floor, and seats in the RCAF version black (H33), with the
fuselage interior dark grey (H27) and the pilots in grey (H64) for the RCAF and
blue (H96) for the BEA version. I chose to use Tamiya XF 53 neutral grey for the
entire interior, and XF 49 Khaki for the seats as reference from the AWM. Not
that the cockpit interior can be seen as the cockpit windows are tiny.
The first
modification, depending on what option the builder wishes to make, is now
needed, as one has to open up an extra window on the port side for the BEA
version. I did not make any changes to the kit at this point. The windows
for both sides are supplied on transparent strips, which are cemented into the
inner fuselage wall before the cockpit and fuselage floor/bulkhead assembly is
glued onto the appropriate locating tabs. The two fuselage halves can now be
joined and the tail wheel inserted into a locating slot on the lower fuselage.
On dry fitting, I found that to get a good fit, I needed to do a little sanding
of the bulkheads, and the fuselage as it did not meet properly. I needed to sand
the 2 halves behind the wing toward the tail gently and just kept test
 fitting till it came together
neatly. At this point I pulled out the trusty elastic bands to hold this flush
with the rest of the fuselage while the glue dried. This took a bit of effort to
manipulate the fuselage so that I got a virtually flush joint. Once the glue had
set fully used a bit of putty to tidy up, and gently sanded it smooth.
fitting till it came together
neatly. At this point I pulled out the trusty elastic bands to hold this flush
with the rest of the fuselage while the glue dried. This took a bit of effort to
manipulate the fuselage so that I got a virtually flush joint. Once the glue had
set fully used a bit of putty to tidy up, and gently sanded it smooth.
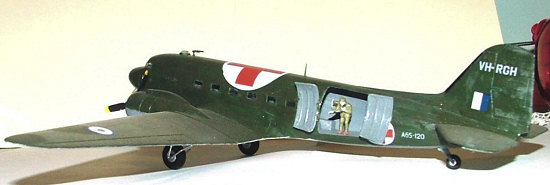
The second modification now needs to be exercised, depending on the build option chosen. The RCAF version has the large opening cargo-type door, while the BEA has a simple passenger entrance. As I was building an ambulance version I chose the cargo doors, Airfix cater for these options by providing two separate “slabs” with the proper doors moulded in that locate into the appropriate hole in the port fuselage. At this stage the two rear tailplanes (each made from a top and lower half) are put in place, and the fuselage is glued onto the lower middle section that makes up the wing.
Airfix next recommend making the undercarriage, which is quite simple. Each wheel is made from a right and left half, and the central axel hole locates into two pins either side of an “H”-type undercarriage unit. Two pins located on top of the two legs of the "H"-type undercarriage unit locate into two holes in the engine nacelle cut outs situated on the lower side of the central wing unit glued to the fuselage. The top half of the port and starboard wings are now glued into place, along with the remaining (shorter) parts of the lower wing. A stirrup-shaped undercarriage jack leg is cemented onto the back of the "H"-type undercarriage leg, and glued to the base of the inner undercarriage nacelle.
 The model is
now flipped over, and the engines installed. The right port and starboard
engines are identical, and comprise of a backing plate onto which the two
cylinder head units locate (a collar is supplied that locates on the rear of the
front cylinder unit for those modellers who wish to have a rotating propeller)
The engine housing is formed from a right and left half that enclose the engine
cylinder units, and an exhaust blanking plate is located in recesses on the
bottom of the engine housings. The engine units then locate onto lips around the
engine nacelles, and are finished off with a simple bent exhaust that locates
onto the outermost side of each engine housing. The propeller is a simple
three-blade type.
The model is
now flipped over, and the engines installed. The right port and starboard
engines are identical, and comprise of a backing plate onto which the two
cylinder head units locate (a collar is supplied that locates on the rear of the
front cylinder unit for those modellers who wish to have a rotating propeller)
The engine housing is formed from a right and left half that enclose the engine
cylinder units, and an exhaust blanking plate is located in recesses on the
bottom of the engine housings. The engine units then locate onto lips around the
engine nacelles, and are finished off with a simple bent exhaust that locates
onto the outermost side of each engine housing. The propeller is a simple
three-blade type.
Adding the common cockpit windshield, upper astrodome, and landing light transparencies on the port and starboard wings finish off the model. Optional parts are then required for the air intakes above the engine units (long = RCAF, short = BEA), lower aerials and pitot tubes, and lower and upper navigation devices for the BEA and RCAF versions, respectively. The rear of the aircraft for the two options is also different, with the BEA option requiring a piece (navigational aid?) to be cemented into place at the very rear of the fuselage. I also needed to add a chin whip aerial as used by the RAAF. Time now to paint.
| COLORS & MARKINGS |
 Decals are
provided for two aircraft. The first is a Douglas DC-3-CSR Dakota of a Royal
Canadian Air Force Search and Rescue unit, based at Abbotsford in 1967. This has
a white top to the fuselage (H130) and a silver lower half (H11). The rudder is
silver/white (H11/H130). The wings are chrome (H191) with silver ailerons (H11)
and red tips (H174). The tailplanes are red and silver.
Decals are
provided for two aircraft. The first is a Douglas DC-3-CSR Dakota of a Royal
Canadian Air Force Search and Rescue unit, based at Abbotsford in 1967. This has
a white top to the fuselage (H130) and a silver lower half (H11). The rudder is
silver/white (H11/H130). The wings are chrome (H191) with silver ailerons (H11)
and red tips (H174). The tailplanes are red and silver.
The second aircraft is a Douglas DC-3 Dakota with an all-white (?) fuselage (H130) with chrome wings and undersides (H191) that flew with British European Airways (BEA) from Northolt in 1950. This aircraft has silver ailerons and rudders (H11).
Both aircraft
have black de-icer bands on the wing leading edges. Both sets of decals are in
register and are very good. I got onto ebay and purchased some Red ROO decals
specifically designed for RAAF aircraft, this sheet also came with a colour
guide for No 86 Wing, No 34 squadron and Aircraft Research and Development Unit.
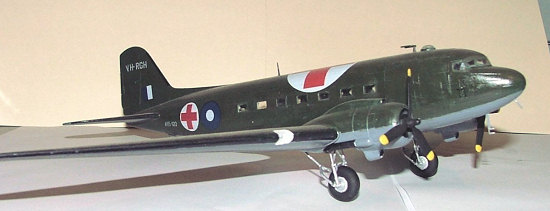
So using the guide I painted the upper surfaces in olive drab and the underside
in neutral grey. The de-icing bands where still present on these aircraft as
well.
| CONCLUSIONS |
 All in all, and notwithstanding the slight
problems aligning the fuselage halves and this kit is an enjoyable one to build.
I would say that, because of the size of the aircraft and the ease of
construction, I would recommend this kit to new modellers wanting to make a
larger kit, for intermediate modellers, it provides a chance to customise and to
experiment with new paint schemes. And for the advanced modellers who as we all
know will do their own thing.
All in all, and notwithstanding the slight
problems aligning the fuselage halves and this kit is an enjoyable one to build.
I would say that, because of the size of the aircraft and the ease of
construction, I would recommend this kit to new modellers wanting to make a
larger kit, for intermediate modellers, it provides a chance to customise and to
experiment with new paint schemes. And for the advanced modellers who as we all
know will do their own thing.
| REFERENCES |
I got all my info on the ambulance aircraft at
www.awm.gov.au then used the search data base link. This takes you to a search site, type in what your looking for and go from there.
April 2007
If you would like your product reviewed fairly and fairly quickly, please contact the editor or see other details in the Note to Contributors.