
| KIT #: | 81746 |
| PRICE: | $38.00 |
| DECALS: | Two options |
| REVIEWER: | John Summerford |
| NOTES: | Seat harness sourced from the parts bin |
| HISTORY |
Excerpted from Swedish Jet Fighter Colours by Mikael Forslund and Thierry Vallet, (IBSN 878-83-65281-01-2) pages 54 and 55. [Note that some editing of the English translation by yours truly has been conducted for better readability.]
“The Saab 29 Flygand Tunnan (Flying Barrel) can trace its lineage to the German swept-wing jet fighter projects under development in 1944/45. The Focke-Wulf project P VI and Messerschmitt P.1011 and P.1106 projects may have inspired the Saab 29. Following the end of the war, the head of Saab’s research department, Frid Wanstrom, located documents in Switzerland which provided detailed information on German experiments regarding swept-wings and associated wind tunnel research. The Saab J 29 became the first such aeroplane designed and built in Western Europe to enter service.
 “First
flight was conducted on 1 September 1948. The first series aircraft, s/n 29101,
was delivered to Wing F 13 in Norrkoping on 10 May 1951. In all, 665 Saab 29s
were built, including four prototypes, 585 J 29A and J 29B fighter variants and
76 S 29C reconnaissance aircraft. Many J 29Bs were eventually converted to “E”
and “F” standard, featuring a modified “saw-tooth” wing with the latter also
having an afterburner fitted. The J 29b and S 29C saw service in 1961-1963
during the UN operation in Congo. [I believe they were the only Swedish jets to
ever see combat.] The sole export customer was Austria, which acquired 30 J
29Fs. Apart from being used in the fighter and aerial reconnaissance roles, the
Saab 29 was also operated for ground attack and target towing duties.
“First
flight was conducted on 1 September 1948. The first series aircraft, s/n 29101,
was delivered to Wing F 13 in Norrkoping on 10 May 1951. In all, 665 Saab 29s
were built, including four prototypes, 585 J 29A and J 29B fighter variants and
76 S 29C reconnaissance aircraft. Many J 29Bs were eventually converted to “E”
and “F” standard, featuring a modified “saw-tooth” wing with the latter also
having an afterburner fitted. The J 29b and S 29C saw service in 1961-1963
during the UN operation in Congo. [I believe they were the only Swedish jets to
ever see combat.] The sole export customer was Austria, which acquired 30 J
29Fs. Apart from being used in the fighter and aerial reconnaissance roles, the
Saab 29 was also operated for ground attack and target towing duties.
“The engine chosen for the Saab 29 was the British de Havilland Ghost DGT 3, which provided 2,270 kp of thrust. The Ghost was manufactured under license by Svenska Flygmotor AB at Trollhattn as the RM 2. In all 789 RM 2s were built, with the first one being delivered to Saab in March 1951. The last engine was delivered in 1955. When an afterburner was fitted to the RM 2, the variant was designated RM 2B, being fitted to the Saab J 29F.”
| THE KIT |
 Four sprues
of gray plastic contain parts for the airframe and ordinance plus a sprue of
clear pieces totaling 125 parts. The clear sprue is wrapped in foam and bagged
separately—a nice touch. A decal sheet with markings for two aircraft and
cockpit details completes the model. No photo etch parts are included.
Instructions are printed on eight pages in black and white. A color sheet is
included with paint references to Mr. Hobby, Vallejo, Model Master, Tamiya, and
Humbrol reference numbers. Unfortunately, there is not any information about the
squadron, location, or date for either aircraft.
Four sprues
of gray plastic contain parts for the airframe and ordinance plus a sprue of
clear pieces totaling 125 parts. The clear sprue is wrapped in foam and bagged
separately—a nice touch. A decal sheet with markings for two aircraft and
cockpit details completes the model. No photo etch parts are included.
Instructions are printed on eight pages in black and white. A color sheet is
included with paint references to Mr. Hobby, Vallejo, Model Master, Tamiya, and
Humbrol reference numbers. Unfortunately, there is not any information about the
squadron, location, or date for either aircraft.
| CONSTRUCTION |
I started by painting the cockpit parts dark gray and prepping the side consoles and instrument panel for decals and applying them. While all that was drying, the main wheel wells were assembled, painted and installed. Looking ahead to step 14, I noticed that several small scoops needed to be glued onto the fuselage. Thinking that it would be easier to do before the halves were mated, I did so. Returning to the cockpit, a photo etch harness was added to the seat, the tub assembled and installed to the right fuselage half. Guides molded into the inside of the half make the tub fall into place.
 The tail
pipe and nose gear well were assembled, painted, and glued into place. The
intake pipe was also completed and a test fit was done with the fuselage halves
together to test the sit between the tub and well. A little scraping on the top
and bottom and it dropped into place. I noticed that there is room above the
intake and in front of the coaming for some ballast to keep the model on the
nose gear. The instructions do not call for adding weight, but I decided to
delay adding the coaming until after the rest of the airframe was assembled to
give myself the option. The halves were glued together and the seam cleaned up.
The tail
pipe and nose gear well were assembled, painted, and glued into place. The
intake pipe was also completed and a test fit was done with the fuselage halves
together to test the sit between the tub and well. A little scraping on the top
and bottom and it dropped into place. I noticed that there is room above the
intake and in front of the coaming for some ballast to keep the model on the
nose gear. The instructions do not call for adding weight, but I decided to
delay adding the coaming until after the rest of the airframe was assembled to
give myself the option. The halves were glued together and the seam cleaned up.
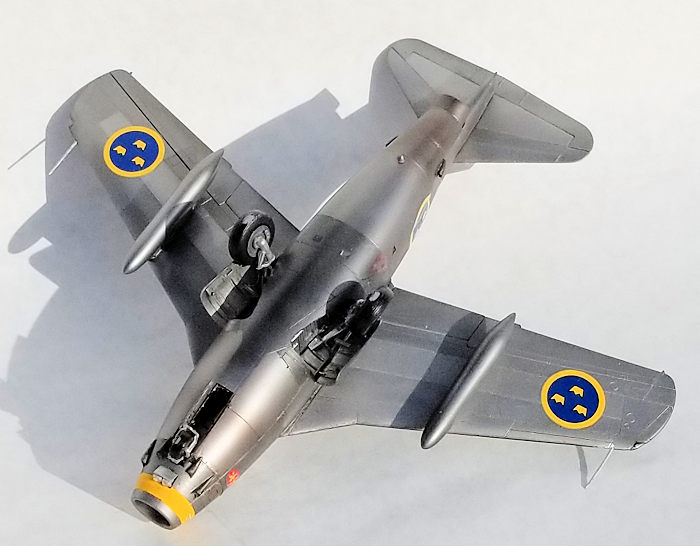
Moving on to the wings, I opened the holes for the pylons that mount the drop tanks, opting to not mount the missiles Each one is assembled from a top and bottom half plus a flap. The fit is very good! Clear ID lenses are provided and I painted the notches on the wing tips the appropriate red and green then glued the parts into place and coated them with a liquid mask. Holes in the leading edges are for pitot tubes. Those were left off for final assembly. I glued on the pylons at this point. I discovered that they are handed in order to compensate for the dihedral of each wing. The wings were attached and the seams smoothed over.
Stabilizers and elevator were attached next. The fit in this area is very good with just a little bit of cleaning up of the seams. As it turned out, there was plenty of room for the ballast in the nose. With that added, the coaming plus windscreen and canopy were glued in place. After masking the clear parts, the model was ready for paint.
| COLORS & MARKINGS |
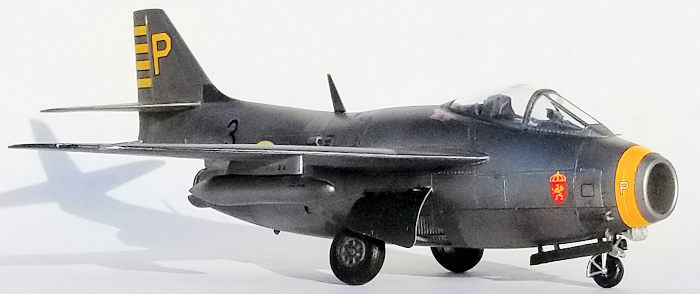
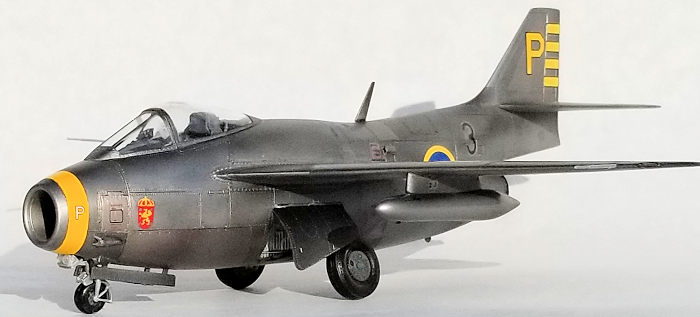
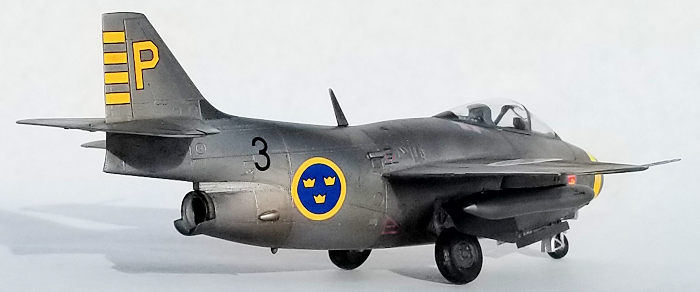
Options presented are a natural metal
aircraft based somewhere in Sweden, or a camouflaged aircraft flown in the Congo
under UN auspices. I chose the first option using the Alclad II system. First,
the nose was sprayed flat white as a primer and then sprayed yellow for the
band. This was masked off by using an oval template to
 cut narrow
curved strips of tape to form a straight band around the compound curve of the
nose. Black primer thinned 50/50 was sprayed on at 12 PSI and then touch-ups
attended to. When the second coat of thinned primer was applied, I experimented
a bit. Under slightly higher pressure, the primer hits the surface dried
somewhat at the edges of the spray pattern, leaving a satin finish with the
center glossy. I created the satin finish along rows of rivets and the edges of
some panels. After spraying a base coat of duraluminum paint, subtle variations
along the airframe could be seen. Select panels were masked and sprayed dark
aluminum or stainless steel and then edges of panels over sprayed with burnt
iron. (It is not opaque, so it is very forgiving during application.) Finely, a
dark wash was applied along panels and the fasteners for the gun bay panels and
engine bay.
cut narrow
curved strips of tape to form a straight band around the compound curve of the
nose. Black primer thinned 50/50 was sprayed on at 12 PSI and then touch-ups
attended to. When the second coat of thinned primer was applied, I experimented
a bit. Under slightly higher pressure, the primer hits the surface dried
somewhat at the edges of the spray pattern, leaving a satin finish with the
center glossy. I created the satin finish along rows of rivets and the edges of
some panels. After spraying a base coat of duraluminum paint, subtle variations
along the airframe could be seen. Select panels were masked and sprayed dark
aluminum or stainless steel and then edges of panels over sprayed with burnt
iron. (It is not opaque, so it is very forgiving during application.) Finely, a
dark wash was applied along panels and the fasteners for the gun bay panels and
engine bay.
The decals separated from the backing paper quickly and easily nudged into position. A little bit of Micro-Sol and they settled down nicely. However, one stencil decal fell off, never to be seen again.
By turning the model over, attention turned the landing gear. All three legs built up easily and their attachment was simple. The doors and headlights under the nose also went on without a fuss. Next came the drop tanks which were painted at the same time as the airframe. The pitot tubes were glued on and then the model was placed on its gear and the dorsal blade antenna was glued on to complete the model.
| CONCLUSIONS |
This kit builds easily and I think makes for a good canvass to experiment with metal finishes. A few hours spent on masking raised the build time to about 25 hours, still in my usual range.
John
Summerford 12 November
2019 Copyright ModelingMadness.com If you would like your product reviewed fairly and fairly quickly, please
contact the editor
or see other details in the
Note to
Contributors. Back to the Main Page
Back to the Review
Index Page
Back to the Previews Index Page