Heller 1/72 Saab 91 Safir
| KIT #: | 80262 |
| PRICE: | €5 in 2008 |
| DECALS: | Two options |
| REVIEWER: | Spiros Pendedekas |
| NOTES: | ` |
| HISTORY |
 The
Saab 91 Safir is a three/four seater, single engine trainer aircraft,
primarily of metal construction, with fabric-covered control surfaces.
Its development began in 1944, with its first flight taking place on 20
November 1945.
The
Saab 91 Safir is a three/four seater, single engine trainer aircraft,
primarily of metal construction, with fabric-covered control surfaces.
Its development began in 1944, with its first flight taking place on 20
November 1945.
As well as its primary role as a trainer/touring aircraft, the Safir was
also used as an aerodynamic testbed for various projects, including
fitting of scaled down wings of the then projected Saab Tunnan and
Lansen fighters!!
The Safir was used by the Swedish, Norwegian, Finnish, Austrian,
Tunisian and Ethiopean air forces, as well as by civilian users, the
major ones being Air France, Lufthansa and the Dutch
Rijksluchtvaartschool (RLS). The type remained in Norwegian and Finnish
service until the late 1980s, and in Austria until 1992. In Sweden,
while it was replaced as a trainer by the Scottish Aviation Bulldog in
1971, it remained in use as a liaison aircraft till the mid-90s. Today,
only a few civil-registered 91As are still flying.
| THE KIT |
Introduced in 1981
and regularly reissued since then, this is your classic, petite, old school,
“sweet” Heller kit. My 1996 reissue comes with the typical Heller
top-opening, very practical box, featuring an attractive boxart of a yellow
Norwegian Safir.
 Inside
the box there are three silver sprues and a smaller clear one, all loosely
floating inside (which is a pity regarding potential scratches to this large
canopy…). All parts are well molded with just a bit of flash here and there.
External details are all finely raised. Cockpit detailing is basic, with
some extra detailing being desirable here, as it will be quite visible under
the large canopy, a prominent feature of the petite Saab!
Inside
the box there are three silver sprues and a smaller clear one, all loosely
floating inside (which is a pity regarding potential scratches to this large
canopy…). All parts are well molded with just a bit of flash here and there.
External details are all finely raised. Cockpit detailing is basic, with
some extra detailing being desirable here, as it will be quite visible under
the large canopy, a prominent feature of the petite Saab!
Landing gear looks very simple, which might as well be the case in reality.
There are no wheel bays whatsoever, just plain emptiness: this is passable
for the nose bay, almost being hidden by the NLG, but not so passable for
the main bays. The nose lower front sports a nice corrugating look radiator
face, but the upper part is bland (it should be hollow, showing the
cylinders, oh well, I might be asking too much!). Prop looks very good.
The large, one piece canopy presents good clarity. Instructions are provided
as a double-sided b/w printed A3 paper, with the simple construction spread
in 7 clear steps and the painting/decaling drawings also being very clear,
but with only Humbrol color numbers supplied. Decals are the usual Heller
and older Airfix ones, meaning fingers crossed regarding color shades and
registration: to my relief, in both regards, they looked passable in my
copy.
| CONSTRUCTION |
 I started
by assembling the simple cockpit, which was consequently trapped between the
fuselage halves. Fit was good, and I followed Torben Plesberg's
recommendation in his excellent same kit Safir
dual build of reducing the
fin offset a couple of degrees (by applying force), in order for a less
exaggerated effect. After studying net pics and seeing a few variations in
cockpit colors, I went on and used a home brewed light blue-gray as the
basic cockpit color, with black instrument panel and stick grips and light
green seat cushions, with “khaki” seat belts painted onto them. The
instrument panel received some silver, red, yellow and white "details" with
a 10/0 brush.
I started
by assembling the simple cockpit, which was consequently trapped between the
fuselage halves. Fit was good, and I followed Torben Plesberg's
recommendation in his excellent same kit Safir
dual build of reducing the
fin offset a couple of degrees (by applying force), in order for a less
exaggerated effect. After studying net pics and seeing a few variations in
cockpit colors, I went on and used a home brewed light blue-gray as the
basic cockpit color, with black instrument panel and stick grips and light
green seat cushions, with “khaki” seat belts painted onto them. The
instrument panel received some silver, red, yellow and white "details" with
a 10/0 brush.
The fuselage was then attached onto the one-piece lower wing, followed by attachment of the top wing halves, horizontal stabilizers, front engine face and top antenna dome. This concluded the major assembly of this simple and petite model. Fit was not perfect, but all over manageable. Being a severe tail sit candidate, quite a lot of weight (for the size of the model) was trapped in the front part before attaching the engine face. After some filling and sanding here and there, I took this petite beauty to the paint shop!
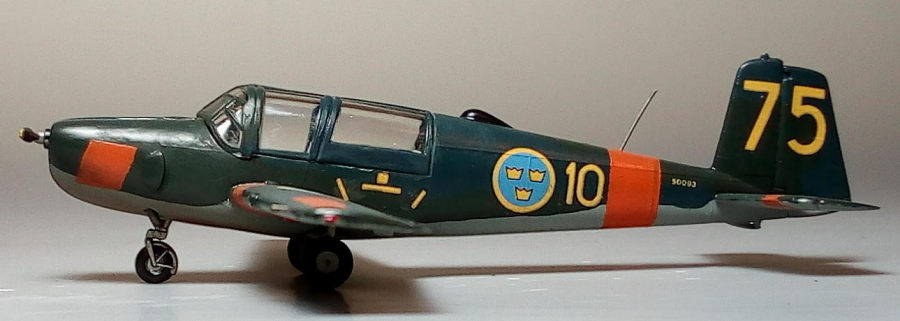
| COLORS & MARKINGS |
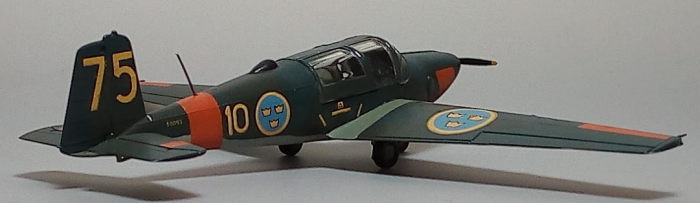
 Prompted
by the model’s minuscule size, I decided to revive the “good old times” and,
purposely trusting Humbrol enamels, I went on brush-painting it! I first
gave the undersides a coat of Hu127 Light Ghost Gray, masked it off and
applied the wonderful top Swedish camo of Navy Blue (Hu77) and Black Green
(Hu91). I removed the underside masking, then re-masked the required areas,
in order to apply not only the day-glo orange (Hu18), but also the wing walk
stripes (light blue-gray).
Prompted
by the model’s minuscule size, I decided to revive the “good old times” and,
purposely trusting Humbrol enamels, I went on brush-painting it! I first
gave the undersides a coat of Hu127 Light Ghost Gray, masked it off and
applied the wonderful top Swedish camo of Navy Blue (Hu77) and Black Green
(Hu91). I removed the underside masking, then re-masked the required areas,
in order to apply not only the day-glo orange (Hu18), but also the wing walk
stripes (light blue-gray).
I then gave the whole model a coat of Future and went on to apply the kit
decals. I was a tad sceptic about the possible outcome of applying those
old, light colored Heller decals (meaning possible issues, translucency
included). To my relief the decals detached easily from their backing paper,
adhered well onto the model and exhibited acceptable color registration and
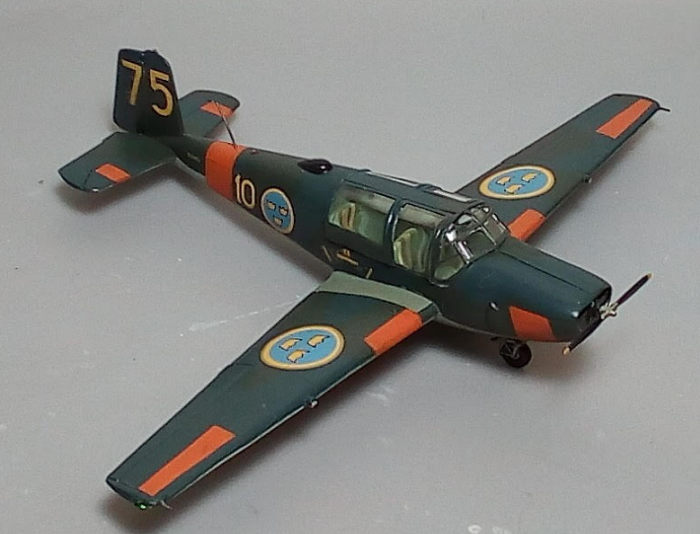
translucency. I have to admit that the Swedish camo, combined with the day-glo
orange and the other insignia colors combination was aesthetically very
pleasing! A coat of Future sealed the decals.
| FINAL CONSTRUCTION |
I could live with
the nose wheel bay emptiness, most of which would be hidden from the NLG leg
and retraction rod, but could not live with the main wheel bays’
openness/emptiness. I took an easy (though not very accurate) way of
inserting a blob of my son’s modeling clay at each bay and forming it with
my finger, in order to represent kind of an inner walling. The two piece
MLGs and one piece NLG (wheels included) were then attached and the Safir
stood on its feet! All landing gear parts, bays and wheel rims were painted
aluminum, with black tires and silver oleos (highlighted with my fine silver
pen).
 The
radiator faces were painted black and dry brushed with silver. The bland
“inlets” above them were painted flat black, in order to give an illusion of
depth. The nice prop was painted black with aluminum hub and yellow tips. It
was horizontally attached, cheatingly blocking the view of the bland engine
inlets. The top antenna dome was also painted black.
The
radiator faces were painted black and dry brushed with silver. The bland
“inlets” above them were painted flat black, in order to give an illusion of
depth. The nice prop was painted black with aluminum hub and yellow tips. It
was horizontally attached, cheatingly blocking the view of the bland engine
inlets. The top antenna dome was also painted black.
I created two tiny
exhausts from a cotton swab rod that I painted Testors Burned Metal and
attached underneath the engine cowling. I also fabricated, out of stretched
sprue, the top wire antenna and the two wingtip mounted pitots. The two
mid-wing approach lights had their fronts painted silver, with tiny blobs of
white glue applied on top, in order to somehow represent lenses. Also, the
wingtip lights and the two top red beacons were accordingly represented with
green and red blobs of Humbrol clear paint.
I applied some weathering using dark color dry pastels, mainly underneath
(engine staining and general dirtying), then gave the model a satin clear
finish.
The canopy framing was nicely prominent and was easily hand painted.
However, upon attaching the canopy in position, not only serious gaps were
encountered, but it was also found to be wider than the fuselage opening.
The gaps were faired with white glue, the width mismatch was “left as is”,
and this petite beauty of a plane was called done!
| CONCLUSIONS |
The Heller kit is one of those “sweet oldies”, with good general shape,
acceptable external and internal detailing and, in my case, acceptable decals.
On the other hand, fit, though generally good, presents some at places issues
and the canopy is annoyingly wider than the fuselage opening it is supposed to
sit onto. The main gear bays' nonexistence, though common to kits of that era,
should also be negatively mentioned.
If you want a “definitive” Safir model, you might consider building the very
detailed, limited run, but, seemingly, not too difficult all-styrene 1/48
Tarangus "modern" kit (Scott’s thorough preview here),
especially if you find it at some kind of offer, as it is not among the cheapest
kits (for its size).
Without any positive info of a new tool release (as of 2021), if you want a 1/72
model of this petite, important trainer, the venerable Heller is your only
option (a totally obscure 70s era kit was seemingly made by AA-Model, but could
not find any info on it whatsoever). The Heller kit is regularly reissued, with
the reboxings of 2019 and onwards featuring extra schemes and nice quality
decals. While parts count is low, fit is challenging at places, as above
mentioned, so a beginner might refrain from tackling it before putting a few
easier kits under his belt.
I had a great time putting the Heller kit together, enjoying the forgotten
feeling of hand brushing a small model. The beautiful Swedish camo, together
with the day-glo orange and high visibility insignia is simply irresistible!
Happy modeling!
27 January 2022
Copyright ModelingMadness.com. All rights reserved. No reproduction in part or in whole without express permission.
If you would like your product reviewed fairly and fairly quickly, please contact the editor or see other details in the Note to Contributors.