
Broplan 1/72 SAAB 201
| KIT #: | MS-56 |
| PRICE: | $20.00 |
| DECALS: | None provided |
| REVIEWER: | Ryan Grosswiler |
| NOTES: | Conversion. Heller base kit with vacuformed and injected Broplan parts |
| HISTORY |
It’s hard now to imagine a time when there was no sophisticated computer modeling or even reliable long-math calculations available when designing high-performance aircraft, especially when dealing with dynamic variables that were at the time still not fully understood. When an engineer, in fact, had to see a theory proven in the physical universe before his very eyes before committing to final design.
Sweden by 1945 had been served a very frightening lesson regarding just how close a nation can brush with massive war going on all around it, and had only (narrowly) managed to avoid direct involvement by maintaining an awkward but cozy neutrality towards the preoccupied Nazi Germany, while playing friendly to the Western Allies as well. Determined to keep that discomforting situation from happening again, the nation resumed its prewar effort at building up its small but world-class military forces with minimal dependence on anyone else. The first step would be to create a fighter aircraft the equal or better of those being developed in the nations around it.
Through a contact in Switzerland, SAAB was able to independently obtain the same German aerospace information being gleaned by the victorious Allies, and like the others, was particularly interested in Kurt Tank's Ta-183 design, plus the various Messerschmitt P.111X studies. A derivative concept was quickly developed, one that would evolve eventually into the Model 29 “Tunnan”. However, the new thin-section swept wings which all these designs featured were generally untested in flight. While SAAB's engineers were confident that this formula was key to aircraft performance in the transonic range, at low speeds these swept wings wanted to fall out of the sky.
 This
inconvenience needed to be resolved, and not merely by a set of calculations.
Accordingly, the fuselage from the prototype Safir trainer/sportplane just
entering production was retrieved and fitted with a half-scale set of the
proposed Model 29 wings. These early Safir examples had a vertical deHavilland
Gypsy engine up front rather than the later and more familiar flat-six Lycoming
installation, and sported a different, pointier nose shape.
This
inconvenience needed to be resolved, and not merely by a set of calculations.
Accordingly, the fuselage from the prototype Safir trainer/sportplane just
entering production was retrieved and fitted with a half-scale set of the
proposed Model 29 wings. These early Safir examples had a vertical deHavilland
Gypsy engine up front rather than the later and more familiar flat-six Lycoming
installation, and sported a different, pointier nose shape.
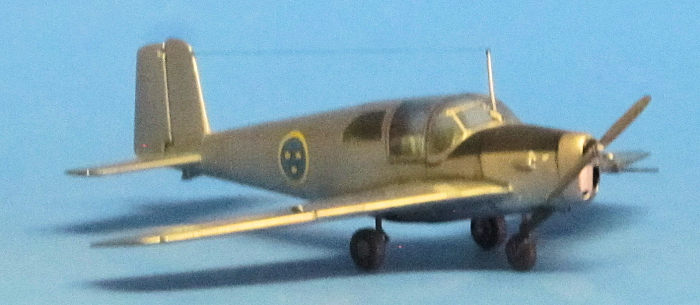
The result was this quirky little lightplane. One of the most important tests carried out with it was to find out how the various settings of the wing flaps would work as the aircraft beat up the pattern at low speeds. All the adjustments took place on the ground since the aircraft lacked controls to change the flap position in the air. These tests lasted for a few months during 1947–1948 and the Model 29 design was frozen.
In September 1948, the Model 29 flew for the first time, the first swept-wing fighter in Western Europe, the radical advance requiring just a few changes before production began a little over two years later. The careful work had paid off. The 201 airframe was reused for the same purpose a few years later to test the wings of the J.32 Lansen in the same way, as the SAAB 202, then was apparently scrapped.
I wonder how it would fly. Without adjustable flaps, you'd obviously need a lot of runway, and don't you dare let that nose get too high in the pattern! But it might have made a superb cross-country zoomer. Fast, mostly due to the high wing loading and not the swept planform. Interestingly, in playing with the wing and fuselage subassemblies during the build I discovered that it became a much better looking airplane with the wing slid a scale foot or two aft.
| THE KIT |
Heller's Safir has been covered well on this site and really needs little introduction. It's a neat little kit, and a fun diversion from your usual stuff, whatever that may be. The most recent releases of this product from the era of the Leisure Suit include new parts for a propeller spinner and additional antennas, plus some absolutely outstanding decals. Its only flaw is a canopy with serious optical distortion issues, common with kits of the period.
 Broplan
is a Polish company that has been turning out an extensive and quite fascinating
line of vacuformed kits for at least thirty years, mostly of truly unusual
subjects that even today cannot be found through any other manufacturer or
medium. I had assumed they'd long since gone by the wayside when I stumbled upon
a retail outfit in the Netherlands that offered Broplan's full line, which is
apparently still a going concern as of this writing. Intrigued, I bought this
product and their SAAB B.18B.
Broplan
is a Polish company that has been turning out an extensive and quite fascinating
line of vacuformed kits for at least thirty years, mostly of truly unusual
subjects that even today cannot be found through any other manufacturer or
medium. I had assumed they'd long since gone by the wayside when I stumbled upon
a retail outfit in the Netherlands that offered Broplan's full line, which is
apparently still a going concern as of this writing. Intrigued, I bought this
product and their SAAB B.18B.
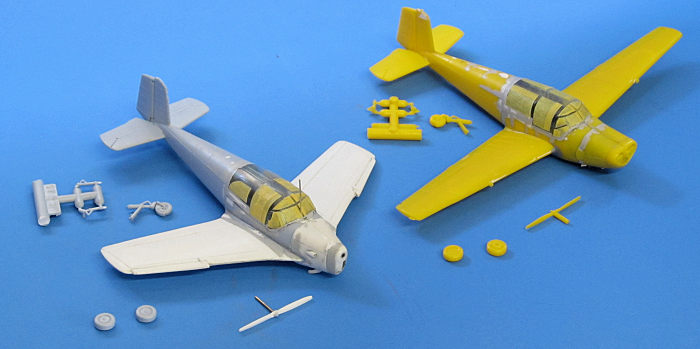
The SAAB 201 conversion is a fairly involved project, consisting of a set of vacuformed wings and canopy depicting the earlier rear window arrangement, and a three-piece injected Gypsy cowl with exhaust pipe. The wings feature remarkably fine recessed panel lines. A set of simple drawings and instructions are folded into the bag, along with some additional guidance if you're instead going to model an early Gypsy-powered Safir with the standard wing. No decals, but the real '201 only carried a pair of Swedish roundels.
| CONSTRUCTION |
I built both the standard Heller Safir (sitting in my stash since Day One of the first Gulf War) and the 201 conversion alongside, the former stock except for a Maestro Models vacuformed canopy and some extra cockpit detail.
The conversion starts with cutting away the Lycoming cowl from the Heller fuselage halves. One half of the Gypsy cowl was glued into place and allowed to cure with the fuselage taped flat on the bench. The second fuselage half was taped to the first and the second cowl half was glued in place, care being taken to not glue the fuselage halves together at this time. The result is perfect alignment of all these parts, and the two fuselage halves were separated.
 (Geek
Sidebar Note: It was at this point that I realized just how meticulous Heller's
original subject research had been for its Safir. The kit fuselage, when viewed
from above, has a subtle and incongruous 'bulge' aft of the engine cowl. With
Broplan's tapered Gypsy cowl in place this bulge actually becomes part of a
smooth contour transition from the cowl area to the fuselage. SAAB naturally
didn't go through the bother of changing the fuselage shape when they switched
to the Lycoming, and Heller faithfully depicted the discrepancy. Also, that
twist in the rudder is supposed to be there: it counteracts spiraling
slipstream.)
(Geek
Sidebar Note: It was at this point that I realized just how meticulous Heller's
original subject research had been for its Safir. The kit fuselage, when viewed
from above, has a subtle and incongruous 'bulge' aft of the engine cowl. With
Broplan's tapered Gypsy cowl in place this bulge actually becomes part of a
smooth contour transition from the cowl area to the fuselage. SAAB naturally
didn't go through the bother of changing the fuselage shape when they switched
to the Lycoming, and Heller faithfully depicted the discrepancy. Also, that
twist in the rudder is supposed to be there: it counteracts spiraling
slipstream.)
Next step is to deal with the vacuformed canopy: it's nicely molded, but the edges are indistinct and it's hard to tell where exactly canopy ends and carrier sheet begins (the even better Maestro Models canopy suffers the same issue). After carefully figuring this out and freeing the canopy, it was fitted to the fuselage with a bit more sanding for adjustment. Once good fit was achieved, the fuselage halves were glued together (no cockpit detail yet; partly because needed to keep the wing-to-fuselage joint accessible from both sides). The seam was then sanded and the raised panel lines repaired. The canopy's joint line was reinforced with a set of fine stretched-sprue flanges around most of its perimeter.
The whole nose needs to be filled with ballast. This is the other reason why I didn't fit even the cockpit floor (Part 5) to this point. The rear mounting tab was cut off this part, and, holding the fuselage nose-down, I alternately dropped a little lead shot into the nose, checked the fit of the cockpit floor, and secured the lead with a bit of CA dribbled in. This process was repeated until I had the nose almost up to the instrument panel filled with lead but still enough clearance to fit the cockpit floor and integral nose wheel bay.
This done, the front face of the Gypsy cowl was improved by improving the shape of the cooling openings, hollowing it out a bit, and depicting the first cylinder of the engine with bits of sprue scrap. This was then glued to the nose and the whole cowl filled, sanded, and rescribed.
The Gypsy installation had a different, fixed pitch propeller, and Broplan doesn't provide this. A new prop was created (referencing the drawings in the Andersson book and online photographs) by carving it out of a styrene blank using the same century-old methods of the free-flight stick-and-tissue crowd which I was once a part of. This dreaded step turned out to be a very pleasant moment of real modeling. The result was mounted on a simple sleeved brass shaft-and-tube arrangement and stuck with a bit of epoxy into a hole drilled in the nose.
 Still
no cockpit detail. The one-piece lower wing was attached, followed after a short
dry time by the two upper parts. I decided that the recessed panel lines, fine
as they are, clashed too much with raised panel lines on the fuselage
(especially on this wee model), so these were filled and sanded. The completed
wing/fuselage assembly was given an overall sanding and polishing as a unit
after a day or so.
Still
no cockpit detail. The one-piece lower wing was attached, followed after a short
dry time by the two upper parts. I decided that the recessed panel lines, fine
as they are, clashed too much with raised panel lines on the fuselage
(especially on this wee model), so these were filled and sanded. The completed
wing/fuselage assembly was given an overall sanding and polishing as a unit
after a day or so.
Finally, the cockpit was built up, painted, washed, and highlighted. I added sidewall detail, lead foil seatbelts and altered the panel of the 201 to depict the simpler layout of the early Safir. Plus assorted do-dads here and there. If you care about internal detail, the hardest part of this last is that there are very visible avionics in that left-rear compartment, immediately under the canopy, and the exact equipment fit varied from time period and different air forces. Fortunately, in the 201 this area seems to have been a blank space. Also, if wheel wells mean anything to you the kit's cockpit floor intrudes very rudely into them, both Safir and 201. Had I foreseen this I would have sanded the floor of Part 5 down as much as possible and fitted a little thin sheet of styrene to form a proper main well roof. But it was too late for this in both models, so I just kneaded together some epoxy putty, shoved it into the wells to form them into shallow bowls, smoothed it all out with an old brush and a little water, and left it at that.
The prominent mesh quite visible in the rear cockpit of both the Safir and 201 was made from tiny sections sourced from my wife's bridal veil. How's that for some steamy romance?
Stabilizers were leveled—a flaw in the Heller kit—by increasing the height of the slot on the right to the level of the one on the left, and filling in the resulting gap beneath with a little strip of styrene. I sanded away the ADF dome, dorsal fin, and beacon. Final touches were done in the cockpit and the canopy was attached and faired in at the rear. This was masked, little parts were attached, and it was off to the paint shop.
Remember how I wrote, way up above, that this would be a "fairly involved" undertaking?
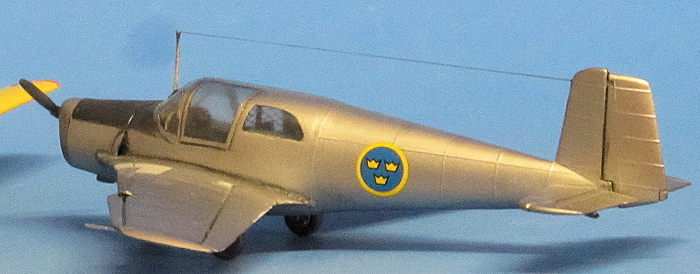
| COLORS & MARKINGS |
 By
contrast, painting was fairly simple—just overall NMF, made easier by my
polishing prep work above. Tamiya X-1 Gloss Black was thinned 50% with Gunze
Levelling Thinner and sprayed as the primer. The following day an overall coat
of Alclad White Aluminum was applied, followed by Aluminum in selected detail.
The anti-glare panel was masked and sprayed in a very dark gray, i.e. "Light
Black." A pair of Swedish national insignia from the Heller kit went on the
fuselage. A flat coat was applied, a few details painted, and that was it.
Little weathering is appropriate for a short-lived test article.
By
contrast, painting was fairly simple—just overall NMF, made easier by my
polishing prep work above. Tamiya X-1 Gloss Black was thinned 50% with Gunze
Levelling Thinner and sprayed as the primer. The following day an overall coat
of Alclad White Aluminum was applied, followed by Aluminum in selected detail.
The anti-glare panel was masked and sprayed in a very dark gray, i.e. "Light
Black." A pair of Swedish national insignia from the Heller kit went on the
fuselage. A flat coat was applied, a few details painted, and that was it.
Little weathering is appropriate for a short-lived test article.
| CONCLUSIONS |
A surprising amount of work for such a tiny piece. But the two finished models make for a most striking duo, both visually and as a representation of how differently the same aircraft type may be repurposed and modified, as the two share only basic fuselage structure, landing gear, and tail. A fun diversion from my usual fare!
This would be a good first exploratory project for the experienced modeler who's always been curious about vacuform models.
| REFERENCES |
Andersson, Hans G. SAAB Aircraft Since 1937. Putnam Aeronautical Books, 1997. ISBN 0-85177-886-0
The Internet
Ryan Grosswiler
28 July 2023
Copyright ModelingMadness.com. All rights reserved. No reproduction in part or in whole without express permission from the editor.
If you would like your product reviewed fairly and fairly quickly, please contact the editor or see other details in the Note to Contributors.