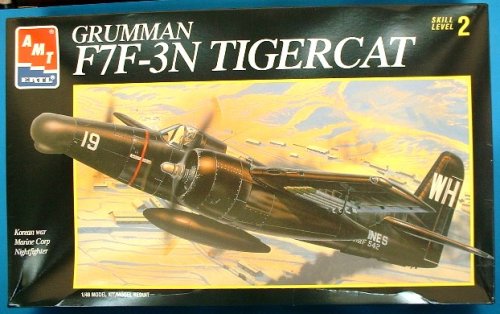
AMT/ERTL 1/48 F7F-3N Tigercat
|
KIT # |
8842 |
|
PRICE: |
$16.00 when new |
|
DECALS: |
One aircraft |
|
REVIEWER: |
|
|
NOTES: |
Aeromaster Decals 48-311 used. |
|
HISTORY |
Grumman produced 106 Night fighter versions of the F7F-2 single seat and the F7F-3 day fighter two seater which was by far the most numerous of the Tigercat line. The –3Ns were delivered between May of 1945 and June of 1946 and most during the latter part of that period. After the Navy accepted them, they were ferried to the Lockeed Air Service center at Van Nays, Ca. for installation of the Radar and other electronic equipment.
 The major differences
between the –3 day fighter and the F7F-3N night fighter were the radar
installation, radome, a second cockpit for the Radar operator and the
armament. The _3N was equipped with the SCR-720 radar with the unique
radome to accommodate the antenna mount and drive. The “droop snoot” look
provided the space for the antenna mount. The .50 Cal. Machine guns were
replaced with 4 20MM cannon at the wing roots. The F7F-3N was
dimensionally identical to the –3 and was only marginally different in
the weight and performance with the exception of the range, which was
reduced with the removal of the 80Gal. Reserve Fuel tank.
The major differences
between the –3 day fighter and the F7F-3N night fighter were the radar
installation, radome, a second cockpit for the Radar operator and the
armament. The _3N was equipped with the SCR-720 radar with the unique
radome to accommodate the antenna mount and drive. The “droop snoot” look
provided the space for the antenna mount. The .50 Cal. Machine guns were
replaced with 4 20MM cannon at the wing roots. The F7F-3N was
dimensionally identical to the –3 and was only marginally different in
the weight and performance with the exception of the range, which was
reduced with the removal of the 80Gal. Reserve Fuel tank.
During the post WWII period, the Marine Air Groups that flew the Tigercats moved all over the south pacific from the Philippines to Okinawa to China to show the Flag and help establish the U.S. presence to counter the threat of the Chinese Communist. The Tigercats performed armed reconnaissance patrols and close air support of Marine ground forces who were under frequent attack by Chinese communist during 1945 and 46.
After the Korean war
started in June of 1950, one of the Marine groups flying the F7F-3N was
the VMF(N)- 542 at El Toro, Cal. and was sent to Japan and began flying
local security patrols and standing alerts. On 19 September 1950, VMF-
542 was deployed to the newly liberated Kimpo Air Base in Seoul, Korea,
the first U.S. unit to base there and they flew around-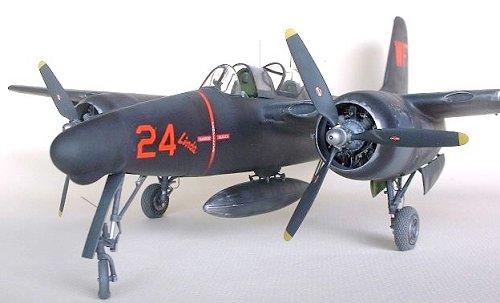 the –clock combat
air patrols. During the Chosin Reservoir fighting withdrawal, the
squadron provided close air support for the Marines and Army units that
were trapped there.
the –clock combat
air patrols. During the Chosin Reservoir fighting withdrawal, the
squadron provided close air support for the Marines and Army units that
were trapped there.
The 542nd was withdrawn to Japan March of 1951 to convert to the F3D, when the Tigercat Squadron left, they relinquished all their F7Fs to VMF(N) – 513 which was an F4U-5N Corsair night fighter squadron called the “Flying Nightmares”. The new composite squadron continued to operate the F-7Fs in Korea until they were replaced by F3Ds in May of 1952.
And thus, this is the subject matter for the this model project as one of the F7F-3Ns that was left behind in Korea to continue to fly with the VMF(N)-513 until it was worn out more or less. This period for the Tigercat produced some of the most unusual incidents during 1951, among these was a Captain E.B. Long and intercept operator, (RIO) Warrant Officer, R.C. Buckingham, on a night mission to try to intercept “bedcheck Charlie” (North Korean Air Force) which flew the very slow black painted PO-2 (crop duster biplane type) that flew every night on a heckling mission. The Tigercat was so fast that Capt. Long over flew it twice but on the third try did shoot down the PO-2 with a burst of 20MM fire. This was the first air-to-air ever scored by the F7F and the first night shoot down for a Marine aircraft in Korea.
|
THE KIT |
 Basically, the
overall kit is very nice and recessed with the right shape, and scale ( I
hope for my “inscale” friends out there) . For awhile, we had a good
thing going with AMT . They produced some nice things and subjects alone
with some re-issue of others and at a very reasonable price for what you
got. The Instruction sheet was not too great and could be confusing for
some modelers.
Basically, the
overall kit is very nice and recessed with the right shape, and scale ( I
hope for my “inscale” friends out there) . For awhile, we had a good
thing going with AMT . They produced some nice things and subjects alone
with some re-issue of others and at a very reasonable price for what you
got. The Instruction sheet was not too great and could be confusing for
some modelers.
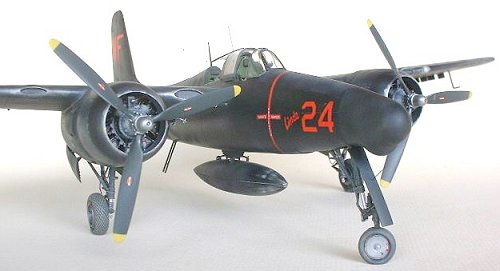
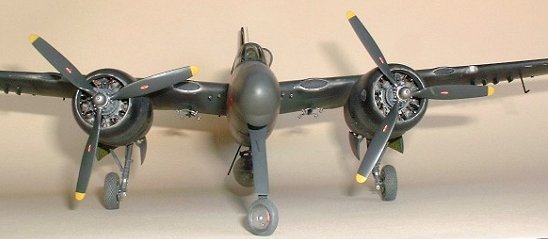
Well, lets get this
“what’s” not right, out of the way, YES! I do know that the prop(s) are
not exactly right, and yes, according to the picture reference, they are
at the right pitch angle, what is wrong is that the larger “cuff” , is on
the wrong side, but I dare say, this is not the first model that I, or,
my contemporaries , have built that has some things
 “wrong” with it.
There is not one commercially produced plastic kit for builders, that
does not have things wrong with them so we must alibi some things and
build and move on. BTW, CE does make some replacement props, or did, if
you so desire.
“wrong” with it.
There is not one commercially produced plastic kit for builders, that
does not have things wrong with them so we must alibi some things and
build and move on. BTW, CE does make some replacement props, or did, if
you so desire.
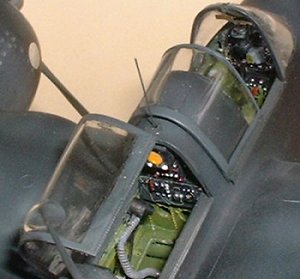
Speaking of which, I did install the very nice Cutting Edge cockpit to correct some wrong things and I had to modify the radar operator’s cockpit completely etc.
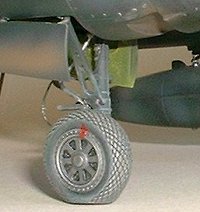
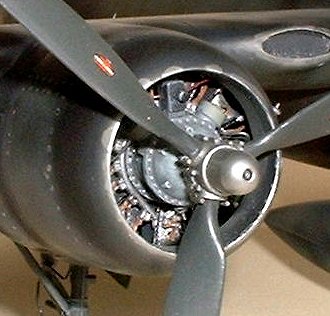
The engines are molded very well and better than most kit R-2800 versions and have nice molded separate wiring harnesses with separate crankcases with the nice Magnetos. The landing gear struts are flimsy but look correct. Please! Throw the wheels away.. they are rubber and will absolutely eat (melt) the plastic hubs in a short time. True Details makes a nice set of replacements, or did, and are well worth the couple of bucks.
|
CONSTRUCTION |
First things first, was to get the CE cockpit, the TD wheels and check the paint supply for some Dark sea Blue, interior green, and some gloss black and some small tubing for the 20MM cannon. I started my usual procedure of setting in front of the “picture radio” and removing all the main parts from the sprues and cleaning them up, test fitting and mating surfaces.
 The fit is good for the
most part with the exception of the engine nacelles which is a common
theme/ problem, for just about all produced multi-engine plastic models
and even the Japanese are that way also. So, grab the putty and favorite
filling methods and go to work. The CE cockpit was very nice and turned
out very well even though you cannot see it very well after it is
installed. The rear cockpit had to have panels made, changed and the
floor lowered and the seat modified with an oxygen regulator and hose,
belts and the scope corrected (note, the scope hood is furnished but, I
just placed it inside on the floor where it stayed when aircraft was
static). I added some detail to the landing gear wheels which included
some rear engine case / pump detail that could be seen inside the wells.
The fit is good for the
most part with the exception of the engine nacelles which is a common
theme/ problem, for just about all produced multi-engine plastic models
and even the Japanese are that way also. So, grab the putty and favorite
filling methods and go to work. The CE cockpit was very nice and turned
out very well even though you cannot see it very well after it is
installed. The rear cockpit had to have panels made, changed and the
floor lowered and the seat modified with an oxygen regulator and hose,
belts and the scope corrected (note, the scope hood is furnished but, I
just placed it inside on the floor where it stayed when aircraft was
static). I added some detail to the landing gear wheels which included
some rear engine case / pump detail that could be seen inside the wells.
The gear itself, was in several pieces and quite fiddly and was touchy to install but looked the part after finish, but just not very strong. The nose wheel gear is real flimsy, CE makes a metal replacement ( or did), but I decided to drill and install a pin inside for strength and while I was at it, I turned the wheel a bit for a little AMS character and besides, the Nose gear door will add a lot of stable strength when finished anyway.
 The nacelle fit problem
was a little more problem than I had hoped for and mostly at the front
where it meets the leading edge of the wing. I had to go over it 3 or 4
times before I was satisfied. Also, the engine cowlings are a nice one
piece unit but with no fasteners scribed so I made those by using a cut
off syringe that I filed sharp around the end and used it to cut the
fasteners, took a while, but was worth the effort.
The nacelle fit problem
was a little more problem than I had hoped for and mostly at the front
where it meets the leading edge of the wing. I had to go over it 3 or 4
times before I was satisfied. Also, the engine cowlings are a nice one
piece unit but with no fasteners scribed so I made those by using a cut
off syringe that I filed sharp around the end and used it to cut the
fasteners, took a while, but was worth the effort.
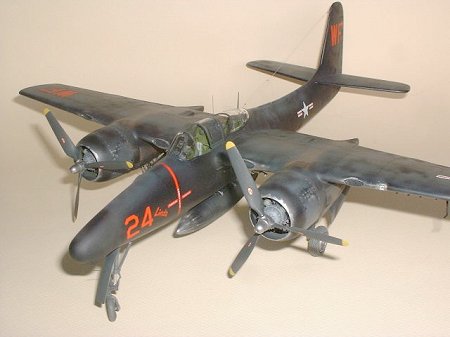
I added a ton of weight to the nose of this thing but in the final fitting and completion, it was still not enough because after the main gear is installed, it is cantered forward so much it changes the center of gravity again, but, actually, this was the reason that the real bird would set on it’s tail without fuel in the main tanks. So I did not worry about it anymore and moved on. In the Squadron “In Action book” there is a picture of this aircraft actually setting on its tail.
After all the welding, filling, wet sanding and priming seams, the project was coming together very well and so now I was ready for some painting and detailing.
|
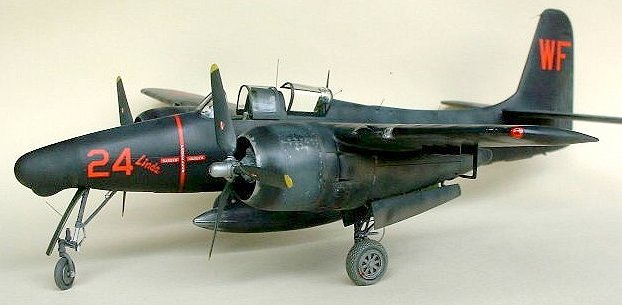
CAMOUFLAGE & MARKINGS |
Of course, the most favorite paint scheme (color) for this bird was for the Black night fighter version even though, some of them were still painted the Dark sea Blue. As matter of fact, they were all painted Blue and some were just painted over with the flat Black ( I used glossy because it was actually “blacker” and helped with decal application but made “flat” when finished etc.). The landing gear for the most part was left Blue and that is why they looked the weird faded and grungy looking weathered beat look after a while in use. As the plane was washed, used, and wiped down and chipped, the Blue color was showing through and the paint was peeling bad in some places.
 Now, of course we can’t
weather any model all that much, weathering is very easy to over do and
then it just looks trashy. So the gear was painted dark blue and faded
with gray for a worn look and use, and brake lines added. The tires were
painted tire black and dry brushed with a tan color with the metal hubs
painted a dark metal color and rubbed with SNJ powder.
Now, of course we can’t
weather any model all that much, weathering is very easy to over do and
then it just looks trashy. So the gear was painted dark blue and faded
with gray for a worn look and use, and brake lines added. The tires were
painted tire black and dry brushed with a tan color with the metal hubs
painted a dark metal color and rubbed with SNJ powder.
The Engine crankcases were painted a dark medium gray and dry-brushed with contrasting lighter shades of gray and the cylinders were painted flat black first, then drybrushed with SNJ powder with the push rods glossy black and the harness was a brown/ gray and brown tone wiring was added to each engine and the hubs on the “wrong Props” was painted with Testors MM metalizer and polished out/.
The method I used to get the cowling “paint chip” or worn down look, was, I painted those areas with a bright aluminum color, then I spot covered all the areas I wanted to show the metal with some “splotchy” white glue, which will peel off when the main paint job is complete. After that, the main paint job of a solid gloss Testors Black was sprayed to cover all over the outside of the model. After I that, I use some flat black mixed with various amounts of grays with blue tones thrown in and weathered some panels, some more than others. The engine cowling panels were weathered more to indicate frequent removal.
Sorry, the kit decals are not too good so I decided to use one of the very nice decal sheets by AEROMASTER sheet # 48-311 for 2 Black aircraft and 2 Dark Sea blue aircraft. The one I chose was the “Linda”: version which was at Pyongtaek (K-6) Korea in the summer of 1952. Note: the name “Linda” was only confirmed for the starboard side, as no photos of the port side were available but the decal was available so I used it.
|
CONCLUSIONS |
 My personal
opinion is that AMT has provided us with the best plastic kit of this
nice looking F7F Tigercat in any scale including the few years ago now,
of the totally resin one by who, I can not remember but I did see some of
those built up and I thought they were nice at that time. For the purist
out there, there are a lot of faults and a lot of modeling skills needed
to do a more than nice build on this kit, but overall, it will suit just
about everyone who just wants a nice replica of this mostly used in post
WWII bird. I enjoyed building this kit and it has served me well anywhere
it was taken for inspection, even with the folks with rivet counters
and laser flash lights. Some of these AMT kits, including the nice A-20
series, are getting hard to find now as we all know, these things usually
recycle at some point.
My personal
opinion is that AMT has provided us with the best plastic kit of this
nice looking F7F Tigercat in any scale including the few years ago now,
of the totally resin one by who, I can not remember but I did see some of
those built up and I thought they were nice at that time. For the purist
out there, there are a lot of faults and a lot of modeling skills needed
to do a more than nice build on this kit, but overall, it will suit just
about everyone who just wants a nice replica of this mostly used in post
WWII bird. I enjoyed building this kit and it has served me well anywhere
it was taken for inspection, even with the folks with rivet counters
and laser flash lights. Some of these AMT kits, including the nice A-20
series, are getting hard to find now as we all know, these things usually
recycle at some point.
|
REFERENCES |
A lot of internet and Korean War history covered in several books and Magazines. I was clued in to the fact about the short falls of this kit by several modeling friends about the wheel problem and the “incorrect” Props but I thought it was cool anyway.. The Gloss Navy Sea Blue single seater would be my next choice.
1. F7F Tigercat - In action, Aircraft Number 79 – Squadron/Signal PublicationsSeptember 2003
2. Encyclopedia of World Air Power- English edition copyright 1980
3. A Modern Illustrated Military History – AIR POWER by Exeter Books copyright 1979.
September 2003
If you would like your product reviewed fairly and fairly quickly, please contact the editor or see other details in the Note to Contributors.