|
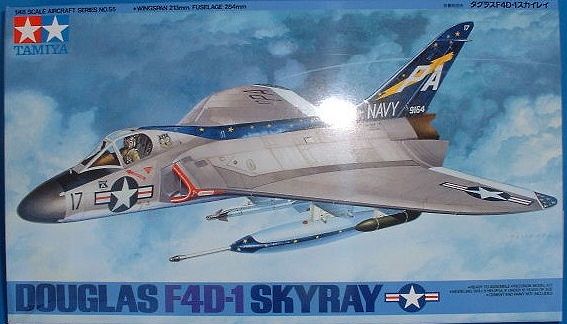
KIT # |
61055 |
|
PRICE: |
$30.00 |
|
DECALS: |
Three aircraft |
|
REVIEWER: |
C.Wayne Sharp |
|
NOTES: |
|
HISTORY |
The Douglas Aircraft Corporation in 1947 started studies about delta winged aircraft using studies conducted during WWII in Germany by a Dr. Alexander Lippisch. Based on that information, the Douglas firm developed the F4D Skyray, the only operational interceptor with delta wings in the U.S. Navy. Starting the design in 1947, Douglas was awarded a contract for construction and testing. The first prototype flew in January of 1951.
This airframe set two new world speed records in October of 1953. the first production F4D-1, made it’s maiden flight in June 1954 and entered squadron service in April of 1956.
 The 50 degrees sweptback wings with rounded tips, were
equipped with leading edge slats and trailing edge elevons. A set of trimmers
were installed on the inboard trailers of the wings. The outer edges (tips) of
the wings would fold up by oil pressure for Carrier storage.
The 50 degrees sweptback wings with rounded tips, were
equipped with leading edge slats and trailing edge elevons. A set of trimmers
were installed on the inboard trailers of the wings. The outer edges (tips) of
the wings would fold up by oil pressure for Carrier storage.
The Skyray never saw combat but it proved it’s high capability as an interceptor with numerous world records and scramble actions in Taiwan in response to crisis in the 1950s.
The F4D-1 specifications were, Power plant, one Pratt & Whitney J57-P-8 or 8B turbo fan engine rated at 8,700lb of thrust normal and with 16,000lb thrust in afterburner. Speed rated at 717mph at sea level and 650 mph at 35,000 ft. The last production aircraft was delivered in December 1958 which brought the total to 421 aircraft. In 1961, wing fatigue was discovered so they were transferred to the reserves and Utility squadrons and was re-designated F-6A. But the type was still used for test pilot school up to 1971.
|
THE KIT |
Well, what can I say, this kit is another Tamiya super
fine, well engineered and well thought out product by one of the premier plastic
model companies in the world . Every once and a while we start construction of
one of these “shake and bake” types as opposed to some of the ones that take a
whole tube of putty and scratch build parts etc. But we like those as well but,
all of us old modelers need a break once in a while.
 This kit consist of 4 sprue sheets and one clear sheet,
they are all super finely engraved. The instruction sheet is very clear and the
fuselage / wings are engineered as a one piece sub section that fits exactly as
it should but has the provision for the wing tips to fold but it gives you the
option to have them in the down position as well. Most people would be very
satisfied with the cockpit parts, they are well detailed and with careful
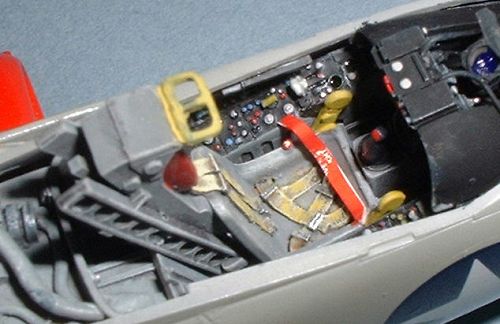
painting and skill it would be very nice as is. I chose instead, to use the
Cutting Edge resin cockpit (about $13.00, I think), because I seem to always
want more detail because of the contest participation. This resin cockpit
is very nice and is much improved over the kit item and paints up in to a very
nice looking cockpit even though you cannot see all the great detail without the
invasive “Jock scale Masters” with the little flash lights and mirrors. ( some
of those folks are dangerous, those with the dangling jewelry and ear bobs,
nose rings etc. have broken models before, and all they say is, “I’m sorry”)..
Big Whoop!! That is grounds for a big red neck “Whuppppass” in my part of the country..My daddy can whup
your Daddy etc. etc…
This kit consist of 4 sprue sheets and one clear sheet,
they are all super finely engraved. The instruction sheet is very clear and the
fuselage / wings are engineered as a one piece sub section that fits exactly as
it should but has the provision for the wing tips to fold but it gives you the
option to have them in the down position as well. Most people would be very
satisfied with the cockpit parts, they are well detailed and with careful
painting and skill it would be very nice as is. I chose instead, to use the
Cutting Edge resin cockpit (about $13.00, I think), because I seem to always
want more detail because of the contest participation. This resin cockpit
is very nice and is much improved over the kit item and paints up in to a very
nice looking cockpit even though you cannot see all the great detail without the
invasive “Jock scale Masters” with the little flash lights and mirrors. ( some
of those folks are dangerous, those with the dangling jewelry and ear bobs,
nose rings etc. have broken models before, and all they say is, “I’m sorry”)..
Big Whoop!! That is grounds for a big red neck “Whuppppass” in my part of the country..My daddy can whup
your Daddy etc. etc…
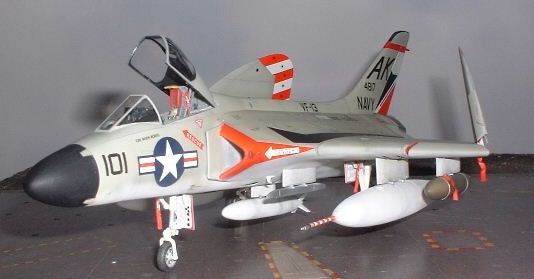
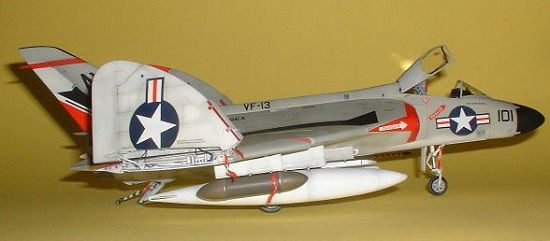
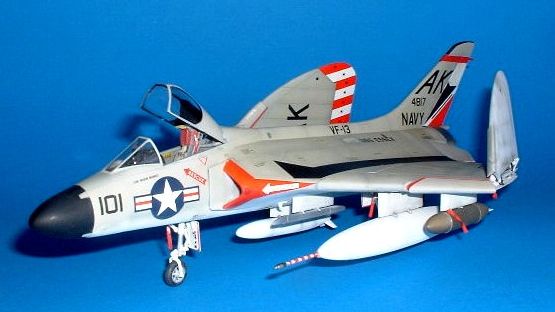
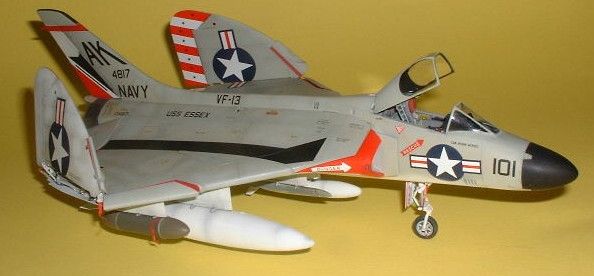
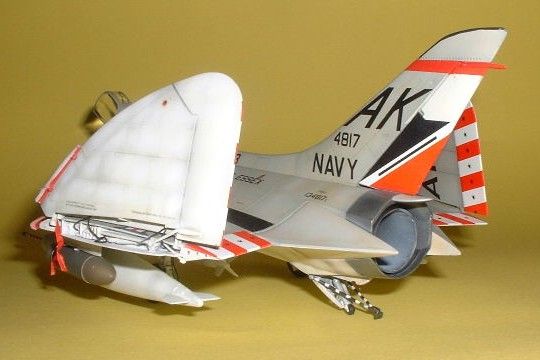
But, I am getting ahead, the kit decals are very nice and provide selection for two aircraft, one Navy, (the box art version) and one Marine type. But, here again, I chose another decal sheet from Cutting Edge, sheet # CED48089 ($ 9.00), for not any particular reason or squadron but just to try to get something that looked a little different and colorful. There are no resin or metal parts that come with the kit, the only thing wrong with this kit is the price but most of the better kits are in this price range now as well as some of the “not so good” kits, so it is pay now or pay later.
|
CONSTRUCTION |
This kit can be started by picking any of the sub-assemblies by pre-painting and detailing, and checking the fit, but, since it all fit so nice there is not much use wasting time on pre-fit.
 Even the resin cockpit fit very well after removing all the
residue. I say this because most resin parts do not fit this well and usually
take many fittings to get them right. After getting most of the cockpit done, I
install and painted the insides of the bottom half of the main body at the
intakes, wheel wells, which I added more detail but that was useless because
after you in stall the main gear doors in the proper closed position, you can’t
see the extra detail anyway. There are various air vents, exhaust ports that are
large and you can see inside, I fixed those with some “scale screen”(he, he).
The interior of the wells was painted white as well as the intakes and the
compressor face was painted gun metal and polished with SNJ powder. The cock pit
was painted dark gull gray, that seems to be the most basic color for most
modern jet cockpits as far as models go. .But anyway, I painted it according to
Cutting Edge instructions and dry brushed with ghost gray with a pre-wash of
umber.
Even the resin cockpit fit very well after removing all the
residue. I say this because most resin parts do not fit this well and usually
take many fittings to get them right. After getting most of the cockpit done, I
install and painted the insides of the bottom half of the main body at the
intakes, wheel wells, which I added more detail but that was useless because
after you in stall the main gear doors in the proper closed position, you can’t
see the extra detail anyway. There are various air vents, exhaust ports that are
large and you can see inside, I fixed those with some “scale screen”(he, he).
The interior of the wells was painted white as well as the intakes and the
compressor face was painted gun metal and polished with SNJ powder. The cock pit
was painted dark gull gray, that seems to be the most basic color for most
modern jet cockpits as far as models go. .But anyway, I painted it according to
Cutting Edge instructions and dry brushed with ghost gray with a pre-wash of
umber.
After all the prelims was done, it was now ready to just get the Ambroid Proweld, ( I do not use Tenax, I had some seams crack a few years back using that stuff so I will never use it again, Weld-on #3 is very good but is only available now in 1 pint cans that can be bought at contractor supply houses), and start putting things together, yes, I did put putty on most of the seams, I do that just from past experience, I always do that regardless of how good the kit parts fit. I put a little primer on all the fitted / and finished seams and now I can proceed with the basic Paint scheme of Light Gull gray and White.
I use various brands of putty of whatever I have, most
kinds work about as good as the other (except the environmentally correct white
type, it flakes and cracks and falls out) and most of them shrink so be prepared
to let it set a couple of days and work on some of the other projects you have.
Scrap off the excess and then wet sand with some 400 + 600 grit , prime with
your favorite light flat gray, correct any bad spots and re-scribe if needed and
prime again. Note: you do not have to prime the whole model when using most flat
enamels, I don’t know about acrylics , there are so many types and with the
viscosity and grainy differences between the types that my Passsche H-1 and VL
don’t spray them very well from brand to
 brand like my old Bager 200 use to. I
have used them all, but the best acrylic in my opinion, is the Tamiya brand
thinned with denatured alcohol but I use mostly Model Master, Floquil, and
Humbrol enamels thinned with Disol now. Youse pays your money and youse selects
what you like.
brand like my old Bager 200 use to. I
have used them all, but the best acrylic in my opinion, is the Tamiya brand
thinned with denatured alcohol but I use mostly Model Master, Floquil, and
Humbrol enamels thinned with Disol now. Youse pays your money and youse selects
what you like.
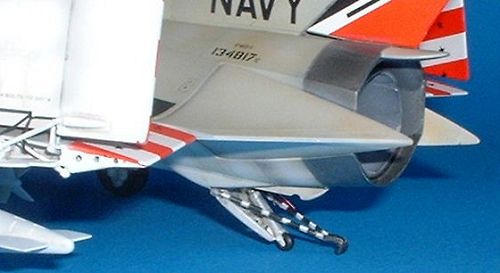
Of course, one of the first things you have to do, is, decide if you want the wings up or down because of the inserts that must go in on both wing parts. I wanted mine up to display the candy cane stripes better but I have seen this kit with them down and they look alright too but not sure about the fit, I think there is a gap problem, so, your choice. Cutting Edge makes a resin Wing fold set but I had already spent too much ($) on this thing and the kit’s parts looked ok so I just detailed them by adding styrene strips, and bits, and dry brushing and .015 solder for wiring/ tubing etc.
|
PAINT & DECALS |

I pre shaded the panel lines with heavily thinned MM raw
umber and painted the basic colors until I removed as much of the umber color as
I thought would work and then I “scale” (har, har ) painted inside the panel
lines with a lighter shade of paint for the look I wanted which was to be just
a little weathered for a non combat Navy plane. Next, I shot the first coat of
Hi-Gloss Floquil clear with about a 50% ( I think, I do not measure, if it
looks right, I spray it) mixture of Disol for thinner. ( I don’t use future
floor wax, it is only good for dipping canopies and maybe for putting on floors,
and I don’t know about that) ( what people fail to say about Future Wax is,
that most decal solutions will “Milk” color your nice new paint job)( Testors
Metalizer Sealer works very well for quicker results but, it is not quite as
glossy as Floquil) the Floquil dries really hard in 24 hours and then I lightly
wet sand with 2000 grit to remove all the bug turds, dust, cooties etc. (don’t
break the paint), spray again with
 the Floquil. Repeat this until there are no
more signs of anything except a total mirror finish ready for decals. (flat
paint usually takes about three times).
the Floquil. Repeat this until there are no
more signs of anything except a total mirror finish ready for decals. (flat
paint usually takes about three times).
I have used Cutting Edge Decals on several occasions and they always work very well with a medium solution or just plain water, but my water is very soft so that may make a difference. Don’t use any of the hot solutions as they will burn and melt or destroy them. The kit decals are a little tougher but you still have to be careful.
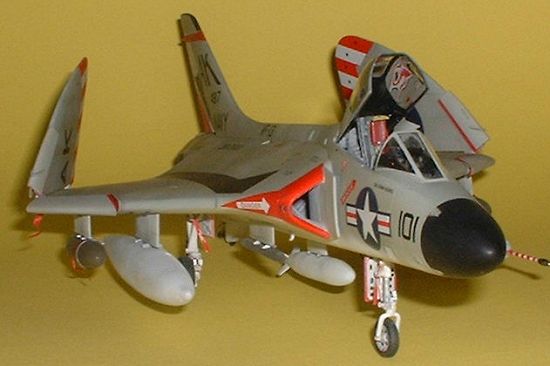
I chose the VF-13 scheme for no reason other than it was going to be colorful and besides, I had seen some of the other versions already so I wanted mine to be different like any modeler with an ego problem. (see, mine looks different!) . This version was for the squadron commander’s aircraft, CDR Norm Berrel, aboard the Carrier, USS Essex, in 1960.
 After the decals were on, I decided to enhance the panel
lines on this model with an acrylic dark gray soapy wash, after it dried
somewhat, I removed the excess with cotton swabs and a piece of old T- shirt,
sprayed again with some more lightened base coat(s) to wash out some of the
panel lines that looked too harsh)( there are other and maybe better ways to
“wash” if that is your thing, I was not real happy with the “Soap” thing, too
messy and too much residue left over, but had to try anyway)- then sprayed
again with clear gloss and the next day or so, sprayed with Testors Dull coat,(
this is the best, I have used everything else, besides, you can trip out better
than tube glue or metal sealer, “whopeee”) (just kidding ya’ll), and any minor
silvering ( gray or white paint seems to silver worse than some other colors)
was corrected and then sprayed again with Dull Coat. ( use light coats, it is a
lacquer and will bubble the enamel is it is too hot, too much, and too heavy,
disol works very well for thinning the lacquer also)
After the decals were on, I decided to enhance the panel
lines on this model with an acrylic dark gray soapy wash, after it dried
somewhat, I removed the excess with cotton swabs and a piece of old T- shirt,
sprayed again with some more lightened base coat(s) to wash out some of the
panel lines that looked too harsh)( there are other and maybe better ways to
“wash” if that is your thing, I was not real happy with the “Soap” thing, too
messy and too much residue left over, but had to try anyway)- then sprayed
again with clear gloss and the next day or so, sprayed with Testors Dull coat,(
this is the best, I have used everything else, besides, you can trip out better
than tube glue or metal sealer, “whopeee”) (just kidding ya’ll), and any minor
silvering ( gray or white paint seems to silver worse than some other colors)
was corrected and then sprayed again with Dull Coat. ( use light coats, it is a
lacquer and will bubble the enamel is it is too hot, too much, and too heavy,
disol works very well for thinning the lacquer also)
All the add-ons, electronics capsule, fuel tanks, landing gears, doors, weapons choice,( not much of a weapons choice). (I was building an airplane, not bombs) tail bumper wheel, and tail hook, were completed and the assembly started. The canopy parts were painted, cleaned up with a very small amount of WD-40 to remove all tape residue, trash etc., then a small amount of Windex to remove the WD-40!! , and then dipped in future wax, after they dried a day or so and then dipped again which will remove blemishes that still may be there and makes it clearer also. (this works best for me, if you like another method, by all means, use it, if it suits you, it just tickles the crap out of me)..there is no authority for this or any other techniques in modeling procedures, if it works for you, your method is as good as anyone , never take solutions or suggestions shouted from the bleachers, and /or the ACES, you are the coach on your team..
|
CONCLUSIONS |
 This little kit was a joy to build and very easy to put
together but to put it in a better build perspective, it would be about a skill
level 2 but the paint scheme(s) levels would vary only by the skill level of the
modeler and that could vary from a skill of 1 to as high as you want to go, but
just enjoy and paint it anyway you like.
This little kit was a joy to build and very easy to put
together but to put it in a better build perspective, it would be about a skill
level 2 but the paint scheme(s) levels would vary only by the skill level of the
modeler and that could vary from a skill of 1 to as high as you want to go, but
just enjoy and paint it anyway you like.
A lot of people spend a lot of time writing down what they consider the “rules” of modeling techniques and /or etiquette but it all boils down to just taking the kit(s) out of the box and start putting it together, have fun with it, as you go, you grow, you can use other people’s suggestions but the bottom line is, that you have to figure it out all by yourself so, just do it, however, unless you are just loaded, it is better to learn on the cheaper kits no matter if it is “in scale” or not. This kit was in the upper cost range so we try to give it some justice and it is reported to be 1/48 scale... I hope so for the purist out there.
Ya’ll have fun and thanks!!
|
REFERENCES |
Scale Aviation Modeller International vol 7/3
Personal photos from the US Naval Aviation Museum in Pensacola FL
Various web sites
Copyright ModelingMadness.com. All rights reserved. No reproduction in part or in whole without express permission.
If you would like your product reviewed fairly and fairly quickly, please contact the editor or see other details in the Note to Contributors.
Back to Reviews Page 2022