
Emhar 1/72 F3H-2 Demon
|
KIT # |
3001 |
|
PRICE: |
$11.98 |
|
DECALS: |
One aircraft |
|
REVIEW : |
Mats Olsson |
|
NOTES: |
Almark #019 decal sheet used |
|
HISTORY |
The F3H Demon was an unspectacular passage in the history of US naval aviation. Serving the Navy between 1956 –1964 it left no lasting impression in Fleet chronicles. The XF3H-1 was McDonnell´s proposal to the 1948 Navy request for a carrier-based interceptor with performance "equal or superior to that of most land-based fighters".
So starts an endless spiral of trouble, involving ever-increasing demands for performance,
a catastrophic obsession with a doomed engine-project (the Westinghouse J-40) and an accident-burdened (several times fatal) test-period. It was not until the Navy finally dropped their insistence that the J40 engine be used that the Demon could become a usable aircraft, now fitted with the far more reliable Allison J-71.Still, the F3H was constantly tampered with, in order to iron out various problems. Wings twisted, and stayed twisted, from roll-maneuvers, and a wing-spoiler system was devised to rectify this. Endurance was always on the very short end and external tanks often shortened the Demon´s legs, due to the increased drag. Eventually an in-flight refueling system was installed. These, and many other bugs, were to define the career of the Demon.
Versions of the Demon were:
F3H-1N First production variant and a total failure with several fatal accidents during the service test program. 58 were built and immediately grounded after cancellation of the program.
F3H-2N with 4x20mm cannon plus Sidewinder armament. 140 built.
F3H-2M, also equipped to carry Sparrows. 80 built.
F3H-2, with a shortened tail and greater weapons-load capability. 239 built.
Fleet service was short and in 1964 the last Demons were phased out, leaving room for Crusaders and Phantoms.
A couple of Demons survive in museums, one example on board the USS Intrepid in New York (and another at the Pima Museum in Tucson as well as one at the US Naval Aviation Museum in Pensacola).
The Demon´s only claim for fame is in it´s role as prime forefather of one of the greatest airplanes ever, the F4 Phantom. If you flatten and square out and tweak the poor Demon about a little bit and stick another jet up the back, presto, there´s your F4!
|
THE KIT |
Emhar kits fall somewhere in between "real" short-run, like Merlin and Beechnut and the "lower" segment of injection moulded like Frog and Matchbox.
 On the F3H2, detail is not
very crisp and panel lines are inconsistent, ranging from hardly noticeable to
severe knife-wounds. On my kit, the rear part of the fuselage had the very deep,
sharp cuts while the wings were quite OK and the lines on the forward fuselage
very shallow. It is engraved lines though, not raised, and I guess we prefer
that, don´t we?
On the F3H2, detail is not
very crisp and panel lines are inconsistent, ranging from hardly noticeable to
severe knife-wounds. On my kit, the rear part of the fuselage had the very deep,
sharp cuts while the wings were quite OK and the lines on the forward fuselage
very shallow. It is engraved lines though, not raised, and I guess we prefer
that, don´t we?
The only other Emhar kit I´ve seen, the FJ-4B(Emhars first kit), has raised panel detail and I don´t know in the case of their later kits of the F-94 Starfire (not quite sure if these kits were ever issued?) {They were. Anyone got a spare canopy for one?, Ed}.
The plus side is that Emhar seems to have researched this kit quite well. Outlines and general forms are good (though some details need to be altered, see construction part) for such a hard-captured form as the Demon represent, especially the front/intakes area. And… it is an injection moulded Demon! Emhar has filled a couple of voids in the US fighter-line and this has to be recommended (the only other alternatives I´m aware of are, in 1/72, vacuforms from Rareplanes and Airmodel, and in 1/48 the outrageously expensive resin kit from Collect-Aire).
Kit comes on two sprues, 89 parts, of soft, grey plastic and clear bits for the windscreen and canopy separately. Decals are provided for two aircraft (insignia and Navy-logos for one aircraft only). Instructions are very sketchy and should have been broken down in clearer steps. Painting instructions are likewise, incomplete, and colour names are only given in generic terms, no ref. to FS or any brands. Other references strongly recommended.
|
CONSTRUCTION |
The kit is spliced up in two halves for the rear fuselage and two halves for the front part. This design solves the problem with the intakes; you insert the forward fuselage into the intakes/rear fuselage. Quite neat!
I started with the cockpit (surprise, surprise!) and the first thing I was going to do was getting rid of that strange looking ejection-seat and replace it with an Aeroclub MB Mk5. However, while plowing through old magazines and books for references, I found a review of this kit in an old MAP (Military Aircraft Preview, good old mag., where did it go??). These seats were actually McDonnell seats, fitted to all early Bu.no. Demons! Nice little extra points for Emhar!
I also found out, very soon, that I needed the Airwaves detail sets if I was going to get this ghost to look decent. There are two sets available, (# AC 72-60, AC 72-62), one for cockpit detail/speed brakes and one with a boarding ladder, replacement wing-spoilers and inserts for the small wing-fences.(I also decided to order a u/c set from Aeroclub, just in case).
The cockpit was put together with some added details (small pieces of rod&fine wire for the seat, pieces of instrument decals from the scrap-box for the side walls, new decking under the canopy) and painted dark grey/flat black. The cockpit tub was glued into one of the nose sections together with the front gear-well and some lead-pellets. The nose sections were glued together as were the rear fuselage halves. Fit was quite good and only minimal filler needed. The same goes for the fit between forward/rear fuselage No filling if careful dry-fitting is executed.
 Now comes the radome!! Test
fitting revealed the radome diameter to be ..YES! ..larger than the fuselage
diameter! An early test flight now threatens this project! Well, I checked out
my supply of sandpaper, glued the sucker to the nose and away I went. Many
sessions later, aching fingers still had to do a little filling under the nose
to get an acceptable fit. So beware, future Demon-fans, brace yourselves for
this one! (This means, of course, that you cannot paint the radome separately
and attach it afterwards. You have to practice your skills of masking a straight
line around a curved, tapering surface. Great fun!)
Now comes the radome!! Test
fitting revealed the radome diameter to be ..YES! ..larger than the fuselage
diameter! An early test flight now threatens this project! Well, I checked out
my supply of sandpaper, glued the sucker to the nose and away I went. Many
sessions later, aching fingers still had to do a little filling under the nose
to get an acceptable fit. So beware, future Demon-fans, brace yourselves for
this one! (This means, of course, that you cannot paint the radome separately
and attach it afterwards. You have to practice your skills of masking a straight
line around a curved, tapering surface. Great fun!)
Wings go together in the standard way, top and bottom, right and left. Fit to fuselage is, once again, good with just some minimal filling of the underside joints.( If I do the kit again I would probably thin the wings down before putting them together, they are a bit thick as finished). Tailplanes are one-piece items and can be saved until the bitter end( at this point it appeared as bitter!)
After completing the basic airframe you can add the various "extras" from the Airwaves sets:
I proceeded with the airframe by opening up various vents and remaining gun muzzles. This is pretty straight-forward, with the exception of the engine cooling vent on the fuselage spine which I drilled out and shaped with the X-acto and putty. This is a rather prominent detail and one of the "musts" to get the Demon representative.
 Next of the
"musts", and by far the most important area, I discovered one step too
late! The splitter-plates (are they really splitter-plates or just braces?) in
the intakes were molded horizontally, while on the real thing they are slanted
and at a 90 degree angle to the fuselage and intakes respectively. The kit-moulding
looks really horrible once you know it! One step too late! Yes, these little
buggers should, of course, have been cut off before assembling the fuselage (that´s
big tip no.2 for you all presumtive Demon-makers). They are certainly more accessible
at that stage, I assure you!
Next of the
"musts", and by far the most important area, I discovered one step too
late! The splitter-plates (are they really splitter-plates or just braces?) in
the intakes were molded horizontally, while on the real thing they are slanted
and at a 90 degree angle to the fuselage and intakes respectively. The kit-moulding
looks really horrible once you know it! One step too late! Yes, these little
buggers should, of course, have been cut off before assembling the fuselage (that´s
big tip no.2 for you all presumtive Demon-makers). They are certainly more accessible
at that stage, I assure you!
Nevertheless, I summoned my surgeon-alter-ego and dove into the intakes, new scalpel in hand, and managed to remove the plates without too much damage done to surrounding tissue. While I was at it, I also thinned down the intake lips, from the inside where I was now huddling with my tools.
Thinning down is a good term to use while dealing with this Demon. I realize, in retrospect, that several more areas would have benefited from shaving off plastic. Wings, fin, intakes, wing fences (well, I did those). Everything is sort of round with this kit, not just the tubby( I like it!) shape of the entire airplane. Most details have that undefined, rounded off, moulding characteristic( y´know Matchbox!). I cut out some new plates (thin acetate) for the intakes and superglued at the proper angle.
Wow, new look mama all together! Love doesn´t last however and I was to be cooled of swiftly. By what, you ask! And I answer: clear parts! (and I know love has died many times before, for this reason alone!). Here we go:
I test fitted the windscreen and canopy ( that was to be posed open and caused no problem). The fit was OK but the framing seemed to go very high up on the sides of the windscreen. Back to references and photos and the merciless truth: Mats, Mats, they are not frames….they are super-heavy MOLDLINES!!
Now Scott comes to the rescue: complete instructions on how to sand and polish away unwanted, bad things on clear parts. First time I did this and it worked like a dream! Puh!( last polish before Future was done with Colgate Sensational Whitening!,pretty brave choice, don´t you think?)
When polished, the windscreen is actually quite good in shape, with the bulged sides like on the real thing. Further dry fitting reveals another aspect to be taken care of: The front of the windscreen ends in a rather abrupt angle to the fuselage and needs to be blended in with putty (thereby big tip no.3 for Demon-builders ,"beware of windscreen", ends).
With the airframe completed it was "off to the paintshop"(gives me the creeps, that quote!).
|
PAINT & DECALS |
This is, of course, a case of Light Gull Grey over White and nothing extraordinary (Hah!).
I used Humbrol enamels throughout and encountered no problems until I lifted off the masks on the white areas. Yep, you guessed it, not just the tape came off, some paint did too!( And this was Tamiya tape?!) I never primed the undersurface for the gloss white Humbrol, bought that ticket and got that ride. Live and learn! I sanded and smoothed out as best I could around the flaked areas, masked and sprayed the white again. Needless to say, the end results are less than perfect for the white areas.
Walkways, anti-glare and radome were masked and painted in the appropriate blacks. Leading edges of flying-surfaces/intakes were done with Humbrol polished alu., jetpipe and lower surfaces of tail/tailplanes with Testors Metallizer Burnt Iron/Steel.
With the base colours painted I installed the undercarriage units. I had acquired the Aeroclub metal u/c set but this was, I´m sorry to say, a grave disappointment. The main gears and wheels were worthless due to mismatched molds, though I did manage to sand one of the wheels usable. The nose-gear item was much better with nose-wheel molded integrally and the final setup was: kit main gear-legs (with Airwaves scissor-links) and one kit wheel +one metal wheel, stock plastic rod for additional struts, metal nose-gear with added Airwaves retraction-struts and "homemade" taxiing-lamp and indexer-panel (thank´s for the input here, fellow discussion-boarders).
All this stuff had been sprayed white and I just would like to add one thing about painting wheel-hubs/tyres on items that lack discernable mold-lines between the two: I must have painted, stripped and repainted the wheels about 50 times each! Still it isn´t good! Please, find a safe way for us shaky-hands, no-Rembrandts, to mask off miniscule wheel-hubs! (And I don´t wanna hear about ready-made masks! Who would make them for these kits when there are twenty-zillion 109´s, FW-190`s, Spifires and Corsairs to earn money on?)
After a coat of Future(Johnson Klar Polish in Swedish) it was decal time( if painting gives me the creeps, decaling is a real love-affair; maybe it´s because it makes such a difference to the model or maybe it´s just a thing with me?)
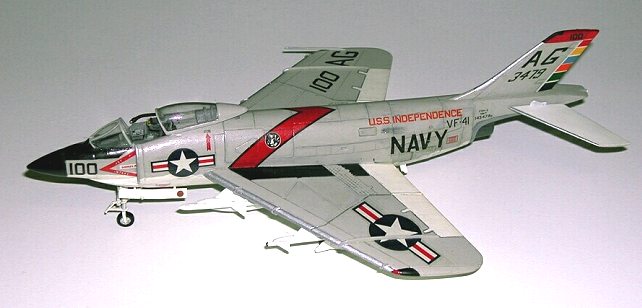
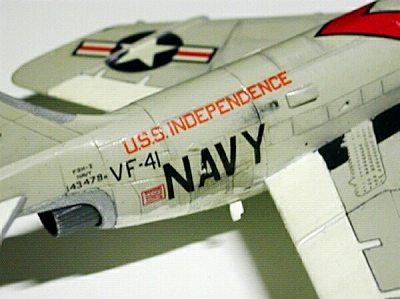
I found an Almark sheet(#019) that had three aircraft options and also included the very prominent panels for the various transducers/transmitters under the fuselage. No insignia or Navy logos included so those came from the kit-decals. The Almark decals are printed on a continuous-film sheet and have to be cut carefully. They were very nice and dense in colour, a bit thick but very easy to handle and snuggled down perfectly with the help of some Microset solution. My choice was the CAG of VF-41 Black Aces, out of USS Independence in 1959, the very same aircraft that is featured on the sheet from Microscale that was reviewed here on MM earlier. This is a really colourful bird and falls right into the correct time-frame for this model. Kit decals (insignia + Navy logos) also performed admirably and were very similar in character to the Almarks, just a little bleak in the colours.

Decals were sealed with a flat acrylic varnish and some weathering was added: Photos suggested that these planes were pretty tidy and the only wear and tear was around the rear fuselage/speed brake area + the Demon "trademark" exhaust stains from the vents on the upper rear fuselage. I had pre-shaded (darkened gull-grey) around some panels on the rear fuselage and wings and left it at that. Just added some acrylic black-wash in panel lines for movable surfaces/wing-fold. The aforementioned "trademark" exhaust stains were added with a watercolor-crayon-pen (Derwent Artist Set).
Another coat of 50/50 flat/clear acrylic varnish sealed off the grand total and time had come for the finishing details.
Gear-doors were CA-glued in place (nose-doors spiced up with drilled out holes on inside surface), tank-vents and tailhook attached and tailplanes and jet-pipe press-fitted in.
A tiny length of banjo-G-string( Yeah, that´s what I do to blow off steam during painting-sessions: play Foggy Mountain Breakdown at max. volume. Always keep yer banjo handy, that´s my best piece of advice as an alternative to test-piloting.) was installed in the windshield to simulate the pressure-head (that´s what the cutaway-pic. calls it anyway).
Final items were the ordnance: I wasn´t too happy about the looks of the missiles (2xSparrows+2x Sidewinders) but failed in the search for relevant pictures of first-generation AIM´s so I settled with what I had and the little painting-hints I could find. Basically all white with metal-look seeker on the Sidewinders??
One drop tank was fitted as this seems to have been the normal setup on the Demon. The fuel/endurance problem was a constant trouble in the Demon´s career. When two drop tanks where fitted the Demon often were shorter-legged than without them, due to drag induced by the close-together fitted tanks. Final measure taken was an in-flight refueling device bolted to the upper starboard side, as seen on this model.
Lastly some painting touch-up was done: Wing-tip lights, tail light (forgot this, I had sculpted a tail light with putty, there's none on the kit)
|
CONCLUSIONS |
You can´t build a correct Demon right out of this box. The intakes and windscreen, at least, need to be taken care of. Otherwise the kit is good for a short-run. Good fit overall and problem-free if you take your time. As for the subject-matter I can only say: Thank you
Emhar! Now where did I put that FJ-4B? Better knock those Emhars off while you´re at it!
|
REFERENCES |
Air Enthusiast #43
US Jet Fighters since 1945, Robert F.Dorr
Various Internet Web-sites.
PS. The S. Ginter book on the Demon should be the definitive reference . Unfortunately, I didn´t have it at the time of this build. DS.
Copyright ModelingMadness.com. All rights reserved. No reproduction in part or in whole without express permission.
If you would like your product reviewed fairly and quickly, please contact the editor or see other details in the Note to Contributors.