
|
KIT: |
Monogram 1/48 F9F-5 Panther |
|
KIT # |
5456 |
|
PRICE: |
$8.50 (1990) |
|
DECALS: |
1 Aircraft: VF-113 |
|
REVIEW & |
|
|
NOTES: |
Aftermarket decals by Repliscale & Microscale |
|
HISTORY |
Grumman's first jet "Cat" was the F9F "Panther". First planned as a four-engined, two-seat night fighter, designated XF9F-1, the Panther
evolved into a single-engined single-seat day fighter when the more powerful license-built version of the
 Rolls-Royce Nene jet engine became
available soon after WW2. The first prototype of the redesignated F9F-2 flew in November of 1947. Armed with four 20mm cannon, the Panther
became the most built of the immediate postwar Navy jets and a workhorse for the Navy during the Korean War.
Rolls-Royce Nene jet engine became
available soon after WW2. The first prototype of the redesignated F9F-2 flew in November of 1947. Armed with four 20mm cannon, the Panther
became the most built of the immediate postwar Navy jets and a workhorse for the Navy during the Korean War.
Its straight wing design did not allow it to be an effective dogfighter and much like its Air Force cousin, the F-80, it served mainly as a ground attack aircraft during the conflict. It did manage to shoot down at least one MiG-15 during the war and after Korea starred in the movie "The Bridges at Toko-Ri". The -5 version of the Panther was the last straight-winged version produced before Grumman switched to the swept-winged Cougar.
|
THE KIT |
Monogram released the -5 version of the Panther in 1990. Prior to this the only Panthers available in this scale were very poor quality models
released mainly in the '50's, so Monogram's model was much appreciated. The model is molded in dark blue plastic with a sprue of clear parts.
It looks good in the box, a look that belies the many problems faced during construction. Typical of Monogram kits of this period, all panel
lines are of the raised variety with only the control surfaces being represented by recessed lines. My kit had a short-shot tailskid, which
was easily fixed by adding strip styrene, then cutting and sanding to shape.
|
CONSTRUCTION |
Construction begins with the cockpit tub, a very nicely molded affair,
also typical of Monogram. The side panels have nicely raised details making them easy to paint and drybrush. I painted the tub with Model
Master Interior Green then masked off the side consoles and painted those black. Next the control stick and rudder pedals were painted and
glued into the tub. The whole assembly was then given a wash of Raw Umber oil paints. When this dried, the green parts of the tub were
drybrushed with successively lightened coats of Interior Green. The rudder pedals were drybrushed with Poly S Metalline Oxidized Aluminum.
The side consoles were given a light going over with a Silver artist's pencil. This brought out the details rather nicely.
 I left the nose gear off until after assembly and painting rather than put it in at the time the instructions suggested. This made it much
easier to paint the model later. Thankfully it butt joins the front of the wheel well and is easily slid into place later. All wheel wells
were painted Model Master Interior Green. The cockpit instrument hood was painted Aeromaster RLM 66 Schwartzgrau
(Dark Gray). The arrestor hook, tailpipe, and flow straightener (I love these old Monogram kits! They actually give you the names of the kit
parts that you are assembling!) were painted Metallizer Exhaust. The flow
straightener was glued into the tailpipe, then this assembly, the completed cockpit tub, the nose gear well, the instrument hood, and the
I left the nose gear off until after assembly and painting rather than put it in at the time the instructions suggested. This made it much
easier to paint the model later. Thankfully it butt joins the front of the wheel well and is easily slid into place later. All wheel wells
were painted Model Master Interior Green. The cockpit instrument hood was painted Aeromaster RLM 66 Schwartzgrau
(Dark Gray). The arrestor hook, tailpipe, and flow straightener (I love these old Monogram kits! They actually give you the names of the kit
parts that you are assembling!) were painted Metallizer Exhaust. The flow
straightener was glued into the tailpipe, then this assembly, the completed cockpit tub, the nose gear well, the instrument hood, and the
arrestor hook were glued into the left fuselage half.
Next, the fuselage halves were glued together. The 20mm cannon were supposed to
be added first, but they were too small so were left off and were later replaced by hypodermic tubing at a later date. DOH! Forgot to put in
the nose weight before gluing the fuselage halves together!! Rookie mistake. After much thought, put the weight in the fuselage behind the
cockpit using Silly Putty to hold it in place. This worked like a charm. Whew! The kit sits on its gear and the weight doesn't rattle
around inside.
Next were added the horizontal tails. They are keyed so that you can't mess up putting them in place. Before gluing the wings together, make
sure to drill out the corresponding holes in the one-piece wing bottom. After consulting reference materials (see below) I noticed that the
plane I was doing, the Blue Tail Fly, only had the outer rocket stubs and the bomb racks installed, so only those corresponding holes were
drilled using a pin vise and a drill bit.
Before gluing the tops of the wings to the bottom, glue the intake trunks to the bottom wing. The entire intake area was painted
aluminum. Next the top wings were glued to the bottom before the completed wing assembly was added to the fuselage. DON'T glue the
rocket stubs or the bomb shackles into place before painting and decaling are finished or you'll run into a major
decaling headache later. The air brakes are supposed to be shown open, but I wanted mine
closed. Since they are designed to be shown open, they don't fit at all well in the closed position. Now the hard part began. Much filling and
sanding of seams took place, especially in the area of the molded-on wing-tip tanks and the closed air brake region.
|
PAINT & DECALS |
 After all seams were filled, Testors Pla Gloss Gray was thinned 3:2 parts paint to Model Master Airbrush Thinner, then sprayed over the
entire model in preparation for the natural metal coat to come. I let the gloss gray dry a week to make sure it wasn't still tacky before
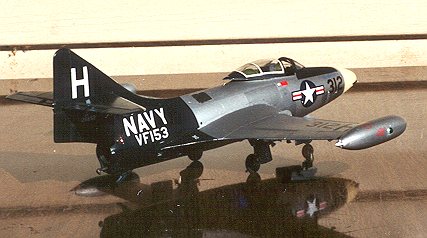
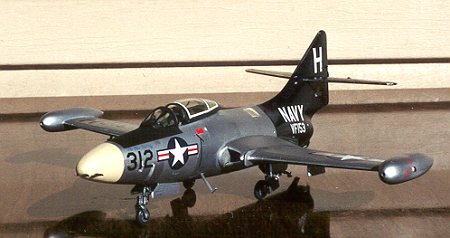
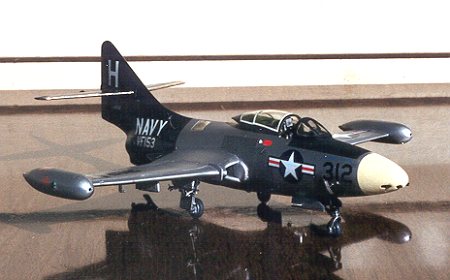
continuing. According to Squadron/Signal's book, F9F Panther/Cougar In Action, page 30, "The Blue Tail Fly was a unique combination of two
different F9F-5's. Both aircraft belonged to VF-153 aboard U.S.S. Princeton.
After all seams were filled, Testors Pla Gloss Gray was thinned 3:2 parts paint to Model Master Airbrush Thinner, then sprayed over the
entire model in preparation for the natural metal coat to come. I let the gloss gray dry a week to make sure it wasn't still tacky before
continuing. According to Squadron/Signal's book, F9F Panther/Cougar In Action, page 30, "The Blue Tail Fly was a unique combination of two
different F9F-5's. Both aircraft belonged to VF-153 aboard U.S.S. Princeton.
The story of the Blue Tail Fly goes that a Lt. Richard (Stretch) Clinite was flying an experimental finish F9F-5 when he was
hit by Communist flak and the tail section of the aircraft was badly riddled but he managed to get the Panther back aboard. In the meantime,
Ens. William Wilds, Jr. brought back a heavily damaged standard Glossy Sea Blue finish F9F-5 with its rear section intact. After mating the
two airframes, the Blue Tail Fly was born. It flew 12 missions in that configuration before being returned to the States for rebuilding." This
meant that the front half of the Panther would be natural metal and the
rear Gloss Sea Blue.
After stuffing the wheel wells with tissue, the canopy was masked and added to the model. The whole model was then painted using my special
formula for natural metal finishes. Using the In Action pictures and centerfold drawings as a guide, I then masked off various areas of the
front half and wings before using different shades of Metallizer to represent different panel tones. My formula is so tough that I was able
to mask these areas using Scotch Brand cellophane tape without pulling
up the original metal finish beneath! Next the front half of the model was masked and the rear half shot with Testors Model Master Gloss Sea
Blue again thinned 3:2 to speed drying time.
After removing the masks and various touchups of the paint, Bare Metal Foil Chrome was added to the leading edges of the vertical and
horizontal tails to represent the anti-corrosion paint on the real aircraft. Since all paints used had a glossy finish, the
decaling 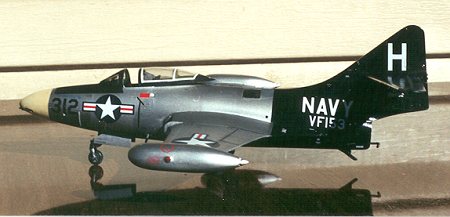 could now begin. The markings for the Blue Tail Fly come from a RepliScale sheet that now,
unfortunately, is out of production. As with many RepliScale decals you only get the bare minimum markings with some
could now begin. The markings for the Blue Tail Fly come from a RepliScale sheet that now,
unfortunately, is out of production. As with many RepliScale decals you only get the bare minimum markings with some
of the markings from the kit being required. In this case, the white "NAVY" that was supposed to go on the fuselage halves were supposed to
come from the kit. The Monogram decals shattered upon touching water!
After a fruitless search through my decal collection, I ended up buying an Aeromaster set for Korean War aircraft that had markings for a Panther included. That little problem solved, I used a Superscale deal sheet featuring Panther data for the rest of the markings. Luckily, this sheet gives identical makings for both natural metal Panthers and Gloss Sea Blue ones, so one sheet sufficed. The decals snuggled down well using the Microscale system. The canopy was unmasked as were the wheel wells before landing gear and various other "hangy-down" bits were added and the model was complete.
|
CONCLUSIONS |
While a good kit overall, the Monogram Panther kit is beginning to show its age with fit problems that are becoming hard for modelers to accept in the climate of Hasegawa/Tamiya/Accurate Miniatures releases of the past five years. If you must have the -5 Panther, then this is the only game in town in 48th scale. Later this year, Hobbycraft is supposed to release a -2 Panther and two versions of the Cougar, all in 48th scale. I'm looking forward to these releases as they will then leave only one gap in my Grumman 'Cat collection, the F11F-1 Tiger.
|
REFERENCES |
Sullivan, Jim and Greer, Don. F9F Panther/Cougar In Action. Squadron/Signal Publications, 1982. Particularly pages 26-27 and 30.
Kinsey, Bert. F9F Panther in Detail and Scale. Kalmbach Books, 1993.
April 2000
If you would like your product reviewed fairly and quickly by a site that has over 800 visits a day, please contact me or see other details in the Note to Contributors.