| KIT: | Battle Axe 1/48 C-45 (Beech 18) |
| KIT #: | 4803 |
| PRICE: | $72.96 MSRP |
| DECALS: | Three options |
| REVIEWER: | Terry Miesle |
| NOTES: | Short run kit |
| HISTORY |
The Beechcraft aircraft company is one of the longest-lived private aircraft companies in America. They have produced classic aircraft including the Model 17, the Staggerwing. The most ubiquitous aircraft they’ve made is the Model 18, the Twin Beech. This aircraft was produced for over 3 decades with minor changes. You will still see these in many airports today, and I the air constantly.
Any transport aircraft this well known will find its way into military service throughout the world. Its easy maintenance, good speed and range, and forgiving flight characteristics made it a natural for military transport.
| THE KIT |
Battleaxe is a limited-run French aircraft kit manufacturer. It’s part of a family of companies including Socrate. Unlike some limited-run kit manufacturers, Battleaxe still produces fairly crude products which need a lot of time and effort. The tradeoff is their subject matter. The Twin Beech is a long-neglected subject. Whether this is because civil subjects don’t sell as well as military I can’t say, but I find it strange that no mainstream company has decided to tackle this subject.
 I was asked to
build a Beech-18 as part of a museum project commemorating the Glenview
Naval Air Station outside Chicago. Foolishly I agreed to this task, and
decided that if I were to spend the time and effort figuring out how to
build this kit, I’d build one for myself. Thus began the twin Twin Beech
project.
I was asked to
build a Beech-18 as part of a museum project commemorating the Glenview
Naval Air Station outside Chicago. Foolishly I agreed to this task, and
decided that if I were to spend the time and effort figuring out how to
build this kit, I’d build one for myself. Thus began the twin Twin Beech
project.
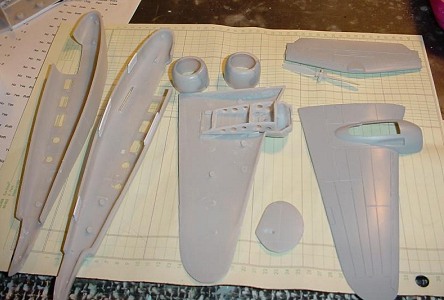
What do you get in this kit? First I must say whoever produced the masters did a very good job. Panel lines are straight (if some overshoot their terminus), alignment is good, and measurements are good. There are just a couple of oddities, which I’ll highlight – though anyone with a couple pictures of the aircraft will spot these on their own without problem.
On the downside, the plastic is incredibly thick. The side windows are all easier to replace than use, the surface is rough and the production crude. You will need to spend a good amount of time making the panel lines presentable, thinning pieces like the cowling interior, gear bay doors, etc. It’s not a kit for beginners or those used to “shake-and-bake” kits. If Koster or Sanger or another good vacuform company had access to these kit masters, I’m confident the plane would be much easier to build.
On another upside, I had presumed the main landing gear would require scratch-built replacement. When I measured the gear on a real plane and compared those figures with the kit’s parts, I was pleasantly surprised to find them as close to perfect as I could hope. They were thick, but that’s just a matter of sanding.
| CONSTRUCTION |
 Where do you start
on a kit like this? I couldn’t even wrap my head around it until I cleaned
the surfaces and examined the fit. Wetsanding with foam pads took care of
the surface pretty well, and after a couple layers of Gunze-Sangyo Mr.
Surfacer 500 in the spraycan more wetsanding yielded a very smooth
surface. You’ll need to even out the windows, even out the panel line
depth (scriber and razor saw), sand the mating surfaces smooth and all the
other things you’ll doubtlessly notice while building.
Where do you start
on a kit like this? I couldn’t even wrap my head around it until I cleaned
the surfaces and examined the fit. Wetsanding with foam pads took care of
the surface pretty well, and after a couple layers of Gunze-Sangyo Mr.
Surfacer 500 in the spraycan more wetsanding yielded a very smooth
surface. You’ll need to even out the windows, even out the panel line
depth (scriber and razor saw), sand the mating surfaces smooth and all the
other things you’ll doubtlessly notice while building.
The interior will
need a little work, too. The cabin is sufficient for what you’ll see
through the windows, as is the toilet. I didn’t
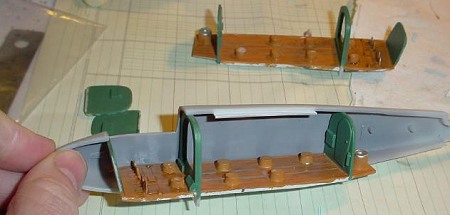 bother
doing much there except clean up the interior and the seats. The
floor needed a bit of added material to fit well against the fuselage
sides. Again, this is easy. The bulkheads fit fairly well, but
the floor with bulkheads seems a bit short for the entire length of this
fuselage. It took a bit of figuring out how to make this work, and it
came down to making sure the cockpit sits correctly.
bother
doing much there except clean up the interior and the seats. The
floor needed a bit of added material to fit well against the fuselage
sides. Again, this is easy. The bulkheads fit fairly well, but
the floor with bulkheads seems a bit short for the entire length of this
fuselage. It took a bit of figuring out how to make this work, and it
came down to making sure the cockpit sits correctly.
The kit has a
little slip of amended instructions for the canopy. They instruct you to
remove a bit of fuselage side and tell you where to cut the vacuformed
canopy. I presume this was to fix a problem reported in earlier reviews
revealing the canopy was too wide and too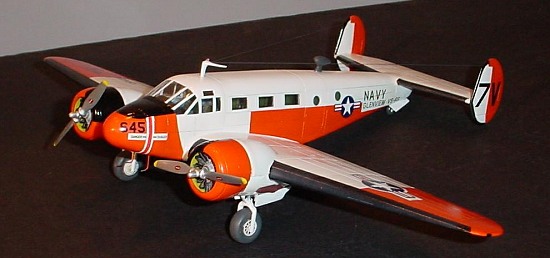 deep for the kit. After making
these changes, I test fit the canopy with the fuselage taped together. I
learned my lesson after building the Koster Ventura, and made sure this was
a good fit. To my surprise I found it fit nearly perfectly. That was a
big relief.
deep for the kit. After making
these changes, I test fit the canopy with the fuselage taped together. I
learned my lesson after building the Koster Ventura, and made sure this was
a good fit. To my surprise I found it fit nearly perfectly. That was a
big relief.
![]() Now on to a major
problem with the fuselage, the windows. The plastic bits contained in the
kit are, in my view, unusable. I’ve learned a few tricks over the years
and was about to discover another. I decided to use Envirotex Light to
replace the windows, a trick I’ve used in the past. However, the normal
method I use has a problem. Tape over the window and resin poured from
behind does make a smooth surface, but the adhesive can cause problems. My
solution was to use a strip of plastic placed down the middle of a bit of
tape to provide a nice, smooth surface as a backing on fuselage interior.
The resin would be poured from the front. After drying, I pulled the tape
off and the results were about as good as I could expect. A bit of sanding
and polishing on the front yielded pretty good windows. There were a
couple of tiny bubbles I had expected to lift to the surface, but somehow
didn’t. It’s still far better than the kit-supplied windows.
Now on to a major
problem with the fuselage, the windows. The plastic bits contained in the
kit are, in my view, unusable. I’ve learned a few tricks over the years
and was about to discover another. I decided to use Envirotex Light to
replace the windows, a trick I’ve used in the past. However, the normal
method I use has a problem. Tape over the window and resin poured from
behind does make a smooth surface, but the adhesive can cause problems. My
solution was to use a strip of plastic placed down the middle of a bit of
tape to provide a nice, smooth surface as a backing on fuselage interior.
The resin would be poured from the front. After drying, I pulled the tape
off and the results were about as good as I could expect. A bit of sanding
and polishing on the front yielded pretty good windows. There were a
couple of tiny bubbles I had expected to lift to the surface, but somehow
didn’t. It’s still far better than the kit-supplied windows.
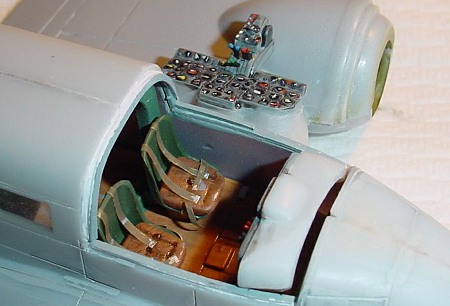 The cockpit didn’t
get much more details. I added seat belts and engine control levers,
painted the colors a bit brighter than necessary, and test fit the
instrument coaming and other bits. The coaming seems not to fit well, with
a big gap in the front. But, the canopy covers this and you will not see
it. The placement guide in the instructions is lacking, but with a bit of
work it can be figured out.
The cockpit didn’t
get much more details. I added seat belts and engine control levers,
painted the colors a bit brighter than necessary, and test fit the
instrument coaming and other bits. The coaming seems not to fit well, with
a big gap in the front. But, the canopy covers this and you will not see
it. The placement guide in the instructions is lacking, but with a bit of
work it can be figured out.
The tail gear really needs to be installed before cementing the fuselage. It doesn’t really look like the gear on the aircraft, which was all tubular construction. I decided to take the lazy way out, as it’s not the most visible part of the plane.
Satisfied with all this interior work, I glued the fuselage together. Yes, there will be a step along the joint. This was not unexpected and it’s something you’ll have to live with. It can be corrected later. After gluing, I employed another trick I learned some time ago. Vacuformed canopies can be tricky. I glued a strip of plastic along the inside surface to provide a lip or notch for the canopy to sit in. This will aid in alignment, and provide greater surface are for cementing. This lip is typically invisible once the canopy is installed and saves a lot of grief when it comes to glue time.
![]() Though the wing
joint is a slot-and-tab affair, and you will need to clean it up a bit, the
fit is actually pretty good. The same cannot be said for the tail. In an
odd bit of master inconsistency, the fuselage tail cone is too long. It
should not extend past the elevator, which extends beyond the fuselage
itself.
Though the wing
joint is a slot-and-tab affair, and you will need to clean it up a bit, the
fit is actually pretty good. The same cannot be said for the tail. In an
odd bit of master inconsistency, the fuselage tail cone is too long. It
should not extend past the elevator, which extends beyond the fuselage
itself.
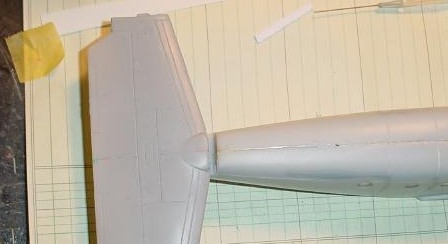 The tail section needs a lot of attention, it doesn’t actually sit
where it should. Plus, the cutout isn’t exactly straight. A bit of plastic stock as shim, and a lot of Aves Apoxie Putty later, and it looked
pretty good. You need to spend a lot of time making sure your alignment is
correct before gluing. The good thing about Aves’ putty is that you can do
all your shaping for huge gaps like this wing with alcohol, a soft paint
brush, a few tools and time. This model would know Aves quite well before
the end of building.
The tail section needs a lot of attention, it doesn’t actually sit
where it should. Plus, the cutout isn’t exactly straight. A bit of plastic stock as shim, and a lot of Aves Apoxie Putty later, and it looked
pretty good. You need to spend a lot of time making sure your alignment is
correct before gluing. The good thing about Aves’ putty is that you can do
all your shaping for huge gaps like this wing with alcohol, a soft paint
brush, a few tools and time. This model would know Aves quite well before
the end of building.
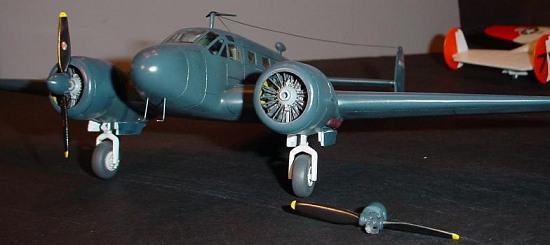
Now for some odds and ends. The vertical stabilizers fit pretty well, all things considered. The landing gear bays build up pretty well, but sanding was needed to make sure they fit correctly. I decided not to install the main gear before assembling the wings. I knew this would require a little surgery later, but decided that was worth the ease come painting time. I painted the gear bays the standard US interior green, and applied a little India ink in Future wash for grime.
At this point I glued the canopy in place. I used a bit of clear epoxy cement, as I was confident in the fit. A little wet-sanding was required after the epoxy cured.
Wings were glued
in place. Yes, there is a major step gap. I sanded a bit of
plastic away, then I turned once again to the Aves. Epoxy putties can
be thinned. A little thinner makes them easier to work with. A
bit more makes them the consistency of glazing compound. That’s
 what you need here, a
smooth paste which can be skated over the entire upper and lower surfaces
of the plane like spackle or frosting. Again, your spatula can make this
pretty smooth. Don’t worry about excess – that can be removed with
alcohol and a paper towel. Once satisfied, a bit of water on a
fingertip smoothes the entire area and also firms the putty. It’s a
great trick, you’ll use it a lot once you try it. It may look a bit
sloppy but as it cures, that water will disperse. You’ll get a glassy
smooth surface with some practice. One tip I didn’t learn until later
is to scribe the putty while it’s still uncured – or mostly cured.
Don’t try to remove putty, but with a curved blade moistened in alcohol,
gently drag a line in place.
what you need here, a
smooth paste which can be skated over the entire upper and lower surfaces
of the plane like spackle or frosting. Again, your spatula can make this
pretty smooth. Don’t worry about excess – that can be removed with
alcohol and a paper towel. Once satisfied, a bit of water on a
fingertip smoothes the entire area and also firms the putty. It’s a
great trick, you’ll use it a lot once you try it. It may look a bit
sloppy but as it cures, that water will disperse. You’ll get a glassy
smooth surface with some practice. One tip I didn’t learn until later
is to scribe the putty while it’s still uncured – or mostly cured.
Don’t try to remove putty, but with a curved blade moistened in alcohol,
gently drag a line in place.
With most of the upper and lower fuselage a layer of Aves putty, a bit of wet sanding will reveal any uneven areas. Foam sanding pads are great for this, as are sanding sticks. When satisfied, I washed the model again and sprayed Gunze Sangyo’s Mr. Surfacer 1000 over the model. I did cover the canopy with tape beforehand. Not only is this a great primer, it’s also a great filler for scratches and blemishes.
The canopy windows were masked with liquid mask. I am becoming more fond of liquid mask for canopies, particularly vacuformed ones. A sharp curved blade doesn’t easily damage the clear parts, and I find it very easy. Tape was used for the rectangular windows, and a circular punch made Post-It notes masks for the round windows.
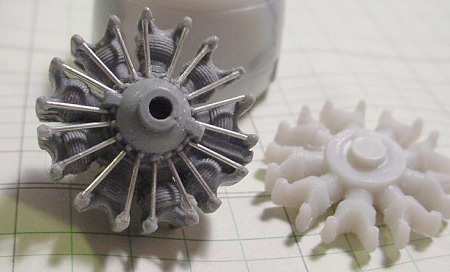 The kit engines
are terrible. I’m not surprised, and don’t really hold Battleaxe in scorn
for this, their low-pressure injection simply can’t produce this sort of
detail. Classic Airframes got around this sort of problem by including
resin bits. Not so with Battleaxe, you’re on your own. Fortunately,
Engines ‘n’ Things makes the PW 985 engines. Their casting isn’t great,
but they are single-piece casts, and I know how to use epoxy putty to fill
any problem areas. Fine solder was used for pushrods, and fine wire for
the ignition wires. I’m much happier with these engines. The props aren’t
bad, they just required a bit of sanding and reshaping.
The kit engines
are terrible. I’m not surprised, and don’t really hold Battleaxe in scorn
for this, their low-pressure injection simply can’t produce this sort of
detail. Classic Airframes got around this sort of problem by including
resin bits. Not so with Battleaxe, you’re on your own. Fortunately,
Engines ‘n’ Things makes the PW 985 engines. Their casting isn’t great,
but they are single-piece casts, and I know how to use epoxy putty to fill
any problem areas. Fine solder was used for pushrods, and fine wire for
the ignition wires. I’m much happier with these engines. The props aren’t
bad, they just required a bit of sanding and reshaping.
Engine cowls required a bit of thinning, but not too much. They were painted in zinc chromate inside and glued in place. The engine backplate was not required, the engine can be glued in place without it.
I’m probably forgetting a few things, but you get the picture anyway.
| COLORS & MARKINGS |
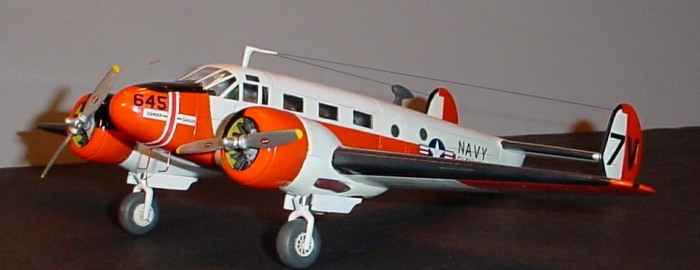
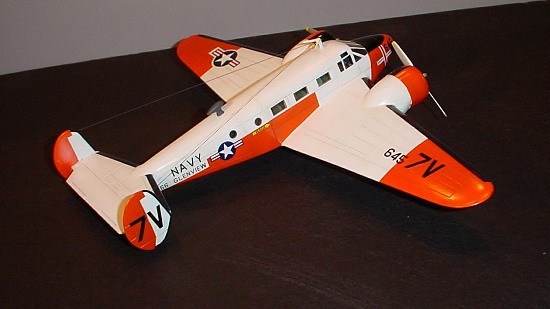 I decided to build
a blue Navy transport version, and the white-and-orange transport for
Glenview. The white is slightly grayed-down, and my now-standard shading
techniques used. Masking is not easy for the orange aircraft. The only
picture I had for this aircraft left me to extrapolate the upper and lower
surfaces based on pictures of similar aircraft. The orange color is
Testor’s Acryl International orange, shaded slightly. One thing to note is
the cutout masking for the wing insignia. This was tricky, but I bought a
compass cutter by Olfa. It’s something I should have bought years ago.
I decided to build
a blue Navy transport version, and the white-and-orange transport for
Glenview. The white is slightly grayed-down, and my now-standard shading
techniques used. Masking is not easy for the orange aircraft. The only
picture I had for this aircraft left me to extrapolate the upper and lower
surfaces based on pictures of similar aircraft. The orange color is
Testor’s Acryl International orange, shaded slightly. One thing to note is
the cutout masking for the wing insignia. This was tricky, but I bought a
compass cutter by Olfa. It’s something I should have bought years ago.
The de-icer boots on the leading edges was painted last, being black. I toned down the Gunze gloss black with some Gunze grimy black to make it look more like rubber.
The blue aircraft is overall Navy blue, the standard paint for mid-war and post-war aircraft.
| FINAL CONSTRUCTION |
Kit decals for lettering on the blue aircraft are sufficient. Insignia was swapped for some SuperScale decals from my stockpile. The orange plane needed some custom markings, many thanks to John Lester for supplying these. Again, based on some other pictures, I added a few other markings like the rescue decals.
Landing gear was
straightforward, though the doors need a hinge mechanism – even if just
tabs of plastic to provide better gluing. I also built a retraction
hydraulic piston from brass tube, and oleo scissors from plastic stock.
The gear bay sits a bit far forward, or the ge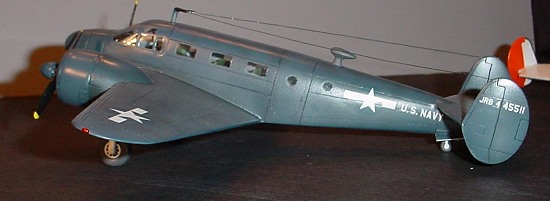 ar
opening is too short; either way, there is little room for those oleo
scissors.
ar
opening is too short; either way, there is little room for those oleo
scissors.
After decals, a good coat of Future sealed everything in place. Then I added some judicious washes – Payne’s Gray watercolor diluted in water with a bit of Liquitex Flow Aid and Slow-Dri to aid flow and workability. I’ve become very fond of this watercolor panel line washing. It can be colored with other watercolors to tone it toward whatever color your base is. Excess wipes away like an oil wash, if used on a glossy surface.
The antenna needed some work, I thinned it down, and epoxied a bit of fine brass wire to the front – which extends beyond the bottom for a glue anchor into the fuselage. The monofilament line was also epoxied to the antenna mast at this point. Wow, is it strong. A small drill hole in each vertical stabilizer accepted the line, and nice thin CA glue holds it fast. These are nice and tight. Later, I looked for smoke colored monofilament line – after a co-worker of mine clued me in to different colored monofilament. A drop of epoxy on each wingtip became a navigation light when painted clear green or red.
The blue Beech was given a semi-gloss topcoat, and the orange Beech stayed glossy.
| CONCLUSIONS |
This was a
difficult project. OK, that may be an understatement. Building two isn’t
much more work than one – considering all the work needed to build even one
of these kits. I’m really g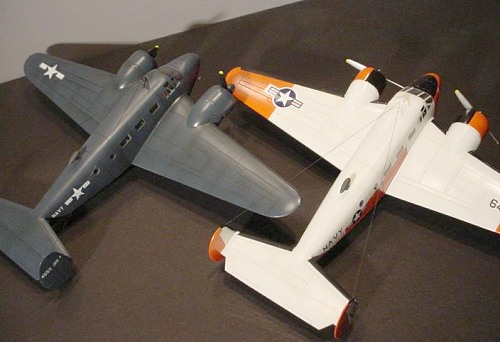 lad someone released this plane in
quarter-scale, but I really would like to have seen it in a better
quality. I think anyone who considers themselves a half-scratch-builder
would have no problem with the kit, but anyone else should think thrice
before starting this kit. Not that they would be likely to purchase the
plane in the first place, but I feel obliged to warn everyone.
lad someone released this plane in
quarter-scale, but I really would like to have seen it in a better
quality. I think anyone who considers themselves a half-scratch-builder
would have no problem with the kit, but anyone else should think thrice
before starting this kit. Not that they would be likely to purchase the
plane in the first place, but I feel obliged to warn everyone.
I think anyone who starts this kit will find some good warnings and tips in this article. Experience with Epoxy putty is also highly recommended. Do yourself a favor and use the good stuff.
I’m very happy to have this plane on my shelf. It is really pretty sitting next to my Ventura, and I think I’ll have to build the Hudson and an Electra to complete the foursome. Maybe even a 1/48 Harpoon, if I can find one. This classic twin-engine, twin-tail, Electra layout is timeless, in my opinion.
June 2005
If you would like your product reviewed fairly and quickly by a site that has around 300,000 visitors a month, please contact me or see other details in the Note to Contributors.