
Testors/Hawk 1/48 F2H Banshee
|
KIT # |
7522 |
|
PRICE: |
$10.00 MSRP |
|
DECALS: |
Two aircraft |
|
REVIEWER: |
Steve Mesner |
|
NOTES: |
|
HISTORY |
In the early to mid-1970s, the 1/48 scale modeler who wanted to build a
collection of Korean War aircraft found the pickings remarkably slim.
There was no B-26 (A-26), no F7F, no Sea Fury, no Skyraider, no F-82, no
Seafire 47, no C-47, no F-94A. Other KW aircraft were represented
only by very old and inadequate kits by the likes of Aurora, Lindberg,
Hawk, and Monogram, many of which were also out of production and already
assuming “collector” status--F9F, F2H, T-6, MiG-15, F-86, F-80, F-84.
Even those few kits that were available--P-51D (Hawk, Otaki) and F4U-4
(Monogram) would be judged only barely adequate or worse by today’s
standards.
Things began to change in the late ‘70s with Monogram’s release of the
F-80C, F-86F, and MiG-15. Since then, a variety of manufacturers (Airfix,
AMT, Hasegawa, Hobbycraft, Modelcraft, Monogram, Tamiya, etc.) have
given us new kits of every aircraft listed above--all but one, the F2H
Banshee. (They might not all be the versions we’d like or of a quality
we’d prefer, but they’re all something to work with). Except for the
ultra-expensive Collectaire resin kit, for the Banshee, we’re stuck with
 the almost half-century old Hawk kit. The only bright spot in this
picture is that this kit, once a highly sought collectible (I paid $20
for one in the early ‘90s), has been reissued by Testor and is once again
readily available.
the almost half-century old Hawk kit. The only bright spot in this
picture is that this kit, once a highly sought collectible (I paid $20
for one in the early ‘90s), has been reissued by Testor and is once again
readily available.
The
Banshee wasn’t as widely or gloriously used in the Korean War as
Grumman’s F9F Panther, but no collection of KW models can be considered
complete without one. The Navy’s F2H might be thought of as rougly
analagous to the Air Force’s F-80: It was their first jet fighter that
could be considered even marginally combat-capable, and though already
obsolescent by the time of the Korean War, it was there when it needed to
be and served honestly and well when called.
It’s also an exceptionally pretty airplane. There is an almost sensuous
aspect to the way the McDonnell designers buried the engines gracefully
in the wings.
I want a Banshee on my model shelf, and I can’t afford the Collectaire
kit. If you’re reading this, I’ll bet you’re in the same boat. We’re not
alone: The Banshee appears near the top of almost every “most wanted new
1/48 aircraft kit” list I’ve seen for quite some time.
So far, there hasn’t been even so much as a single hint or rumor that any
major (or minor!) kit manufacturer is going to take care of us. While we
wait for someone to wake up and smell the opportunity, let’s see if
there’s anything we can do with the ancient Testor/Hawk kit to
fill that hole on our model shelves.
|
REFERENCES |
Our very first problem is trying to round up decent reference material on
this red-headed stepchild. Until a Squadron/Signal In Action book
appeared late last year (see my Modeling Madness review of it here) , the
only dedicated Banshee book I’m aware of was an early Ginter offering,
whose drawings and BW photos were mainly useful for paint and markings
ideas (i.e., 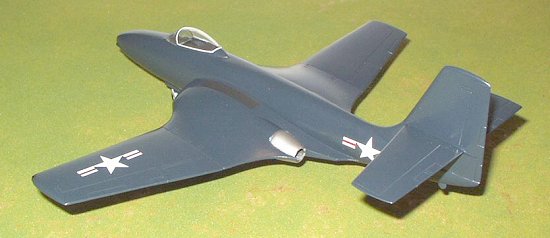 no detailed 3-view drawings, few detail photos, etc.) The
Squadron In Action book is a mandatory reference for the Banshee modeler,
but it’s weak in detail photos, too. (Worse yet, I’m not convinced that
the drawings in it are particularly accurate--they don’t seem to portray
what I see in photos, most especially in the case of the F2H-2N. But
they’re the best we have for things like panel line placement.)
no detailed 3-view drawings, few detail photos, etc.) The
Squadron In Action book is a mandatory reference for the Banshee modeler,
but it’s weak in detail photos, too. (Worse yet, I’m not convinced that
the drawings in it are particularly accurate--they don’t seem to portray
what I see in photos, most especially in the case of the F2H-2N. But
they’re the best we have for things like panel line placement.)
The Detail & Scale book USN Fighters of the ‘50s, which is included in
the Revell reissue of the Monogram F9F-5 Panther kit, has some useful
Banshee information and photos, including one cockpit shot. The old
Squadron/Signal book USN/USMC Over Korea has some very useful Banshee
photos and color profiles, though no detail pics.
There was a Banshee feature article in an issue of Wings or
Airpower many, many years ago. It’s far less helpful than any of us
would like.
An excellent 3-D reference is the little Airfix 1/72 F2H-2 kit. It would
come in very handy for a necessary fix we’ll get to in a minute.
Thus endeth the lesson on “Everything I Know About Banshee Reference s.”
|
THE KIT |
The box says F2H-2. The instruction sheet says F2H-2. The decal sheet
includes markings for a pair of F2H-2s. Bombs and rockets and wing tip
tanks, which weren’t carried by the F2H-1 (with one exception, which
we’ll get to in a minute), are included in the kit. Hell, it even has
“F2H-2” molded in relief on the fin!
 Lies, all lies! The length and wingspan of the model scale out perfectly
to published dimensions of the F2H-1, which was 14 inches shorter in the
fuselage than the -2. (Published wingspan of the -2 is longer than the
-1, but this is accounted for by the non-removable tip tanks.) This is
disappointing because the -1 Banshees saw only limited production and
service, and NO use at all in the Korean War. Conversion to a -2 would be
a semi-major undertaking. But then again, “conversion” to a good
-1 would also be fairly major.
Lies, all lies! The length and wingspan of the model scale out perfectly
to published dimensions of the F2H-1, which was 14 inches shorter in the
fuselage than the -2. (Published wingspan of the -2 is longer than the
-1, but this is accounted for by the non-removable tip tanks.) This is
disappointing because the -1 Banshees saw only limited production and
service, and NO use at all in the Korean War. Conversion to a -2 would be
a semi-major undertaking. But then again, “conversion” to a good
-1 would also be fairly major.
Problems, Problems, Problems
There’s no cockpit. There’s no gear well detail, and no front gear well
at all, just a hole for the nose gear to mount into. The landing
gear and wheels are extremely simplified, and the gear doors are
basically just slabs of plastic. Control surface lines are engraved, but
raised decal placement markings are molded on. The rockets and bombs are
unusable, the guns
are just lumps in the fuselage, and the wing tanks are wrong. There’s no
pitot tube. The wing trailing edge is a bit too thick. And remember, it’s
the less-than-desirable -1 variant.
But all these problems pale compared to two others--the canopy and the
“black hole” of the wing intakes.
Canopy
The canopy and windscreen are molded as one thick unit, and don’t fit the
fuselage especially well. The lower section of the canopy frame is
actually molded as part of the fuselage--on this one, I scribed the
canopy frame out fairly deeply to give the idea that it’s supposed to be
a separate part.
But the canopy is too short in length, giving it an odd appearance when
compared to photos of the real thing. No aftermarket vac canopy for the
old Hawk Banshee exists; if you want to fix it, you’ll have to carve your
own master and vac it yourself.
Ah, but wait a second. A careful “read” of the photos in the
Squadron/Signal book shows that some of the early -1s look like
they might have had a different shape--somewhat shorter in
length, and perhaps a bit taller in height than later units. If you have
the book, check it and you might see what I mean. Perhaps this was the
shape Hawk was going for back in the mid-50s? Hard to say--the kit canopy
isn’t an exact replica of this shape either, but it’s closer to it.
Hmmmmm.....
The Wing
Now we hit this kit’s really big problem, the intake section of the wing.
The wing is molded in two big, simple pieces, top surface and bottom
surface. The intake and exhausts are open, and there is nothing
whatsoever in there. It’s one big open bay from the tip of the left
intake all the way to the tip of the right intake. You can look into the
left intake and see straight through the fuselage and out the right
exhaust, and you don’t need a penlite to do it--the cavern is so big that
normal room light will do. It looks just awful.
The intake area will require some splitter plates standing out from the
fuselage, which (if you’ve seen the kit or are understanding what I’m
telling you here) doesn’t exist past the wing/intake leading edge. What a
mess! It’s difficult to describe exactly what you need to do to fix this
area, but if you have the Airfix 1/72 kit handy, a glance at that will
show you just what’s needed. (Just one reason why I say the Airfix kit is
a valuable reference for building the Hawk kit.)
Looking at this area caused me to put this kit back in the box many, many
times over the years. Finally, I came up with a “quick and dirty” fix for
the problem, which I’ll describe below.
|
CONSTRUCTION |
I had fond memories of the old Hawk Banshee from building it as a kid
(when my standards were even lower than they are today), so when Testor
reissued the kit a few years back, I grabbed a few copies of it and
stashed them away. The overall shape of the thing was accurate enough to
keep me interested in it, once I’d figured out that it was a -1 (i.e.,
“it looks like a Banshee to me, sorta, kinda, except for the canopy”),
but that cavernous intake mess always discouraged me.
 Finally, one day while looking through the Ginter book, I noticed that
there were at least a few F2H-1s that did not carry the silver leading
edges on the wings and tailplanes. Well, fine, I thought, at least I
won’t have to worry about masking and painting those. I decided to
pimp-slap one of the ancient monsters together strictly out-of-the-box
just as a “test run” to see
Finally, one day while looking through the Ginter book, I noticed that
there were at least a few F2H-1s that did not carry the silver leading
edges on the wings and tailplanes. Well, fine, I thought, at least I
won’t have to worry about masking and painting those. I decided to
pimp-slap one of the ancient monsters together strictly out-of-the-box
just as a “test run” to see
what it looked like built and what would be needed to turn the kit into a
good F2H-2.
And so I did. Assembly went just as instructed; parts fit wasn’t bad,
except for the wing, which left a huge gap across the top where it
should have met the fuselage. I plugged this gap up with several pounds
(seemingly) of putty and pressed on.
While sanding out this filler, an idea to fix (sort of) the wing intake
canyon problem occurred to me. With my razor saw, I cut slots about an
inch long into the top and bottom of the wing, right next to the
fuselage. Then I slid pieces of sheet styrene into these slots and hit
them with liquid cement. When the glue was dry, I trimmed the styrene
down top, bottom, and front. I now had some nifty fake intake splitter
plates/inner walls! Oh, the fuselage is still hollow behind those
splitters, but with the Sea Blue paint, the thin black hole is not too
noticeable. You can no longer look in the left intake and see out the
right exhaust--from certain angles, anyway! This is not a real fix for
the problem, but it’s quick, cheap, and easy, and I can tell you that the
model looks about 700% better with the mod than without it.
 Shortly after getting that sorted out, I lost interest in the whole
project again and set it aside for several years. It was the publication
of the Squadron/Signal In Action book last fall that rekindled my
interest in digging the Banshee-wannabe project out and drop-kicking it
through the goal posts (figuratively, not literally, although the latter
thought had occurred to me several times, I assure you!).
Shortly after getting that sorted out, I lost interest in the whole
project again and set it aside for several years. It was the publication
of the Squadron/Signal In Action book last fall that rekindled my
interest in digging the Banshee-wannabe project out and drop-kicking it
through the goal posts (figuratively, not literally, although the latter
thought had occurred to me several times, I assure you!).
One photo in particular in the Squadron book caught my eye: At the top of
page 15 is a high-angle shot of the prototype F2H-2, which was in reality
nothing more than an early F2H-1 but fitted with tip tanks! Here, in one
airplane, was everything I needed: short (-1) fuselage, no silver leading
edges, tip tanks, and it even appeared to have the early, short canopy
(if such in fact actually existed)! And, for the icing on the cake, it
didn’t appear to have the flat black nose radar area--one less thing to
mask and paint! Life is good!
Moving with the speed of an onrushing glacier, it took me only a few
short weeks to round up all the wayward parts of my Banshee project and
get them all back in one box. I’d fortotten how far I’d actually gotten
with the thing, and it took only a couple hours of finish-sanding
(including removing all the molded-in decals) and priming before my
Banshee was ready for paint.
|
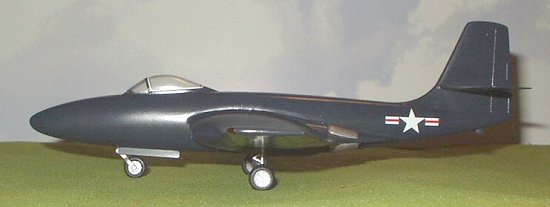
CAMOUFLAGE & MARKINGS |
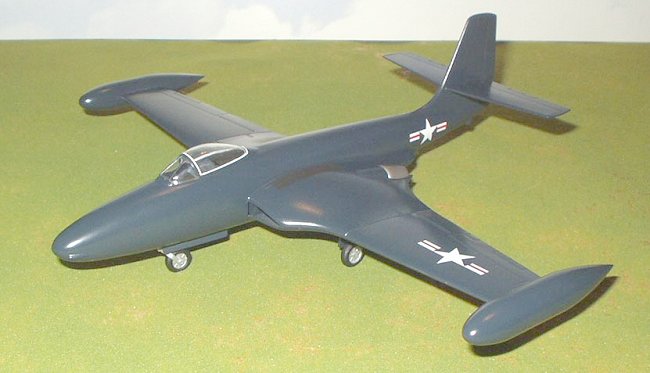
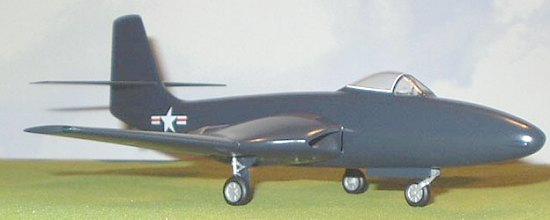
You see the final result here. Finish is Model Master Glossy Sea Blue
thinned with naphtha (lighter fluid); Walmart aluminum for the landing
gear and wheels, some sort of silver I found on my paint bench for the
exhaust cans, flat white canopy sealing strip, and old MicroScale generic
insignia for the simple markings. I forgot to mention that during
assembly, I taped (yes, just taped!) a .357 bullet into the nose for
weight. I should have gone with a .45 bullet, because the small-bore only
just barely keeps it on its nose gear. The cockpit is a black hole, and
the nose gear well is just black paint, but it’s finished.
|
CONCLUSIONS |
I built this kit and wrote it up here to answer the common question on
the model discussion boards, “What’s the Testor Banshee like? Any good?
Worth the money?” Well, here’s what it looks like built (mostly) OOB, and
I’ve told you what it lacks and given you some idea of what you’d need to
do to fix it. Only you can decide what to do with that
information.
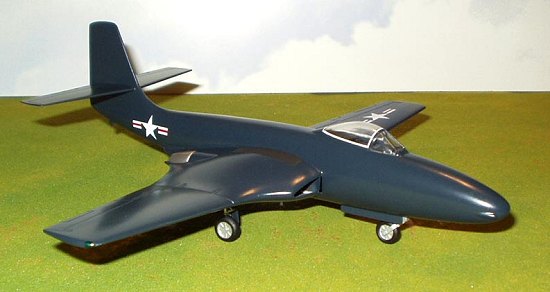
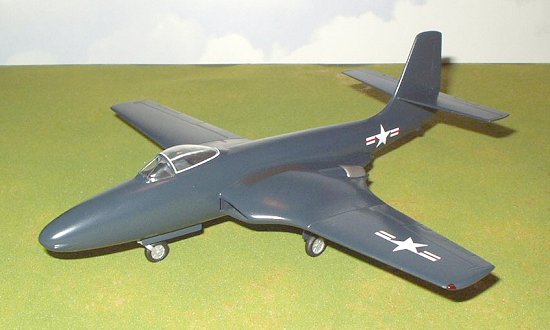
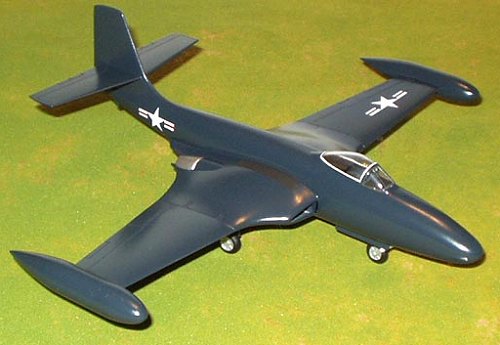
Wing Tanks
I built the wing tanks, too, but I’m not particularly happy with them.
They don’t “hang” far enough forward to suit me; they don’t look like
Banshee photos. I’m not sure if the tanks are too short or if their
wingtip mounting slots are just too far forward; I’ll have to do more
research on that. I’ve included a couple photos with them on so you can
see for yourself. Damn, the model looks so different with them
on--almost makes me want to start another one and do it right!
A Plea for Sanity
 Some model manufacturer is missing a bet by not bringing out a series of
F2H Banshee kits. A whole line could be developed based on a common wing,
cockpit, canopy, landing gear, wheels, etc. Then kit up -2, -2P, and -2N
versions with a common fuselage and different noses (put me down for one
of each), then add a new fuselage and tailplanes for the -3/-4 versions.
That’s five variants for the cost of tooling up for about one-and-a-half
models! (Yes, I know that the -3/-4 had some minor shape differences in
the engine area. Let the aftermarket guys tool up correction sets for
that. The guys wanting Canadian F2H-4s will be so happy to have something
to start with that they’d gladly buy ‘em!)
Some model manufacturer is missing a bet by not bringing out a series of
F2H Banshee kits. A whole line could be developed based on a common wing,
cockpit, canopy, landing gear, wheels, etc. Then kit up -2, -2P, and -2N
versions with a common fuselage and different noses (put me down for one
of each), then add a new fuselage and tailplanes for the -3/-4 versions.
That’s five variants for the cost of tooling up for about one-and-a-half
models! (Yes, I know that the -3/-4 had some minor shape differences in
the engine area. Let the aftermarket guys tool up correction sets for
that. The guys wanting Canadian F2H-4s will be so happy to have something
to start with that they’d gladly buy ‘em!)
What are you waiting for, manufacturers? I’ve got a paid-up MasterCard
and I’m not afraid to use it!
Model on!
Steve Mesner
May 2003
Copyright ModelingMadness.com. All rights reserved. No reproduction in part
or in whole without express permission.
If you would like your product reviewed fairly and fairly quickly, please contact the editor or see other details in the Note to Contributors.