Revell 1/72 F-89 Scorpion
|
KIT # |
4320 |
|
PRICE: |
$8.95 MSRP back in the late 1980's |
|
DECALS: |
2 options |
|
REVIEWER: |
Tim Mansfield |
|
NOTES: |
Builds either a D or J version |
|
HISTORY |
The Northrop Scorpion came from a USAAF requirement – dated 23 March 1945, for an all-weather interceptor to defend the northern zones of continental America – with particular emphasis on Alaska. So far it sounds like an improved P-61 Black Widow. In December 1945 the requirement was changed to include jet propulsion.
Project submissions were received from Bell, Consolidated, Douglas, Goodyear, Northrop and Curtiss-Wright. The Curtiss-Wright XP-87 Blackhawk found the most favour – but the Air Force ordered two prototypes from Northrop – designating them XP-89. This was the last project involving Jack Northrop himself, prior to his retirement.
 The
design consisted a slim 2 seat fuselage with nose mounted radar, low
mounted engines and a mid mounted unswept, laminar flow wing of generous
proportion. The wing was optimised for low-speed stability in treacherous
weather. Other notable features were wing-tip fuel tanks and a mid
mounted horizontal stabiliser – away from the exhausts. Ground crews
thought the aircraft had a threatening look of a Scorpion about to
pounce, and the name stuck - officially.
The
design consisted a slim 2 seat fuselage with nose mounted radar, low
mounted engines and a mid mounted unswept, laminar flow wing of generous
proportion. The wing was optimised for low-speed stability in treacherous
weather. Other notable features were wing-tip fuel tanks and a mid
mounted horizontal stabiliser – away from the exhausts. Ground crews
thought the aircraft had a threatening look of a Scorpion about to
pounce, and the name stuck - officially.
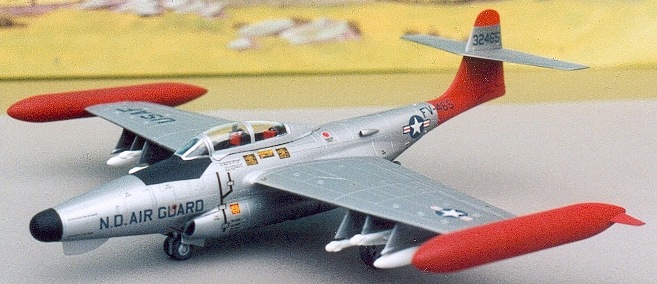
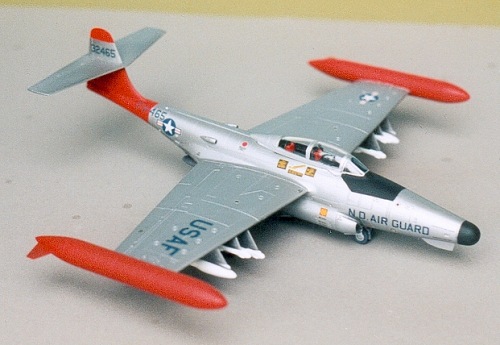
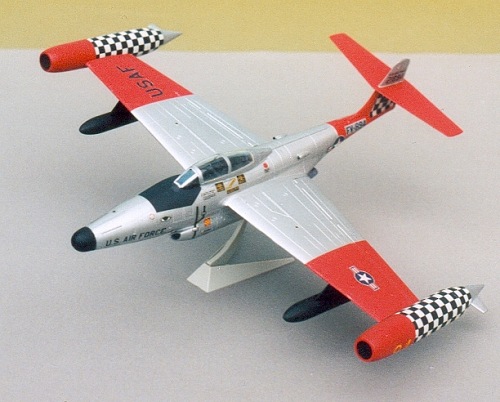
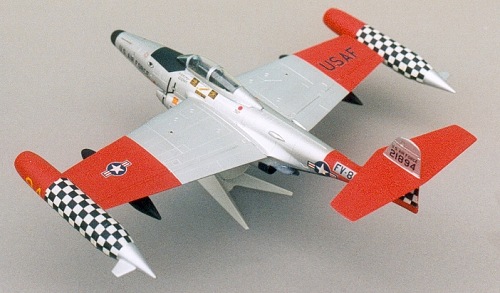
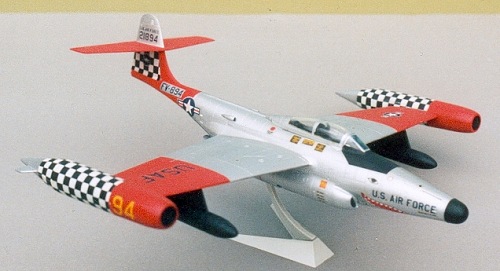
The Scorpion first flew on Aug 16 1946, and 48 aircraft were ordered in 1949 – after the Curtiss-Wright project had been cancelled. A, B, and C versions were all cannon armed, but armament got more interesting with the F-89D, primary subject of this kit. This first flew in 1951 and was armed with 104 air-to-air rockets in two enlarged wingtip pods. These also contained fuel in the rear section of the pod. 682 of these airborne shotguns were built. The E, F and G versions never went beyond prototype, but the H had different wing-tip pods housing 3 Falcon missiles. The F-89J is the alternate subject of this kit, and was the designation given to 350 modified F-89Ds. Wingtips reverted to 600 gallon tanks and armament was changed to 4 Falcon air-to-air missiles and two unguided Genie missiles with nuclear warhead. The shotgun had become an airborne sledgehammer.
Performance of the F-89 was typical for straight wing fighters of the period – with maximum quoted speed of 650mph at sea level.
The F-89 was never exported and the final versions left the USAF ANG in 1969.
|
THE KIT |
Instructions are copyright 1991, so I think that’s its vintage. I’ve seen a much earlier Revell Scorpion in this scale – but I can’t believe it’s related.
The kit
comprises 74 parts (some are duplicated) in silverish grey plastic with
exquisite panel-lines and detail, and a clear canopy. Decals are matt
finished and typical of Revell, offering a D version serving with the
USAF and a J version serving the Air National Guard. The parts build
either version with undercarriage extended, and I had to perform
 some
surgery to build an example with the gear retracted. The construction of
this kit is unique in my experience, in that the cockpit is inserted into
the fuselage after the halves have been assembled. This enables
work to proceed on the airframe and cockpit simultaneously.
some
surgery to build an example with the gear retracted. The construction of
this kit is unique in my experience, in that the cockpit is inserted into
the fuselage after the halves have been assembled. This enables
work to proceed on the airframe and cockpit simultaneously.
This review is a tale of two models from the same kit – just over 10 years apart.
My memory of the F-89D which I build during 1993, is of great fit of parts, and decals that fitted the model incredibly well for the complex shapes (chequered weapons pods!) that they were being asked to cover.
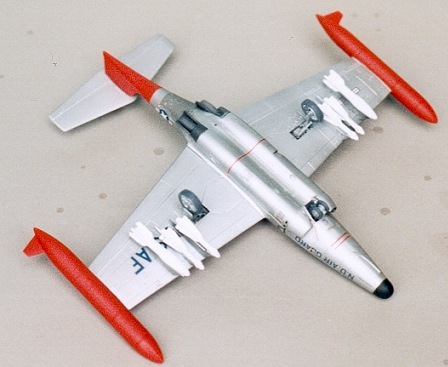
My F-98J was built during the winter of 2003 and does not quite live upto the memory. The lower fuselage section did not fit as well, and the decals released some brown gooey crap when put in water. Most of this account describes the building of the F-89J model.
The Scorpion D/J is not well served by the decal makers, for what amounts to over 1000 aircraft and an 18 year history – I only found references to 2 sets in 1/72 scale. The F-89J is missing a blade under the nose. I don’t know if this is aerodynamic – or an aerial or camera, but mine is made from plasticard.
Instructions lead through 26 stages of construction, which does not necessarily lend best use of the breakdown for painting purposes. An immediate example being the radome cover in stage 1. This was about the final item I fitted, as it was a different colour to the rest of the airframe – and it contains the ballast to avoid tailsitting. Modelling experience will let you know which bits to leave until later.
The cockpit comprises 2 different 4 piece ejection seats, a tub, pilot’s instruments, stick and different rear instrument panels for the different versions. Instruments and consoles are all decal – and look good through the canopy. My only addition was harness straps of Tamiya tape in the F-89J.
|
CONSTRUCTION |
Uniquely, this model starts with the fuselage halves – and enables wings to be attached before insertion of the cockpit. After insertion of the cockpit, insert the jet compressor faces, then the lower fuselage can be fitted. This stretches from the undercarriage to just aft of the engines. I don’t remember or see any problem with the F-89D, but discovered a gap and step when I built the F-89J. I cured the step by clamping an internal piece of plasticard.
 Next
comes other detail like air intakes, and main gear wheel doors – at which
point the hull can be painted.
Next
comes other detail like air intakes, and main gear wheel doors – at which
point the hull can be painted.
With the F-89D I trimmed and fitted the main gear leg doors, and filled the nose well with putty prior to painting.
|
COLORS AND MARKINGS |
I stuffed the cockpit aperture with tissue and airbrushed the red Artic markings first, and left them to dry. After masking – I airbrushed the rest of the airframes. The F-89D used Humbrol 11 Silver (because I knew nothing else at that time), and the F-89J uses Alclad Aluminium – I also painted the tail, undercarriage doors, pylons and canopy surround at the same time.
Both versions of this model have lots of decals bits, all of which can be applied now. I remember being pleasantly surprised at the remarkable fit of decals on the F-89D. I was highly disappointed at the performance of the decals with my more recent kit – however with enough swishing round in clean water the crap washed off. I now apply decals over a blob of wet Klear to avoid silvering.
An interesting feature of the decals – is that the national insignias and some numbers, have metal surrounds – as Arctic marked metal aircraft tended to have. These are MUCH darker than Humbrol 11 Silver, and a bit darker than Alclad.
|
FINAL CONSTRUCTION |
First I assembled the tail from painted components.
Engine exhausts and heat-plates are gunmetal and fit into the lower fuselage. I painted the panel immediately aft the engines with steel to contrast the rest of the airframe.
 Next
came the canopy (I can’t remember this detail from my F-89D) – this took
me 2 attempts to get right on the F-89J. First time I assembled the
components with Humbrol Clearfix – unfortunately the frame was a little
wishbone shaped making it difficult to fit the glass evenly. When
assembled onto the airframe it became apparent that the glass was
uneven. For my second attempt I fitted the frame to the plane – allowing
it to set, then fitting the glass to that. I was much more satisfied
with that result.
Next
came the canopy (I can’t remember this detail from my F-89D) – this took
me 2 attempts to get right on the F-89J. First time I assembled the
components with Humbrol Clearfix – unfortunately the frame was a little
wishbone shaped making it difficult to fit the glass evenly. When
assembled onto the airframe it became apparent that the glass was
uneven. For my second attempt I fitted the frame to the plane – allowing
it to set, then fitting the glass to that. I was much more satisfied
with that result.
Main undercarriage is conventional – with HUGE wheels I did have to drill small location holes into the leg end of the retraction strut. The nose gear consists of doors which tuck into the well – then a 4 part leg, which is quite tricky to fit. At this point I could see that I hadn’t stuffed enough plasticene into the forward fuselage – so I put some lead into the radome before fitting it permanently.
Pylons, and wingtip pods were fitted last of all – before a final coat of matt varnish for weathering.
Accuracy
 For the
purposes of review completeness, I measure models to establish their
accuracy, multiplying my measurements by 72 and comparing with the quoted
dimensions.
For the
purposes of review completeness, I measure models to establish their
accuracy, multiplying my measurements by 72 and comparing with the quoted
dimensions.
I must say that my quoted dimensions don’t say whether span includes tanks or not.
Span 252mm x72= 18.144M Quoted 18.41M Difference -266mm
Length 222mm x72= 15.984M Quoted 16.4M Difference -416mm
Height 74mm x72= 5.328M Quoted 5.33M Difference –2mm! (Spot-on!)
So the model is about 5mm short in length and I’m not sure about the wings – but it captures the unmistakeable look of a Scorpion.
|
CONCLUSIONS |
Overall this is a delightful kit, which builds to an excellent and acceptably accurate model with very little skill required. My second attempt was marred by poor quality decals – but they were not enough to condem the kit. Looking at the pair of models together I’m very pleased with the results that this kit can provide – and will continue to recommend it.
March 2004
Copyright ModelingMadness.com. All rights reserved. No reproduction in part or in whole without express permission.
If you would like your product reviewed fairly and quickly, please contact the editor or see other details in the Note to Contributors.