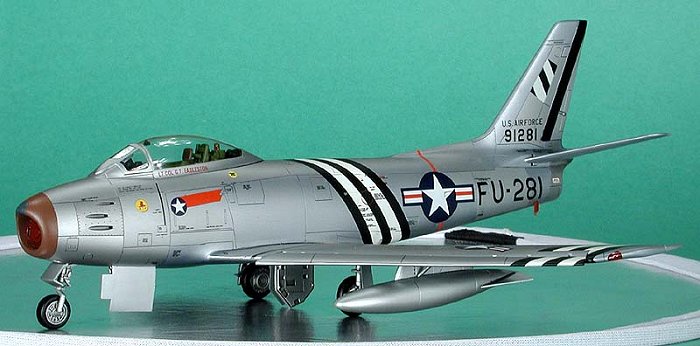
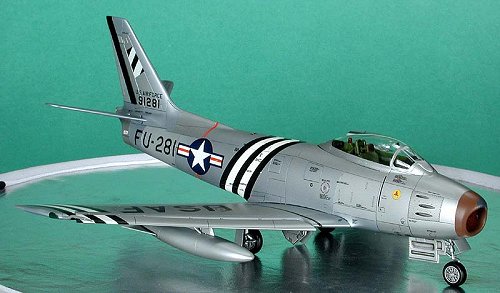
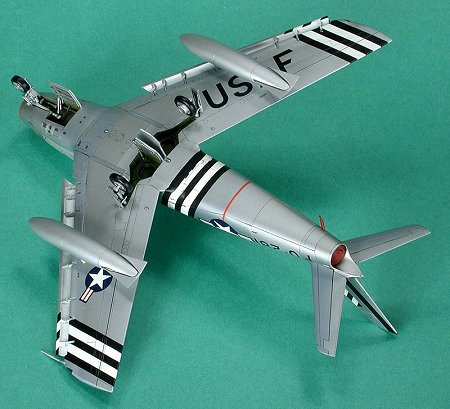
Hasegawa 1/48 F-86A (Conversion)
|
KIT # |
PT 13 |
|
PRICE: |
$39.98 MSRP |
|
DECALS: |
Two options |
|
REVIEWER: |
Bob Laskodi |
|
NOTES: |
Cutting Edge F-86A Conversion used. |
|
HISTORY |
It’s interesting how wars are one of the greatest factors spurring aircraft designers on to technical innovations in the aircraft industry. Certainly, WWII with the introduction of the revolutionary jet aircraft into combat can be called one of the starting points in aviation history. The F-86 “Sabre” actually had its start in WWII with an initial design starting in the latter phases of the war. North American Aviation (NAA) initially designed the “Sabre” as a straight winged aircraft, but shortcomings in speed after a significant amount of development work led the engineers to seek another technical solution.
 In late 1945, wind tunnel testing of the “Sabre”
with a swept wing indicated an astonishing increase in speed over 150 MPH
faster than comparable straight winged jets. In November 1945, the
go-ahead was given to NAA to produce a prototype “Sabre” with a swept
wing designated the XP-86. The aircraft was completed in August 1947, and
on its first test flight on 1 October 1947, test pilot George Welch flew
the prototype near the speed of sound (Mach 1). Some historians will
argue that the XP-86 did indeed break the sound barrier that day, beating
Chuck Yeager’s historic flight in the Bell X-1 on 14 October.
In late 1945, wind tunnel testing of the “Sabre”
with a swept wing indicated an astonishing increase in speed over 150 MPH
faster than comparable straight winged jets. In November 1945, the
go-ahead was given to NAA to produce a prototype “Sabre” with a swept
wing designated the XP-86. The aircraft was completed in August 1947, and
on its first test flight on 1 October 1947, test pilot George Welch flew
the prototype near the speed of sound (Mach 1). Some historians will
argue that the XP-86 did indeed break the sound barrier that day, beating
Chuck Yeager’s historic flight in the Bell X-1 on 14 October.
With production of the F-86 commencing in the late 1940’s, the F-86 would eventually be produced in eleven variants, and serve in about 30 air forces throughout the world before it was retired in the late 1980’s. But perhaps the “Sabres” shining moment occurred in the Korean War, when it faced off over “MiG Alley” against arguably the other best jet powered fighter aircraft in the world, the incomparable MiG-15. By the end of the war, “Sabres” had racked up an amazing kill record over the MiG of 800 victories, representing a kill ratio of an incredible 10:1, thereby crowning the “Sabre” as the “king” of the sky during the Korean War.
|
THE KIT |
 It amazes me that the first variant of the historic
“Sabre”, the F-86A, has never been done as a mainstream injected molded
kit. While Hasegawa (among others) has released several later variants of
the “Sabre”, the “A” is still waiting in the wings. Fortunately, Cutting
Edge (CE) has released a resin conversion set that will work with either
the Hasegawa or Academy F-86F kits. The Hasegawa F-86F-30 kit served as
the basis of conversion and I will say it is typical Hasegawa in terms of
construction, engineering, and parts fit and will not give the modeler
any troubles. Instead I will focus on the conversion kit issued by CE
(CEC48196). The CE set consists of 13 resin cast parts containing the
rear fuselage, horizontal stabilizers, wing leading edge inserts and
slats, early gun door panels and pitot tube (if needed), and the
distinctive “V” shaped windscreen and armored glass molded in clear
resin. I think that CE has some of the best resin products on the market
these days, featuring flawless castings, great detail, and ease of
assembly, but this conversion is quite difficult to accomplish and has
some attributes that I feel are very un-Cutting Edge (read on!).
It amazes me that the first variant of the historic
“Sabre”, the F-86A, has never been done as a mainstream injected molded
kit. While Hasegawa (among others) has released several later variants of
the “Sabre”, the “A” is still waiting in the wings. Fortunately, Cutting
Edge (CE) has released a resin conversion set that will work with either
the Hasegawa or Academy F-86F kits. The Hasegawa F-86F-30 kit served as
the basis of conversion and I will say it is typical Hasegawa in terms of
construction, engineering, and parts fit and will not give the modeler
any troubles. Instead I will focus on the conversion kit issued by CE
(CEC48196). The CE set consists of 13 resin cast parts containing the
rear fuselage, horizontal stabilizers, wing leading edge inserts and
slats, early gun door panels and pitot tube (if needed), and the
distinctive “V” shaped windscreen and armored glass molded in clear
resin. I think that CE has some of the best resin products on the market
these days, featuring flawless castings, great detail, and ease of
assembly, but this conversion is quite difficult to accomplish and has
some attributes that I feel are very un-Cutting Edge (read on!).
|
CONSTRUCTION |
I will warn you straight up. If you are timid about cutting, dry fitting, sanding, and filling DO NOT use the CE set! In fact, most of this article is going to deal with the pitfalls of this set since the Hasegawa kit can almost be built with your eyes shut if you follow the directions!
Removal and initial clean-up of the resin pour stubs was quickly accomplished using my trusty diamond-coated cut-off wheel. After some clean-up with sanding sticks it was time to attack the most feared modeling task of all time, cutting away the kit parts! I will state that the CE instructions are fairly good and you should definitely follow them to the letter. I used the Hasegawa Trytool Modeling Saw Scriber Set (TP-4) to cut off the leading edges of the wing and to cut the fuselage halves as indicated in the instructions. The Hasegawa set is a re-release of the old Trimaster set, and I strongly advise serious modelers to take the effort to acquire these as they are absolutely fantastic.
 The first problem arose in that when you remove the
leading edges of the kit wings, there is not a lot of plastic left to
join the wing halves together. I recommend that you assemble the wings
halves and resin leading edges with tape prior to committing to your
favorite glue since this is a very tricky process. In addition, some
warpage in the resin parts will add to the challenge. The worst part is
that the resin leading edges merely butt-join to the open plastic wing.
It would have been much easier if CE had designed this piece as an insert
to fit into the wing to ease this task. I was able to get one wing
together without any significant problems, but the other wing was a
different story, requiring large amounts of superglue and lots of
sanding, and rescribing of lost detail. Be very careful with this step as
it is very easy to mess things up that will cause huge problems to fix
later.
The first problem arose in that when you remove the
leading edges of the kit wings, there is not a lot of plastic left to
join the wing halves together. I recommend that you assemble the wings
halves and resin leading edges with tape prior to committing to your
favorite glue since this is a very tricky process. In addition, some
warpage in the resin parts will add to the challenge. The worst part is
that the resin leading edges merely butt-join to the open plastic wing.
It would have been much easier if CE had designed this piece as an insert
to fit into the wing to ease this task. I was able to get one wing
together without any significant problems, but the other wing was a
different story, requiring large amounts of superglue and lots of
sanding, and rescribing of lost detail. Be very careful with this step as
it is very easy to mess things up that will cause huge problems to fix
later.
The resin fuselage halves went together much easier with the only warning is that the kit engine will not fit correctly (the speed brakes interfere) and you will have to build some mounting brackets to fit it in place. A quick dry fit showed the plastic front fuselage would mate up very nicely with the resin rear fuselage with the exception of the area where the wing would mount on the bottom. I had to use a lot of superglue to fill the gaps along the aft wing / rear fuselage join, but this was relatively easy.
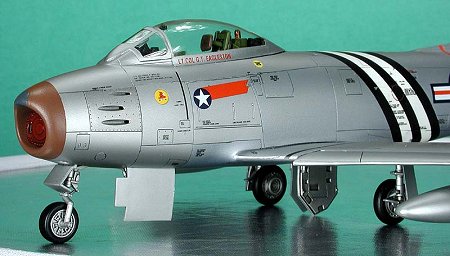
I will mention a word about the cockpit since there is a lot of controversy about the “correct” cockpit color. I will not go into the interior green vs. black vs. grey arguments, but I will quote the Squadron book listed in the references. “The basic cockpit color was changed from Interior Green (FS34151) with a black instrument panel to Interior Gray (FS36231) on all Sabres in 1953”. If you disagree with that please send an e-mail to Squadron and not to me, since they are the ones who published the book!
I was less than thrilled with CE’s clear resin windscreen and armor. At first I thought the pieces needed a polishing and a dip in Future to restore their clarity, but this did not improve the clarity one bit. I put the pieces under my son’s microscope and discovered to my horror, millions of minute air bubbles suspended in the resin, so no amount of polishing or Future would do any good. In addition the windscreen did not fit correctly, sitting much too high on the canopy. A lot of careful filing and dry fitting was necessary to rectify this.
|
COLORS AND MARKINGS |
The model was almost completely assembled prior to
painting, with only the horizontal stabilizers, wing tanks, leading edge
flaps, and landing gear components and doors left off. Masking off the
canopy, I gave the model a quick wipe down with Polly’s Plastic Prep and
sent it off to the paint shop. First up was airbrushing the wheel wells
Testor Model Master (TMM) Interior Green. After letting this dry
overnight, I stuffed the wheel wells full of wet tissue paper and
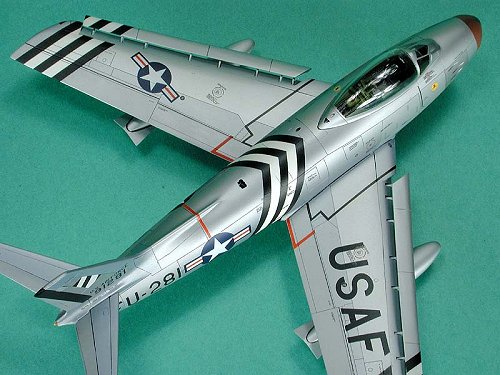
airbrushed the entire 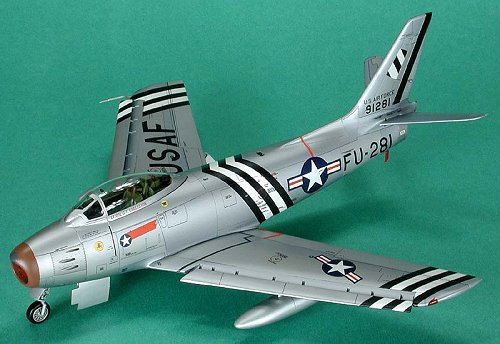 model SNJ Aluminum. In order to provide some
variety in panel shading, I masked off selected panels and airbrushed SNJ
Aluminum tinted with only a single drop of white, blue, or black to
provide four different metal shades.
model SNJ Aluminum. In order to provide some
variety in panel shading, I masked off selected panels and airbrushed SNJ
Aluminum tinted with only a single drop of white, blue, or black to
provide four different metal shades.
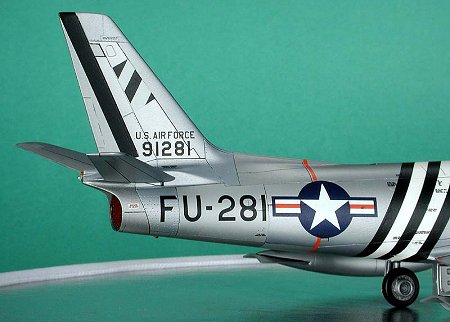
I used Cutting Edge F-86A Part 3 (CED48175) decals for the build. Unfortunately, the striping on the wings and fuselage is printed only in black, so the underlying areas need to be painted white. Since there are many compound curves around the fuselage that would be difficult to mask, I copied the decals from my scanner so I could make a template to get the white in the correct locations. A complex step that would have been much easier if the decals had the white printed. Otherwise the decals were quite good, well printed, in register, and printed on a thin carrier. However, they are quite fragile so care must be taken in use.
In preparation for decals, I airbrushed a heavy coat of Floquil Crystal Cote to protect the finish. Mission accomplished with a beautiful end result, as all the decals snuggled down beautifully using Microscale “Micro Sol” with no discoloration. After a light sealing coat of Future, I used a Payne’s Gray watercolor wash to highlight the detailing on the kit.
|
FINAL ASSEMBLY |
 In order to prevent breakage, I left off the landing
gear, gear doors, extended slats, and drop tanks until after
painting/decaling. These all went on with no problems using super thin
superglue. After a final “leveling coat” of Future (great for hiding
those superglue splooges!), I airbrushed a 50:50 mix of Testor Dullcote
and Glosscote for the final finish. Remove the masks and you are done
with a great model build.
In order to prevent breakage, I left off the landing
gear, gear doors, extended slats, and drop tanks until after
painting/decaling. These all went on with no problems using super thin
superglue. After a final “leveling coat” of Future (great for hiding
those superglue splooges!), I airbrushed a 50:50 mix of Testor Dullcote
and Glosscote for the final finish. Remove the masks and you are done
with a great model build.
|
CONCLUSIONS |
While the basic Hasegawa kit is very easy to build, coupling the kit with the CE conversion to get an F-86A turns the build into quite a complex affair best left to more advanced modelers. I really wish someone would release an F-86A so one does not have to go to all the trouble and expense (the conversion is more expensive than the kit!). Hopefully, my wish will be granted!
 December
2003
December
2003
|
REFERENCES |
Squadron Signal Publications, Walk Around F-86 Sabre, SS5521
Squadron Signal Publications, F-86 Sabre In Action, SS1126
If you would like your product reviewed fairly and quickly, please contact me or see other details in the Note to Contributors.