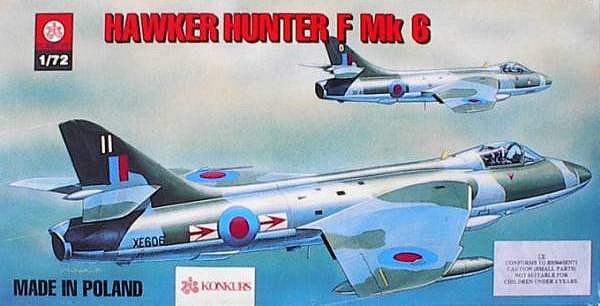
Plastyk 1/72 Hawker Hunter
|
KIT # |
S-007 |
|
PRICE: |
$5.40 |
|
DECALS: |
Two Chilean Air Force FGA. 71 |
|
REVIEW : |
Guy King |
|
NOTES: |
ex-Frog mold |
|
HISTORY |
The Hawker Hunter was a jet fighter designed by famous Sidney Camm who produced the Fury, Hurricane, Typhoon, Tempest, and Sea Fury. Almost two thousand Hunters were built serving with at least twenty-two air forces around the world. The Hunter first flew in 1951 and they are still operational as trainers.
The Hawker Hunter was a very successful fighter. Many aviation historians consider the Hunter to be the best post-war British fighter. All versions were supersonic in a shallow dive. The Hunter remained a first-line fighter into the 1970s. The Iraqi, Jordanian, and Indian Air Forces flew it in air-to-air combat. The Hunter also was flown in combat as a ground-attack aircraft by several additional air forces.
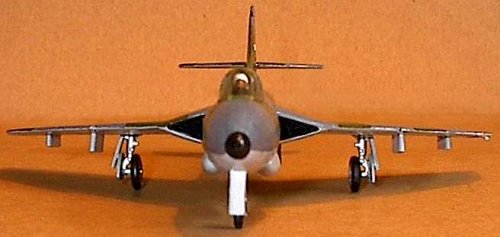
The F.1 was the first production Hunter that entered service in 1954. Production of the Hunter continued until 1966. The FGA. 9 was the definitive version. Over 700 earlier versions of the Hunter, mostly F. 6 aircraft, were converted to FGA. 9 standards. The Mark 9 Hunter was optimized for ground attack. It was powered by the Avon Mk 207 jet engine, had four underwing-stores attachment points, tougher landing gear, cockpit air conditioning, and a braking chute.
|
THE KIT |
Frog originally issued this Hawker Hunter kit in 1974 as a FGA. 9 version. Various Polish and Russian companies have reissued this kit through the years.
 I
originally built the Frog Hawker Hunter FGA. 9 kit back in the 1980s. It was a
joy to open the reissued Plastyk kit and find the same classic kit that Frog
released almost thirty years ago. This model kit is typical of later Frog
molds. It is a nice thick gray plastic kit without any flash or dimples. The
Plastyk Hunter kit is sold as a F.6 version since the box art and decals
represent upgraded F. 6 Hunter marks. The kit comes with four drop tanks (both
the 276 and 120 U.S. gallon types) and Sidewinder missiles.
I
originally built the Frog Hawker Hunter FGA. 9 kit back in the 1980s. It was a
joy to open the reissued Plastyk kit and find the same classic kit that Frog
released almost thirty years ago. This model kit is typical of later Frog
molds. It is a nice thick gray plastic kit without any flash or dimples. The
Plastyk Hunter kit is sold as a F.6 version since the box art and decals
represent upgraded F. 6 Hunter marks. The kit comes with four drop tanks (both
the 276 and 120 U.S. gallon types) and Sidewinder missiles.
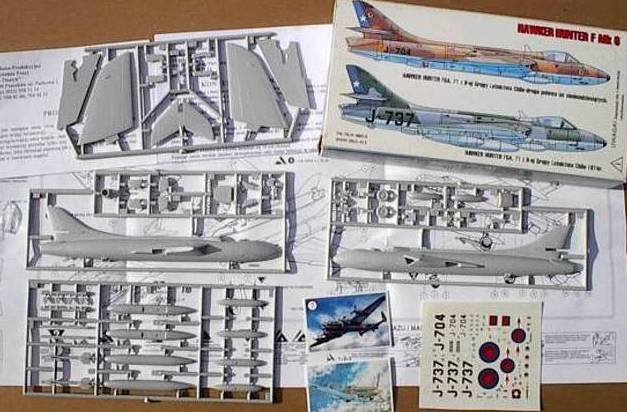
All the kit instructions are in Polish. The aircraft drawings do include English translations of the paint colors. The kit includes great decals for two Chilean Air Force FGA. 71s and a RAF FGA. 9. The back of the box has excellent color profiles of the Chilean Hunters while the front box art illustrates the British Hunter. The kit includes a brown plastic vial of glue and two collector cards showing other Plastyk model aircraft (see illustration of kit contents).
|
CONSTRUCTION |
This classic Frog kit is a fine representation of a late-model hunter. The engraving is nice and crisp which was typical for the latter Frog kits. I compared the parts to a scanned three-view drawing that was printed out at 1/72 scale. The kit wings, fuselage, and tail surfaces fit the drawing very well except for the top of the nose. The panel engraving is nice, except for the lines that cross the fuselage halves. The following modifications are needed to make the Frog Hawker Hunter FGA.9 into a good model aircraft:
- The fit of the model parts is not that great, but since the plastic is very thick, the model sands down real well.
- Reshape the upper nose profile between the cockpit and tip.
 - Shorten
the main landing gear by about a ¼ inch (most 1/72 classic jet kits have landing
gear that is too tall).
- Shorten
the main landing gear by about a ¼ inch (most 1/72 classic jet kits have landing
gear that is too tall).
- Remove the lip from the jet exhaust so that it will fit in the rear fuselage.
- Replace the pitot tube with stretched sprue.
- If you use the larger drop tanks, move the inboard stores attachments away from the landing gear doors. If you don’t, the tanks won’t fit. Also fill in the odd indentations in the top of the tanks.
- Remove the sink marks from the inside of the main landing gear wells.
- Since it is hard to line up, glue the cockpit floor into the nose and let dry before gluing the fuselage halves together.
- Considerable nose weight needs to be added.
The later Frog kits like this Hunter did not have seated pilot figures. I like to put pilots in my planes because they provide a feeling of action. I added a jet pilot figure from another Frog kit.
|
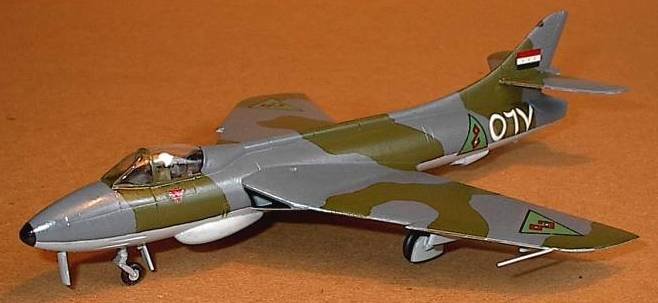
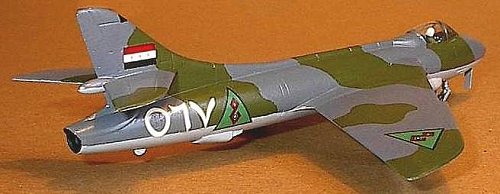
PAINT & MARKINGS |
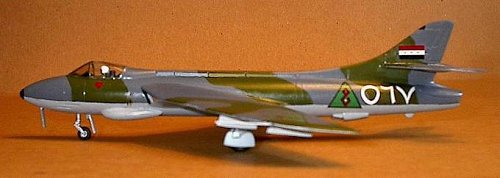
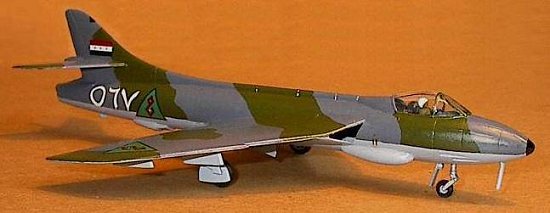 While the decals provided in this kit are really nice,
especially for the Chilean Air Force aircraft, I decided to paint my Hawker
Hunter to represent an Iraqi Hawker Hunter from the late 1960s. The model was
painted in standard RAF colors: dark green, dark gray, and light gray
underneath. I brush-painted the aircraft using Testors paints. I coated the
model with Future floor wax.
While the decals provided in this kit are really nice,
especially for the Chilean Air Force aircraft, I decided to paint my Hawker
Hunter to represent an Iraqi Hawker Hunter from the late 1960s. The model was
painted in standard RAF colors: dark green, dark gray, and light gray
underneath. I brush-painted the aircraft using Testors paints. I coated the
model with Future floor wax.
The decals I used for the Iraqi Air Force Hunter came from an old ESCI sheet for Hawker Hunters and Gloster Meteors. I have had this decal sheet for over thirty years. To bleach the yellow out, I put the decal sheet in a plastic bag and placed it outside in the sun for a few days. Despite their age, the ESCI decals went on really well though I had to paint over the numerous silvered-film areas.
|
CONCLUSIONS |
 I really enjoyed making this reissued Frog Hawker Hunter
model kit. It is superior to the 1/72 Airfix Hunter FGA.9 kit. I love building
the old Frog kits. Many of them are available through companies like Plastyk,
Chematic, Modelcraft, Eastern Express, Toko, Maquette, and Zvezda. These
classic kits are a joy to build and are very inexpensive. Read my lips: The
quarter-scale folks with AMS (Advanced Modeler Syndrome) can only turn green
with envy.
I really enjoyed making this reissued Frog Hawker Hunter
model kit. It is superior to the 1/72 Airfix Hunter FGA.9 kit. I love building
the old Frog kits. Many of them are available through companies like Plastyk,
Chematic, Modelcraft, Eastern Express, Toko, Maquette, and Zvezda. These
classic kits are a joy to build and are very inexpensive. Read my lips: The
quarter-scale folks with AMS (Advanced Modeler Syndrome) can only turn green
with envy.
|
REFERENCES |
Donald, David, editor. 1997. The Complete Encyclopedia of World Aircraft. Barnes and Noble Books.
Donald, David and Jon Lake, editors. 2000. The Encyclopedia of World Military Aircraft. Barnes and Noble Books.
Gunston, Bill, editor. 1982. The Encyclopedia of World Airpower. Crescent Books.
Copyright ModelingMadness.com. All rights reserved. No reproduction in part or in whole without express permission from the editor.
If you would like your product reviewed fairly and fairly quickly, please contact the editor or see other details in the Note to Contributors.
Back to Reviews Page 2023