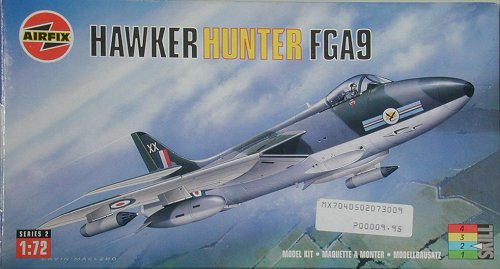
Airfix 1/72 Hawker Hunter FGA.9
|
KIT # |
02073 |
|
PRICE: |
€ 5.00 |
|
DECALS: |
Two options |
|
REVIEWER: |
Lars Jørgensen |
|
AFTERMARKET: |
Aeroclub canopy/seats, Daco decals |
|
HISTORY |

The Hunter is one of the
classic fighter aircraft of all times, so I will not repeat the history
of the aircraft at this point. The Danish aircraft which served as the
prototype for my Hunter is one of 30 Hunter F Mk. 51, which was an export
version of the F Mk. 4. The main external difference to later marks is
the strait leading edge of the wing, where later a dog-tooth was added.
The Danish Hunters where purchased in 1956 to replace Meteors, serving
with Sdn 724. They where used, together with the
 Meteor NF 11 and later
the F-86D, for the defense of Danish airspace, some aircraft being on
permanent quick reaction alert (QRA) duty for aircraft identification. As
time went on and newer aircraft (F-104G) entered service, the Danish
Hunters where given the task of air defense for lower altitudes. This was
done in cooperation with a system of air observers, situated at elevated
towers throughout the country. Often marked for replacement, the Hunters
soldiered on until 1974. They also served as a lead-in fighter for pilots
destined for the F-104G Starfighter and where used for target-towing
work.
Meteor NF 11 and later
the F-86D, for the defense of Danish airspace, some aircraft being on
permanent quick reaction alert (QRA) duty for aircraft identification. As
time went on and newer aircraft (F-104G) entered service, the Danish
Hunters where given the task of air defense for lower altitudes. This was
done in cooperation with a system of air observers, situated at elevated
towers throughout the country. Often marked for replacement, the Hunters
soldiered on until 1974. They also served as a lead-in fighter for pilots
destined for the F-104G Starfighter and where used for target-towing
work.
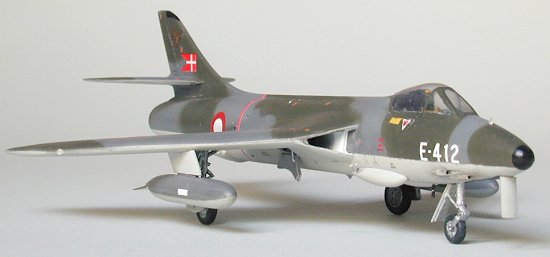
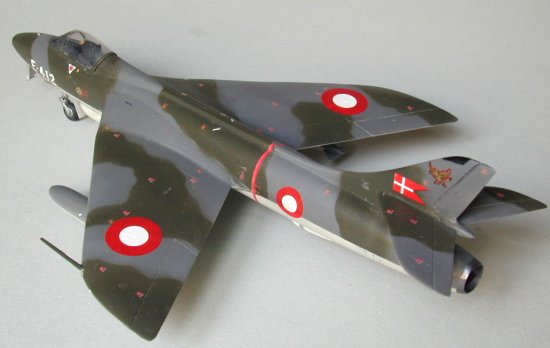
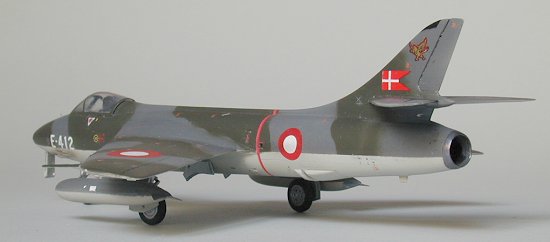
The Danish Hunters where delivered in standard RAF day-fighter camouflage of the time. In later years the original camouflage was changed to a overall olive green color with reduced size roundels. This matte paint was prone to heavy weathering and fading, which did not improve the aesthetics of the aircraft.
|
THE KIT |
In 1/72 scale Airfix and
Frog had some early Hunter kits, then came Matchbox with a F Mk. 6/T Mk.
7 kit, this was a bit crude and toy-like. The newer Airfix offering
originates from 1982 and looks more refined than the Matchbox kit, having
fine raised panel lines instead of Matchbox' heavy trenches. The Airfix
kit features the FGA Mk. 9, a later Hunter variant used as a fighter
bomber. Two different types of external tanks and two rocket pods are
provided. I have two issues of the kit. The
 earlier kit features a RAF
(20 Sqdn) and a Kuwait Air Force Hunter. The actual kit has decals for
two different RAF aircraft, a silver bellied aircraft from No.20 Sqd
(1962) with the old style roundels and a later aircraft from No 79 Sqd
(1972). These decals are a marked improvement and include very nice
stencils.
earlier kit features a RAF
(20 Sqdn) and a Kuwait Air Force Hunter. The actual kit has decals for
two different RAF aircraft, a silver bellied aircraft from No.20 Sqd
(1962) with the old style roundels and a later aircraft from No 79 Sqd
(1972). These decals are a marked improvement and include very nice
stencils.
So what are the problems with the kit, why is a decent Hunter kit often called for in Internet forums? Typical fir the time, internal detail is sparse. In the cockpit we find a floor, a not too good seat and a stick. The wheel wells are not so cleverly designed with some reinforcements running through the well, a see-through effect and a wrong shape for the outline. The wing tooth is perpendicular to the wing leading edge and not parallel to the aircraft center line. The canopy is very thick. The fuselage is rumored to be too short, I could not see that from drawings. but it should be too short behind the wing.
Before starting the construction, some additional shopping was done. A new seat and canopy came from Aeroclub, the canopy is a vast improvement over the original one. A decal sheet came from DACO in Belgium. This is for the Belgian Hunter, but was used for the stencils. This sheet is a piece of art with more than 100 individual decals. Not to forget the scale plans, which proved invaluable to the construction.
|
CONSTRUCTION |
Ok, lets see if we can get a nice Hunter replica out of this kit without too much effort. Construction was started with the wing. The dog tooth had to go for the early Hunters, so first a reinforcing plastic strip was added inside the wing leading edge. Some material was removed from the wells and the holes for the outer pylons where plugged. Moving to the fuselage, a blocking plate directly behind the intakes was removed and some simple wheel wells where constructed.
 The wings where glued
together and the separate ailerons were added. When dry, the dog-tooth
was filed off completely. The Hunter dog-tooth is simply a rounded metal
sheet added to the outer wing leading edge. The leading edge of the
earlier wing had a straight edge following the inner wing portion, so it
is quite easy to remove the dog tooth. Moving to the wing trailing edges,
these are much too thick and where thinned down using a file. All panel
lines where sanded off and some sink marks where filled. Finally, the
wings where primed to check for problems.
The wings where glued
together and the separate ailerons were added. When dry, the dog-tooth
was filed off completely. The Hunter dog-tooth is simply a rounded metal
sheet added to the outer wing leading edge. The leading edge of the
earlier wing had a straight edge following the inner wing portion, so it
is quite easy to remove the dog tooth. Moving to the wing trailing edges,
these are much too thick and where thinned down using a file. All panel
lines where sanded off and some sink marks where filled. Finally, the
wings where primed to check for problems.
Continuing with the fuselage, the cannon ports had to be modified. These are too far back and only shallow indentations. Ventral cannon ports are hard to mould, unless you use an insert, as Heller did in some of their kits. The Hunter I went to model had blast-tubes fitted, so some Contrail tubes where used to represent these. Holes where cut to the fuselage to take up the tubes and everything was carefully faired in. Well, as good as I was able to do, as I'm not too satisfied with the end result.
The fuselage got some interior colors, the cockpit and tailpipe where sprayed scale black and the intake trunks white. An instrument panel decal came from the Matchbox Hunter. The halves where joined, with some ballast added in the nose. Fit is not too good and the shape was worked out with putty and lots of sanding. The brake chute fairing above the tail pipe was filed off, this was without problems, as enough material is present. The separate rudder was added, here again the trailing edge had to be thinned. All panel lines came off and where rescribed. The real Hunter was very well built and shows minimal panel lines, so you might just sand it smooth. I carved out some small NACA inlets and drilled out small slits on the lower and upper side of the intakes, these are the outlets for the boundary layer splitter plates. Holes where drilled for the gun camera (nose) and the engine bearing cooling air outlet just behind the wing.
The wings where glued on, they have to have a slight anhedral. The wing's tongues have minimal support in the fuselage, so alignment was not simple. The wings where added with a good amount of glue and supported as good as possible to get the correct anhedral and to fit correctly at the trailing edge. This was left to dry to the next day, then the remaining gaps where filled and sanded.
 The next problem was
found with the tailplanes, which are 4mm too far forward. They where
moved back by cutting their mounting tongues. Again, the tailplanes had
to be supported carefully while the glue set to get the correct angle.
Moving on with fuselage parts, the spent link collector cases and the air
brake where added. Small tubes where added above the end of the link
collectors, these are the cartridge case ejectors. Then I continued with
the wing tank pylons, which have - you guessed it - the wrong shape.
Well, this time it was not Airfix' fault, as those used with the long
tanks are different from those for the short tanks I went for. New pylons
where fabricated from plastic sheet to the correct dimensions and glued
to the wings. The tanks where taken from the Matchbox Hunter.
The next problem was
found with the tailplanes, which are 4mm too far forward. They where
moved back by cutting their mounting tongues. Again, the tailplanes had
to be supported carefully while the glue set to get the correct angle.
Moving on with fuselage parts, the spent link collector cases and the air
brake where added. Small tubes where added above the end of the link
collectors, these are the cartridge case ejectors. Then I continued with
the wing tank pylons, which have - you guessed it - the wrong shape.
Well, this time it was not Airfix' fault, as those used with the long
tanks are different from those for the short tanks I went for. New pylons
where fabricated from plastic sheet to the correct dimensions and glued
to the wings. The tanks where taken from the Matchbox Hunter.
As the main wheel bays had been corrected, a new set of undercarriage doors was needed. These were made from plastic card, each with an outer and an inner, smaller skin. The kit has three separate doors for each side, while four are needed.
|
COLORS AND MARKINGS |
After some cycles of
priming and fixing minor flaws finally the time came to apply the top
coats. The canopy was masked carefully with Parafilm, as the camouflage
pattern goes over the frames. Then the frames got a black coat, followed
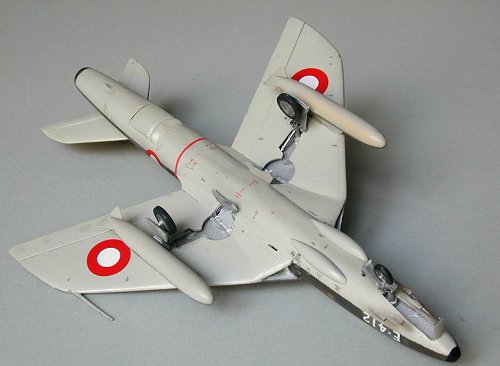
by some 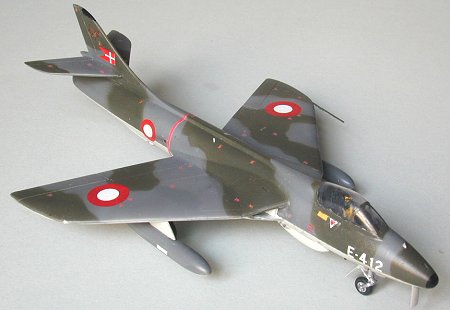 gray primer. The gear bays where sprayed silver and masked. Next
the lower surface was sprayed with Xtracolor's 'RAF Light Aircraft Grey'.
This was set aside to dry overnight, then the lower surfaces where
masked. Now a coat 'RAF Dark Sea Grey' followed for the upper surfaces.
This was sprayed as it came from the can, then the paint was lightened
with some white. The dark gray was over-sprayed with this randomly to
break up the monotone color somehow, this was done very subtle. The
original aircraft where kept clean and did not weather much.
gray primer. The gear bays where sprayed silver and masked. Next
the lower surface was sprayed with Xtracolor's 'RAF Light Aircraft Grey'.
This was set aside to dry overnight, then the lower surfaces where
masked. Now a coat 'RAF Dark Sea Grey' followed for the upper surfaces.
This was sprayed as it came from the can, then the paint was lightened
with some white. The dark gray was over-sprayed with this randomly to
break up the monotone color somehow, this was done very subtle. The
original aircraft where kept clean and did not weather much.
Next some tape masks which were cut following the scale plans from DACO's decals. These were applied with a wire running close to the edge to lift the mask from the surface. This resulted in a soft demarcation line when the dark green was sprayed. In parallel the wheel well doors and the drop tanks where sprayed.
With the masking removed it was time to add the decals. The roundels where cut from red and white solid decal sheets, using a compass with a knife blade insert. The split flag,, numbers and the fin marking came from some old sheets of Danish origin.
|
FINAL CONSTRUCTION |
After applying the decals the undercarriage was added. The main gear struts have to be set up carefully, as the struts point slightly outward. A rod was added to replicate the retraction cylinder and to add some strength. Then all the new doors where carefully set up, checking against plans.
I used Tamiya's X-22 'Clear' with a drop of X-21 'Flat Base' for a nice satin finish. This also blended in the decals very well.
|
CONCLUSIONS |
 Here we go! I finally
have a Hunter in 1/72 scale. I hope you got some idea about the kit and
how to fix some problems. This took more time than I thought of
beforehand. The kit can be seen as a challenge to be tackled or you might
go for a resin kit. Maybe you can tolerate the shape problems, then you
could just get it together, sand off the panel lines and add the nice kit
decals for a minimal investment. As kit producers slowly work their way
through early jets, there are chances we will some day see a better kit.
Here we go! I finally
have a Hunter in 1/72 scale. I hope you got some idea about the kit and
how to fix some problems. This took more time than I thought of
beforehand. The kit can be seen as a challenge to be tackled or you might
go for a resin kit. Maybe you can tolerate the shape problems, then you
could just get it together, sand off the panel lines and add the nice kit
decals for a minimal investment. As kit producers slowly work their way
through early jets, there are chances we will some day see a better kit.
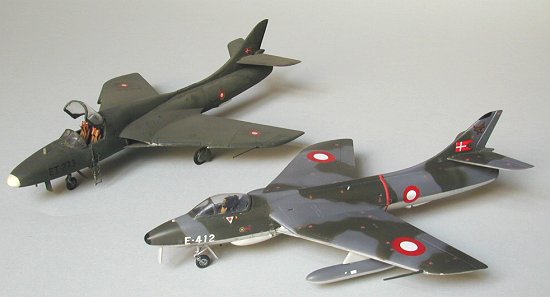
For the last picture I pulled my old Hunter T Mk.7 out, this was built long time ago from the Matchbox kit. The trenches where filled by applying thick paint, the scheme is the newer, olive camouflage. This kit is said to have some shape problems with the nose, but I think it can pass for a Hunter.
March 2004
If you would like your product reviewed fairly and quickly, please contact me or see other details in the Note to Contributors.