Monogram 1/48 F-84F Thunderstreak
|
KIT # |
85-5437 |
|
PRICE: |
$13.00 |
|
DECALS: |
Two aircraft |
|
REVIEWER: |
|
|
NOTES: |
SS 48-798 decals used |
|
HISTORY |
Republic Aircraft Company took note of the extremely successful North American F-86 swept wing fighter and set their design team headed by the able Alex Kartveli to build their own swept wing fighter using the proven F-84E airframe. Work started in late 1949 and was dubbed the YF-96A Thunderstreak. The prototype which was built from an F-84E fuselage at the Farmingdale factory on Long Island, retained about 60% of the original airframe from its straight wing brethren.
 The F-84F teetered on the
brink of oblivion due to fiscal restraints in buying by Congress. All Air
Force funding was being directed towards the F-86 Sabrejet. Outbreak of
war on the Korean peninsula saved the project. The Thunderstreak suffered
many growing pains discovered in the YF-96A. With the new infusion of
money into Republic, they went about solving the problems with better
aerodynamics and the totally new Siddeley Saphire engine.
The F-84F teetered on the
brink of oblivion due to fiscal restraints in buying by Congress. All Air
Force funding was being directed towards the F-86 Sabrejet. Outbreak of
war on the Korean peninsula saved the project. The Thunderstreak suffered
many growing pains discovered in the YF-96A. With the new infusion of
money into Republic, they went about solving the problems with better
aerodynamics and the totally new Siddeley Saphire engine.
Teething problems and production fowl-ups at the corporate level kept setting the swept wing program back. The Air Force went ahead and purchased the upgraded and improved straight wing F-84G to fill their tactical nuclear strike force. In November 1952, the first F-84F rolled out of the Farmingdale Plant with all its problems in quick tow.
Problems within the F model continued to plague the Thunderstreak. Flight control problems, landing gear problems and continuing problems with the J65 engines tarnished the reputation of the F-84F and Republic. The plane slowly made its way to Guard and Reserve units that slowly massaged the planes into formidable opponents. NATO began receiving the swept wing fighter in 1955 and served with the French, Netherlands, Italians, and German Air Force. Many other countries used the F-84F until the early 80’s. It was an astonishing lifespan for a fighter of any type.
|
THE KIT |
Continuing my love affair with those wonderful 1/48 scale Monogram kits of the late 70’s and early 80’s, I set my eyes on the F-84F Thunderstreak. I bought this kit while I lived in Germany in the early 90’s. I don’t recall what it cost then but I have seen them at trade shows lately for as low as $13.00. This kit is a true bargain in my book. My kit was molded in silver plastic and suffered signs of being undershot in the fuselage, wheels and other assorted thick parts. I know that the kit was shot in a dark olive drab color also. No flash and well packed. I think this was one of Monogram’s best efforts. This one will be built to IPMS Out Of Box rules.
|
CONSTRUCTION |
I started with step one of the instruction sheet, the cockpit. This turned out to be a real gem. It has superb detailing straight out of the box. The bang seat makes a splendid rendition of the late model seat used in the F-84F-25. I held off putting the seat into the cockpit tub until completion of painting and decaling to keep from damaging it. The instrument panel makes a impressive little unit straight from the box. Detail to your own desire. There is plenty to work with.
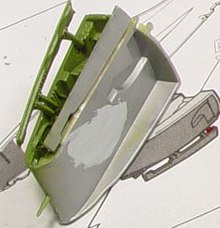 The splitter plate inside
the intake and the forward wheel well are the same unit with the landing
gear doors attached to it. You can either cut the doors off now or
reattach them later or just built it straight out of the box. The inner
wheel well is painted Model Masters Acryl Interior Green and then glued
together. My kit displayed many signs of being undershot and it was very
evident here on the outer skin of the splitter plates. I used Mr.
Surfacer to fill in the low spots and cut off the pitot tube to be able
to sand the front edge of the splitter plate smooth. The nose of the
aircraft is a very prominent part of the aircraft that draws everybody to
look into the intake. There are deep injector pin markings in the intake
that took a bit of filling and sanding to smooth the contour of the
intake out.
The splitter plate inside
the intake and the forward wheel well are the same unit with the landing
gear doors attached to it. You can either cut the doors off now or
reattach them later or just built it straight out of the box. The inner
wheel well is painted Model Masters Acryl Interior Green and then glued
together. My kit displayed many signs of being undershot and it was very
evident here on the outer skin of the splitter plates. I used Mr.
Surfacer to fill in the low spots and cut off the pitot tube to be able
to sand the front edge of the splitter plate smooth. The nose of the
aircraft is a very prominent part of the aircraft that draws everybody to
look into the intake. There are deep injector pin markings in the intake
that took a bit of filling and sanding to smooth the contour of the
intake out.
I loaded up the airbrush with Alclad Aluminum and shot the inside of the fuselage halves and the splitter plate. After drying, I fitted it into the right half of the fuselage and reloaded the fuselage with interior green and hit the cockpit area. Then I turned my attention to the burner can which is a simple tube glued together and placed in the tail area. There is a vent tube that you shouldn’t forget but if you do, it is no big deal. Just glue it to the fuselage later. This is what I did to keep it from getting broken off during construction. The plane is a tail sitter so I glued some weights into the nose behind the wheel well with white glue.
 The fuselage halves fit
like a snap-tite model and a real accolade to the designers of Monogram.
The wings are a bit thick on the trailing edge and could use some
thinning. I thought the wheel wells are done very convincingly with
raised detail molded directly to the top wing. I painted it Interior
Green and used a black wash to bring out the detail. The wing to fuselage
construction is a slot and tab affair with two offset tabs coming into
contact with each other inside the fuselage making a strong wing
connection. I had to shave down the end of the tabs just a bit to help
the fit. I filled the wing seam with Mr. Surfacer 1000 and sanded it down
smooth.
The fuselage halves fit
like a snap-tite model and a real accolade to the designers of Monogram.
The wings are a bit thick on the trailing edge and could use some
thinning. I thought the wheel wells are done very convincingly with
raised detail molded directly to the top wing. I painted it Interior
Green and used a black wash to bring out the detail. The wing to fuselage
construction is a slot and tab affair with two offset tabs coming into
contact with each other inside the fuselage making a strong wing
connection. I had to shave down the end of the tabs just a bit to help
the fit. I filled the wing seam with Mr. Surfacer 1000 and sanded it down
smooth.
Hold off on installing the horizontal stabs and the small wheel well covers. It will help in sanding and painting later in the construction. I decided to re-scribe the panel lines at this time. You can sand the fuselage and wings smooth. The silver plastic leaves a ghost line where the panel lines use to be. The ever present Copyright year marking is on the lower right horizontal stabilizer and needs to be sanded off. I picked and choose which lines I wanted to re-scribe. Access panels were left raised and wing and fuselage lines were re-scribed one at a time. It is time consuming but the effort is well worth it. I used Mr. Surfacer again to correct any mistakes I might have made. I polished the whole fuselage down with a cotton tee shirt to polish it out in preparation of the coming coat of silver.
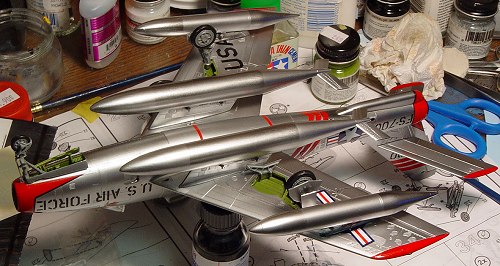
 Taking a break from
scribing all those lines, I glued the wing tanks together and worked on
the bomb racks, speed brakes, and landing gear covers. The landing gear
is well detailed and strong. I cleaned up the seam marks and airbrushed
them medium Grey. I had thought that the landing gear would be the same
color as the wheel wells but it is in fact a medium to light grey. The
nose gear is a bit tricky with the mud guard being molded directly to the
wheel. A bit of detailed painting and a dark wash and you have a very
realistic front wheel. Don’t forget the landing gear light which is
attached to the left side of the front gear strut. I use Testors Chrome
for the struts to simulate the polished metal surface.
Taking a break from
scribing all those lines, I glued the wing tanks together and worked on
the bomb racks, speed brakes, and landing gear covers. The landing gear
is well detailed and strong. I cleaned up the seam marks and airbrushed
them medium Grey. I had thought that the landing gear would be the same
color as the wheel wells but it is in fact a medium to light grey. The
nose gear is a bit tricky with the mud guard being molded directly to the
wheel. A bit of detailed painting and a dark wash and you have a very
realistic front wheel. Don’t forget the landing gear light which is
attached to the left side of the front gear strut. I use Testors Chrome
for the struts to simulate the polished metal surface.
Don’t install the bomb racks until after decaling unless you want to be cutting your star and bars and USAF markings to go under the racks. All the external tanks got re-scribed and polished then put off to the side awaiting the airbrush.
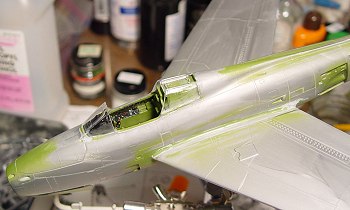
I cut the clear parts off the tree using a hot knife to keep from breaking the plastic or causing stress cracks to appear. A few hits with the sanding stick knocked off any extra plastic that shouldn’t be there. I dipped them in future to prep them for the superglue that I am going to use as filler to attach them to the fuselage. Once dry I took the edge of my knife and scraped off the future along the mating edge to give the superglue something to hold on to. I painted the forward cockpit sun screen area flat black then glued in the front windscreen allowing the superglue to squeeze out along the mating edges. Allow it to dry about an hour then go in and sand the area. It makes a smooth area and really helps out the appearance.
|
CAMOUFLAGE & MARKINGS |
The back of the cockpit got a shot of Interior Green then the same process was used on the back glass as the front. I used Tamiya Tape to mask off the polished glass areas and sprayed them Interior Green to represent the structure you would see from the inside looking out. Then the whole plane got a going over once more to check out for any scratches or blemishes. The silver plastic makes it very hard to see the scratches and some might choose to spray a primer grey down first to uncover those pesky little problem areas.
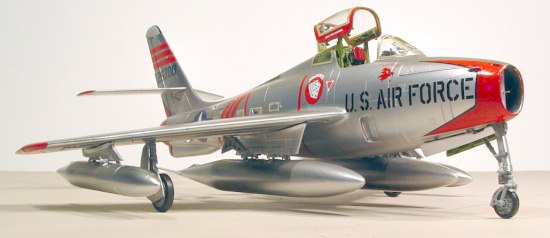
 The plane I wanted to do
was a very polished aircraft so I used the Alclad Black Primer and shot
the plane completely. I was very glad that I spent so much time making
sure the surface was properly prepared because the gloss black really
showed up all imperfections. I sprayed the whole plane Alclad Polished
Aluminum and let it dry overnight. The next day I really wasn’t happy
with the color. It was too bright. It didn’t look real. So I masked off
areas according to my reference and shot it Alclad Duraluminum, removed
the tape and let dry about 2 hours. Then I hit the whole plane with a
light coat of Alclad Aluminum. The result is a tonal change in the
surface showing up the different areas while toning down the polished
aluminum look. This looked great. I left the speed brakes Polished
Aluminum color because the reference books show this area highly
polished. The effect is just what I wanted. The Olive Drab anti-glare
panel was sprayed directly onto the silver using Badger Precision color
16-95 Green Drab.
The plane I wanted to do
was a very polished aircraft so I used the Alclad Black Primer and shot
the plane completely. I was very glad that I spent so much time making
sure the surface was properly prepared because the gloss black really
showed up all imperfections. I sprayed the whole plane Alclad Polished
Aluminum and let it dry overnight. The next day I really wasn’t happy
with the color. It was too bright. It didn’t look real. So I masked off
areas according to my reference and shot it Alclad Duraluminum, removed
the tape and let dry about 2 hours. Then I hit the whole plane with a
light coat of Alclad Aluminum. The result is a tonal change in the
surface showing up the different areas while toning down the polished
aluminum look. This looked great. I left the speed brakes Polished
Aluminum color because the reference books show this area highly
polished. The effect is just what I wanted. The Olive Drab anti-glare
panel was sprayed directly onto the silver using Badger Precision color
16-95 Green Drab.
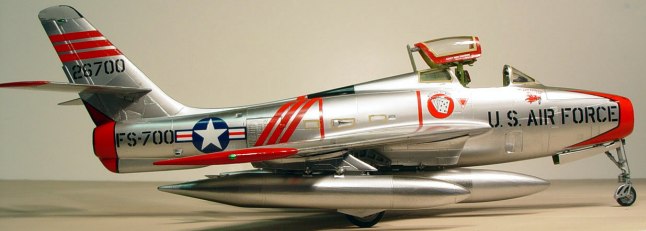
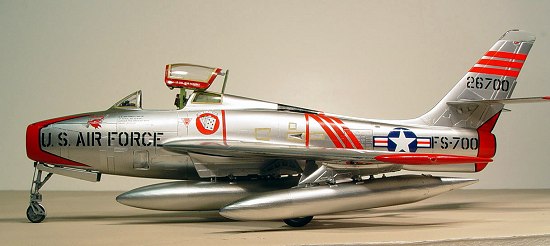
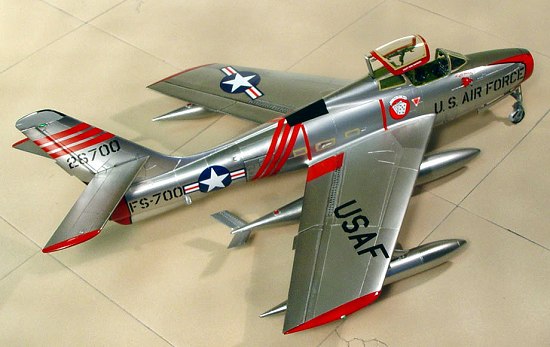
The plane I picked to do
was “The Red Falcon 2”, the personal aircraft of Lt Col Bob Ackerly,
commanding the 77th Fighter-Bomber Squadron in 1957. It can be
found in the re-issued SuperScale Decal sheet 48-798. It is the only
plane on the sheet. The decals are very nicely done. The red colors are
strong and vibrant and do not show through the silver at all. They re-act
to Solva-Set very well and snuggled down with no problems at all. The
wing tips and horizontal stabs tips were
 masked off and painted with
Badger Precision Color 16-08 Caboose Red. It is an almost perfect match
for the decals. I also masked off the canopy and shot it while I had the
airbrush loaded up with the red. A small dab of Testors Chrome silver and
then after it is dried, a dab of Tamiya Clear Red for the right and Clear
Green for the left, finished off the formation lights.
masked off and painted with
Badger Precision Color 16-08 Caboose Red. It is an almost perfect match
for the decals. I also masked off the canopy and shot it while I had the
airbrush loaded up with the red. A small dab of Testors Chrome silver and
then after it is dried, a dab of Tamiya Clear Red for the right and Clear
Green for the left, finished off the formation lights.
I painted up then glued the gun sight glass onto the sun screen in the cockpit then put the small accessory gage on the front windscreen. One feature of the canopy is the sealant around the framing of the canopy. I sprayed Tamiya Buff XF-57 onto some clear True Details Fast Frames film and cut it into small strips. Then I used it to line the railing of the canopy frame. The trick looks good and adds to the canopy detail. The canopy is a strange contraption that moves up and aft on the real plane. You have to glue a small bracket and the risers to the bottom of the canopy. There is a vertical cap that holds up the back of the canopy. Take your time and align them up right. It will throw off the look of the plane if the canopy is not lined up right.
|
CONCLUSIONS |
I recommend this kit to all. It was fun and a easy build. It makes a great looking model right out of the box and stands up to today’s standards and can be found for as low as five bucks at some swap meets. If you do not want to deal with the natural metal finish, there are many different NATO nations that used the Thunderstreak. I plan to do a German F-84F in the near future and a Heller RF-84F Thunderflash. They would look great sitting on the shelf with a Monogram F-86D to share the spotlight with. It took about 15 hours to complete due to the silver finish. This time can be cut down doing an South East Asia scheme or a NATO scheme instead.
|
REFERENCES |
F-84 Thunderjet in Action #61 by Larry Davis & Dave Menard
Republic F-84 by David R. McLaren
USAF Europe 1948-1965 in Color by Robert Robinson
Scale Aviation Modeller International Vol 9 Issue 2
July 2003
Copyright ModelingMadness.com. All rights reserved. No reproduction in part or in whole without express permission.
If you would like your product reviewed fairly and fairly quickly, please contact the editor or see other details in the Note to Contributors.