|
KIT: |
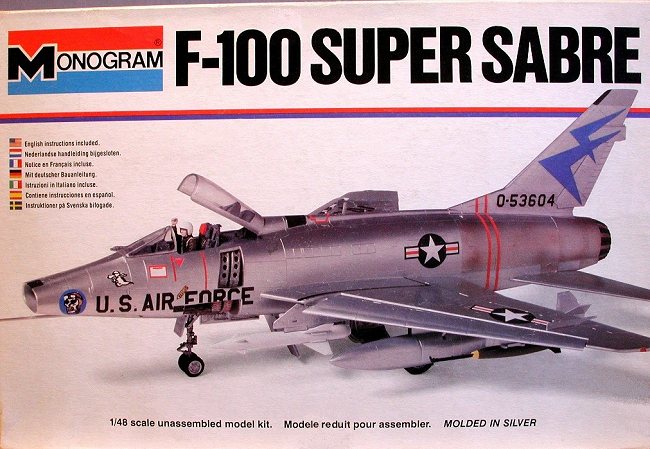
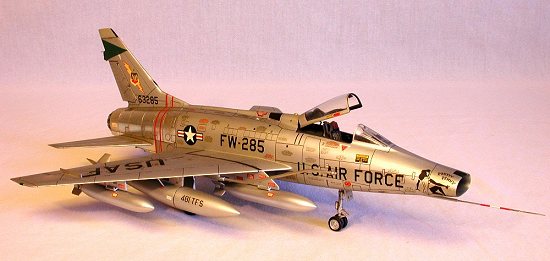
Monogram 1/48 F-100D Super Sabre |
|
KIT # |
5416 |
|
PRICE: |
$3.25 (in 1980) |
|
DECALS: |
Two Aircraft |
|
REVIEW: |
Roger Jackson |
|
NOTES: |
Original Issue |
|
HISTORY |
Reluctant to complacently rest upon the laurels of its eminently successful F-86 Sabrejet, the design engineers at North American Aviation, under J. H. "Dutch" Kindelberger, began a supersonic follow-on fighter in late 1948. The next year, with the basic concept and lay-out finalized, NAA submitted an unsolicited proposal to the Air Force for review. The response, initially tepid due to reduced military spending in the pre-cold war era, became an enthusiastic go-ahead as after-action reviews regarding aerial combat with Soviet-built MiG-15s in 1951 demonstrated the near-parity of the Russian jets competing for supremacy in the skies over the Korean peninsula.
Concurrently at Pratt & Whitney, powerplant engineers, eager to compete with their counterparts at Wright, Westinghouse, and General Electric for primacy in the arena of jet turbine design, posited the idea of multiple compressor stages as the most efficient method of increasing an engine’s sustained thrust. As sub-sonic air (a necessity, to prevent primary compressor damage or flame-out) passed into the secondary stage, the independently rotating compressor blades there would vastly increase the velocity of air entering the engine’s combustion chambers (the "hot section"). With an optimal air/fuel ratio and an improved ignition system, the theoretical thrust would be nearly double that of the first generation of jet turbines, placing the prospect of sustained supersonic flight within practical grasp.
Pratt & Whitney began building prototypes of its new engine and amassing static- and flight-test performance data. A comprehensive analysis of the information confirmed the design engineers’ theories. By 1950 the new powerplant, now known as the J-57, was producing 9250 lbs of military thrust. Adding an afterburner upped this to an incredible 14,000 lbs. The company was certain that it had a winner and started shopping for an airframe to wrap around it.
As the war in Korea dragged on, in early 1952 the Air Force ordered two prototypes of North American’s NA-192, or Sabre-45 as it was known at the Inglewood facility. The specified powerplant would be Pratt & Whitney’s new J-57 equipped with an afterburner and the aircraft would be designated the F-100 Super Sabre. The single-seat fighter featured full-span leading edge slats, an ‘all-flying’ tailplane, and a steerable nosewheel to facilitate ease of ground handling. Four 20 mm cannons comprised the armament, while jettisonable droptanks could be fitted to increase the combat radius.
 Typical of all cutting edge military technology, the prototypes, while fully
capable of Mach 1+ performance, highlighted a number of problems not fully
understood by engineers probing the problematical parameters of supersonic
flight. Chief among these was an inherent instability at high transonic Mach
numbers, extending well beyond the speed of sound. This problem would continue
to plague the program in varying degrees throughout much of the Super Sabre’s
early career.
Typical of all cutting edge military technology, the prototypes, while fully
capable of Mach 1+ performance, highlighted a number of problems not fully
understood by engineers probing the problematical parameters of supersonic
flight. Chief among these was an inherent instability at high transonic Mach
numbers, extending well beyond the speed of sound. This problem would continue
to plague the program in varying degrees throughout much of the Super Sabre’s
early career.
The Air Force, eager to showcase its new jet fighter, placed the Super Sabre into production as the F-100A with an order for 250 aircraft, as prototype flight testing continued. One rather significant modification from the prototypes was shortening the vertical fin and rudder in an effort to reduce weight and drag. NAA test pilot George Welch, a WWII ace with four of his kills scored over Pearl Harbor, was killed in one of these short-tailed ‘A’ models when the empennage separated from the airframe in a supersonic dive.
The problem was quickly diagnosed and all F-100As (those on the production line and those already in squadron service) were fitted (or retro-fitted) with the original tall vertical fin and rudder. The ‘all-flying’ stabilator was enlarged and strengthened and featured an improved buffer/damper assembly to minimize oscillations when transitioning through the Mach, while the wingspan was increased by 27 inches to slightly reduce the roll-rate.
The ‘B’ designation was stillborn, having been assigned to a proposed all-weather interceptor variant that, because of a multitude of problems, would not be developed for several years. When the hardware finally emerged (as a strike fighter, to compete with Republic’s F-105 Thunderchief), it bore so little resemblance to the original Super Saber concept that it was redesignated the F-107A.
Midway through the initial production order, the Air Force decided to add a secondary air-to-ground capability to enable the F-100 to deliver a tactical nuclear weapon. NAA engineers obliged, redesigning the airfoil to a "wet wing" configuration, adding two additional hardpoints under the wings, and incorporating an in-flight refueling probe mounted under the starboard wing. 476 of these ‘C’ models were built, including seventy aircraft originally ordered as ‘A’s.
As the Super Sabre was considered a "hot" aircraft, especially during final approaches and landings, NAA proposed a company-sponsored two-seater to aid in pilot transitioning. The F-100F, as this new variant was designated, featured landing flaps inboard of the ailerons, a new enlarged vertical fin, and a five foot stretch to the fuselage to accommodate the tandem second cockpit. Armament was reduced to a pair of 20 mm guns with the magazines relocated and rearranged. A pair of wing fences were fitted in an attempt to cure the nagging directional stability problems. Though successful as a trainer, a quarter of the 333 F-100Fs produced were lost due to accidents. Later in its career, many of the surviving two-seaters would be converted to Wild Weasel and Fast FAC aircraft as US involvement in the Vietnam War grew to gargantuan proportions.
 The definitive ‘Hun’ model became the F-100D. Developed as a pure
fighter-bomber, it used the flap-equipped wing of the ‘F’, and featured
seven hardpoints for air-to-ground ordnance. A two-foot stretch to the fuselage
accommodated an additional fuel cell. The enlarged vertical fin and rudder of
the two-seater was used, while the aircraft was equipped with an arresting hook,
and the first supersonic-certified autopilot. Nuclear capability was retained
and provisions for Sidewinder and Bullpup missiles were available on properly
modified pylons. A total of 1274 ‘D’s were built with production split
between the Inglewood (California) and Columbus (Ohio) plants.
The definitive ‘Hun’ model became the F-100D. Developed as a pure
fighter-bomber, it used the flap-equipped wing of the ‘F’, and featured
seven hardpoints for air-to-ground ordnance. A two-foot stretch to the fuselage
accommodated an additional fuel cell. The enlarged vertical fin and rudder of
the two-seater was used, while the aircraft was equipped with an arresting hook,
and the first supersonic-certified autopilot. Nuclear capability was retained
and provisions for Sidewinder and Bullpup missiles were available on properly
modified pylons. A total of 1274 ‘D’s were built with production split
between the Inglewood (California) and Columbus (Ohio) plants.
Under the Military Assistance Program (MAP), Super Sabres were made available to the Republic of China (Taiwan), France, Denmark, and Turkey, which used them in combat against Greece during the 1974 dispute over the island of Cyprus. The USAF Thunderbirds selected the F-100 for team use, using both ‘C’ and ‘D’ variants along with the two-seat ‘F’.
F-100s were among the first tactical air assets deployed to Vietnam in the early 1960s, and by 1965 were flying strike and interdiction sorties north of the 17th parallel. As North Vietnamese air defenses grew in sophistication the Super Sabre ceded these missions to more advanced types and assumed the close air support (CAS) role, assisting US and ARVN infantry units engaged in brutal close combat with NVA regular and PRG (VC) insurgent forces in the south.
At war’s end, the surviving Huns were turned over to the Air National Guard, where they soldiered on far in excess of the initial service life of 3000 flying hours. Structural modifications and improvements allowed many aircraft to serve as much as 7000 hours before mandatory retirement. The 181st TFG (Indiana ANG) flew the last USAF F-100 mission on November 10th, 1979, when 56-2979 (a ‘D’ model) was flown to the boneyard at Davis-Monthan AFB to await the breaker’s torch. Later, many Super Sabres would receive a new lease on life as remotely-piloted QF-100 drones, to serve as targets at the William Tell competitions and at White Sands SMR in New Mexico.
|
THE KIT |
Monogram’s F-100D Super Sabre kit consists of 82 silver-gray parts, a clear sprue containing 5, a decal sheet offering two schemes, and a fold-out instruction pamphlet featuring a brief history of the aircraft, sequential assembly steps, and a painting and decaling guide. A paint chart references generic colors, though the camouflage paints for the alternate scheme are cited as FS-specific colors.
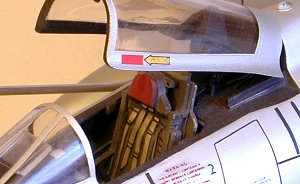
Optional features include an exposed gun bay and magazine (port side only), a positionable canopy and speedbrake, a two-piece boarding ladder, a seated pilot figure, a standing crew chief figure, and an alternate afterburner assembly (necessary for modeling a Hun in its later years).
A pair of 275-gallon droptanks with integrally-molded pylons are included, while the remaining external ordnance consists of a pair of early Bullpup missiles and two Mark 82 500lb bombs with "daisy cutter" fuse extenders.
The wing leading edge slats are separately molded pieces and are designed to mount in the ‘deployed’ position. Two refueling probes are furnished (straight and ‘cranked’) to give the modeler still more options. The stabilators are molded integral to the top fuselage half and may prove troublesome. An embossed "F-100 Super Sabre" plaque is included for those inclined to mount the model to a diorama or presentation base.
 Typical of the period, the surface detail is raised and, for the most part,
correct. All the various scoops, vents, and grilles are recessed with a modest
amount of relief, though the guns are poorly depicted. The cockpit is adequately
detailed and features a three-piece seat. Speedbrake and gearwell details are
outstanding, looking sufficiently ‘busy’ to obviate the need for a
super-detailing job in these areas.
Typical of the period, the surface detail is raised and, for the most part,
correct. All the various scoops, vents, and grilles are recessed with a modest
amount of relief, though the guns are poorly depicted. The cockpit is adequately
detailed and features a three-piece seat. Speedbrake and gearwell details are
outstanding, looking sufficiently ‘busy’ to obviate the need for a
super-detailing job in these areas.
On the other side of the ledger, all the wing pylons have crater-sized dimples which must be filled, and warpage at the rear of the upper fuselage half will make the afterburner installation problematic. The 275-gallon droptanks are somewhat rare and should be rebuilt to the more common 335-gallon configuration. The intake trunk is much too short, though if properly assembled and finished is usable.
The featured schemes on the decal are: 1) 55-3604, a lacquered-aluminum finished F-100D-25-NA from the 416th TFS, Bien Hoa AFB, RVN, circa 1965 and 2) 55-0598, a SEA-camouflaged aircraft assigned to the Michigan Air National Guard (the alternate F-102-style afterburner is used with these markings). The review sample is thick, matte-finished, and slightly off-register. Minimal stenciling is included and the modeler will be better served by an aftermarket decal sheet.
|
CONSTRUCTION |
After a quick mock-up of the basic airframe using masking tape (to check for dimensional discrepancies and center-of-gravity problems), I began construction by removing the stabilators from the fuselage with a razor saw. The mock-up demonstrated some serious warps at the rear of the fuselage that would be better addressed with the stabs removed.
I’d already decided to build a ‘clean’ airplane so I glued the gun and ammo bay doors into position with Crazy Glue. The fit was less-than-thrilling, requiring careful prefitting and a lot of filling and sanding. I treated the auxiliary landing gear doors and speedbrake in similar fashion, closing up everything closeable.
All the various exhaust vents were opened up by first drilling them out, then squaring up the holes with an X-acto knife. The gun troughs were drilled out obliquely to accept 3/32" aluminum tubing installed parallel to each other and the C/L of the lower fuselage. I glued the tubing in with gap-filling Hot Stuff, and when fully dry, sanded them flush to the fuselage. I used #20 hypodermic needles as guns, set into 1/16" aluminum tubing collars then inserting them into the troughs from the inside and gluing them from the rear.
I assembled the intake trunk with CA, and when fully dry, removed the rear wall so I could address the seams all the way down from the inside. This little chore was very time-consuming but necessary, as the intake is fairly prominent and must be seam-free. When I was satisfied, I polished the inside with Bare Metal compound and Q-Tips until it shone like a mirror. A new rear baffle was fabricated from black sheet styrene and pre-fitted into the rear of the trunk. I shot the inside of the intake with Spray ‘n’ Plate buffing aluminum then gently rubbed it to a bright metallic luster with a piece of cotton T-shirt wrapped around a Q-Tip and held in place with a rubber band. After polishing the new baffle with Brasso and a buffing wheel I attached it to the rear of the trunk.
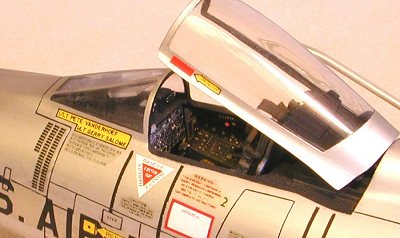 The cockpit was painted and assembled then glued into position with CA.
Monogram, in typical fashion, omitted the throttle so I made one from sprue and
attached it to the quadrant with Testor’s liquid cement. A few other bits and
pieces from the spares box were used to flesh out the area and impart a ‘busy’
look to the office.
The cockpit was painted and assembled then glued into position with CA.
Monogram, in typical fashion, omitted the throttle so I made one from sprue and
attached it to the quadrant with Testor’s liquid cement. A few other bits and
pieces from the spares box were used to flesh out the area and impart a ‘busy’
look to the office.
I assembled the wing next, after flexing it numerous times to work out some serious warps. I removed the leading edge slat tracks and glued the slats in the ‘closed’ position. The slats were too small so shimming was required to get a nice flush fit. The wingtips were notched to accept position lights fabricated from suitably-colored Lexan, filed and sanded to proper shape, then polished with Bare Metal compound and a buffing wheel. I installed all the weapons pylons at this time, after filling and sanding the huge dimples in them. A razor saw was used to remove the integrally-molded droptank pylons, and these too were glued into position. I replaced the over-scale plastic wing fences with new ones fabricated from .010" aluminum sheet, inserted into slots cut in the appropriate locations. With the gluing complete, I rescribed all the surface detail with an X-acto knife.
On the standard afterburner shroud, I removed the tailpipe, then recontoured the plastic on the cut fuselage end, thus lengthening the exhaust petals. Using the optional ‘F-102’ afterburner, I cut away the tailpipe section from the sheetmetal, then used my Dremel tool and a router bit to thin the inside, allowing the standard tailpipe to slip inside, thus providing addition depth and detail to this area. I removed the inside of the tailpipe itself and attached an afterburner flame-holder ring from my spares box. Several pieces of sheet styrene were used to create an engine mount to prevent the tailpipe from slipping too far into the afterburner shroud and to provide a snug, friction fit without adhesive.
I attached the intake trunk to the upper fuselage half, glued some lead sinkers to the lower fuselage half near the nose gear well as insurance, then trapped the wing between the upper and lower fuselage halves and glued them together with CA. The upper part had a serious warp at the rear (where the stabilators had been) that I addressed by using a beefy piece of sprue as a shim to spread the sides out, thus providing a flush fit with the lower half. The afterburner shroud was glued on after first adding some reinforcing strips to the inside of the fuselage seams. When the adhesive had dried I filed and sanded the seams smooth. With the fuselage sheet metal done, I rescribed all the surface details, using the F-100—In Detail And Scale three-view drawings to locate a few panels missing from the kit parts.
I fabricated new stabilator mounts by using a piece of 3/32" aluminum tubing for a bearing and 1/16" tubing for the pivot/mount. The larger tubing was installed in the rear fuselage by drilling a hole in each side then inserting it all the way through. CA was used to glue it from the inside, as access was available with the tailpipe assembly removed. When the adhesive had dried, I sanded the ends of the bearing flush. The smaller 1/16" stock was used as a pivot, inserted into the bearing then trimmed so that approximately ten millimeters extended out from each end.
The vertical fin was assembled next, sanded smooth, then rescribed to match the other subassemblies. Many F-100Ds had a scoop at the base of the fin’s leading edge to provide additional cooling capability for avionics equipment installed in the fin fairing. I replicated this detail by notching the fin and installing a hollowed-out piece of a spare A-7 pylon there, then filing and sanding it to shape. The amber and white position lights were added to the rear of the fairing, as was a static discharger and the fuel system purge vent. I sawed off the fin tip and replaced it with a new one constructed of gray plastic with a piece of black styrene laminated to the leading edge. Sanded and polished, this detail would not need to be painted. The base of the fin was hollowed out at the rear where the drag chute is anchored. With the fin complete, I attached it to the airframe with CA then sanded the seams flush.
 The gunsight glass and windcreen were added next, along with a couple of
scratch-built anti-collision beacons, one to the rear of the cockpit and the
other between the hinge arms of the speedbrake. A new pitot tube was fabricated
from K & S 1/16" aluminum tubing and several different sizes of hypo
needles, all sleeved into one another and designed to be removable (to
facilitate ease of handling during the remainder of assembly and painting.
The gunsight glass and windcreen were added next, along with a couple of
scratch-built anti-collision beacons, one to the rear of the cockpit and the
other between the hinge arms of the speedbrake. A new pitot tube was fabricated
from K & S 1/16" aluminum tubing and several different sizes of hypo
needles, all sleeved into one another and designed to be removable (to
facilitate ease of handling during the remainder of assembly and painting.
I drilled a 1/16" hole into each stabilator at the root and test-fitted them to their new mounting pivots. As I suspected, gravity caused them to droop well beyond the normal ‘full-down’ position. I solved the problem by installing a pin forward of the pivot on each stab to fit into a correspondingly drilled hole in the fuselage forward of the bearing.
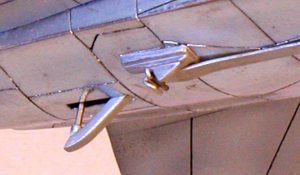
 Aluminum tubing was used to replicate the ‘cranked’ refueling probe. I
used the plastic mount, after first removing the kit probe from it and drilling
a 1/16" hole into the front to accept the new metal replacement. When I was
satisfied with the new probe’s fit, I glued the mount to the underside of the
starboard wing. I used an MV lens to replicate the aerial refueling floodlight
on the right side of the nose, then added lenses underneath the fuselage to
serve as landing/taxi lights.
Aluminum tubing was used to replicate the ‘cranked’ refueling probe. I
used the plastic mount, after first removing the kit probe from it and drilling
a 1/16" hole into the front to accept the new metal replacement. When I was
satisfied with the new probe’s fit, I glued the mount to the underside of the
starboard wing. I used an MV lens to replicate the aerial refueling floodlight
on the right side of the nose, then added lenses underneath the fuselage to
serve as landing/taxi lights.
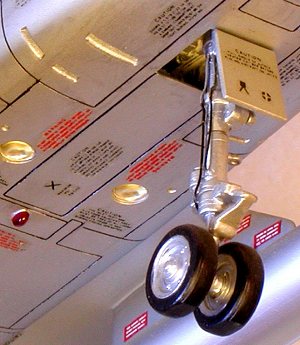
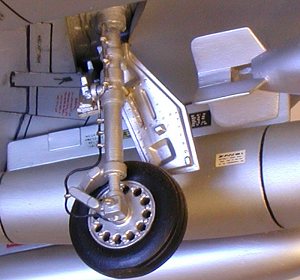 All the landing gear parts, save for the wheels and tires, were replaced with
scratch-built metal items, using a combination of aluminum, brass, and steel
tubing. Small diameter wire, anchored with tiny brass eye-bolts, was used to
replicate the hydraulic lines and brake hoses. The hydraulic reservoirs,
retraction arms, and oleo-scissors assemblies were carefully removed from the
kit parts and re-attached to the new struts with small drops of CA. I flattened
all the tires slightly then press-fit them onto the axles.
All the landing gear parts, save for the wheels and tires, were replaced with
scratch-built metal items, using a combination of aluminum, brass, and steel
tubing. Small diameter wire, anchored with tiny brass eye-bolts, was used to
replicate the hydraulic lines and brake hoses. The hydraulic reservoirs,
retraction arms, and oleo-scissors assemblies were carefully removed from the
kit parts and re-attached to the new struts with small drops of CA. I flattened
all the tires slightly then press-fit them onto the axles.
The canopy mount was vague so I re-engineered the installation with a couple of pieces of brass wire attached to the rear of the framed area then drilled two holes into the rear decking to hold the canopy at the proper angle. The omni-directional antenna lead-in cable was made by heat-stretching a vinyl sprue that had once held a pair of flexible AFV tracks. When I had a suitable length of uniformly thick filament, I coiled it around a straight pin and clamped it tight with a pair of hemostats. Using a pot of boiling water as a heat source, I dunked the pin into it for a few seconds, then immediately immersed it in cold water. After removing the clamp the coiled ‘cable’ slid easily off the pin and was trimmed to length and cemented to the canopy with CA. A photo-etched rearview mirror from Model Technologies completed the assembly.
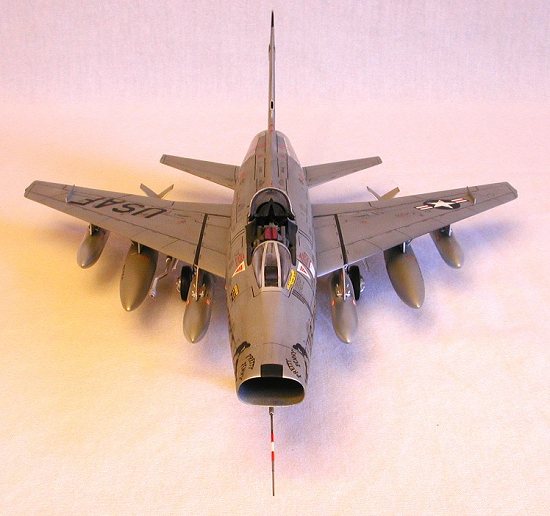
The kit-supplied external stores were pretty sad, fit-wise, so I decided to
replace them with better-molded pieces from the Hasegawa ‘A’ weapons set,
specifically the finned napalm bombs. I rebuilt each pylon’s set of sway
braces using trimmed straight-pins for the casing nuts, then installed the
ordnance using brass wire pins anchored to each pylon. After reading Bert Kinzey’s
kit review comments regarding the Monogram droptanks, I lengthened mine to the
335-gallon configuration by inserting a thirteen-millimeter plug, sectioned from
a second set of tanks, in the
 center and sanded to shape. The tanks were fitted
to the pylons using the brass wire method, while the sway braces were fabricated
from a pair of large-diameter straight-pins.
center and sanded to shape. The tanks were fitted
to the pylons using the brass wire method, while the sway braces were fabricated
from a pair of large-diameter straight-pins.
At the rear, I scratch-built a new tail-skid from K & S 1/16" brass square channel, a straight-pin, and a short length of #20 needle. I rebuilt the arresting hook with a strip of suitably-sized sheet brass, folding one end into a claw shape. The hinge was made by a combination of the kit part and a piece of steel wire, while the up-lock assembly was similarly done, but with a piece of chrome-plated straight-pin. After a final inspection of all seams and an additional light sanding to remove some errant file marks at the wing-roots it was off to the paint shop.
|
PAINT & DECALS |
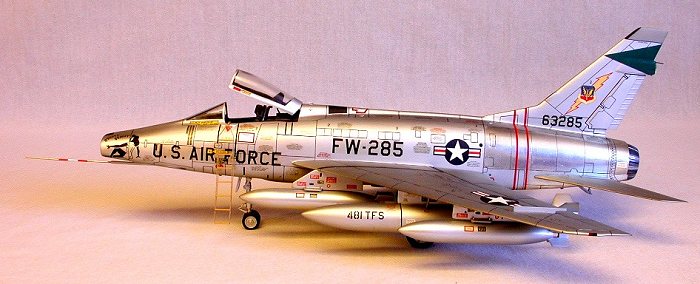
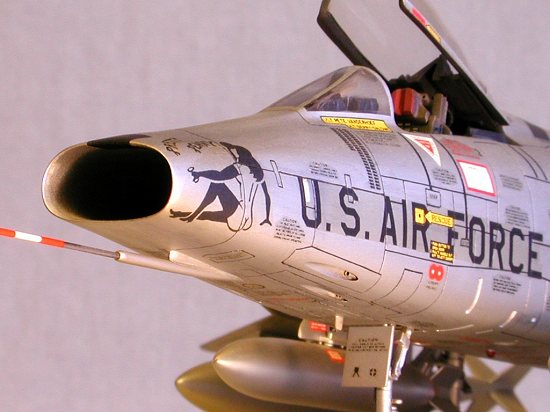
I regard the silver-finished aircraft as much more aesthetically pleasing than their drably-colored camouflaged brethren and I have a ‘thing’ about ‘girlie’ nose art. Therefore, the choice of schemes became no choice at all—I had to do Lt. Sloame’s "Pretty Penny". Microscale offered the scheme in both 1/72nd and 1/48th scale and it became an exercise in finding a shop that had the decal in stock. After a fruitless search extending from Phoenix to El Paso, I ended up ordering it direct from Microscale, requesting both size sheets.
 A word on silver aircraft is in order here. Unpainted aluminum airplanes were
de rigueur until around 1961 when corrosion problems were discovered,
primarily among European-based units. As a preventative measure, all unpainted
aircraft were sprayed with a silver coating consisting of a 16-ounce tube of
powdered-aluminum paste mixed with a gallon of lacquer reducer. This produced a
uniform silver color which oxidized quickly if not waxed and buffed
periodically. This program was known as "Project Look-Alike" and was
applied to all aircraft not already painted with conventionally-colored pigments
(eg: ADC’s fleet of interceptors, ATC T-37s and T-38s, etc. Skyblazer and
Thunderbird aircraft were also exempted). Dielectric panels were to be masked
and selected high-heat areas were left au natural. As this model would
depict a Vietnam-era F-100 in 1965, sans camouflage, a highly-polished
bare-metal finish would be inappropriate.
A word on silver aircraft is in order here. Unpainted aluminum airplanes were
de rigueur until around 1961 when corrosion problems were discovered,
primarily among European-based units. As a preventative measure, all unpainted
aircraft were sprayed with a silver coating consisting of a 16-ounce tube of
powdered-aluminum paste mixed with a gallon of lacquer reducer. This produced a
uniform silver color which oxidized quickly if not waxed and buffed
periodically. This program was known as "Project Look-Alike" and was
applied to all aircraft not already painted with conventionally-colored pigments
(eg: ADC’s fleet of interceptors, ATC T-37s and T-38s, etc. Skyblazer and
Thunderbird aircraft were also exempted). Dielectric panels were to be masked
and selected high-heat areas were left au natural. As this model would
depict a Vietnam-era F-100 in 1965, sans camouflage, a highly-polished
bare-metal finish would be inappropriate.
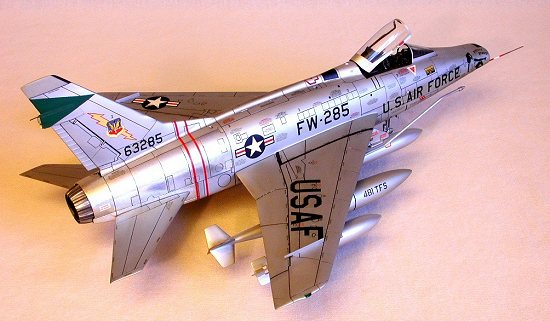
To provide a suitable amount of contrast between the F-100’s unpainted rear fuselage and the rest of the lacquered aluminum airframe, I used Bare Metal foil at the rear and Testor’s silver paint everywhere else. The only other colored areas were the dielectric panels on the nose and spine, and the green delta marking on the fin. For these areas I used Microscale solid decal, pre-cut to the approximate shape. The fin cap, lights, windscreen glass, cockpit, and intake trunk were masked prior to painting.
The 1/48th scale nose art decals looked too big according to my reference photos, so I used the 1/72nd scale images instead. The TAC emblem and two-toned lightning bolt were too small on the 1/48th scale sheet so I cobbled together new ones, using solid red and yellow decal cut with a template, and a larger TAC badge from my spares box, superimposed on the new lightning bolt.
 Minimal stenciling is included with the Microscale sheet so I supplemented
the items with additional decals from several F-4, F-84, F-105, and F-111
sheets. Turbine warning stripes, wing walk demarcations, and boarding ladder
locaters were cut from solid decal material and applied individually to minimize
carrier-film problems. Red and white decal pieces were also use to mark the
pitot tube.
Minimal stenciling is included with the Microscale sheet so I supplemented
the items with additional decals from several F-4, F-84, F-105, and F-111
sheets. Turbine warning stripes, wing walk demarcations, and boarding ladder
locaters were cut from solid decal material and applied individually to minimize
carrier-film problems. Red and white decal pieces were also use to mark the
pitot tube.
When the decals had dried I shot Testor’s Dullcote over the silver-painted areas, producing the slightly oxidized effect I wanted. When the model was dry enough to handle, I used Liquitex dark gray watercolor to highlight the panel lines, vents, and movable control surfaces. A second shot of Dullcote sealed the weathering. After a couple of days I used Testor’s lacquer thinner and a #1 sable-haired brush to remove the overspray from the foiled rear fuselage.
I spun the wheels onto their axles after first painting the tires with Pactra Scale Black and the hubs with Testor’s aluminum. Elmer’s white glue was used to attach the remaining gear doors. I used silver Rub ‘n’ Buff and flat black paint burnished with powdered graphite to finish the tailpipe, with the alternating colors producing the characteristic ‘petal’ effect of the prototype. Inside, I sprayed flat black and dusted with graphite to impart a sooty look. With the afterburner finished, I inserted it into the rear of the fuselage then carefully press-fitted the stabilators onto their new metal mounts.
I sprayed the BLU-27 napalm tanks with Spray ‘n’ Plate aluminum, buffed them lightly, then installed then on the pylons along with the droptanks. After inserting the pitot tube and refueling probe into their respective orifices, I executed a half-roll, installed the canopy, then flew the model to my display case. As an afterthought, a photo-etched Model Technologies boarding ladder was folded into shape, painted yellow, then hung from the port-side canopy rail, replacing the relatively awkward-looking kit-supplied item.
|
CONCLUSIONS |
Monogram’s Super Sabre, while not an exceptionally great kit, is nonetheless a good kit, worthy of any modeler’s attention if their interests run to modern jets. All the nuances of shape and form have been well-depicted and the model scales out well compared to published data and specifications. It is certainly miles ahead of its only competition in this scale, the out-of-production 1/48th ESCI offering, possessing none of the import’s vices (mis-shapened and mis-proportioned overall dimensions, minimal cockpit detailing, lackluster external ordnance, and a rubbery feel to the plastic). The optional features in this kit will allow super-detailers to indulge themselves while the diorama possibilities are literally endless. The F-100 has been prolifically covered by the aftermarket decal manufacturers, ensuring a plethora of available color and markings options.
Perhaps the most substantially negative criticism I can offer is in regard to the integrally-molded stabilators and upper fuselage. This engineering, while speeding and simplifying the kit’s assembly, is bound to produce warping problems if the parts sprues are ejected from the molds while still warm (a near-certainty with mass production kits). The only other nit-pick applies to the fit of the gun bay doors when attaching them in the ‘closed’ position. Of course, the kit-supplied decals are worthless but that’s a ‘given’ with Monogram kits. Someday they may get the message…
This was my first attempt at totally scratch-built landing gear struts and using the Bare Metal foil to accent and contrast a silver-painted finish. I guess I’d do a few things different in retrospect, but overall, I was pretty satisfied with this project. Unless Hasegawa or Tamiya decided to release a Hun, I’d continue to recommend this kit.

|
REFERENCES |
F-100 Super Sabre—In Detail & Scale; Bert Kinzey; Airlife Publishing
Century Series in Color; Lou Drendel; Squadron-Signal Publishing
F-100 Super Sabre In Action; Lou Drendel; Squadron-Signal Publishing
Air War Over Southeast Asia, Vols. 1, 2, & 3; Lou Drendel; Squadron-Signal Publishing
Tactical Air Command—A Pictorial Review; Lou Drendel; Squadron-Signal Publishing
U.S. Fighters Of The Fifties; Nico Sgarlato & Franco Ragni; Squadron-Signal Publishing
USAF Aircraft Of Today; Nico Sgarlato; Squadron-Signal Publishing
Koku-Fan Famous Planes of the World, No.29; Bunrin-Do Publishing
Vietnam: The War In The Air; Rene J. Francillon; Arch Cape Press
Air Force; Martin Caidin; Bramhall House
The History Of The U.S. Air Force; Bill Yenne; Exeter Books
USAF Europe In Color, Vol. 1; Robert Robinson; Squadron-Signal Publishing
If you would like your product reviewed fairly and quickly by a site that has over 1,800 visits a day, please contact me or see other details in the Note to Contributors.