Airfix 1/72 Hawker Hunter FGA.9
|
KIT # |
02073 |
|
PRICE: |
£3.00 |
|
DECALS: |
Two options |
|
REVIEWER: |
Ant Harrington |
|
NOTES: |
|
HISTORY |
The Hawker Hunter is one of the great classic jets not just in terms of its performance and capabilities but also it’s sheer beauty. The aircraft’s Chief Designer Sir Sidney Camm once said that the Hunter was the best looking aircraft he’d ever designed and there are surely few who would disagree.
The full history of the Hunter
is an epic in itself and I would be here all day if I tried to cover the
type’s entire development and service history. Suffice to say that the
Hunter was a huge success with the RAF and numerous other air-arms around
the world, the number of exported and licence-built aircraft running into
the many hundreds. The RAF used Hunters in various roles until 1984, a
full 30 years after entering service and the last major user of the type
was Switzerland, who
 retired their
last examples in 1995. It’s thought that there may still be a handful
with Zimbabwe’s air force, but it’s doubtful whether any of these remain
operational.
retired their
last examples in 1995. It’s thought that there may still be a handful
with Zimbabwe’s air force, but it’s doubtful whether any of these remain
operational.
A much fuller history of the Hunter is given in some of the other reviews on this site, and I can also recommend the Thunder & Lightnings website run by Damien Burke, which has a huge amount of detailed information available on the Hunter and numerous other classic British jets.
|
THE KIT |
The kit comprises 57 moulded plastic parts including a clear one-piece canopy. The kit’s three frames were bagged together within the box, with the canopy loose in amongst them rather than bagged separately but thankfully there seemed to be no harm done. All parts were neatly moulded with little flash. The only slight problems are the canon troughs, which aren’t too well defined and need a bit of work, and the slightly inaccurate nose profile which to my eye is barely noticeable.
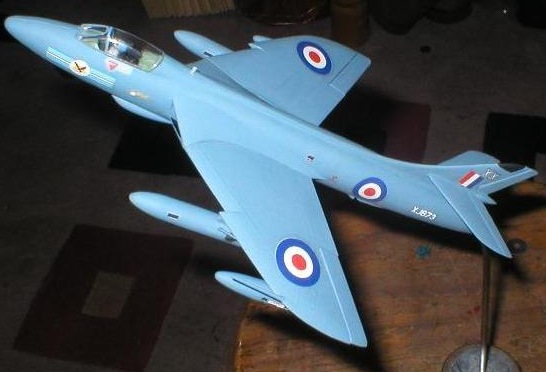
The kit decals give two marking options, one for XE624 of 79 (Shadow) Squadron based at RAF Chevinor in 1972 and the other for XJ673 of 20sqn based at RAF Tengah, Singapore in 1962. Thankfully the decals in this kit were printed to an acceptable standard, which isn’t something you can say about many of Airfix’s decal sheets these days, although they were still a bit on the thick side.
|
CONSTRUCTION |
This is one of those kits that practically builds itself, I assembled all the major parts in the space of an afternoon. Although this kit would build perfectly well with the gear down, I decided from the start to build the model in a flying pose and mount it on a stand to show off the Hunter’s beautiful lines to best effect.
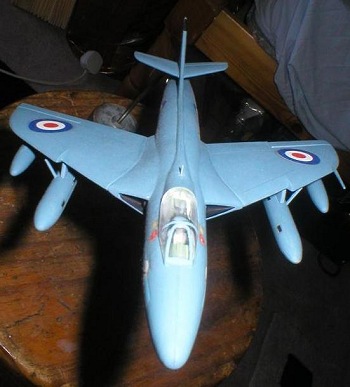
Interior:
The cockpit consists of the floor, seat, pilot figure and control stick. I assembled all these parts and painted them with artists’ acrylics. The inside of the engine intakes and exhaust nozzle were painted Humbrol Matt Black and the cockpit area Interior Green. I then glued the inner face of the engine intakes in place, having painted those Matt Black as well. The cockpit area was then glued in place with the fuselage halves dry-fitted to hold it in position.
Fuselage:
Dry fitting of the fuselage halves showed that they didn’t join too well under the belly, with one half being just proud of the other, but this was remedied easily enough with a bit of sanding once the fuselage halves were assembled. Somewhat oddly, the rudder is moulded separately and this can be glued in place before the halves go together, or inserted afterwards, as I found. The joint is a pin and socket type, so there is no option for a moveable rudder. Quite why they decided to mould it as a separate piece is beyond me, the fin and rudder could just as easily be moulded as one. I also added the small UHF aerial on the fuselage spine just behind the cockpit.
 There is a solid bulkhead
moulded into the rear fuselage about 2cm forward of the engine nozzle to
prevent the fuselage from looking hollow and with the basic fuselage
assembly complete, I drilled a small hole in this bulkhead to make way
for the stand the model was going to be ‘impaled’ on later.
There is a solid bulkhead
moulded into the rear fuselage about 2cm forward of the engine nozzle to
prevent the fuselage from looking hollow and with the basic fuselage
assembly complete, I drilled a small hole in this bulkhead to make way
for the stand the model was going to be ‘impaled’ on later.
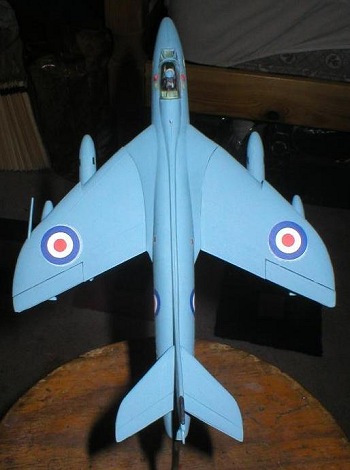
Wings & Tail:
The wings come in the conventional two halves, but like the rudder the ailerons are moulded separately with the same type of pin and socket joint. There was no need to do any detailing or painting in the undercarriage bays as the undercarriage was going to be retracted, so it was simply a matter of slapping all the parts together. You might want to do some detailing of the nose and main landing gear bays if you decide to build the model with the gear down.
The wing joins to the fuselage by the usual flange and socket near the leading edge of the joint, with a pin and socket near the trailing edge for good measure. The fit is good with no need for filler; even the dry fit was neat.
The tailplanes were even simpler and went on without fuss or filler.
Undersides:
Next came the undercarriage doors. If you were to build this kit with the gear down I should think you wouldn’t have any problems, although the main legs did look to be a touch on the flimsy side. The main undercarriage fairings come in two parts and there is also a wheel-well door, which attaches to the fuselage. I glued the wheel well doors in place first and then the upper part of the leg fairings. Once they were dry, it was a case of squeezing the lower leg fairing between them. Not easy, but the result was decent.
The nosewheel doors were trickier and in hindsight it may have been a good idea to glue them in place before the fuselage halves were joined. I almost lost the pieces into the nose bay several times, but eventually I got the doors in position. Then it was onto the airbrake under the tail, which on this kit can only be posed in the closed position.
One of the characteristic features of all but the earliest Hunters were the teardrop ‘Sabrina’ fairings under the nose. On the first Hunters it had been found that whilst spent cartridge cases fell away cleanly the ammo belt links were too light and often clattered along the belly before falling away, causing scratches and dents. More worryingly, it was also possible for some of these links to be sucked up into the engine intakes, causing damage to the engine. The solution were these ‘Sabrina’s, named after a well-endowed starlet of the time, which collected the spent links. It required some care and attention to remove the kit items from the frame as they were joined to it at either end and it was hard to tell where frame ended and Sabrina started. I cut the items out of the frame with plenty of material to spare and after dry fitting the parts I was able to whittle them down to the right size and profile.
Underwing Stores:
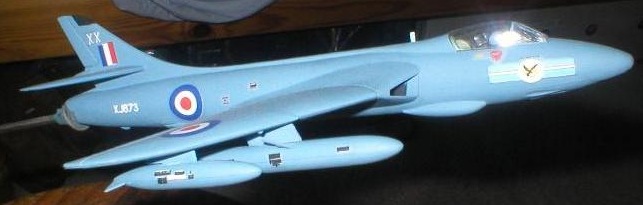 Four external fuel tanks are
included in the kit, a large 230 Gallon tank for each inboard pylon and a
smaller 100 Gallon tank for each outboard one. Alternatively, a SNEB
rocket pod is also provided for the outboard pylons, but I chose to use
all four fuel tanks. These were assembled without difficulty and they
were a snug dry fit, so much so that I decided to leave them on for
painting (they would have to be removed again for decaling, more on that
later.)
Four external fuel tanks are
included in the kit, a large 230 Gallon tank for each inboard pylon and a
smaller 100 Gallon tank for each outboard one. Alternatively, a SNEB
rocket pod is also provided for the outboard pylons, but I chose to use
all four fuel tanks. These were assembled without difficulty and they
were a snug dry fit, so much so that I decided to leave them on for
painting (they would have to be removed again for decaling, more on that
later.)
The Stand:
This consisted of a heavy cylindrical lump of scrap metal with a hole through it, a long piece of heavy gauge wire and a couple of washers, one small and another large but both with a hole the same size as the piece of wire. The large one was fixed to the base with multi-purpose glue and once dry the wire was put in place and bent at a suitable angle. The small washer was then applied to the top end of the wire to prevent it from going too far up inside the fuselage, and I added a rubber band behind the washer to prevent it from sliding down the wire. I ‘impaled’ the model on the stand and it worked perfectly and looked great. I should point out that the model isn’t glued to the stand, so it’s possible to pose it at various angles of bank and the wire is fairly malleable so it’s possibly to alter the angle of pitch as well.
|
COLORS AND MARKINGS |
Having the model mounted on the stand proved to be a positive boon when it came to painting as it allowed me to paint the entire model in one go without having to handle it.
 I’d been admiring the looks of
the model as it came together and by the time I’d reached the painting
stage it seemed a shame to disrupt the Hunter’s lines by applying a
camouflage scheme so I decided to finish the model in one overall colour.
I also wanted to have the model finished in the space of the weekend, so
the overall scheme also had the advantage of being quicker.
I’d been admiring the looks of
the model as it came together and by the time I’d reached the painting
stage it seemed a shame to disrupt the Hunter’s lines by applying a
camouflage scheme so I decided to finish the model in one overall colour.
I also wanted to have the model finished in the space of the weekend, so
the overall scheme also had the advantage of being quicker.
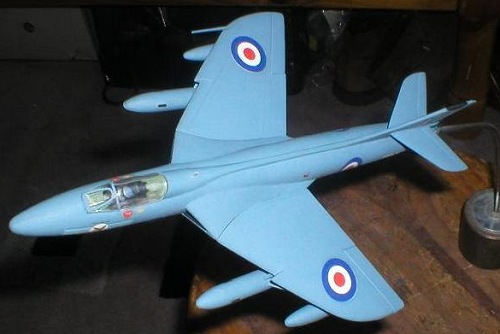
The colour I chose was Gloy’s RAF Light Grey Blue, one of a large number of Gloy enamel paints I picked up in a garage sale about ten years ago (I believe Gloy have been out of business for some years, so sadly I shouldn’t think their products will be readily available now). I should point out that the shade of blue shown in the accompanying pictures looks a little lighter than it is in reality and I think this is down to the bleaching effect of the camera’s flash.
I used the decals for the 20sqn example, as the large three-colour roundels look better than the later red and blue ones on the 79Sqn example. All the decals went on without fuss, although it’s a good tip not to glue the fuel tanks in place so they can be removed when it comes to applying the underwing decals, particularly the large serial numbers.
With the decaling done, the tanks were glued in place along with the canopy and some final paint touch ups were also applied.
|
CONCLUSIONS |
This was really a very pleasant kit to build, it went together with minimum fuss and I’m very pleased with the finished article. There is perhaps a problem regarding the nose profile of this kit, it looks a bit short and stout compared to the real thing, but it’s not too noticeable and it’s really this kit’s only drawback. Overall, I’d recommend this one to just about anybody; it’s good value for money and is probably the most widely available Hunter in 1:72. Come to think of it, I quite fancy building another…
|
REFERENCES |
Airplane magazine, Part 57- Orbis Publishing
www.thunder-and-lightnings.co.uk- Damien Burke’s excellent website
March 2004
If you would like your product reviewed fairly and quickly, please contact me or see other details in the Note to Contributors.