Airfix 1/48 DHC-1 Chipmunk T.10
| KIT #: | A04105 |
| PRICE: | $35.00 |
| DECALS: | Four options |
| REVIEWER: | John Summerford |
| NOTES: |
| HISTORY |
The Chipmunk was the first post-war project designed and manufactured by De Havilland Canada. The first flight was on 22 May 1946 at Downsview, Toronto, Ontario and it entered service with the Royal Canadian Air Force during April, 1948.
 de
Havilland Canada constructed the type at its factory in Downsview where it
produced 217 Chipmunks during the 1940s and 1950s, the las one completed in
1956. Another 1,066 were built by the parent company in the UK, with 735
entering RAF service, replacing the DH Tiger Moth.
de
Havilland Canada constructed the type at its factory in Downsview where it
produced 217 Chipmunks during the 1940s and 1950s, the las one completed in
1956. Another 1,066 were built by the parent company in the UK, with 735
entering RAF service, replacing the DH Tiger Moth.
The all-metal fuselage featured stress-skinned alloy with the forward portions of the wings metal overlay and aft portions fabric. The rudder was fabric covered and the rest of the empennage metal skinned. Other features included hand-operated single-slotted wing flaps, anti-spin strakes, disc brakes on the wheeled undercarriage, a thin propeller composed of a solid lightweight alloy, driven by a Gipsy Major engine, plus the adoption of an engine-driven vacuum pump in place of external venturi tubes to power cockpit instrumentation, Optional features included an electric or Coffman cartridge engine starter, cockpit lighting, onboard radio system, and an external identification light underneath the starboard wing.
On 2 June 2015, retired de Havilland Canada test pilot George Neal set a new world record flying a chipmunk for the oldest active licensed pilot at the age of 96 years 194 days.
| THE KIT |
A single bag holds three light gray sprues and the clear parts are in their own bag within the primary bag. The decals are found in the folds of the instructions.
The parts are well molded with crisp detail, no flash, and seams almost nonexistent. There is just enough texture on the surface to soften the sheen of the plastic. Fabric detail is nicely restrained. The instrument panels have raised details and decals for the dials. 76 parts are on the gray sprues, including two pilot figures and an assembly jig for the canopies. The clear sprue holds eight parts and they have great clarity. Photo-etch harnesses for the seats are not included, so you’re on your own sourcing them if the figures are not installed.
 The
instructions are in a 16-page booklet. The first two pages cover a brief history
in five languages and the usual cautions and symbol explanations. Two airframe
options are available and their differences are subtle. The next 10 pages
illustrate a conventional assembly sequence starting at the cockpit and
continues over 54 steps. Most of the steps show only one or two pieces added.
The
instructions are in a 16-page booklet. The first two pages cover a brief history
in five languages and the usual cautions and symbol explanations. Two airframe
options are available and their differences are subtle. The next 10 pages
illustrate a conventional assembly sequence starting at the cockpit and
continues over 54 steps. Most of the steps show only one or two pieces added.
One can add hinges to display the cowl panels opened plus, there is the choice of landing gear struts compressed if on the ground, or extended if flying. Also of note is that the lower wing piece is offered up first, then the upper pieces.
The only color call-outs are on the final four pages and list the overall schemes of the four decal options. The colors appear to be linked to Humbrol paints, but not specified. A search on the internet revealed the cockpit interior is dark gray. Engine bearers and firewall can be either British interior green or black.
Decal options are: 1) a 2020 restoration of WB585 on view at Audley End Airfield. This paint scheme is white over red fuselage and red forward of light gray horizontal flying surfaces. 2) WB549 as seen in 1949 with overall silver and yellow marking bands. 3) WK608 during the 2009 Roya Navy Historic Flight with gray fuselage and wing with nose, outer wing panels, ant tail red. 4) A dark earth, dark green Army aircraft WP964 circa 1968.
| CONSTRUCTION |
Assembling the cockpit is more about painting than gluing. One possible deviation that might be easier to make is to glue parts B 11 and B 13 (which in real life is a dual lever control system that passes through the side of the front seat) before the seats are installed into the left fuselage half. The instructions call for the parts to be added after installation. Before closing up the fuselage, about a millimeter of material needed to be removed from the rear bulkhead side. That could have been due to a slip-up installing the seats.
 Several
different kit manufacturers have concluded that the best way to deal with models
larger than 72nd scale that have
inverted, air-cooled, inline engines, (in this case, the Gypsy Major) is to
include a complete engine on its mount so that the front of the cowl and the
exhaust pipes can be accurately rendered. My preference is to not bother with an
engine if the cowl is buttoned up, but it’s easier to build it just to get the
exhaust pipes right, so the bare minimum was done in this area. (I believe that
a two-piece engineless cowl with one seam would be easier to deal with.)
Several
different kit manufacturers have concluded that the best way to deal with models
larger than 72nd scale that have
inverted, air-cooled, inline engines, (in this case, the Gypsy Major) is to
include a complete engine on its mount so that the front of the cowl and the
exhaust pipes can be accurately rendered. My preference is to not bother with an
engine if the cowl is buttoned up, but it’s easier to build it just to get the
exhaust pipes right, so the bare minimum was done in this area. (I believe that
a two-piece engineless cowl with one seam would be easier to deal with.)
Anyway, I was unable to build up the fixed cowl pieces so that they would have an even seam around the removable panels. This was the area where I used the most amount of putty. All of that work can be avoided if the panels are displayed open.
With fuselage completed, the wings are mated to it. Here Airfix has done some clever engineering. The one-piece lower wing slots into place first. I had to remove some material at the front to get it to lock in. Attachment of the upper with the right wing was perfect, no filler needed. The left wing, however, didn’t align properly and gap appeared between the fuselage and the wing near the trailing edge. This did take some putty.
Once again, with the stabilizer piece, some material needed to be removed to get it to slot into place. The rest of the tail feathers attach easily. Note that, if the stab chines are added, the instructions indicate that 1mm holes be drilled for their pins in step 8. Those holes are too large and should be about .7mm.
 Saving the
wheels and pitot for later, the struts and flap actuators were added next. The
kit offers a choice between compressed (ground sitting) or extended (in flight)
struts. Next in the directions is the prop and this was also left for later.
Saving the
wheels and pitot for later, the struts and flap actuators were added next. The
kit offers a choice between compressed (ground sitting) or extended (in flight)
struts. Next in the directions is the prop and this was also left for later.
Since the cowl was already buttoned up, the clear parts followed. Here I made my greatest deviation from the instructions. Instead of attaching frame-piece B3 to the windshield, I glued it to the coaming in a proud, nearly vertical, position. While the glue was still curing, the windshield was added to press the piece into its final position. The piece was painted and the windshield attached.
Assembling the canopy was a bit gimmicky. Despite being as cautious as possible, I still managed to glue the rear frame piece (A5) to the jig. I suggest that it be added after the clear pieces are assembled.
I didn’t realize that the canopy can be installed opened or closed. I opted for open. Regardless, it and the cockpit must be masked before painting the model.
| COLORS & MARKINGS |
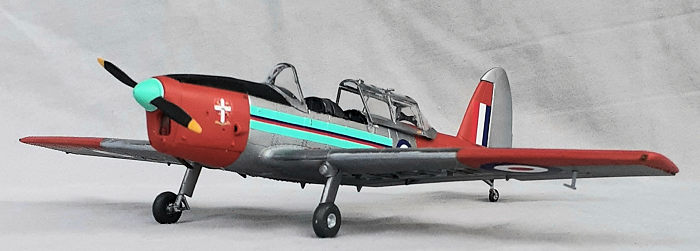
Black paint was sprayed over the masked windshield, then a coat of light gray Alclad II primer was sprayed on the rest of the model, except the clear parts. More work was done on some of the seams and another shot of primer applied to the affected areas. After that set, International Orange was sprayed on the relevant areas. The nosed was masked for the flat black antiglare panel, then that was masked when it was dry. The colored areas were masked and Alclad’s gloss black bass coat applied to everything, including the clear pieces. White Aluminum was used as a stand-in for High-Speed Silver.
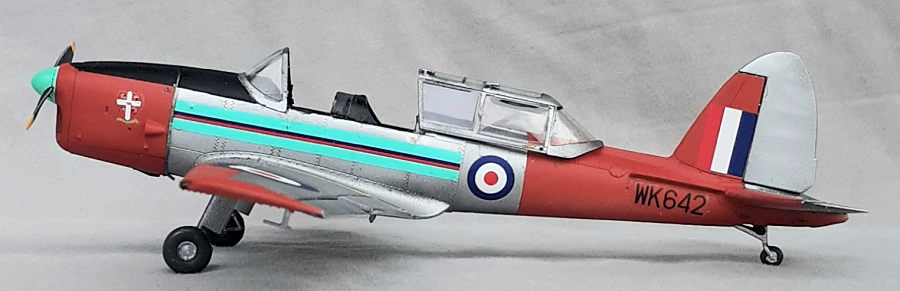
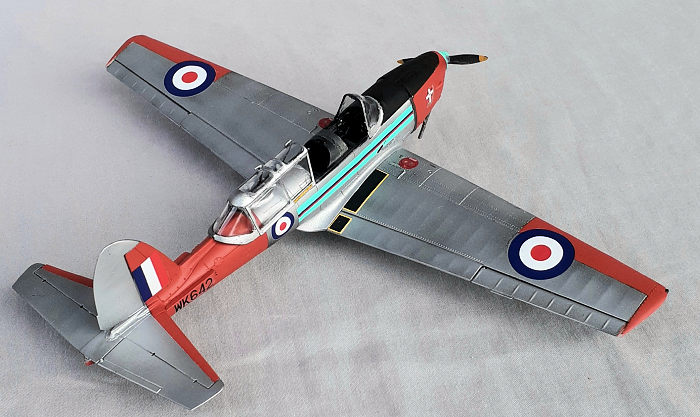 The colored
areas were unmasked for decaling. Markings came from the Xtradecal set X48222
and represent WK642, of Cambridge University Air Squadron, RAF Volunteer Reserve
as seen during the 1960s. There are seven other choices available on the set.
This choice was made mostly for the unusual turquoise prop spinner. One
observation: the blue in the roundels and fin flashes is darker than the kit
decals and appears to be more accurate.
The colored
areas were unmasked for decaling. Markings came from the Xtradecal set X48222
and represent WK642, of Cambridge University Air Squadron, RAF Volunteer Reserve
as seen during the 1960s. There are seven other choices available on the set.
This choice was made mostly for the unusual turquoise prop spinner. One
observation: the blue in the roundels and fin flashes is darker than the kit
decals and appears to be more accurate.
Applying and the decals was easy and a couple of coats of Micro Sol got them to settle down on the raised detail. One decal did peel off during later handling and was re-applied with very thinned white glue. Xtradecal did not supply stencils, so those in the kit were used. This required some guess-work as to which to use. After the decals were dry, a satin clearcoat was sprayed over everything to done tone the gloss a bit.
On the underside, the pitot and wheels were installed. The cockpit was unmasked and some touch-up painting was done. The clear parts were unmasked and the canopy installed. Even in the open position, it did not fit well, being too narrow. I tried Revell’s Contacta Clear and it did the trick. A couple of small daubs of paint for the nav lights went on the wing tips and the prop’s addition completed the model.
| CONCLUSIONS |
This was an enjoyable, nearly shake-and-bake build. More effort went into filing away material than dealing with putty. I’m not, however, sure that building up the canopy versus a single piece is the best way to portray the glazing. Vinyl masks in this instance would be very helpful. It only took a about 18 hours to complete the model.
12 December 2022 Copyright ModelingMadness.com. All rights reserved. No
reproduction in part or in whole without express permission. If you would like your product reviewed fairly and
fairly quickly, please
contact
the editor
or see other details in the
Note to
Contributors.