| KIT: | Revell 1/32 Hunter FGA.9 |
| KIT #: | ? |
| PRICE: | $ |
| DECALS: | See Review |
| REVIEWER: | Frank Spahr |
| NOTES: |
| HISTORY |
I´m sorry this will be a rather brief article as I constructed this model in fits and spurts between other projects and sadly neither took appropriate construction pics nor kept a proper building log. So I have to cobble this review together from my none-too-perfect memory. Yes, I´m properly embarrassed about that. But let´s begin, as the surgeon said to the nurse ...
 Given
the considerable amount of info already available on the type on this site, I´ll
also try to get away without too much history. After all, the Hawker Hunter has
been a very well known and very long serving aircraft with scores of Air Forces,
so I guess it´ll easily enter a top ten list of important jet aircraft. This of
course makes for a vast range of - often colorful - markings options, and so the
Hunter is a good aircraft for those who look upon the kit as the canvas on which
to apply the "art" of markings (paraphrased by one of daboss´ recent reviews).
Given
the considerable amount of info already available on the type on this site, I´ll
also try to get away without too much history. After all, the Hawker Hunter has
been a very well known and very long serving aircraft with scores of Air Forces,
so I guess it´ll easily enter a top ten list of important jet aircraft. This of
course makes for a vast range of - often colorful - markings options, and so the
Hunter is a good aircraft for those who look upon the kit as the canvas on which
to apply the "art" of markings (paraphrased by one of daboss´ recent reviews).
I have always had fond feelings for the Hunter, since my first Airfix kit built when a kid, and when Revell endeavoured to produce a big new kit in 1:32, I soon bought it - and let it rest at that. I also got the Squadron/Signal booklet with all those nice color profiles in the center, and I bought an Eduard PE set. And then introduced it all to my stash. The thought of actually building the kit entered my mind now and then, mostly triggered by poring through the Squadron booklet. And things remained like that for some years.
| THE KIT |
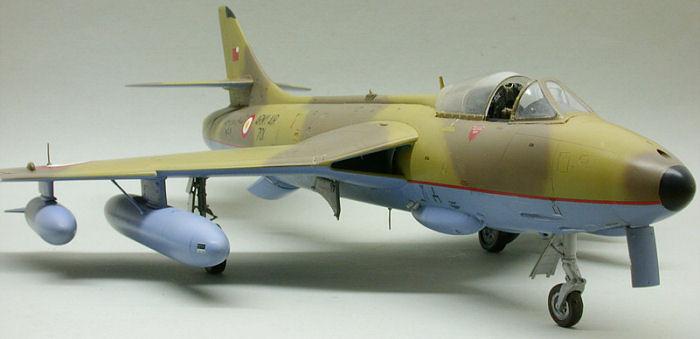
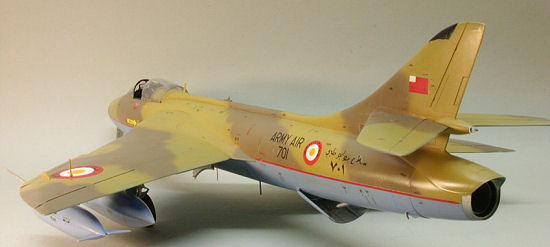
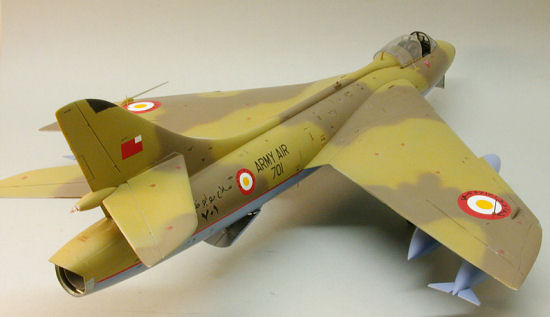
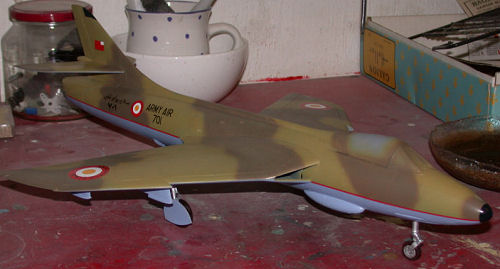
This kit depicts a rather late Hunter, the FGA Mk. 9 (Fighter/Ground Attack) or the F. Mk. 58 (Fighter). Those had an improved engine plus redesigned wings to carry a wider range of weapons and enough fuel. The fuel-thirsty Hunters always lacked range. In the FGA 9 the outer wing had a leading edge extension plus an additional wing pylon, and the flaps had a cutout to enable carrying an extra large auxiliary fuel tank, which was stabilized by a brace.
The two-digit
numerals of the F. Mk. 58 point to an export version (derived from the F.6), and
in this case it´s the famous Swiss Hunters Revell used as
a pattern. Switzerland operated Hunters in the FGA role for a very long time and
incorporated some unique upgrades and modifications to keep the aging airframes
in service. So these Hunters were equipped to launch US missiles as
 Mavericks and Sidewinders,
and of course they had upgraded electronic systems. Hence the Swiss
Hunters bustle with antennae and blisters and pods - and it´s all in the box! At
least in the box we Europeans got to buy from Revell of
Germany ... Kit decals include two British FGA 9, one
from Kuwait in 1961 and the other from Wittering, UK, in 1976. Plus two Swiss
planes from the early 1990´s, soon before their final retirement in 1994. One of
them is a plane of the Patrouille Suisse aerobatic team.
Mavericks and Sidewinders,
and of course they had upgraded electronic systems. Hence the Swiss
Hunters bustle with antennae and blisters and pods - and it´s all in the box! At
least in the box we Europeans got to buy from Revell of
Germany ... Kit decals include two British FGA 9, one
from Kuwait in 1961 and the other from Wittering, UK, in 1976. Plus two Swiss
planes from the early 1990´s, soon before their final retirement in 1994. One of
them is a plane of the Patrouille Suisse aerobatic team.
So I pondered what version to build for a considerable while. Somehow I got hooked on building something exotic, such as the Sultan of Omani Air Force plane shown in the Squadron booklet, painted in a wraparound scheme of two browns and with arabic lettering. I found out that Aeromaster had produced a decal sheet with an Omani bird, only to find out it was OOP. I mentioned that on the forum some day. To the rescue came our intrepid editor Scott, who very helpfully let me have the sheet from his collection. A big thank you for being so generous and kind, Scott!
So I felt additionally motivated to really put glue to styrene after all in order to repay him this favor with a review!
Well, I looked at the decal sheet and decided after all not to build the Omani, but an Abu Dhabi bird. That one had the much brighter and nicer markings, with azure blue undersides demarcated by a fine red cheat line from the uppersides which were painted in a scheme of mid stone and dark earth - all pretty straightforward RAF shades.
| CONSTRUCTION |
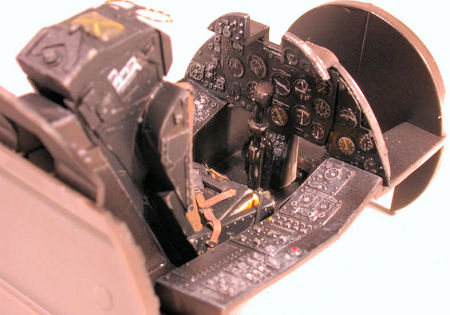 Construction began with
the cockpit (yawn). In this case, I had my hands full what with all the PE
supposed to go there. The cockpit receives the majority of the steel PE parts,
the remainder being used for the flaps, the rocket launchers and some bits and
pieces as grilles and actuators plus some antennae. This PE was prior the
prepainted era, so I had to do some painting of all the seatbelts and instrument
panels. The ejection seat from the kit benefits a lot from the PE, and I was
pretty happy with the results. The instrument panels are reproduced the usual
Eduard method with an acetate sheet and look the part. I added small droplets of
Kristal Kleer over the various instrument dials after the cockpit was really
done and I like the result. The cockpit was painted in a not too dark grey to be
able to discern some of the detailing afterwards.
Construction began with
the cockpit (yawn). In this case, I had my hands full what with all the PE
supposed to go there. The cockpit receives the majority of the steel PE parts,
the remainder being used for the flaps, the rocket launchers and some bits and
pieces as grilles and actuators plus some antennae. This PE was prior the
prepainted era, so I had to do some painting of all the seatbelts and instrument
panels. The ejection seat from the kit benefits a lot from the PE, and I was
pretty happy with the results. The instrument panels are reproduced the usual
Eduard method with an acetate sheet and look the part. I added small droplets of
Kristal Kleer over the various instrument dials after the cockpit was really
done and I like the result. The cockpit was painted in a not too dark grey to be
able to discern some of the detailing afterwards.
While working on the cockpit I realized that one of the fuselage parts was a short shot, lacking a triangular wedge. Getting the replacement from Revell was no problem, but kept up construction. I did some work on the intricate air intake system and the other subassemblies during that time. That air intake took some thinking in assembly but went together well. I identified the underwing stores I meant to use (just fuel tanks) and assembled them. I also pre-assembled the wings and did work on the exhaust. So I was able to build the rear part of the fuselage at that period.
 Construction on the front
part of the fuselage continued after the replacement part arrived; as was to be
anticipated, I managed to misalign the parts so much that some serious work with
filler, sanding and rescribing was necessitated. Folks, I can just humbly state
the fact that there´s seemingly no wunderkit fool-proof enough not to be botched
by me. I´m perfectly sure that most of you will assemble this state-of-the-art
kit very fast and without even a fleeting glance at the putty.
Construction on the front
part of the fuselage continued after the replacement part arrived; as was to be
anticipated, I managed to misalign the parts so much that some serious work with
filler, sanding and rescribing was necessitated. Folks, I can just humbly state
the fact that there´s seemingly no wunderkit fool-proof enough not to be botched
by me. I´m perfectly sure that most of you will assemble this state-of-the-art
kit very fast and without even a fleeting glance at the putty.
Well, there is quite a number of parts to be assembled and joined correctly at this front fuselage subassembly. And you have to insert a serious amount of weight into whereever you can pack it to keep this bird from tail-sitting. Finally I made it and could mate the various parts. I had closed the cockpit before all that puttying and sanding started, masking the transparencies with Parafilm and gluing the sliding cockpit hood with Kristal Kleer, to be able to remove it later. The front part pf the cockpit was glued definitely using liquid glue, filling the seams with Mr Surfacer.
Mating the wings to the fuselage meant just very limited puttying to me. At this point I looked at all the seams and corrected where necessary. The wheel wells were sprayed Revell silver at that time and masked off. Then painting started.
| COLORS & MARKINGS |
I first gave the model a primer coat using Model Master primer. I then checked for flaws and corrected them until I was satisfied and declared the "It won´t get any better, so continue" approval. In my experience, that primer takes a longer time to dry than other MM enamels, BTW. Using the primer was also intended to improve the grip of the main coat of paint, as I started into something new for me.
I had decided to use
Xtracrylix paints for this project, so I got the required shades and loaded my
Harder&Steenbeck Evolution airbrush with them. I had tested them on a Heller
P-38 before and was fairly confident, and broadly speaking, all went well. I
began with the underside and painted that azure blue. I did neither pre- nor
postshading on this project. I feel that the look is OK "as is" in such a large
model. I attribute it to my lack of experience with acrylics that the paint
dried out flat at first, as I had expected the
 Xtracrylix to be satin, but
didn´t mind that much. At least they dried pretty fast. I did some experimenting
with the air pressure and found a higher pressure to work better with me,
otherwise I had paint buildup in the nozzle and some very nasty spewing and
splotching. With some pracatice, I could spray fine enough to feel confident
about the camo scheme.
Xtracrylix to be satin, but
didn´t mind that much. At least they dried pretty fast. I did some experimenting
with the air pressure and found a higher pressure to work better with me,
otherwise I had paint buildup in the nozzle and some very nasty spewing and
splotching. With some pracatice, I could spray fine enough to feel confident
about the camo scheme.
Then came the task of masking the demarcation between undersides and uppersides. I used Tamiya tape plus Parafilm. After that, I shot the lighter shade of the camo. I didn´t use masks for the camo scheme in this scale, but instead worked carefully with the airbrush, including some (with me) inevitable back-and-forthing until satisfied. With me, the method of priming with enamels and then using acrylics worked fine, and I had no trouble with masks and paint liftoff. At this point, the landing gear was applied. It was painted Revell silver, too, the tyres received my usual MM rubber.
My next concern was the cheat line. It was supplied as decals with the Aeromaster sheet, but ... well, I didn´t quite trust the material (and myself). But before trying to mask and paint that nasty bugger, I decided to give it a try and applied the decals. It all went well and I needed only very minor touchups with paint. So I could proceed with decalling, starting with the ones from the Aeromaster sheet. Meanwhile, the paintjob had a nice satin sheen and I was pretty confident about it, but after applying the first decals to the underside I realized I had to future the model, as they silvered.
Which I did and
which I somehow botched. I had all the Future problems I thought I had left
behind, but in the end I persevered and felt ready for the decals. As the
material wouldn´t form a uniform glossy surface, but in spite of multiple
applications still 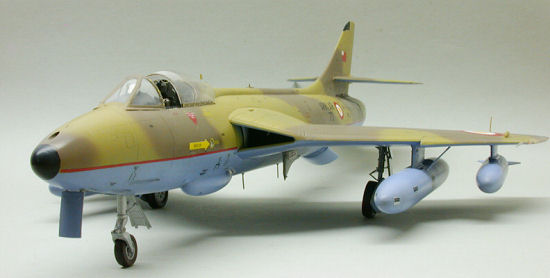 orange-peeled,
I used Micromesh polishing cloths on the surfaces to achieve a nice finish.
Applying the Aeromaster decals was a breeze (after waiting long enough for the
Future to cure before attacking it with Microsol!), and then the model sat for a
while until I started with the brazillion of stencils. That took some effort and
lots of patience, but of course helped the model´s looks up. The decal sheet is
BIG and contains all the stencils you could wish for, both for the swiss and the
british versions. I assumed that the Abu Dhabis used the british stencils, BTW.
orange-peeled,
I used Micromesh polishing cloths on the surfaces to achieve a nice finish.
Applying the Aeromaster decals was a breeze (after waiting long enough for the
Future to cure before attacking it with Microsol!), and then the model sat for a
while until I started with the brazillion of stencils. That took some effort and
lots of patience, but of course helped the model´s looks up. The decal sheet is
BIG and contains all the stencils you could wish for, both for the swiss and the
british versions. I assumed that the Abu Dhabis used the british stencils, BTW.
When all that was done, the model was futured again to blend the decals in yet more, and then the final bits and pieces were applied. This bird took less of them than the swiss version, but there were some of them still. I got to admit that I skipped converting the flaps with the PE parts, and neither did I use the various other external PE parts - and I don´t miss them. At this point, the underwing stores were added, too.
Finally, the model received a coat of Xtracrylix clear satin and the cockpit was opened. The pictures were taken in my newly lit basement. I recently bought new neon lighting for both the room I build my models in and the one I take my pics. Those have twin 58 watt neon lights in them and improved the lighting situation vastly. I used that occasion for cleaning the modeling den up a bit and for rearranging things. Plus for taking pics of a desk that for a brief time wasn´t messy and cluttered (as it should be;-)
| CONCLUSIONS |
I´d like to conclude that this big Revell kit offers lots of modeling fun and - display space provided - is a great and rewarding build.
February 2006
If you would like your product reviewed fairly and quickly by a site that has over 300,000 visitors a month, please contact me or see other details in the Note to Contributors.