Frog 1/72 Meteor F.IV
| KIT #: | F-200 (1970 issue) |
| PRICE: | Out of production |
| DECALS: | Two options |
| REVIEWER: | Victor Scheuerman |
| NOTES: | Still looks OK |
| HISTORY |
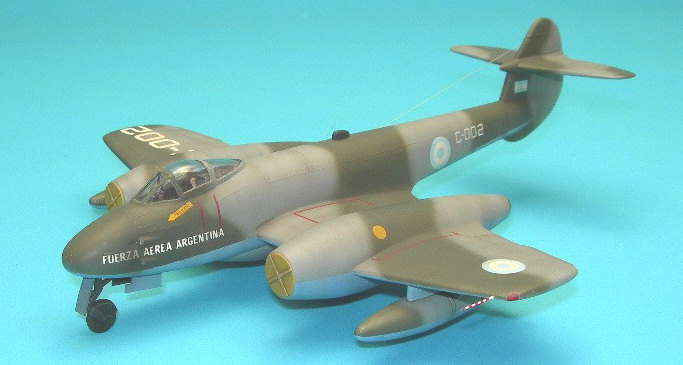
Argentina’s adoption of the Meteor came about my chance. After World War II, Great Britain had a debt to pay for all the food and raw material that she had received from this South American country during the war. In lieu of currency, Argentina was offered and accepted military equipment as payment. In addition to the 100 Gloster Meteor Mk IVs, Argentina became the continents most formidable air arm when 15 Lancaster and 30 Lincolns were also added.
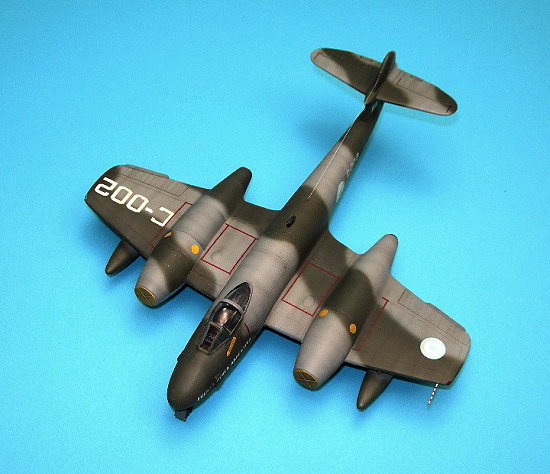
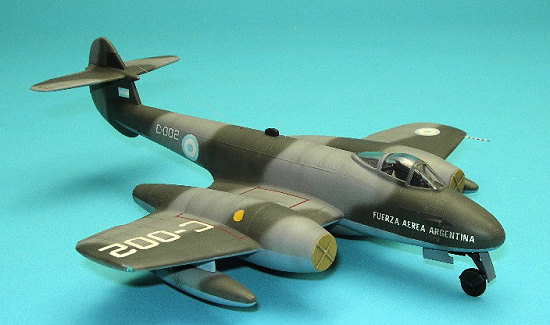
The first 50 had been built for the RAF, but the second batch of 50 was Argentine from the start; indeed, these were the first exports of the Meteor. In Argentine service they were originally used as that nation’s interceptor and were coded I-001 and up and were painted high speed silver overall. Later in their career when they were assigned as ground attack aircraft they were coded C-001 and up and adopted a tactical camouflage.
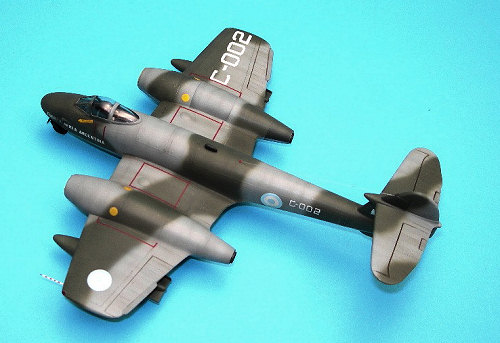
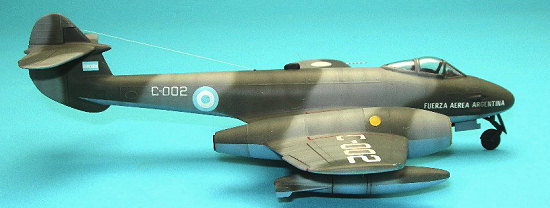 This scheme, that appears to be
based on the RAF pattern, consists of a mid-grey and dark green upper disruptive
pattern over a mid-blue bottoms. The contrast between the two upper colours is
pronounced while the lower blue is a little darker them the powder blue used on
the national insignia. One odd thing about this scheme is that the landing gear
members and the inner surface of the doors appear to be painted black.
This scheme, that appears to be
based on the RAF pattern, consists of a mid-grey and dark green upper disruptive
pattern over a mid-blue bottoms. The contrast between the two upper colours is
pronounced while the lower blue is a little darker them the powder blue used on
the national insignia. One odd thing about this scheme is that the landing gear
members and the inner surface of the doors appear to be painted black.
During the life time of this pattern, there were also two variations on the titling on the forward fuselage. I believe the original was FUERZA AREA with ARGENTINA added later. This was done in white as was the fuselage and upper wing coding, with black coding on the lower surface.
In addition to the scheme changes, the original antenna post on the fuselage was first replace with a whip aerial, and this was supplemented with a small radome and an antenna wire to the fin. One other note that is unique to these Latin Meteors was that some were modified to carry the 120 gallon tanks from the Sabre when the latter replaced the Meteor as the nation’s interceptor.
Having an inclination towards subject or finishes off the beaten track, this Latin certainly fitted the bill. While looking at the photographs in the noted reference, both port and starboard view of C-005 are shown in colour. If that wasn’t good enough, C-005 has a slightly different pattern on the port nacelle; subject chosen.
| THE KIT |
Frog's kit of the Meteor F.4 has been a favorite of fans for many years, even past the demise of Frog in 1976. Fortunately for us all, Novo of the then Soviet Union bought all the non-German aircraft molds and so the kit was still regularly available for those who had to have it. The decals in those Novo kits were either quite poor or non-existent, but the aftermarket decal crowd was able to provide a number of options to keep us happy.
 The kit itself is quite basic, but also quite nicely
molded with raised detailing. Mine is molded in a very dark blue plastic and the
previous owner had already pared away a number of parts from the sprues, but the
kit is complete (aside from the stand which, when this was boxed, was available
separately).
The kit itself is quite basic, but also quite nicely
molded with raised detailing. Mine is molded in a very dark blue plastic and the
previous owner had already pared away a number of parts from the sprues, but the
kit is complete (aside from the stand which, when this was boxed, was available
separately).
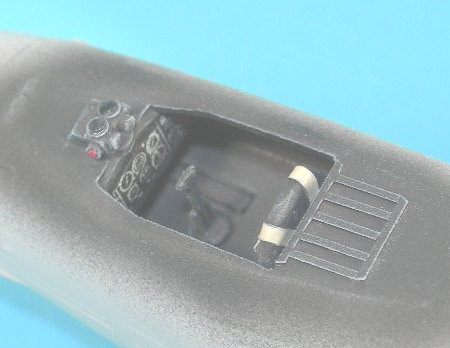
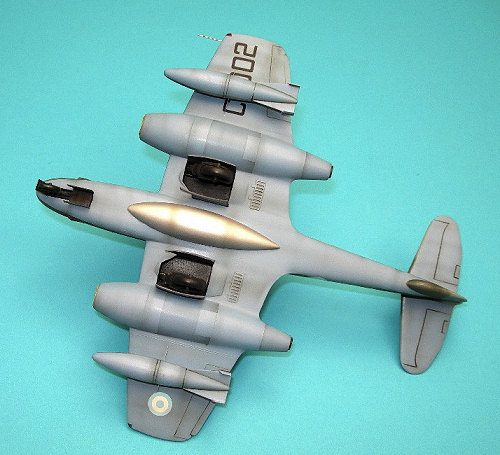
The cockpit consists of a floor, seat, stick and pilot. At the time, the detail level of the pilot's office was not considered a priority so most kits had quite Spartan interiors. Wheel wells are not boxed in for the main gear and quite shallow for the nose gear. No indication of weight is given but you will need to pack in a considerable amount to keep it on its nose. A blanking plate is provided for the engine fronts with the exhaust remaining open. The only real options are fuel tanks. One for the lower fuselage and a pair for beneath the wings. Holes for the latter are already drilled out on the lower wings. A once piece canopy that is rather thick is provided.
Despite the age of the kit, mine is in very good condition. I did find sink areas on the wheels and opposite alignment pins on the lower wings. The latter will be easy to fix, but not so the ones on the wheels. I'd recommend some Aeroclub replacement gear to take care of the latter situation.
Instructions are typical Frog in that they are well done and provide no interior or well color information. In fact, no color information is given at all aside from the overall aluminum recommendation of the decal placement guide on the bottom of the box. Markings are given for two aircraft. One is a Dutch aircraft from 323 squadron as shown on the box art. The other is from 263 squadron, RAF, both in overall aluminum. I do believe that this color was lacquer paint and not unpainted metal. (Kit description courtesy your editor)
| CONSTRUCTION |
One of the best things about building these old kits is the modest number of parts. This works great here. All I wanted from this project was to build what was offered with a slightly improved cockpit and thinning or replacing the gear doors.
 Before construction could begin, the
sink holes in the main tires and landing gear legs were filled with Milliput
Super Fine (white) two-part epoxy. This was applied and then wiped smooth with a
dampened Q-tip and took only a couple of minutes. All the remaining parts were
cut from the sprue and any mold seams or ejector pin towers were removed by side
scraping with a No 11 blade.
Before construction could begin, the
sink holes in the main tires and landing gear legs were filled with Milliput
Super Fine (white) two-part epoxy. This was applied and then wiped smooth with a
dampened Q-tip and took only a couple of minutes. All the remaining parts were
cut from the sprue and any mold seams or ejector pin towers were removed by side
scraping with a No 11 blade.
Thankfully, the British were painting their cockpits black when this aircraft was in service and with the canopy molded close and the cockpit opening being quite small; cockpit upgrading was kept to a minimum. Improvements were limited to; an aft bulkhead made from card, card detail added to the gun sight molded to the fuselage, some strips added to the aft decking, both the instrument panel and seat were borrowed from the Airfix Meteor kit with the seat receiving a lead foil harness. Since FROG supplied a decent control arm it was straight to the paint shop and a coat of black. This was dry brushed with grey to supply some contrast and the harness was painted a buff colour. Airfix supplies an instrument panel decal (with their current boxing) and this was used. To improve the appearance of this decal, a drop of Future was added on each instrument face to replicate the glass. Some lead weights were added to the nose and the cannon ports were drilled out, and then the fuselage was glued together, clamped, and left to cure.
Some work had been done on the wings as I had originally plan to give this a good upgrade until MPM announced their Meteor F Mk VIII, which probably means they will produce the Mk IV. Work had included the main gear wells getting card framing on two sides and the wing tip lights being replicated with appropriate colour plastic from old tooth brushes. While gluing the pieces of colour plastic in place, the large seams and hinge line on the outer lower wing panel were flooded with super glue as was the mold sink in the upper ailerons. These areas were sanded smooth.
 The join along the nacelles was not
great but careful sanding with the excellent Squadron Sanding sticks cured this
in short order. One of the things that simple does not look correct is the
forward engine nacelles. These were sanded back until they looked a little
better and then the main wings were glued to the fuselage. The join along the
upper surface though not bad, did require a small amount of Squadron filler.
However, the lower join required super glue to fill the seam. This did remove
the petit raised panel lines in the area.
The join along the nacelles was not
great but careful sanding with the excellent Squadron Sanding sticks cured this
in short order. One of the things that simple does not look correct is the
forward engine nacelles. These were sanded back until they looked a little
better and then the main wings were glued to the fuselage. The join along the
upper surface though not bad, did require a small amount of Squadron filler.
However, the lower join required super glue to fill the seam. This did remove
the petit raised panel lines in the area.
Like wise, the tail’s horizontal control surfaces were sanded to get a tight fit, but a bead of superglue was applied to hide the seam and these were sanded slightly thinner and looked better. With all the joins filled and sanded, the frame was given a coat of primer using Tamiya’s excellent rattle can primer (Fine). The removed panel lines on the upper surface and all the aileron control hinge lines were engraved with either an OLPHA P-Cutter blade or a sewing needle in a pin vise. Testors tape was used as an edge guide. Another addition to the upper control surface only, was simulating the rivets heads on these using a pounce wheel. Improvements to the lower surface was limited to sanding the speed brakes from the Airfix kit paper thin and gluing them in location.
FROG includes both the large belly and under wing fuel tanks and the latter’s pylons were cut off and sanded thinner and then used to mount the modified Hobby Craft F-86 tanks. FROG supplied nice shaped main gear doors and these were made thinner by first side-scraping the interior walls with a No 10 blade followed by sanding. The thick gear doors for the nose gear were simply replaced with new ones made from card.
| COLORS & MARKINGS |
With the model primed and ready for paint, the lower surface panel lines, wheel wells, landing gear and inner doors were sprayed black. For the blue on the lower surfaces; Model Master RAF Azure Blue was close enough so it was applied. To break up the lower surfaces a little, some panels on the engine nacelles were masked and sprayed a darkened mix of this blue. When the enamel paint had cured, the lower surfaces were masked to copy the sharp division line that was on the full sized aircraft.
 Upper surfaces were preshaded and
then Testors Model Master RAF Medium Sea Grey was applied, followed by Humbrol
116 Dark Green free hand. Random panels were masked and sprayed a little darker
as had been done with the lower blue and after the gear was glued into location,
a gloss coat was applied.
Upper surfaces were preshaded and
then Testors Model Master RAF Medium Sea Grey was applied, followed by Humbrol
116 Dark Green free hand. Random panels were masked and sprayed a little darker
as had been done with the lower blue and after the gear was glued into location,
a gloss coat was applied.
Fortunately, I had Super Scale sheet 72-352 which covers various Argentine jets in 1/72 scale so the national insignia, rescue arrow and FUERZA AEREA ARGENTINA logo were used from this. Both the black (Ventura Decals), white (Super Scale) codes and yellow discs came from the spares bin and the white decals required a coat of Microscale Liquid Decal Film to be barely useable. A really old sheet from Scale Master provided the red walkway guide lines. All the decals were applied using Micro Set and Sol and all went on fine except where noted.
The model was given a matt finish using Polly scale flat. To add some wear and tears; paint chipping was simulated with a PRISMA silver pencil, random streaks of black were sprayed on cord-wise on the wings surfaces and vertical on the rest, steaks were added aft of wheel wells and the cannon ports were also darkened. When completed, the masking was removed from the canopy and the wing-tip lights and the former was then polished. Next, the Sabre tanks attached to the modified kit pylons were glued into location followed by adding the side bracing made from painted brass wire. Final steps were adding the whip aerial and antenna wire made from stretched sprue while the Pitot tube was painted brass wire.
| CONCLUSIONS |
 This maybe over 30 years old; but
with some minor improvements, a combination of unique camouflage and external
fuel tanks, it still looks OK.
This maybe over 30 years old; but
with some minor improvements, a combination of unique camouflage and external
fuel tanks, it still looks OK.
| REFERENCES |
Scale Models Jan. 1983, FROG Kit List, DCT Teague
International Air Power Review Volume 7, Argentina’s Meteors, Juan Carlos Cicalesi and Santiago Rivas
December 2007
Copyright ModelingMadness.com. All rights reserved. No reproduction in part or in whole without express permission from the editor.
If you would like your product reviewed fairly and fairly quickly, please contact the editor or see other details in the Note to Contributors.