Airfix 1/48 Sea Fury FB.11
| KIT #: | A06105 |
| PRICE: | 45 Euros |
| DECALS: | Two options |
| REVIEWER: | Frank Spahr |
| NOTES: |
Eduard BigE p.e. set |
| HISTORY |
 In 1943, a
lighter replacement for the big Hawker Tempest fighter was sought by the RAF.
The RN was also interested in a new shipboard fighter aircraft, so development
took place of a type that could fulfill both services´ requirements. With the
end of the war approaching, the RAF lost interest in the project, and it was
continued for the RN only, as their shipboard fighters were inferior to what the
RAF had. The first flight of a protoype was on 21 February, 1945. A number of
design changes and further development followed, until the Sea Fury was cleared
for operational use on 31 July, 1947. The definitive version was the Sea Fury
Mk.11, also known as FB.11, as the aircraft was now a fighter bomber.
In 1943, a
lighter replacement for the big Hawker Tempest fighter was sought by the RAF.
The RN was also interested in a new shipboard fighter aircraft, so development
took place of a type that could fulfill both services´ requirements. With the
end of the war approaching, the RAF lost interest in the project, and it was
continued for the RN only, as their shipboard fighters were inferior to what the
RAF had. The first flight of a protoype was on 21 February, 1945. A number of
design changes and further development followed, until the Sea Fury was cleared
for operational use on 31 July, 1947. The definitive version was the Sea Fury
Mk.11, also known as FB.11, as the aircraft was now a fighter bomber.
The Sea Fury only served with the FAA for a short period until 1953, and was the last propellor-driven fighter in its service. Yet it held its own even during the Korean war, with one Sea Fury even shooting down a MiG-15 jet fighter. The type was also a success in exports, and on the whole, around 860 aircraft were built, amongst them a good number of two-seated trainers. Sea Furys were used as target tugs and racers due to their high speed, and even today quite some of them are in airworthy condition.
| THE KIT |
This kit has been previewed on this site already. From what I read and what I saw, it´s a very neat kit, in line with many of Airfix´ later offerings. My example did not suffer from the short shot area earlier issues had, and the plastic looked very convincing.
On getting the kit, I had also bought Eduard´s BigEd. It is of Eduard´s usual quality and design, and instructions. It comprises steel seatbelts, an interior and an exterior set, a separate set of landing flaps and paint masks. More to that very, very soon.
| CONSTRUCTION |
 Frequent
contributor to this site and online friend Spiros Pendedekas told me that his
approach to writing a review is to do it parallel to the build, in small
portions as you proceed. I had been amazed at how fast he submitted his reviews
after completing the kit. That was the answer, and looked very commendable.
Especially compared with procrastinating me, who regularly needs some time to
gather the dedication to perform some actual writing, and at that point has
already forgotten more than a few salient points.
Frequent
contributor to this site and online friend Spiros Pendedekas told me that his
approach to writing a review is to do it parallel to the build, in small
portions as you proceed. I had been amazed at how fast he submitted his reviews
after completing the kit. That was the answer, and looked very commendable.
Especially compared with procrastinating me, who regularly needs some time to
gather the dedication to perform some actual writing, and at that point has
already forgotten more than a few salient points.
So I decided to give his approach a go with this kit, and see how it goes.
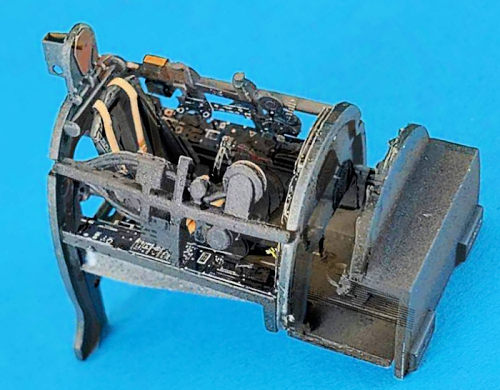
I did begin this build not with the cockpit, but with opening the first PE set, the landing flaps. My rationale was to see if and how well I would get it done, and then decide whether to include it in the build. Well, the set is ambitious, the instructions not always 100% crystal clear, and the thin CA glue by Zap-a-Gap would not stick as well as I needed it to. It was a slog. And at some point I realized that on no image of a Sea Fury did I see its flaps extended whilst parked on the ground, which was how I wanted to display mine. Well, after two days of trying to complete that set I effectively binned it and decided I could well live without it.
The next set was the one
devoted to the exterior. I started instinctively on the largest and most
intimidating subassembly, the main wheel wells. The experience continued. Glue
adherence hadn´t improved in the last 24 hours, these instructions also had some
gray aeras, and moreover I found out that some parts would not fit as they were
supposed to. I tend to search for the fault with clumsy me first and foremost.
But – I have some nagging doubts whether the ribbing I needed to trim really
would have fit had I folded / assembled the main part any differently. If
possible. Mind you, I had not sanded, cut or removed any plastic so far, and
still was able to do without these PE parts, too. I decided to assemble them all
to the best of my abilities, then prime and revisit them, and only then do
anything to the kit parts I might regret otherwise.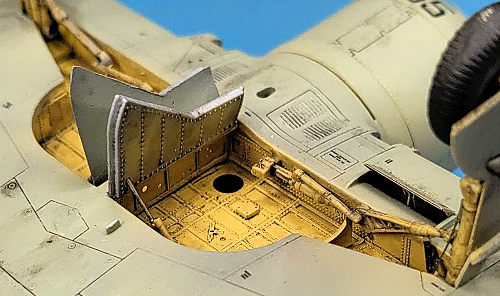
I used mustard yellow primer by Stynylrez, lacking chromate yellow, but I wanted the stuff to stick to the brass and cover well. Anyway, after priming the PE assembly looked way better than I had feared, due to the multiple attempts at gluing and the trimming and re-fitting I had had to do.
The effort continued. To integrate the PE assembly needed quite some trimming of the plastic upper wing roots, until they were quite thin, always hoping not to overdo it. Quite scary at times. And in some areas, it didn´t fit the cutout on the lower wing as I would have wanted it. I needed to add some styrene stock to definitely locate the wheel well, and some thin sheet to cover the remaining gaps. Replacing the solid molded-on gun barrels with brass tubing paled against all the effort connected with those wheel wells.
 Having
finally prepared the wing root parts to fit over the PE, I added the PE to the
tail wheel well and then set aside this part of the build to adress the cockpit.
Having
finally prepared the wing root parts to fit over the PE, I added the PE to the
tail wheel well and then set aside this part of the build to adress the cockpit.
But before that, I attended a model show and talked to a friend who showed me how he had riveted one of his models. From, there it was but a few steps to a vendor of tools where I bought a.7 mm riveting wheel.
Back home I developed a major cold, and was sick for almost two weeks. But when I felt well enough again, I tried the riveting tool, having beforehand downloaded line drawings of the Sea Fury showing the rivet positions. The tool worked really nicely, and even though some of my lines are a tad on the wonky side, I was quite happy with the result. It looked nicely restrained and my hope was that it would add some structure to the surface without looking unduly pronounced. I then turned my attention to the cockpit.
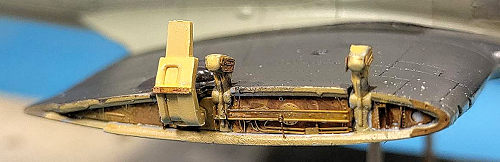
Building the cockpit went well, despite the amount of PE and needed modifications. The Eduard printed PE eases things and makes an improvement. Yet I did not use all of it, there were parts so utterly flimsy I knew instinctively I would not be able to work with them.
 Having
completed the cockpit and taken some photos of it, I installed it into the left
fuselage half. Following that I glued the stabilizing wing spar and assembled
the various parts for the front fuselage, including the engine face and the
exhausts. I painted the insides where possible, using Stynylrez´ mustard yellow
primer as a substitute for Hawker Yellow. Zinc Chromate Yellow looked too crass
for me, and the instructions called out for „Linen“ as the paint shade. That
done, I glued the fuselage halves, which fit quite nicely, and let that cure.
Having
completed the cockpit and taken some photos of it, I installed it into the left
fuselage half. Following that I glued the stabilizing wing spar and assembled
the various parts for the front fuselage, including the engine face and the
exhausts. I painted the insides where possible, using Stynylrez´ mustard yellow
primer as a substitute for Hawker Yellow. Zinc Chromate Yellow looked too crass
for me, and the instructions called out for „Linen“ as the paint shade. That
done, I glued the fuselage halves, which fit quite nicely, and let that cure.
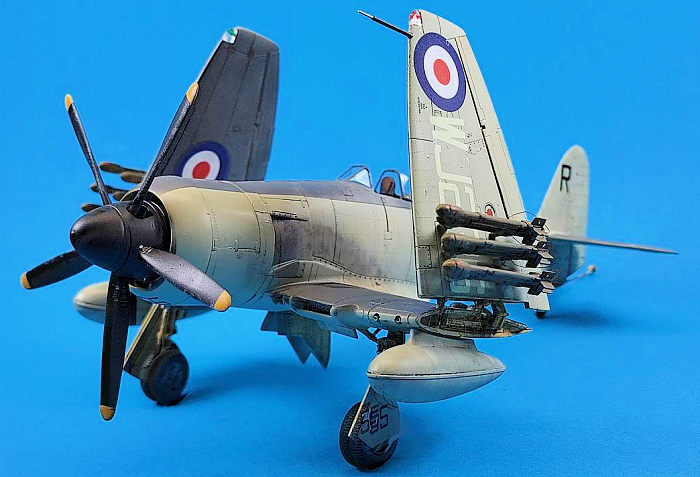
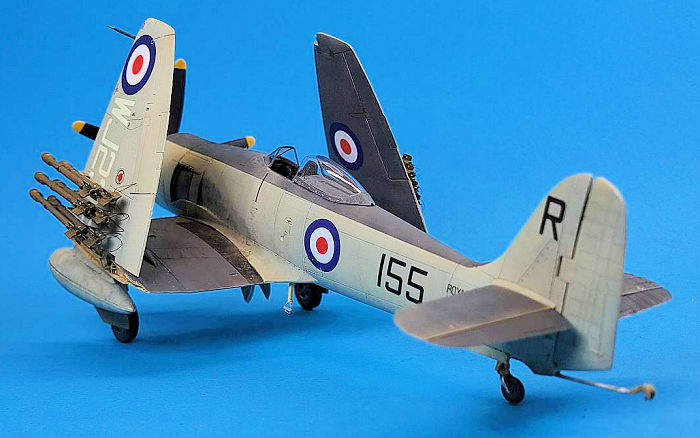
After which I ran into problems. I now had to decide whether to build the wings folded or deployed. For the latter, a reinforcement part had to be glued inside the wing. And this part would not fit. I realized I had glued the wing spar too far forward, and now it interfered with the reinforcement. My best guess is that the reason was the PE wheel bay which has a different shape from the kit part. So I tried to make things fit, but at some point got frustrated and decided to build the wings folded, which is space-saving into the bargain.
So I now re-checked the fit of the upper halves of the inner wing, and they wouldn´t fit now, either. Despite my having checked this before. Some more tweaking and cutting and sanding and trimming and checking followed, until I got one side to fit at least. Whilst that dried, I tried to balance the benefits of the (admittedly very nice and crisp) PE wheel wells with the hassle they had caused. In building them, and now in getting them to peacefully live together with the rest of the model. My result was that they weren´t worth the bother at the end of the day. Of course, as always, you are entirely entitled and justified to see things differently from me. I worked on some subassemblies next, namely the outer wings , the control surfaces and the wheels. All that went well.
Next came cleaning up the seams of my subassemblies, and then priming them. That done, I preshaded the aircraft and then started painting in Sky Type S. After appropriate masking, the horizontal surfaces were (intentionally a bit unevenly) sprayed in Extra Dark Sea Grey. The bare metal areas behind the exhausts were masked and sprayed a fitting metal shade. I then added the control surfaces. That done, the model received a glosscoat prior to decaling.
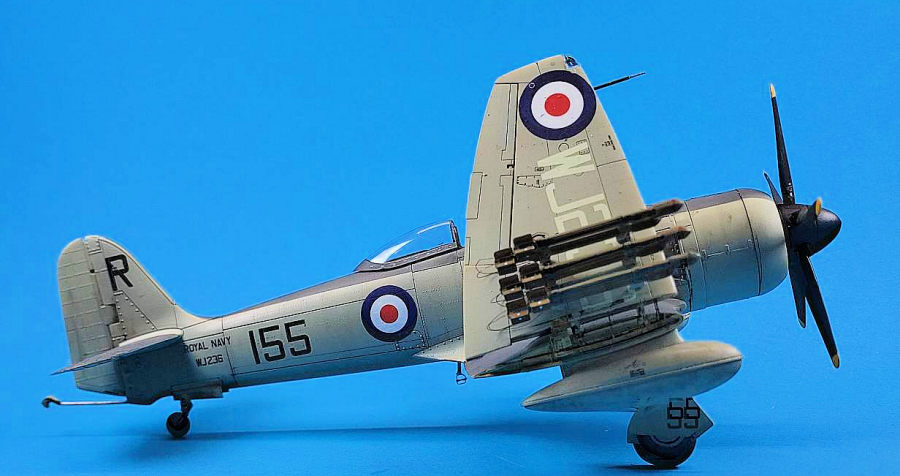
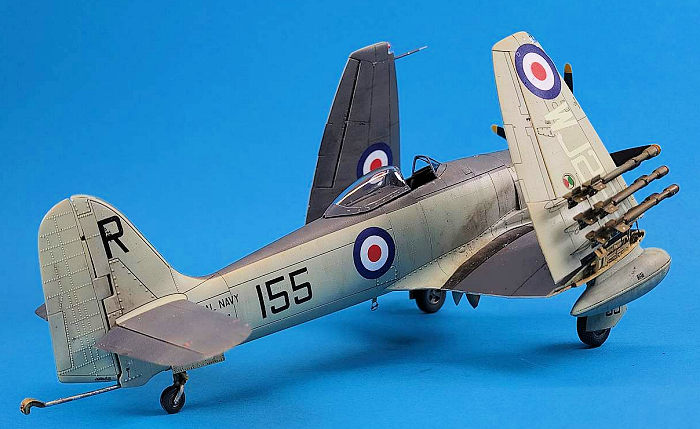
I then tackled some of the bits and bobs, as in wheels, landing gear and external stores. Apart from two drop tanks, I opted for the 3-inch RP missiles, even though they need a sizable amount of cleanup. But I was too mean to buy 3D printed replacements.
| COLORS & MARKINGS |
At that time I started on the decals, and was surprised. I´ve never had decals that needed such a long time after soaking until they were ready to be transferred to the model. And even after ten minutes, they needed some firmness in handling to get moving. A firmness I very reluctantly used, as I always feared tearing the decals. But then again, most of them turned out to be quite sturdy, and moved freely on the plastic. That was a relief, just as how they reacted to MicroSet and MicroSol, as in very neatly.
Nonetheless I ran into trouble with the decals. The large underwing serials tore without much provocation and needed careful realignment. And somehow I managed to move the portside serial and damage the „Royal Navy“ above it. Which I obviously only realized hours later, when there was no hope for corrections. So I needed to come up with a solution. In the end, I found a halfway fitting font and printed a replacement on clear decal sheet.
 Having let
the repainted and reglossed area cure for 36 hours, I applied my homemade
decals, and they worked well. A heartfelt sigh wafted through my home.
Having let
the repainted and reglossed area cure for 36 hours, I applied my homemade
decals, and they worked well. A heartfelt sigh wafted through my home.
What with the amount of PE and my trials and tribulations therewith, I only very belatedly realized I should have detailed the wingfold areas prior to painting and decaling the wings. Well, I now needed to find out the best course of action.
Which was to bite the bullet, eat humble pie – and grind away what Eduard wanted to be gone and install the PE instead. Which took a bit more than an hour, and was not that easy, but doable.
After quite some renewed masking, I sprayed the now PE-adorned wingfolds primer yellow and then gave them a wash to enhance detail. I then continued on the various bits and bobs, until I had the drop tanks and rockets ready for decaling. I elected not to use the PE gear doors, but prepared the (actually quite nice) kit parts instead.
Next came adding the landing gear to be able to place the model on its wheels for ease of handling. Additionally I made a simple jig from foam board to place it upside down for working on the underside. I also continued on the decals, always keeping in mind how much their strange behaviour slowed me down.
At some point, though, I had applied all the stencils. Save those for the rockets. I thought a while about applying 48 little white dots to the rocket fins and twelve red bands to the warheads. Then I painted both, and only used the yellow stenciling decals.
All that well cured, I added another gloss coat to get an even surface to all the parts and let that cure. Next came a more or less uniform flat coat over all.
I have described the painting process throughout the build, but will recapitulate here. I used Stynylrez primer, with the mustard yellow one very nicely standing in for Hawker´s yellow primer. I preshaded with dark grey and/or black primer, and used Vallejo ModelAir Sky Type S and Extra Dark Sea Grey for the main colours. I tried not to let things get too uniform throughout. I coated the entire model with Humbrol acrylic clear gloss prior to decaling, and sealed the decals with another Humbrol gloss coat, before adding a flat coat with Winsor & Newton´s Galleria matt coat. That served as a good base for the weathering.
For weathering, I used artist´s oils thinned with enamel thinner as a wash, partly wiped with a Q-Tip in the direction of airflow. Moreover I used various pastel chalks. I tried to get close to an aircraft during serious carrier operations – cared for and yet showing the strain.
| FINAL CONSTRUCTION |
Having the main components together, it was about some remaining bits and bobs. I made a mistake in attaching the rockets to the wings prior to adding their ignition cables. Access to the places where they originate on the launchers was so iffy that I had to break them off the wings again before beginning to add the cables. I did not use the PE cables, but single strands of model railroading copper cable, as they are thin and easily shaped. They were attached to the rockets with white glue and to the launchers with CA glue. I had drilled small holes at the access points using my new very small drills (.278 mm). The cables were painted using an AK real colors marker.
 Now I had
to reattach the launchers, which needed some work. But using a .5 mm drill and
brass wire, I was able to replace them where they had been, and securely enough.
I did replace the pitot tube with a homemade one from brass tubing and brass
wire, and had to completely rebuild the pilot´s extendable access step as I lost
the kit part. Using styrene stock and the Eduard PE parts, that worked well. I
then turned to the gear doors, using the kit parts for the main gear wells and
the Eduard PE for the tailwheel well. I only then realized that replacing the
kit main wheel wells meant omitting the kit part with the actuators for the
inner parts of the gear doors. I now had to somehow cut the actuators out of the
kit part, and modify them with brass wire so they would fit both the wheel well
and the gear doors.
Now I had
to reattach the launchers, which needed some work. But using a .5 mm drill and
brass wire, I was able to replace them where they had been, and securely enough.
I did replace the pitot tube with a homemade one from brass tubing and brass
wire, and had to completely rebuild the pilot´s extendable access step as I lost
the kit part. Using styrene stock and the Eduard PE parts, that worked well. I
then turned to the gear doors, using the kit parts for the main gear wells and
the Eduard PE for the tailwheel well. I only then realized that replacing the
kit main wheel wells meant omitting the kit part with the actuators for the
inner parts of the gear doors. I now had to somehow cut the actuators out of the
kit part, and modify them with brass wire so they would fit both the wheel well
and the gear doors.
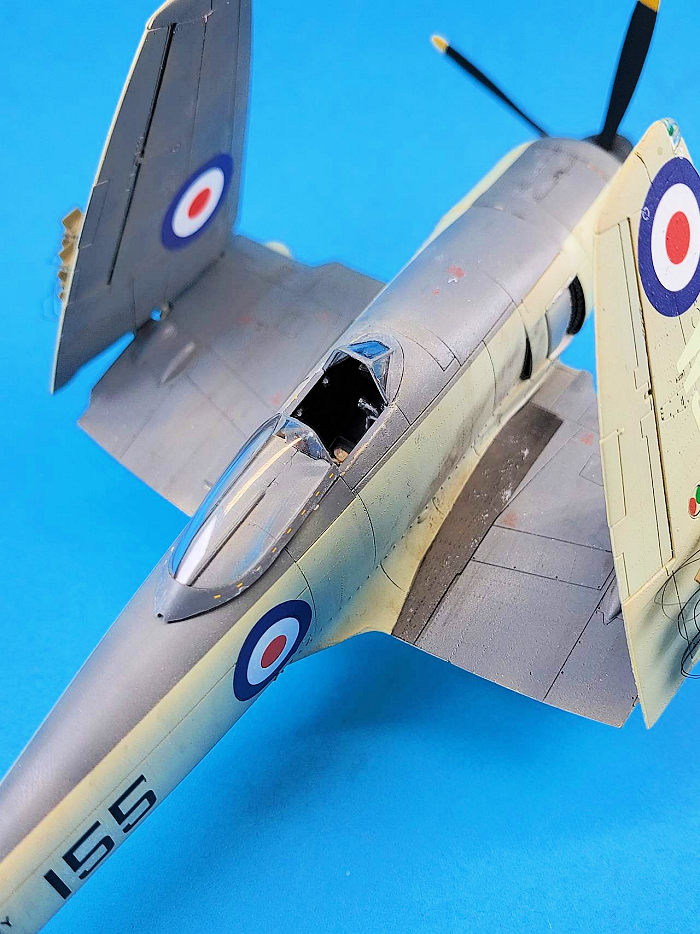
On the final stretch, I added the gunsight, which sadly fitted too low in my opinion, but there was nothing I saw I could do. Then came the canopies, using flat-curing white glue Bindan RS. The front part fit exceedingly well into a recess in the fuselage – cleverly done, Airfix! After the outer wings had been added and the glue had cured, I tried my hand at the connecting cables visible in the wingfold area. That proved to be as iffy as expected, but worked out with a mix of Eduard PE and wire. Having painted and flatcoated these and other critical areas, I declared the project complete and turned to taking photographs.
| CONCLUSIONS |
Well, that might have been a smoother build. It really started with my issue with the PE flaps, and then the wheel wells, and sort of tainted things for me. Silly, huh? And I´d rather give me the fault than the PE, but this time things didn´t really come together for me. I now like the look of the wingfolds with the PE, and the wheel wells really look convincing. But would I do those wheel wells again? Not very likely.
The rest of the build went well, and I liked the process of building and the kit. Virtually everything fit together well and was cleverly designed, and the instructions are realistic in their approach. The only thing that irked me were the decals and the really long time they needed until they could be moved off the backing paper.
Trying something new is sure worth my while, and in this case it has been simulating riveting. I like how the rivetingdoes not intrude upon the eye, but just enhances the overall impression. I have since bought two inexpensive tools which give me larger rivet distances, and will sure try those on my next project.
All in all a very commendable kit. The paint masks and interior PE are well worth it, even though little of the cockpit can be seen on the completed model. It´s a case of knowing it´s there ... Last but not least thanks to Spiros, without whom this review would still lie somewhere in the future.
| REFERENCES |
https://en.wikipedia.org/wiki/Hawker_Sea_Fury
In German, the site of a company that does restoration and maintenance of historic aircraft
https://www.meiermotors.com/index.php/aircraft/hawker-seafury
5 June 2025
Copyright ModelingMadness.com. All rights reserved. No reproduction in part or in whole without express permission.
If you would like your product reviewed fairly and fairly quickly, please contact the editor or see other details in the Note to Contributors.