| KIT #: | A11002 |
| PRICE: | $30.00 |
| DECALS: | Four options |
| REVIEWER: | Torben Plesberg |
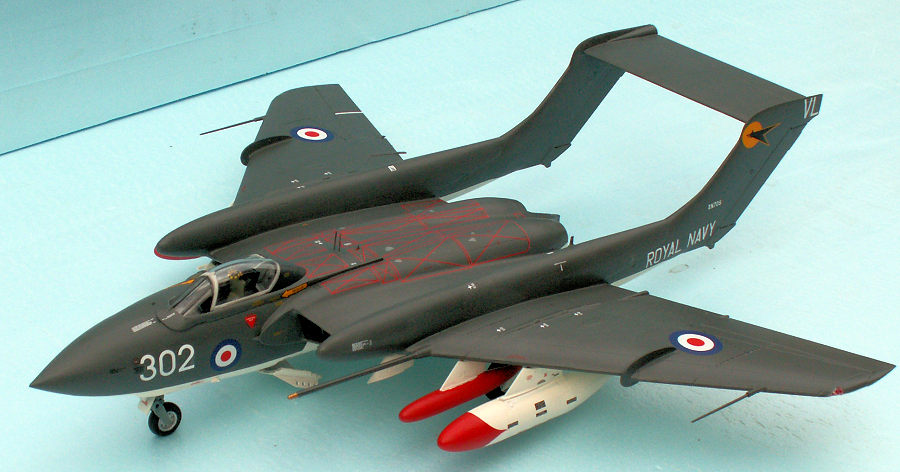
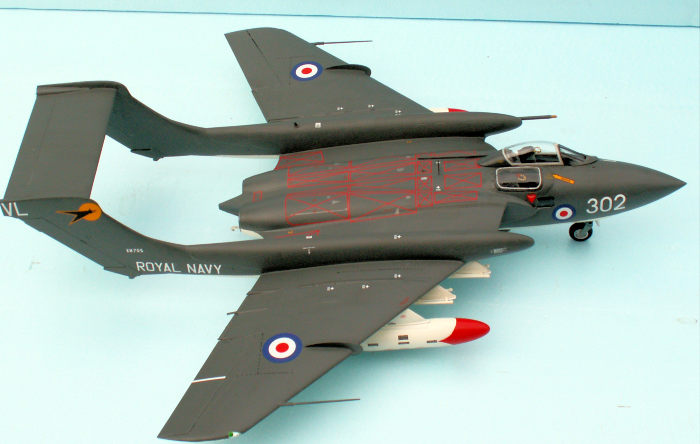
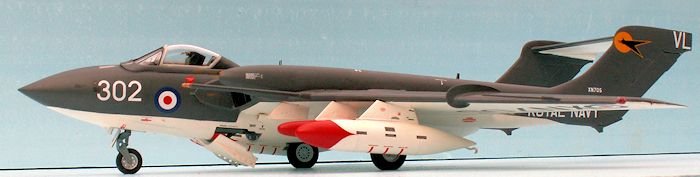
| NOTES: | Built as Simon’s Sircus XN705/302 |
| HISTORY |
The Sea Vixen was a second generation twin boom twin engine jet fighter developed from the first generation plane, the Vampire. However, the Sea Vixen was much bigger and far more powerful than the single engine Vampire – and Venom. The prototype DH 110 flew for the first time 26-9-1951 at Hatfield with John Cunningham at the controls. The performance was even better than expected, and it was capable of flying faster than the speed of sound in a shallow dive. The engines were a pair of Rolls Royce Avon turbojets each rated at 7.500 lbs of thrust. It had a swept wing and the canopy was offset to the port side in the same way as the Canberra B 8. The armament was to be four 30 mm Aden cannons, and hard points under the wings and fuselage allowed a variety of tanks, bombs and rockets.
At the Farnborough Airshow 6-9-1952 the prototype disintegrated in the air, killing the crew and 29 spectators on the ground. The failure was traced to a faulty design of the end sections of the wing spars, which were too weak and in the end caused the disintegration of the whole aircraft.
Now De
Havilland had to strengthen the design to avoid similar tragedies. The modified
second prototype did not fly until July 1954. The third navalised prototype was
demonstrated at the 1955 Farnborough
 Airshow. The RAF had at that time lost the
interest in the DH 110, and the Gloster Javelin was chosen for a new all weather
fighter to succeed the Gloster Meteor and the Venom. The Royal Navy kept its
interest for the design as the successor to the stop gap Sea Venoms in service.
The navalised third prototype made its first arrested deck landing on the HMS
Ark Royal in 1956. In 1957 the first Sea Vixen FAW 1 took to the air, and two
years later the first Sea Vixen Squadron (no 892) was formed on July 2 1959 at
Yeovilton.
Airshow. The RAF had at that time lost the
interest in the DH 110, and the Gloster Javelin was chosen for a new all weather
fighter to succeed the Gloster Meteor and the Venom. The Royal Navy kept its
interest for the design as the successor to the stop gap Sea Venoms in service.
The navalised third prototype made its first arrested deck landing on the HMS
Ark Royal in 1956. In 1957 the first Sea Vixen FAW 1 took to the air, and two
years later the first Sea Vixen Squadron (no 892) was formed on July 2 1959 at
Yeovilton.
The Sea Vixen became the first British combat aircraft to be armed only with missiles, rockets and bombs. A typical armament would be four De Havilland Firestreak air-to-air missiles, two packs of Microcell unguided 51 mm rockets and four 500 lbs or two 1000 Lbs bombs. The engines were more powerful than on the prototypes: two 11.230 lbs thrust (50 KN) Rolls Royce Avon 208. Top speed was 1100 km/h and range 1000 km.
The Sea Vixen FAW 1 was developed further to the FAW 2. Most noticeable were the larger booms, which protruded the wing leading edge. The extra internal room of the booms was suitable for extra fuel to improve range. There was an improved escape system (Martin Baker ejection seats), especially for the observer in the “coal hole” on the starboard side of the cockpit. Improved armament included Red Top AAMs, four SNEB rocket pods and the Bullpup air-to-ground missile. The FAW 2 entered service with the Squadrons in 1964. 29 new aircraft were built as FAW 2s, and some 67 FAW 1 aircraft were converted to FAW 2 standard.
 The FAW
1 began phasing out in 1966 and the FAW 2 six years later, replacement aircraft
being the F-4K Phantom. The two largest carriers, the Ark Royal and the Eagle,
were to be refitted to operate the Phantom, however, only the Ark Royal was
refitted due to defense cuts. The Eagle was decommissioned and from now on
serving only as spare parts for the Ark Royal.
The FAW
1 began phasing out in 1966 and the FAW 2 six years later, replacement aircraft
being the F-4K Phantom. The two largest carriers, the Ark Royal and the Eagle,
were to be refitted to operate the Phantom, however, only the Ark Royal was
refitted due to defense cuts. The Eagle was decommissioned and from now on
serving only as spare parts for the Ark Royal.
The Sea Vixens never fired their weapons in anger. The aircraft played, however, an important role alone by their presence in troublesome areas.
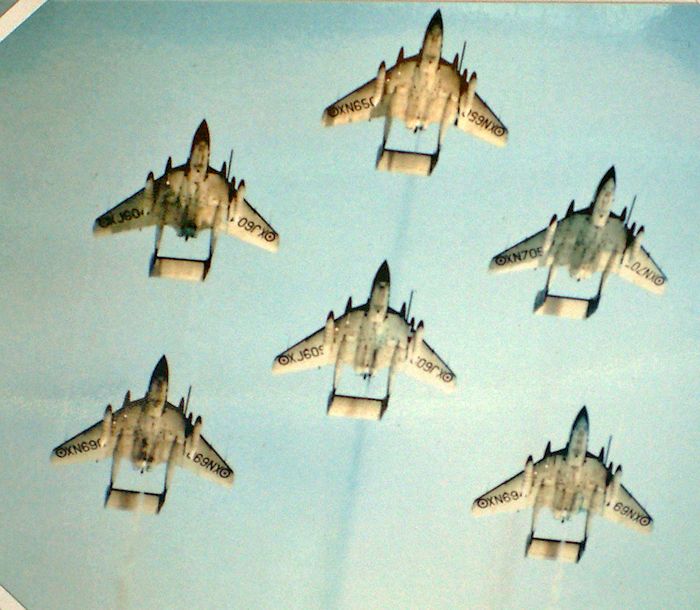
The Royal Navy established an aerobatic team with 5 Sea Vixen FAW 1 called “Fred’s Five”. The team performed displays during the second half of 1962, and was disbanded in 1963. In 1968 a similar team was established with six Sea Vixen FAW 2 called “Simon’s Sircus”. The aircraft were the last from Squadron 892, which decommissioned from HMS Hermes early in 1968. Simon Idiens got the task to make an aerobatic team named after him, and the team made about 20 performances during 1968 – the last one being at the Farnborough Airshow in the beginning of September 1968.
I had the joy to watch the last performance of Simon’s Sircus at Farnborough. It was very impressive to see these large aircraft flying as if they were only one. Very skillful indeed! I took some photos of the performance with my tele lens and got some good shots, especially one of the 302 during a fly past at Mach 0.85, generating a small cloud above the wings. It was visible because the air was rather wet after some showers earlier on the day. The 302 is the subject of my model – not an option of the kit.
 The
last squadron to operate the Sea Vixen FAW 2 from a carrier, HMS Eagle, was no
899, and it returned to Yeovilton on 23-1-1972 for disbandment. The
decommissioned aircraft were either scrapped, or converted into drones. In the
end, the drones were also scrapped, when the drone program was abandoned. Only
one drone, the XP924, remained flying and got a suitable civil registration:
G-CVIX. For many years, the G-CVIX made performances at airshows in the color
scheme of the drone, and with De Havilland as owner. In the end, the aircraft
went to Naval Aviation Ltd, which is a subsidiary of Fly Navy Heritage Trust.
The Aircraft was painted in the colors of Squadron 899 and is based and
displayed at the Fleet Air Arm Museum, Yeovilton, Somerset. The XP924 alias
G-CVIX in this color scheme is one of the decal options of the kit.
The
last squadron to operate the Sea Vixen FAW 2 from a carrier, HMS Eagle, was no
899, and it returned to Yeovilton on 23-1-1972 for disbandment. The
decommissioned aircraft were either scrapped, or converted into drones. In the
end, the drones were also scrapped, when the drone program was abandoned. Only
one drone, the XP924, remained flying and got a suitable civil registration:
G-CVIX. For many years, the G-CVIX made performances at airshows in the color
scheme of the drone, and with De Havilland as owner. In the end, the aircraft
went to Naval Aviation Ltd, which is a subsidiary of Fly Navy Heritage Trust.
The Aircraft was painted in the colors of Squadron 899 and is based and
displayed at the Fleet Air Arm Museum, Yeovilton, Somerset. The XP924 alias
G-CVIX in this color scheme is one of the decal options of the kit.
| THE KIT |
The kit
comes in a large box with a picture of a Sea Vixen on the lid. The instructions
are an A4 booklet with 24 pages. Page one gives a very short history of the Sea
Vixen in five languages, including Swedish. Page 2 has some assembly and icons
instructions in twelve languages. Page 3 to 19 show in 84 steps how to assemble
the model, and showing the options: wings folded, flaps up or down
 etc. Page 20
shows the finished model – wings folded or not. Pages 21-23 show the position of
the stenciling on the airframe, armament and drop tanks. Besides there is a
color printed folded A3 sheet with the color scheme of the four options.
etc. Page 20
shows the finished model – wings folded or not. Pages 21-23 show the position of
the stenciling on the airframe, armament and drop tanks. Besides there is a
color printed folded A3 sheet with the color scheme of the four options.
There are three large sprues in a light grey styrene and a clear one with the canopy parts. The quality is first class, without flash or sink marks, and most of the parts fit perfectly well together. The kit is with recessed panel lines and a few rivets here and there. The decal sheet is very large with about 135 stencils, which are readable – printed by Cartograf, which means first class quality. It seems that the number on the fuselage sides in front of the national insignia are not all the same size. I thought that such numbers all were to the same naval standard. I realized that was not the case: I needed the “2” from 247 to make the “302”. However, this was not possible, because the 247 was 11 mm in height, and 302 was only 9 mm high!
| CONSTRUCTION |
The instructions are easy to understand, and if you follow the 84 steps in numerical order, you can’t miss getting a nice model. In the following, I shall make comments on some of the steps in order to make the assembly easier or avoid possible problems.
Steps 1-22, the cockpit assembly. Most important are the ejection seats, especially the firing handles with their black and yellow stripes. On the finished model most of the detailed interior is hidden, so don’t spend too much time on the cockpit. The top of the ejection seats are clearly visible and should be done properly.
Next item is the airbrake, steps 24-28. If the airbrake is shown activated, care should be taken painting the interior, step 25. You must choose between parts 26B and 27B, depending on degree of activation. 27B is only to be used on a “flying” model on a stand. The arrester hook has also two activation options, step 29-30. Part 24B is for a standing model, and part 25B is for a flying model.
Steps
31-38 deal with the engine intakes and jet pipes. The front end of the engines,
part 32A, no need for painting, because it is hidden inside the fuselage. In the
opposite end, part 31A should be painted, because it is visible if you are
looking into the jet pipes. Step 35: important to be aware of openings to be
cut, if you choose parts 1C, 2C, 5C and 6C (pylons) or the stand, which is not
included with the kit. Step 38: Wings up or down. An important decision to make!
I chose wings down. Step 39: The assembly of the upper and lower fuselage halves. If you have chosen wings up, don’t forget to drill the 0.8 mm holes. You
need some clamps to make a proper assembly without gaps!
halves. If you have chosen wings up, don’t forget to drill the 0.8 mm holes. You
need some clamps to make a proper assembly without gaps!
Steps 40-44: assembly of the booms and tail plane is without any problems. Otherwise step 48: If you choose parts 47a + 47b, these parts should be glued in place before the booms! These parts were the only parts of the kit that did not fit properly. They needed filling and sanding to get in alignment with the booms.
Steps 49-58: The undercarriage assembly. Some of the smaller parts may be difficult to glue properly in place – use a pair of tweezers. Painting of the parts of the undercarriage is necessary before the assembly. The easy way: A flying model with gear up!
Steps 59-62: The wing halves should be glued together on the wing stubs of the assembled fuselage. Clamps are also important to secure a proper assembly. If you choose “wings up” option, the wing halves are assembled with parts 46C and 47C on the roots. The assembly of the folded wings to the wing stubs is shown in steps 65 + 66, by means of parts 86C-89C.
Step 80: Important is nose weight, if you have chosen a model standing on the ground. 35 g is recommended, and might be enough. I put 45 g of lead in the nose cone, and sealed it with white glue. Do not use plastic cement! It is not useable for metals, and might damage the cone.
Part
42C - the lower framing of the canopy- does not need glue! Just press the
framing with the two small pins into the corresponding small holes in the
fuselage. The paint will lock this part to the fuselage. I repla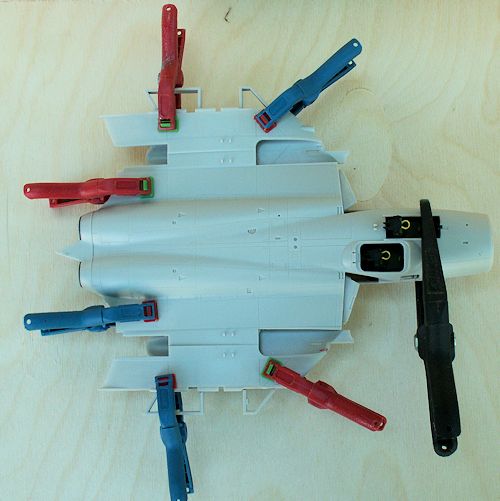 ced parts 21C (pitot
tubes) with brass wire, the plastic ones are too fragile.
ced parts 21C (pitot
tubes) with brass wire, the plastic ones are too fragile.
Steps 81-82. The hatch covering the “coal hole” is the most delicate item of the entire kit. Especially part 1B – the frame – does not fit properly in the opening. It is a little too large and need some very careful trimming. Airfix has seemingly forgotten the thickness of the paint! If properly sanded down, the part will fit into the opening, and no glue is necessary.
Steps 83-84: The (sliding) canopy. The parts fit well together and glue the canopy in place with a clear varnish. I always prefer closed canopies – no dust in the interior of the cockpit or on the inner side of the canopy. It is possible to make the canopy slide backwards – if you are to movements on your model.
Finally, I need to describe the extra scratch-built items necessary to model the XN705/302 from Simon’s Sircus. It was possible because of my photos from the Farnborough Airshow in September 1968. As shown on the color plate of the aircraft of Simon Idiens, the XN650, there are two drop tanks with a red decoration in the fronts. Furthermore, all six aircraft had a smaller device in the shape of a tank to the starboard of the port drop tank. It seems to be red, but not red overall on all six aircraft. The device might very well be a tank of colored diesel oil for the smoke generator. Simon’s Circus made colored smoke traces during the performance. The other great aerobatic team at the 1968 Farnborough Airshow, the “Phoenix Five” with five Buccaneers did not have a special smoke device – their engines produced a nice black smoke!
Besides, there were two packs of Microcell unguided 51 mm rockets. Each pack holds two rockets. These were scratch built of 0.25 mm plastic card and 1.2 mm plastic rod. The warheads were dried drops of white glue. The look of these packs was documented by my photo of the XP955 (Sqdn 899), taken at the Biggin Hill Airshow 19-9-1970. This aircraft would be my second choice for a model, since the decal sheet has an option for XP954 from Squadron 893, HMS Victorious 1966. Markings for Squadron 899 are with the sheet, namely for the XP924, the only surviving flying Sea Vixen. The extra 5 can be taken from XS577.
| COLORS & MARKINGS |
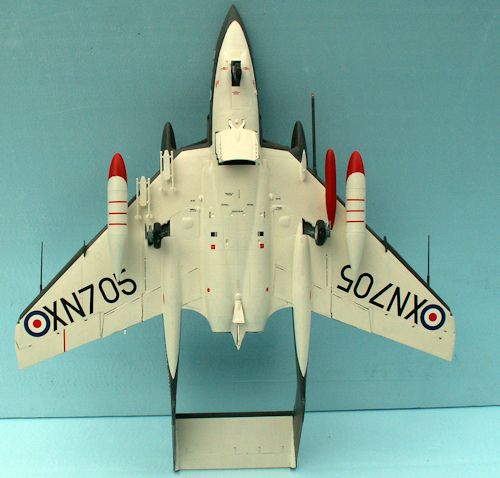 The
color scheme of the Sea Vixen is white gloss HB 22 on the under sides, and extra
dark sea grey on the upper sides. The leading edges of the wings and the
elevator are also extra dark sea grey, HB 123. A problem is the extent of the
white under the nose. The color print of the kit shows the “cut” variant, that
is, the white color is cut at the nose cone. My photos show two different ways
of painting the under side of the nose: three of the aircraft of Simon’s Sircus
had the pointed nose painting, including the “302”. Photos show, what the real
thing looks like, drawings might be wrong!
The
color scheme of the Sea Vixen is white gloss HB 22 on the under sides, and extra
dark sea grey on the upper sides. The leading edges of the wings and the
elevator are also extra dark sea grey, HB 123. A problem is the extent of the
white under the nose. The color print of the kit shows the “cut” variant, that
is, the white color is cut at the nose cone. My photos show two different ways
of painting the under side of the nose: three of the aircraft of Simon’s Sircus
had the pointed nose painting, including the “302”. Photos show, what the real
thing looks like, drawings might be wrong!
The under sides of the airframe got three layers of HB 22 gloss to cover properly. Before painting the upper sides and the booms, some careful masking had to be done. (The white paint needed no masking.) At first, the upper sides got a layer of HB 5 dark admiralty grey gloss. This color was lighter than the extra dark sea grey, and a single layer covered. However, the color looked absolutely right, and I had to force myself to put on a layer of the alleged correct shade. If you believe in “scale colors”, I think the dark admiralty grey is a far better choice for a “correct” shade of color. Most color photos of Sea Vixens show a color lighter than the extra dark sea grey! The dark color probably gets paler in time. Well, my photo program of my computer is able to change the color to any shade, whatever. A second layer of extra dark sea grey was necessary to cover perfectly. Then I masked the leading edges of the wings and elevator on the under sides and painted the extra dark sea grey stripes. One (thick!) layer covered.
To make
the red “decorations” on the front end of the drop tanks, I cut two circles
gauge 20 mm from 40 mm Tamiya tape. These circles were cut through the center,
and two halves in the front end of a drop tank made up the right masking for the
decoration, which was painted with Revell 31 bright red gloss. The smaller
“tank” (or what it is?) got the same color overall. The two Microcell packs got
white (they might be a light grey shade?) On my photos the rockets are darker
th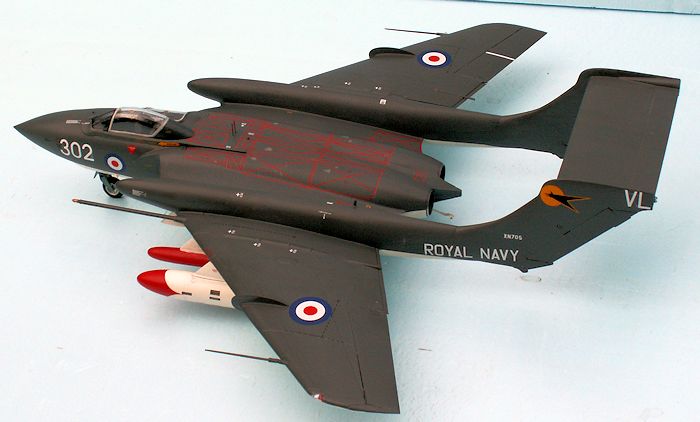 an white, the exact color is unknown to me. Some day in the future, I might
know the right color, and then it will be possible to make a correction.
an white, the exact color is unknown to me. Some day in the future, I might
know the right color, and then it will be possible to make a correction.
The decaling might be a major job – depending on how many of the stencils you choose to apply! However, since my XN705/302 was not one of the options of the kit, it was not a simple job. For XN705 on the under sides of the wings, I used XN650 with the 6 replaced by 7 (from XS577) and the 50 changed to 05. Similar procedure for the small markings on the fins. The 30 came from 301 to make “302”. The 2 from 247 was 2 mm too high, and I had to buy an XtraDecal sheet with Sea Vixen decals, just to get the 2 in the right size!
The red markings on the fuselage above the engines were easy to apply, there is a lot of them! I chose all of the larger stencils and certainly those with red, yellow or white colors contrasting to the extra dark sea grey color of the airframe. The position of the Squadron badge is not correct on the color print. The yellow circle is very close to edge of the fin, less than one mm!
When all the wanted decals were in place, the whole aircraft got a layer of HB Satin Cote to seal the decals and provide a nice finish of the model.
| CONCLUSIONS |
It was a real pleasure to build this kit, and it is highly recommendable to all fans of the Sea Vixen and Simon’s Sircus. The only flaw of the kit was the bad fit of parts 6A and 7A. The finished model is large and accurate – a worthy replica of a unique aircraft type.
| REFERENCES |
Flying Tigers article: The De Havilland Sea Vixen by Richard Darling, 16-1-2016.
Wikipedia: Article on the Sea Vixen
Philip Birtles: De Havilland Vampire, Venom And Sea Vixen. Ian Allen Publishing ISBN O-7110-1566-X
My own photos of XN705 and XP955
26 November 2018
Copyright ModelingMadness.com
If you would like your product reviewed fairly and quickly, please contact the editor or see other details in the Note to Contributors.