Matchbox 1/32 Sea Venom FAW.22
| KIT #: | PK-500 |
| PRICE: | $25.00 in 1989 |
| DECALS: | Three options |
| REVIEWER: | Christopher Campbell |
| NOTES: | Be prepared with filler and patience |
| HISTORY |
The long running series of De Havilland twin boom jet fighters likely needs no introduction on this website. Its story began with the De Havilland Vampire, a lightweight jet fighter developed during World War II, first taking flight in 1943, and more grandfather than father of the Sea Venom. Of mixed plywood and metal construction, in some respects, it could in some respects be called the British analog to the German Heinkel He.162.
Both were lightweight, single engine jet aircraft of mixed material construction. Both were also a somewhat radical departure from what had come before. It would have been rather interesting to see how they might have fared against one another in combat, as one could almost describe them as natural enemies. However, that was not to be the case, as the Vampire just missed becoming operational before War’s end and the He.162 only saw very limited action in the final days of World War II.
The Vampire would go on to extensive service in numerous countries around the world. It was a staple of the R.A.F., the Commonwealth, and many N.A.T.O. air forces through the early 1950’s, though could be found in some rather unexpected places. While many Latin American countries’ first jets were Lockheed F-80’s, Mexico and the Dominican Republic would operate Vampires. Likewise, it would see service in Egypt, Jordan, Iraq, Lebanon, India, Sweden, Finland, Ireland, Rhodesia, Japan, and Switzerland.
 It would be developed into numerous variants, to include trainers and night
fighters. It also was successfully tested as a carrier fighter, though never
adopted. Inevitably, being adopted by so many air forces around the world, it
would see combat a number of times. The last examples to fighter would be in the
Rhodesian Bush War in the 1960’s and 1970’s, with some surviving to enter
service with the Zimbabwe Air Force. The last once in active service were
retired by Switzerland in 1990, which is an impressive service life. However,
there are still quite a number flying in private hands today.
It would be developed into numerous variants, to include trainers and night
fighters. It also was successfully tested as a carrier fighter, though never
adopted. Inevitably, being adopted by so many air forces around the world, it
would see combat a number of times. The last examples to fighter would be in the
Rhodesian Bush War in the 1960’s and 1970’s, with some surviving to enter
service with the Zimbabwe Air Force. The last once in active service were
retired by Switzerland in 1990, which is an impressive service life. However,
there are still quite a number flying in private hands today.
The Vampire was improved upon and developed into the De Havilland Venom in 1949. It was a larger, heavy, all metal aircraft derived from the earlier Vampire. Now featuring the De Havilland Ghost jet engine, it was both faster and more powerful. Additional fuel tankage was provided with wingtip tanks, the mass of which, as with most similarly equipped aircraft improved its roll rate as well.
While a conventional day fighter was developed, all weather interceptor and strike variants as well as a naval variant were also produced, resulting in a substantially modified airframe, essentially constituting a new aircraft. It would also be the testbed for precursor to the Firestreak missile under project Blue Jay, though would never carry the missile in active service.
As a land based aircraft, the Venom saw some export success, though was never as widely adopted as the Vampire. It would, however, see service in Iraq, Sweden, Switzerland, and New Zealand, in addition to the R.A.F. The final aircraft were withdrawn by Switzerland in 1983, rather ironically before the more elderly Vampires.
A dedicated two-seat naval variant, the Sea Venom made its first flight in 1951. This included the usual navalization features of folding wings, sturdier landing gear, and an arresting hook. However, radar was also standard, giving it all weather and multi-role capabilities. This version would see service in the Royal Navy, the Royal Australian Navy aboard HMAS Melbourne, and the French Aeronavale, where it would be dubbed the Aquilon. British versions would see combat in the Middle East, most notably in operation Musketeer during the Suez Crisis while French Aquilons would fly sorties in Algeria. The final Sea Venoms were withdrawn the British Fleet Air Arm in 1970. However, its lineage can be seen in its successor, the De Havilland Sea Vixen, which had replaced it with the Royal Navy and would soldier on until 1972. One example of this svelte, final descendent of the venerable Vampire was still flying as of 2017 in all of its twin boom glory. There are hopes that it will once again return to the sky in the near future.
| THE KIT |
 First released by Matchbox in 1980 a part of their 1/32 scale line. The kit
is, in my opinion, better than the other Matchbox 1/32 offerings, and I believe
it was also the last introduced. Detail is heavy-handed, as is typical of
Matchbox kits, though more acceptable in this scale. Parts are offered to build
either a Naval variant or a land based R.A.F. all weather fighter.
First released by Matchbox in 1980 a part of their 1/32 scale line. The kit
is, in my opinion, better than the other Matchbox 1/32 offerings, and I believe
it was also the last introduced. Detail is heavy-handed, as is typical of
Matchbox kits, though more acceptable in this scale. Parts are offered to build
either a Naval variant or a land based R.A.F. all weather fighter.
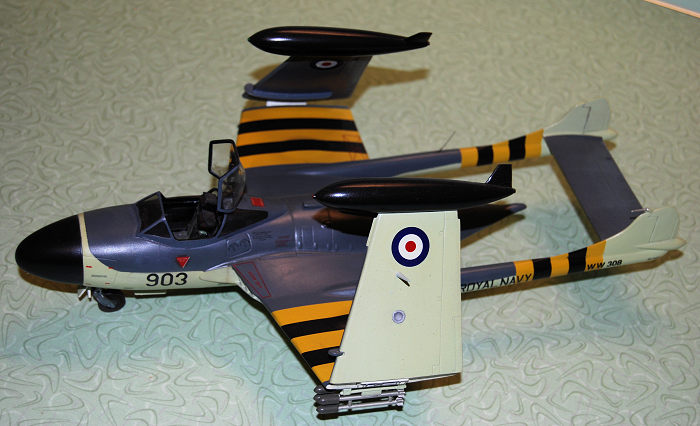
It is molded in multiple shades of grey, or greyish blue and features markings for three aircraft. One is an R.A.F. aircraft based in Scotland and appropriately featuring Scottish flags on the booms flanking the roundels. Naval markings are provided for British and Australian aircraft. The kit also includes the options for folded or fixed wings as well as two canopies and exhausts appropriate to the variant to be modeled.
For its period, it was a good kit and has good bones for any determined modeler. The cockpit I definitely the best of any of the big scale Matchbox kits that I have seen. The ejection seats are far from perfect, though they are at least the right shape, in sharp contrast to the pilot’s seat of their SBD. There is no question that it is lacking by today’s standards. Still, if you want a big Sea Venom, this is it. It is likely to remain it. Play the lottery and wish for a new mold 1/32 Sea Venom and see which one you get first.
The kit has been released as recently as 2007 by Revell after they had acquired the Matchbox molds. It is, by the general rule of mold release timelines, due for a new release. As to whether or not we will see one remains to be seen. It is much more likely than a new mold kit, given its rather esoteric nature.
| CONSTRUCTION |
This kit has a bit of history for me. I had just gotten back into modeling after a six year or so hiatus in 1988. In the summer of 1989, I had just met Frances McDaniel with whom I was most enamored and later to be engaged. We spent a weekend in Birmingham, Alabama and, as part of it, stopped in Homewood Toy and Hobby Shop so that I could check out the model kits. I recall that I purchased several kits, though I could not tell you what they were now. However, one that caught my eye was the Matchbox Sea Venom.
I have always had a somewhat unexplained taste for British stuff. This included cars, as I was driving an MG-B, my third British sports car, after an Austin Healey 3000, and a 1967 Sprite that I still have, when I first obtained this kit. I have always loved Jaguars and Bentleys, with all their faults, for their undeniable elegance and purity of form. I had my share of tweed jackets, and I enjoy my British pipes from Dunhill, GBD, and Saseini. During college, I could usually be found driving an Austin or M.G., wearing a Campbell tartan flat cap, tweed jacket, with such a British pipe clenched in my teeth. These days, less hair, same pipe, same cap, and most recently, a Jaguar S type.
 I also always liked British aircraft, too. This naturally translated building
Spitfires. Hurricanes, and Hunters. However, anything that looks exotic or
unusual has always appealed to me. My uncle, Richard Cobb, had a number of
Vampire and Venom models in his collection that I always found quite intriguing
because they simply did not look like anything else. When I saw a 1/32 Sea
Venom, I wanted it, in a big way. More so, there was one in the hobby shop
display case built up in Australian markings that I had to stop and ogle,
possibly even drooling over.
I also always liked British aircraft, too. This naturally translated building
Spitfires. Hurricanes, and Hunters. However, anything that looks exotic or
unusual has always appealed to me. My uncle, Richard Cobb, had a number of
Vampire and Venom models in his collection that I always found quite intriguing
because they simply did not look like anything else. When I saw a 1/32 Sea
Venom, I wanted it, in a big way. More so, there was one in the hobby shop
display case built up in Australian markings that I had to stop and ogle,
possibly even drooling over.
I could have bought it and cut into my spending money or take Frances out to a romantic dinner and evening to follow. That was, as they say, a no-brainer. The Sea Venom would have to wait.
A month or so later, she was going back to Birmingham to see her cousin and do some shopping and asked me if there was anything that I wanted from the hobby shop. Naturally, I answered, the Sea Venom. Meanwhile, I was stricken with a very nasty bout of mononucleosis. I was just coming down when she came back and presented me with the kit. I eventually wound up in the hospital on I.V. fluids, as I could no longer keep water down. Obviously, I recovered, though I was not myself for nearly a month, having lost more than forty pounds and with, for a time, what might be called brain fog.
The Sea Venom went into my stash as I went into the first phase of my first adult aged fixation with Spanish Civil War Aircraft and Brewster Buffalos. There it stayed when the unthinkable happened. In 1993, Frances McDaniel died in an automobile accident that left me utterly grief stricken for a number of years. The Sea Venom stayed where it was and collected dust, as I could neither bring myself to build it nor to discard it.
Fast forward more than a decade and my life was back in order, more or less. I started thinking about building this kit once again, in part as a tribute to my love for her. It so happened that the 2006 Anniston IPMS show going to be themed around the Six Day War. I decided that this would be an ideal time to build the model as one of the Sea Venoms that had participated.
Ironically, it was illness that once again intervened. Four days before the show I was struck with the first case of full-blown influenza that I had suffered since I was five years old. I had finished the model a few days before but was sick as the proverbial dog all week and unable to attend. The next year when I displayed the model, I related the story to some of the club members and was given a honorable mention ribbon that year, probably as much as my intentions, the ordeal, the history, and having missed the “big show,” as it were.
As for building the kit, it has now been eighteen years, so some of my details may not be precise. I will recount it as best I can though. I will say that I enjoyed the build, mostly, and it is still one of my favorite models in my collection.
The kit is broken down in such a way that multiple sub-assemblies can be built. That was the route that I went. It was, mostly, a trouble-free build. Note that I said: mostly.
I built this one mostly straight from the box. If there were any aftermarket items available for this kit, I was unaware of them at the time. To date, I am not certain that I have seen any, though I suspect that there may be some.
First of all, I knew that this was going to be a tail-heavy beast, so I packed the nose cap with modeling clay that had #9 birdshot kneaded into it. While the instructions mention adding weight, I wanted to be certain that I had enough and then come.
As with most Matchbox kits of this scale, the engine is made to be displayed if so desired. I did not wish to do so, though, so I completed on minimal assembly in this area. However, prior to assembly the intake and exhaust areas were sprayed with Model Master Dark Anodonic Grey, which seem appropriate.
 The cockpit and most associated components were sprayed with Tamiya Flat
Black. After this, gauges on the instrument panel were painted with Tamiya Flat
White and accented by dry brushing with Flat Black. Various points were picked
out and accented with red or yellow and most areas were dry-brushed with Testors
Silver.
The cockpit and most associated components were sprayed with Tamiya Flat
Black. After this, gauges on the instrument panel were painted with Tamiya Flat
White and accented by dry brushing with Flat Black. Various points were picked
out and accented with red or yellow and most areas were dry-brushed with Testors
Silver.
The ejection seats were assembled and the cushions painted with Testors Olive Drab. The seat molded in belts were painted with Model Master Pale Green and the headrests with Tamiya Hull Red. Everything was dry-brushed with Model Master Anodonic Grey to enhance detail and given a light oil wash to imply use and wear. Lastly, the instrument gauges were given a drop of Micro Krystal Clear to simulate glass.
The assembly of the main fuselage assembly is a little odd, in keeping with the design of the aircraft. However, if you follow the instructions and test fit everything, it goes fairly well.
There is a complete engine, impressive for the time in which the kit was originally released, though dated and substandard now. There are fuselage panels that can be removed to display it, though I elected to build it buttoned up. However, the engine should be built and installed simply to include the rudimentary intake and exhaust pipe so that you do not have a see-through model. I completed it and painted it in Dark Anodonic Grey with some black shading in the inlets and exhaust.
With this and the cockpit installed into the fuselage along with the nose gear bay and ventral nose panel, which are molded as one piece, everything was closed up with thick CA glue and sanded smooth. The inboard wings with their intakes were then assembled attached with more gap filling CA glue and sanded down with 400 grit paper followed by polishing with 0000 steel wool. The outer wings were assembled and sanded, thusly, after assembling and attaching the tip tanks.
The fit of parts such as the wing tanks and wing components was fairly good. The fuselage, not as much. Still, it was a little less daunting than I had expected.
The Sea Venom Variant has a its own special, triangular exhaust deflector hood. Both the naval type and the standard NF-3 version exhausts are included. So, be certain to use the correct version for the type being built. Here was where things got difficult.
Everything had gone reasonably well up to this point. Then I assembled the tail booms and tried to attach them to the model and the results were noticeably warped. As to whether or not this is a kit flaw, warpage form the parts having been stored for so long, or my own error, I have never been certain. Ther was no question that this had to be addressed, though. I thought about a number of ways to fix this. What I ultimately settled on was a bit brutish but worked rather well.
The tabs to affix the booms to the fuselage subassembly were cut away and hollowed out with a #11 X-Acto. Then I found some bronze brazing rod that fit and was quiet sturdy. I inserted sections of it so that around one centimeter extended into each side of the join, all the while making sure that I could mate it to the booms to their roots on the fuselage. Then the whole mess was fitted into place with a substantial application of five-minute epoxy. Once this had dried, there was quite a lot of sanding and polishing. Somewhat, to my surprise, it worked and very well.
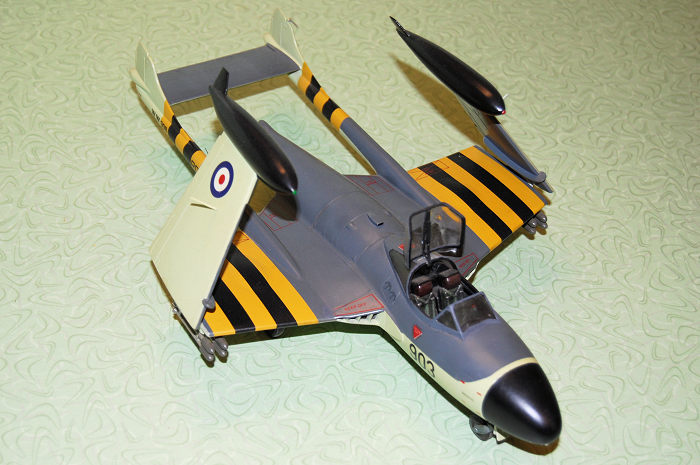
The horizontal stabilizer and rudders were glued in place and gave no trouble, doubtless in part to having fixed the warped booms. The nose cap was now fitted in place and required only a little sanding, as it proved to be a fairly clean join. I was going to build the model with the wings folded, so it was now ready to paint.
| COLORS & MARKINGS |
As mentioned, I had elected to build this as an aircraft from Operation Musketeer in the Suez crisis. I will openly say that my markings are incomplete. At the time that I built it, I was unaware of any aftermarket decals for the kit and my sources on markings for the Sea Venom were limited. I did not acquire the book Wings Over Suez until about a year or so later, nor the book De Havilland Twin Booms.
I did some searching on the internet and got a mix of details, some from the old Wing’s Palette website, various photos of aircraft, and at least one other sea venom build that I found. What I came up with was fairly accurate, but not quite.
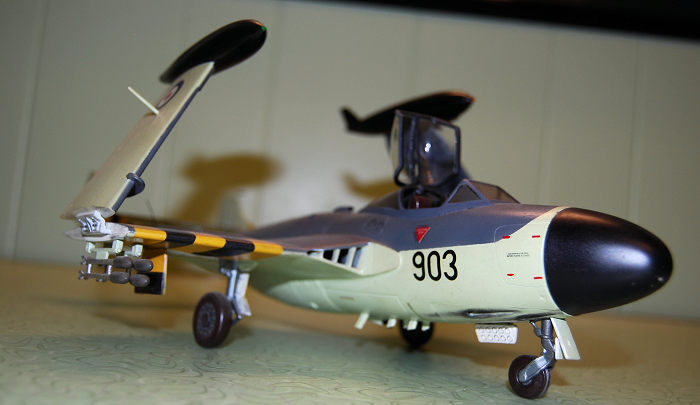
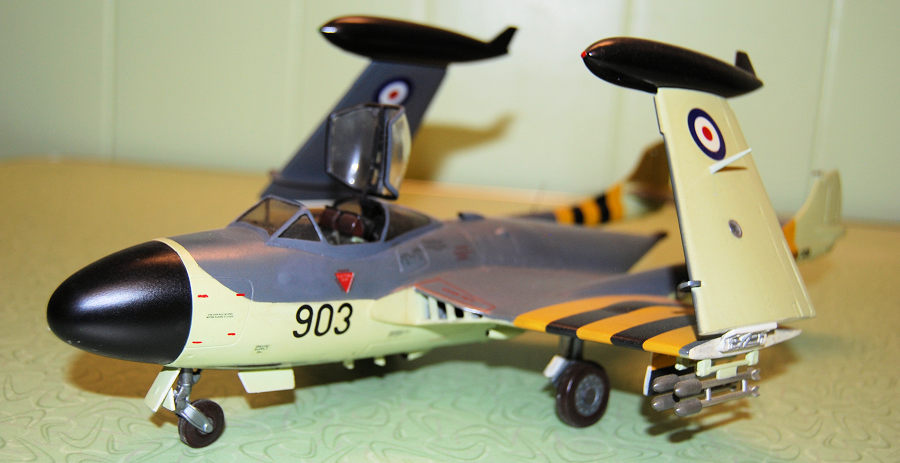
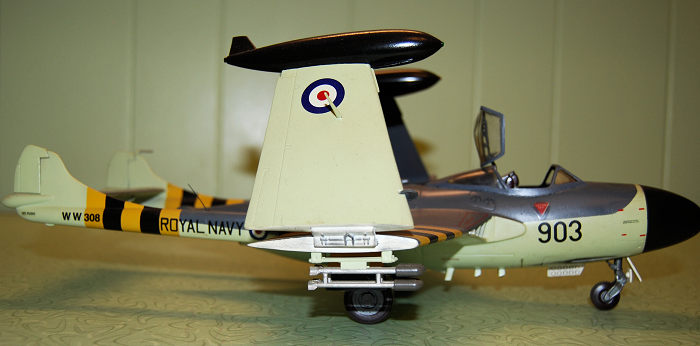
The nose and wing tanks were first painted in Model Master Flat Black along with the areas where the “bumble bee” invasion stripes would be. The nose was masked off and as well as the black striped. This was followed by the yellow for which I used Polyscale Seaboard Airline Yellow (A railroad paint, actually, and I still have more than half a bottle of it. Though I think that it is now and extinct species, like so many colors from so many companies.), which seemed the right shade to me based on the color photos that I have seen. In all of the photos that I have seen of these aircraft, the yellow seemed to have a hint of a mustard cast to it and the Polyscale color matches it more to my eye than anything else that I have seen or tried.
Once this was dry and masked off and the upper surfaces painted in Model Master Extra Dark Sea Grey. This was masked off appropriately and followed with painted the undersurfaces in Model Master R.A.F. Sky. While this color is frequently used on models of Royal Navy aircraft from the postwar area, I now know that while similar, it is not entirely correct. However, at the time that I built this, I was unaware ofthis.
The landing gear bays and wing folds were hand painted with Floquil Reefer White. While this was drying the landing gear was assembled and painted in Dark Anodonic Grey with Model Master Chrome for the oleos. The tires were also assembled and painted in Testors Rubber with more Dark Anodonic Grey for the wheels themselves.
Lastly, the landing gear doors were painted, more Floquil Reefer White on the inside and the appropriate colors on the outside. The main gear doors were a little tricky, as there are stripes running through them. Still, nothing one does not encounter building D-Day or Suez aircraft.
I must admit that I was once intimidated by painting stripes as many modelers are. However, they are not really the terror that one might think. To me, painted stripes always look better than decals, even if they are available.
The decal stripes ae often too even looking. Photos of such aircraft, especially those used in D-Day operations often show irregularities in them. (Some on C-47 wings are notably “rough” looking.) I formerly knew a man who painted some of them on the C-47’s prior to D-Day who noted that they actually were using brooms as paint brushes. After hearing that, I was never too concerned if mine were a little bit off here and there.
Before decaling the aircraft, I installed the landing gear and the gear doors. These went on with no problems using some ordinary CA glue. There are a few of the requisite “fiddly bits” (shell ejection chutes, a gun/strike camera, tail hook, antennas, and so on) to be added, though these were saved for the end.
Once the masking had been removed and a few touchups made by brush here and there, I began to decal it. These were a mix of the kit decals and bits gleaned from the decal files. There was no substitute available for much of the data and warning decals from the kit, so what I had was what I worked with.
The waxed paper covering protecting the decal sheet had practically annealed itself to the kit decals over nearly twenty years. I was more than a little worried about pulling it off, a I had seen these take decals with them. Fortunately, this one came off cleanly.
The model was shot with Model Master rattle can Gloss and left to dry while I selected and cut out the decals that I would use. The warning panels and other data from the decal sheet were used and these went on better than expected. I have had very mixed results with Matchbox decals. Some work fairly well, others are like trying to apply a sheet of cardboard. These seemed to be some of the better ones. Solvaset was used, as it will tend to soften the most stubborn decal. The only one that I had any trouble with was one of the warning panels on the aft, right fuselage that wanted to silver. This was mostly successful, though some hints of it can still be seen in the photos.
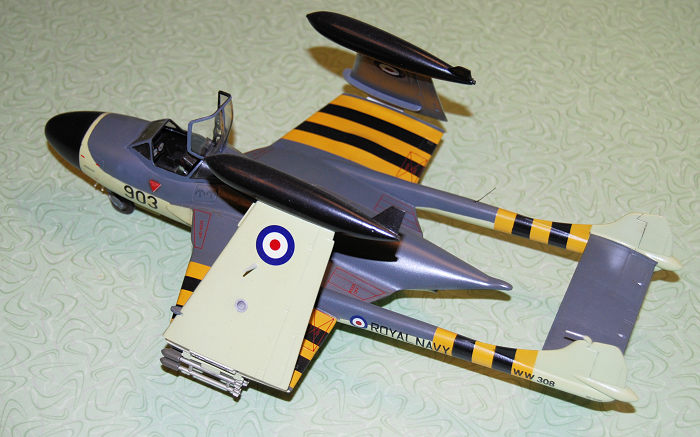
The national insignia, numbers, and Royal Navy markings came from several different sheets in the stash, most of them newer. I believe they were from various Eagle Strike or Xtradecal sheets. Thus, they went on without trouble.
Here is where I made a quite glaring mistake. I do not recall which British carrier squadron that I was modeling. However, there may have been a squadron emblem on the nose or an additional marking on the tail that I forget to get and add at this point. Of this I am not certain, as it has been a few years now. The real issue was that I somehow utterly missed adding the lettering and numbers under the wings. There is no question that this should have been there. However, I missed it at the time.
Unfortunately, I did not realize this until a couple of years later. When I did, I was generally so pleased with the look of the model overall that I could not quite bring myself to change it and possibly mess things up. It bugs me at times, though, so I probably should. I could call it a case of if it ain’t broke don’t fix it. Yet, that does not exactly apply.
Once the decals were fully dry and set, the model was given a coat of Model Master rattle can Semi-Gloss. This was followed by a dusting of their Dullcoat. Once this had dried, I began the final assembly.
| FINAL BITS |
 All of the aforementioned bits were glued into place using CA glue with any
appropriate painting and touchups. The landing gear bays were given some light
weathering with a thin wash and some dry brushing with Tamiya Flat Black and
Testors Dark Anodonic Grey. A whip antenna was added from stretched sprue, glued
to a small hole drilled in the boom with a pin vise.
All of the aforementioned bits were glued into place using CA glue with any
appropriate painting and touchups. The landing gear bays were given some light
weathering with a thin wash and some dry brushing with Tamiya Flat Black and
Testors Dark Anodonic Grey. A whip antenna was added from stretched sprue, glued
to a small hole drilled in the boom with a pin vise.
Now for the canopy. This was where it all went off the rails a little. First, there are two canopy hoods, one for the FAW Naval version and one for the NF-3. Again, be certain that you are using the correct one. The NF-3 version is notably flatter and less bulged. There is an entire canopy and windscreen base that is a separate piece that has to be glued into place atop the fuselage and I found that it did not fit as neatly as I had hoped.
The interior of this was painted in Tamiya Flat Black, along with everything that would be enclosed within it. Clear parts were given a dunk in Future and then glued in place with CA glue once dry. The framing assembly itself was also glued in place with CA glue, though not enough to be used as filler. I had no desire to mask off and repaint all of this, especially since there were decals in close proximity. Instead, I used a LOT of Elmers School glue, carefully applied over several sessions with a toothpick and a fine brush.
This took longer than I would have liked, though it finally seemed to do the job. This was touched up with more Extra Dark Sea Grey until it looked as right as I thought that I could make it.
The underwing rockets were painted and installed, and some gun blast was added to the cannon ports by dry brushing with Testors Model Master Flat Black. The wingfold parts were given some light dry brushing with Dark Anodonic Grey and the wings fitted in the folded position. Lastly, the running light on the wingtip tanks were colored with Testors square bottle Green and Red. With that, the kit was effectively done, and I had a reasonable, though not entirely accurate representation of an Operation Musketeer Sea Venom in my collection.
| CONCLUSIONS |
I will not begin to say that the Matchbox 1/32 Sea Venom is a peach of a kit. It is not. Nor is it the utter dog that their 1/32 Bf-109 is. Mine is far from perfect, but it does look nice, so far as I am concerned. I took it to another show on a whim and placed third in large scale jets, despite its flaws that I have noted. I will ultimately probably fix some of these, especially the underwing numbers and letters.
I would call this kit something of a diamond in the rough, at least, to a degree. For a big scale Sea Venom, this is what we’ve got to work with and it is likely to be for quite some time, if not eternity. It could be improved with some judicious scratch building and detailing from the parts box. I was happy enough with what I got, mostly out of the box.
I would not recommend this for modelers without some experience or those without some skill at rolling their own detail parts. I think that there are now some aftermarket parts and possibly decals available for it, though they are decidedly limited.
That being said, I have another in my stash, to be built as the Scottish flagged NF-3, fixed wing night fighter. I have also given some very strong consideration to building one in Aussie markings and even an Aquilon in French Aeronavale markings. These are truly lovely aircraft in their overall dark sea blue markings, some of which featured quite striking international orange as well. I would, and definitely will build another, and possibly more than one.
It is by no means shake and bake kit. I would not recommend it to any novice modeler. Had I built it at the level of skill that I possessed when it was gifted to me, I probably would have made a mess of it. To a degree, I would now treat this much like a limited run kit.
If handled in this manner, it can be built up to a fairly nice model, even a show piece. If nothing else, it is nice to see something so unusual and esoteric in this scale. If you choose to delve this, you will certainly have something unique and eye-catching on your shelves. While the marking options are limited, they, too, are distinctive and striking. To quote an Indiana Jones film, “You must choose, but choose wisely.” Keep that in mind, but most of all, have fun and build to your own satisfaction. That is what this hobby is all about.
| REFERENCES |
https://en.wikipedia.org/wiki/De_Havilland_Sea_Venom
https://en.wikipedia.org/wiki/De_Havilland_Venom
https://en.wikipedia.org/wiki/De_Havilland_Vampire
Wings Over Suez by Shlomo Aloni , Brian Cull , & David Nicolle ; Grub Street Publishing, 2008
De Havilland Twin Booms, Vampire, Venom, & Sea Vixen, by Adrian Balch; Airlife Publishing Ltd., 2002
Christopher Campbell
9 April 2024 Copyright ModelingMadness.com. All rights reserved. No
reproduction in part or in whole without express permission from the editor.
If you would like your product reviewed fairly and fairly quickly, please
contact
the editor or see other details in the
Note to
Contributors.