| KIT #: | |
| PRICE: |
£15-00 (see notes below) |
| DECALS: | None in my sample |
| REVIEWER: | Frank Reynolds |
| NOTES: | Available periodically under different labels. |
| HISTORY |
The Avro Shackleton was a fourth generation aircraft, evolved from a 1930s
concept for a long range bomber for the Royal Air Force. The unsuccessful twin
engine Manchester bomber evolved into the legendary four engine Lancaster,
itself updated and improved in the form of the Avro Lincoln.
The Lincoln’s sturdy wings were married to a new enlarged fuselage to
form the basis of a long range maritime patrol aircraft for the RAF’s Coastal
Command as the Shackleton MR.1, which first flew in March 1949. By 1951 the
design had been modified as the MR.2 to carry twin 20mm cannon in the nose with
a distinctive clear hood for the gunner, a triangular bomb aimer’s window in the
flat fronted lower nose section and a clear vision streamlined tail fairing was
fitted. In common with its Lancaster
forebear the Shackleton featured a large weapons bay that was also able to
accommodate airborne rescue equipment. The most distinctive feature of
 the Shackleton both visually and aurally was provided by its four mighty Rolls Royce
Griffon engines driving six-bladed contra rotating propeller units. Its nickname
of “Growler” was truly appropriate. 76 Mk.1 aircraft were delivered to the RAF
and 70 Mk.2. The last version of the Shackleton was the further modernised MR.3
which first flew in 1953 and entered service in 1955. A tricycle undercarriage
was fitted, shortening the weapons bay slightly and the wing altered to permit
the fitting of tip tanks. Considerable internal alteration was carried out to
improve crew comfort and new clear canopy was fitted over the flight deck.
Exhaust extension tubes were fitted to carry the exhaust under the wings in an
attempt to reduce noise in the cabin. Just thirty four Mk.3s were built for the
RAF and it registered the type’s only export success when 8 were sold to the
South African Air Force in 1957.
the Shackleton both visually and aurally was provided by its four mighty Rolls Royce
Griffon engines driving six-bladed contra rotating propeller units. Its nickname
of “Growler” was truly appropriate. 76 Mk.1 aircraft were delivered to the RAF
and 70 Mk.2. The last version of the Shackleton was the further modernised MR.3
which first flew in 1953 and entered service in 1955. A tricycle undercarriage
was fitted, shortening the weapons bay slightly and the wing altered to permit
the fitting of tip tanks. Considerable internal alteration was carried out to
improve crew comfort and new clear canopy was fitted over the flight deck.
Exhaust extension tubes were fitted to carry the exhaust under the wings in an
attempt to reduce noise in the cabin. Just thirty four Mk.3s were built for the
RAF and it registered the type’s only export success when 8 were sold to the
South African Air Force in 1957.
Versatile long range aircraft, RAF Shackletons were to be found anywhere around
the World that the British had interests, until their retirement in 1971 in
favour of the jet-powered NImrod. However 12 surviving Mk.2 aircraft were
converted to a stop-gap Airborne Early Warning platform and trundled on until
1991.
In the maritime role, it would be the South African fleet that served the
longest, from 1957 to 1984, a dwindling complement of No 35 squadron that relied
upon the cannibalisation of higher houred aircraft until the last three Mk.3s
were stood down in a ceremonial flypast on 23 November 1984.
| THE KIT |
This is my third attempt at this kit in some 47 years. I remember building it
around 1967, when a brave and determined Frog company were going head to head
with Airfix, Monogram and Revell in providing spectacular state of the art kits
and this was one of Frog’s headline offerings. Even then, its highly riveted
 exterior caused some raised eyebrows and since there were no decal setting
solutions in those days, I never saw a finished one that was free from silvering
under the decals. The kit also appeared under the Hasegawa label, under a
sharing arrangement between Frog and the newly emerging Japanese brand. My
second attempt was in the late 1980s , in my pre-airbrush days.
I wearily sanded off all of the rivets of my RAF version and I recall
painting multiple coats of white to the fuselage roof to try and cover the dark
blue plastic.
exterior caused some raised eyebrows and since there were no decal setting
solutions in those days, I never saw a finished one that was free from silvering
under the decals. The kit also appeared under the Hasegawa label, under a
sharing arrangement between Frog and the newly emerging Japanese brand. My
second attempt was in the late 1980s , in my pre-airbrush days.
I wearily sanded off all of the rivets of my RAF version and I recall
painting multiple coats of white to the fuselage roof to try and cover the dark
blue plastic.
When Frog went out of business, in 1974,
its aircraft kit moulds (of non-Nazi subjects) remained in production in the
USSR and the Shackleton has subsequently appeared under different vendor labels
such as Chematic, Museum, Novo, Eastern Express, even Revell. It reappears on
the market with random frequency and can be found on sale with kit dealers,
certainly in the UK, at the time of writing at prices around £25-00 to £30-00.
It was the release of the new Airfix Lancaster that set me off on the trail of a
new theme - Avro “heavies”.
I spotted an original Frog Shack on a vendor’s table at the Duxford Spring Air
Show in 2013. It was a familiar first series box with the lid illustration of a
roaring Shackleton over a foaming sea. Even now I find that I am easily swayed
by box art. But did I really want the hassle of that trip down memory lane? I
must have walked past the vendors stall six times during the day and as the show
wound down I went for a last look. It was still there. The downside – missing
decals. The upside – mine for £15-00 cash. The deal was done.
I convinced myself that, having a first edition of the kit,
it should have the crispest version of moulded parts and the clearest of
transparencies, at least compared with some of the subsequent releases from the
gradually ageing tooling that has come onto the market from that variety of
sources over the years. Decals might have been a problem, but I found an
excellent aftermarket source.
The parts were loose in the battered box, but, miraculously, all were present,
even though many had broken off the sprues. Moulded in the original dark
blue/grey rather brittle plastic, there was some flash on the parts but the
legendary rivets, densely sprinkled over all of the major parts were crisp and
sharp. And sharp they really are! You could abrade skin with them. The original
instructions were there in 15 stages of pictograms printed in black and white in
newsprint style. The large box is hinged so as be used as a building tray
according to the “Top Model Tips” on the instructions. The bottom of the box has
full colour 3 views of both versions available with the original decals, one
from RAF Coastal Command and one from the South African Air Force. Now it may be
rude to be picky after all these years, but if the box is the building tray
would it not be a little tricky to have the colour information on the underside
of that tray? This piece of modelling archaeology was complete with a packing
slip that listed the wide range of Frog kits then available priced
 from 2
shillings and 6 pence (12.5 pence or about 20 cents) and a “16 page gaily
coloured catalogue on sale at your local toyshop”. Packed into the cram full box
was a large and spectacular display stand in bright red plastic.
from 2
shillings and 6 pence (12.5 pence or about 20 cents) and a “16 page gaily
coloured catalogue on sale at your local toyshop”. Packed into the cram full box
was a large and spectacular display stand in bright red plastic.
I was delighted to find that the transparencies were commendably thin, clear and
free from major scratches. The box enthusiastically proclaims that the kit has
147 parts and a 20” wingspan. Over the years the kit has been acknowledged as
having reasonable proportions but apart from the over-enthusiastic application
of rivets, it is quite starkly detailed. Interior features are no more than
plain bulkheads; pilot seats and control columns and the undercarriage legs are
heavy one-piece lumps, in the case of
the latter no bad thing, since the kit seems to weigh a ton and requires a
massive amount of nose weight. The basic shapes are all there and viewed from a
21st century perspective, this Shackleton is rather like a short run
kit. I almost found myself looking for a bag of resin parts that does not exist.
Detailing is absent from the inside of the undercarriage and weapons bay doors
although some attempt is made to provide raised detail to the roof of the bomb
bay and the inside of the wing flaps. Both the bay doors and wing flaps are
described as being moveable, as are the ailerons, elevators and rudders. In the
manner of some kits of the period the wheels are over-simplified and the
instructions direct that the nose wheels be installed by melting the axle ends
with a heated knife blade. I opted to fix all of these movable features with
permanently glued joints. With so many moving parts the kit has an almost
toy-like quality.
There is nothing in the way of stores for the weapons bay, but the most glaring
omission from the kit is the prominent pair of nose cannon and the mouldings
give no hint that they ever existed.
For detailing, there is limited help available from the aftermarket since the Airwaves range offers an etched fret (no AEC72199) for the interior. This covers the main cockpit instrument panel, side consoles and seat belts and by way of a bonus, some exterior parts including engine grilles, wheel chocks, access ladder, dipole aerials and windscreen wipers. This is available from Hannants in the UK, price £6-12. The same company also offers a set of detailed wing flaps (AEC72198 at £13-27) but I decided not to push the detailing too hard and just settled for the interior set.
| CONSTRUCTION |
 Although simple in its structure, the real slog with this kit is the
preparation, since I set out to eliminate the rivets. First I carefully examined
all of the external surfaces and identified the panel lines that I wanted to
keep and scribed them in with a Trumpeter scribing tool and a steel straight
edge. Eliminating the rivets took three days of modelling sessions and I
estimate a total of ten hours of such work. I started off using 400 grade wet
and dry paper on a cork sanding block, used wet with a very great deal of water,
carefully guiding the sander around the various bumps and bulges on the airframe
that must be retained. Next a medium grade sanding stick was used to get into
the nooks and crannies around the wing roots, the nose structure and the under
fuselage fairings. Any remaining rivets in the tightest corners were picked off
with the tip of a scalpel blade. Next I sprayed a coat of auto primer from a
rattle can over the external surfaces of all the parts that I had de-riveted,
let it dry and then sanded all of the primer off. I reasoned that if the primer
was removed, then so were the last of the rivets. All of the major components
required de-riveting, the wings, fuselage halves, all tail surfaces, engine
nacelles and bomb bay doors.
Although simple in its structure, the real slog with this kit is the
preparation, since I set out to eliminate the rivets. First I carefully examined
all of the external surfaces and identified the panel lines that I wanted to
keep and scribed them in with a Trumpeter scribing tool and a steel straight
edge. Eliminating the rivets took three days of modelling sessions and I
estimate a total of ten hours of such work. I started off using 400 grade wet
and dry paper on a cork sanding block, used wet with a very great deal of water,
carefully guiding the sander around the various bumps and bulges on the airframe
that must be retained. Next a medium grade sanding stick was used to get into
the nooks and crannies around the wing roots, the nose structure and the under
fuselage fairings. Any remaining rivets in the tightest corners were picked off
with the tip of a scalpel blade. Next I sprayed a coat of auto primer from a
rattle can over the external surfaces of all the parts that I had de-riveted,
let it dry and then sanded all of the primer off. I reasoned that if the primer
was removed, then so were the last of the rivets. All of the major components
required de-riveting, the wings, fuselage halves, all tail surfaces, engine
nacelles and bomb bay doors.
I began the build as a series of sub assemblies. The fuselage went together
fairly easily with a series of interlinked bulkheads and floors to form the
compartments around the nose area and bomb bay. A search of the internet
disclosed a copy of the Revell instruction sheet that called out 42 grammes of
nose weight. By some minor miracle I found a solid metal cylinder of
41 grammes
in my “keep it forever in case it comes in handy”
storage box and this was tacked in place in the nose compartment with
epoxy filler. I kept cockpit detail to a minimum with the use of the Airwaves
etched seat belts and instrument panel. The substantial nose leg was simply
pushed in place unglued when the fuselage halves were stuck together and could
be temporarily swung up into the wheel bay during construction. The whole of the
main fuselage interior was left bare and simply painted dark grey, since little
can be seek through the fuselage windows. In accordance with my plan to keep
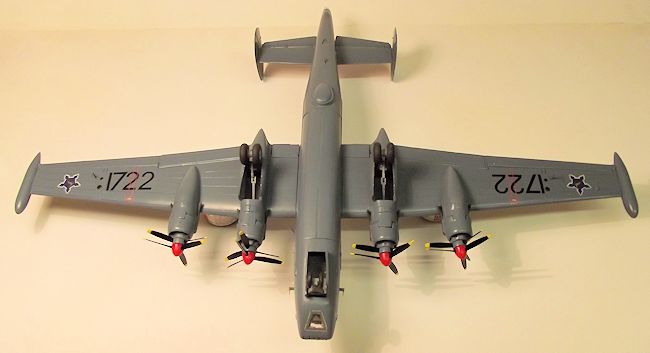
everything simple, the bomb bay doors were glued shut. The cannon locations were
established by photo references and scribed onto the nose area.
The port and starboard wings came next. The moveable ailerons and flaps have
rather clunky hinge arrangements and an excessive gap along the hinge lines. I
cut off the hinge pivots and packed out the leading edges of the flaps and
ailerons with strips of plastic card to tidy things up. The engine nacelles
required a lot of fettling and filing to close up the joints and the main wheel
legs, as with the nose leg, were
 given temporary “moveable” status to enable
them to be folded out of the way during the build. These main undercarriage
structures consist of a substantial one piece main leg and strut and a separate
diagonal strut, each section plugged into the side of the nacelles. They were
left “as is” without any additional detailing.
given temporary “moveable” status to enable
them to be folded out of the way during the build. These main undercarriage
structures consist of a substantial one piece main leg and strut and a separate
diagonal strut, each section plugged into the side of the nacelles. They were
left “as is” without any additional detailing.
The tail surfaces are as over engineered as the wings, consisting of upper and
lower panels for the horizontal surfaces with separate elevators and two part
fins, each with a one piece rudder. I glued up all of the parts as non-moving,
to eliminate any excessive gaps.
Both the wings and tail planes have substantial locating tongues to lock the
components in place and the main wing/fuselage joint has the luxury of a
substantial spar running from the inboard engines right through the fuselage.
The wing and tail assemblies were glued to the fuselage and the main
transparencies fixed and masked up ready for painting. Small fuselage windows
would be added at the finishing stage.
| COLORS & MARKINGS |
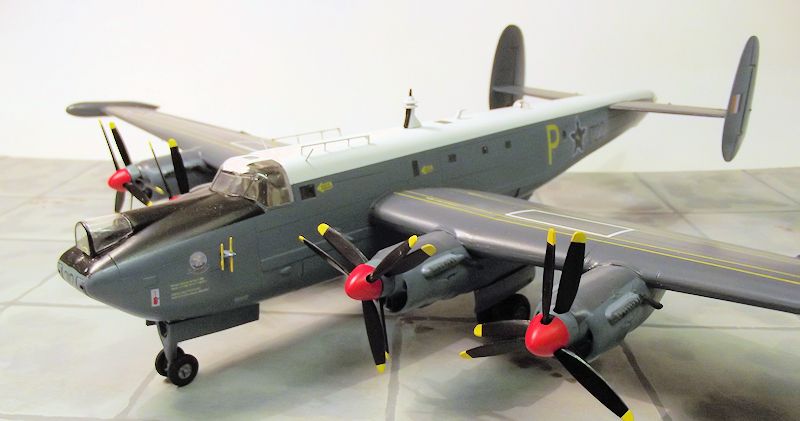
After a light overall sanding the whole airframe received a coat of grey auto
primer from a rattle can. The basic airframe is airbrush finished in PRU Blue XA
1008 from Hannants Xtracrylix range. The upper surfaces of the wings, engine
nacelles and tail surfaces in XA 1005 Extra Dark Sea Grey. The cabin top
received three thin coats of White from a rattle can of Tamiya Fine Primer.
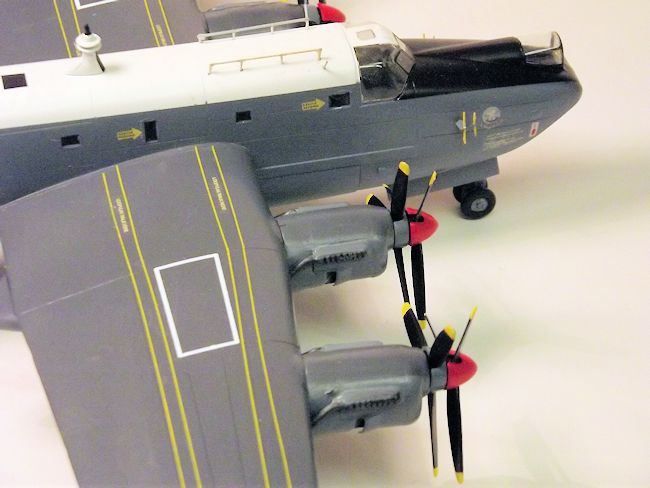
Propeller front spinners are Tamiya XF-7 Flat Red. The prop blades – all twenty
four of them – are Flat Black with Yellow tips. Undercarriage legs and wheel
hubs are Medium Grey. A thin wash of dirty brown was applied to the engine front
intakes and exhausts to bring out the detail.
The airframe was prepared for the decals with two brushed coats of Future/Klear.
The problem of missing decals was solved with the discovery of MAV Decals from
South Africa. (http://www.mavdecals.co.za)
This company has an amazing range of
decals for aircraft operated on the African continent and its web site lists
100s of subjects in scales ranging from 1:144 to 1:32.This is a tour de force of
specialist aviation decals
 and I was astounded by the range. They offer sheets
covering all eight Shacks operated by the South African Air Force, featuring
both the early type of insignia with an orange Springbok on a blue roundel and
the later type “castle” insignia with a gold Springbok. I ordered the sheet
“SAAF Shackleton (late version)” at 77 Rand, at 2013 exchange rates that’s about
£4-90 in UK currency and with Air Mail charges I received my order in four days
at a total cost of just under £10-00, which I consider to be great value for
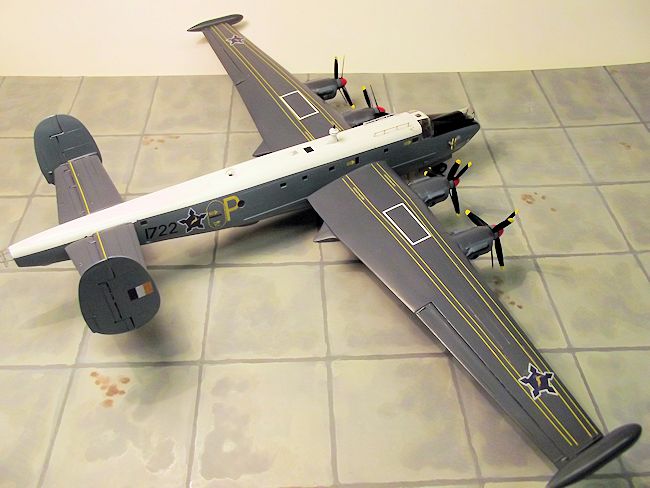
money. The sheet includes full serials, wing walks, national insignia and
squadron badges and beautiful gold printing of the Springboks. The decals may
have been generated by an ALPS-type printer since the instructions call out the
need to spray the whole sheet with varnish before use and to cut out each
subject close to its outline. The instructions are very brief and include a
small 2-view in colour for one sample aircraft. A trawl through the web or a
series of reference books is essential for further information. Fortunately the
SAAF Shacks have been well filmed and photographed over the years.
and I was astounded by the range. They offer sheets
covering all eight Shacks operated by the South African Air Force, featuring
both the early type of insignia with an orange Springbok on a blue roundel and
the later type “castle” insignia with a gold Springbok. I ordered the sheet
“SAAF Shackleton (late version)” at 77 Rand, at 2013 exchange rates that’s about
£4-90 in UK currency and with Air Mail charges I received my order in four days
at a total cost of just under £10-00, which I consider to be great value for
money. The sheet includes full serials, wing walks, national insignia and
squadron badges and beautiful gold printing of the Springboks. The decals may
have been generated by an ALPS-type printer since the instructions call out the
need to spray the whole sheet with varnish before use and to cut out each
subject close to its outline. The instructions are very brief and include a
small 2-view in colour for one sample aircraft. A trawl through the web or a
series of reference books is essential for further information. Fortunately the
SAAF Shacks have been well filmed and photographed over the years.
The decals are incredibly thin and fragile, even after the recommended coat of
varnish that is to be applied while they are still on the backing paper – in
this case a coat of Future/Klear. They release from the backing paper almost
immediately on contact with water, so no decal setting solution was needed. They
are so thin as to tend to curl up easily and need great care in handling. I did
not want to risk the long wing walk lines breaking up, so these were replaced
with strips of yellow 1/64” decals from the Superscale range. It took a couple
of days to complete the decals. They were sealed with an airbrushed coat of
Xtracrylix Semi-Matt varnish.
| CONSTRUCTION CONTINUES |
The four sets of contra rotating rotating propellers need some care in setting
up, since the rearmost set of blades have a reverse pitch to those of the front
and they can be assembled incorrectly. Each unit consists of three blades that
slip onto central shafts that carry the front and rear sections of the spinners.
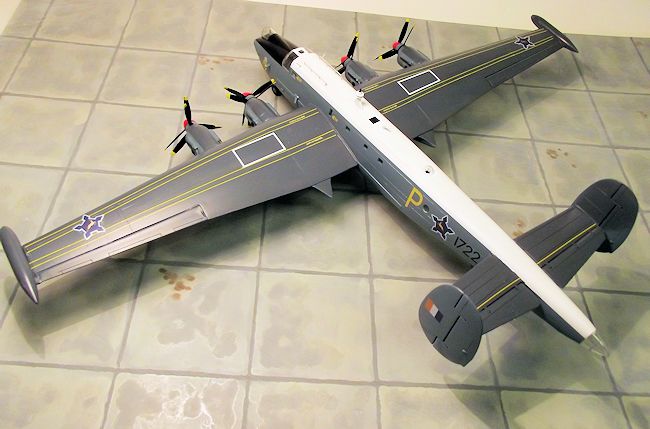
Parked 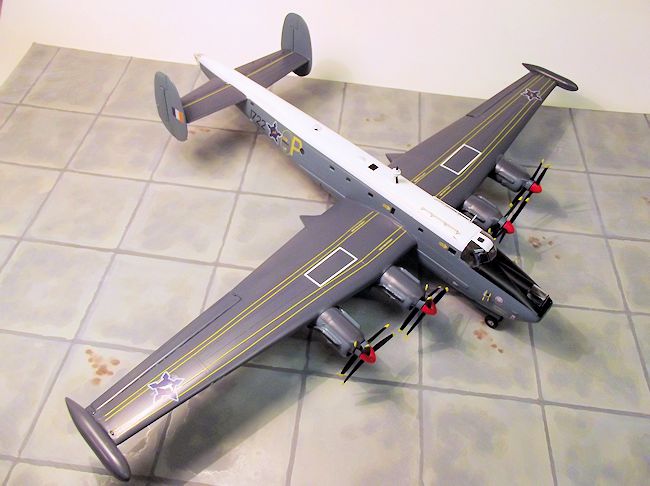 Shackletons often have the front and rear propeller units lined up one
behind the other with only a small amount of offset. I was pleased to find that,
all those years ago, Frog had captured one of the subtle details of this
aircraft, for the rearmost set of propellers are correctly moulded as having a
slightly smaller diameter than the front ones.
Shackletons often have the front and rear propeller units lined up one
behind the other with only a small amount of offset. I was pleased to find that,
all those years ago, Frog had captured one of the subtle details of this
aircraft, for the rearmost set of propellers are correctly moulded as having a
slightly smaller diameter than the front ones.
The remaining small fuselage windows were glazed with Micro Kristal Klear, a
method that I find useful since it saves fiddly masking of small windows during
the construction and painting phase.
Photographs of SAAF Shackletons in service show them operating both with and
without the nose cannon fitted, so I chose to model the type with them removed.
The undercarriage units were swung down and glued into position, then I added the wheels, undercarriage doors, aerials and the distinctive “spark plug” antenna to the fuselage spine. The towel rail aerials aft of the flight deck were made up from brass wire.
| CONCLUSIONS |
f you want an injection moulded Shackleton, this I still the only game in town.
The outline shape looks fine to me, but it is a long slog to get there. Imagine
a short run kit in terms of accuracy of moulding, but very basic in terms of
detail. Preparation of the parts is as time consuming as a vacuform. A good deal
of filler is required around the engine nacelles. The finished article is
amazingly solid and heavy. The Shackleton Mk.3 is a big aircraft and its
menacing bulk looks suitably impressive in my collection. The build is not
complex but justifies steady work. There is scope for much more super detailing
for those who have the skill and inclination.
Still recommended after all these years.
| REFERENCES |
Avro Shackleton by John Chartres, Ian Allen Publishing 1986.
Avro (Hawker Siddeley) Shackleton Mks. 1 to 4. Profile Publications (No 243),
1972
If you would like your product reviewed fairly and fairly quickly, please contact the editor or see other details in the Note to Contributors.