Airfix 1:72 Avro Shackleton MR.2
| KIT #: | A11004 |
| PRICE: | £39-99 SRP |
| DECALS: | Two options |
| REVIEWER: | Frank Reynolds |
| NOTES: | Simple build, Out of the box |
| HISTORY |
Britain had a long record in the use of Maritime Reconnaissance aircraft dating back to the First World War and had specialised in the use of long range flying boats. During World War2, the Royal Air Force had come to appreciate land based patrol bombers, particularly in the form of the Consolidated B-24 Liberator, so when Specification R5 of 1946 was issued by Britain’s Air Ministry the requirement for a long range ocean patroller with 18 hours endurance was met by the Avro aircraft company. The age of the military flying boat had passed its peak and a state of the art new design was required. However the need to get the new type into service was pressing and the design was something of a parts-bin special even to the extent of employing an old-school tail wheel undercarriage
Avro had the right depth of
experience in the production of over 7,000 long range bombers in the Avro
Lancaster and its successor the Avro Lincoln. By marrying an existing wing
design to an all-new fuselage the Shackleton was purpose designed for long range
over water operations with search radar under the
 nose. Avro
described the type as having the outer wings and undercarriage of their Tudor
airliner, married to a modified Lincoln centre section. The all new fuselage was
intended to provide good headroom and walkway areas for the crew and provision
for a galley and rest bunks. A large bomb bay was provided to enable the
carriage of bombs, torpedoes and rescue gear. Four 2,450Hp Rolls Royce Griffon
engines were equipped with massive six-blade contra-rotating propeller units.
nose. Avro
described the type as having the outer wings and undercarriage of their Tudor
airliner, married to a modified Lincoln centre section. The all new fuselage was
intended to provide good headroom and walkway areas for the crew and provision
for a galley and rest bunks. A large bomb bay was provided to enable the
carriage of bombs, torpedoes and rescue gear. Four 2,450Hp Rolls Royce Griffon
engines were equipped with massive six-blade contra-rotating propeller units.
Following wartime traditions the new type mounted twin 20mm cannon mounted either side of the nose to enable forward attacks on surface vessels, twin 20mm cannon in a mid-upper turret and a tail turret with twin .50 cal. machine guns, although the latter would be deleted before service deliveries.
The design had a clear family link to the illustrious Lancaster but would become well known in later years for the unique sound of the “Griffon Growl” at low level.
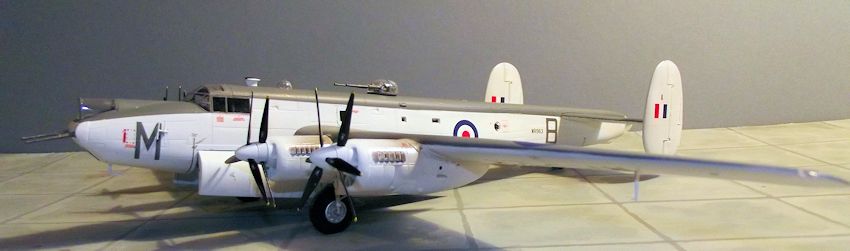
The first Shackleton flew on 9 March 1949 and 76 were built, however even as the first of them entered service in 1951, the successor Mk.2 was under development. The chin mounted radar was vulnerable to damage so a retractable unit was designed to be located in the belly to the rear of the bomb bay. The cancelled requirement for a tail turret enabled a rear observation position in the tail to incorporate a streamlined clear fairing. The bulky side-mounted nose cannon were moved into a redesigned nose with separate windows for the bomb aimer and gunner. The mid upper turret was retained but would be deleted in later years of service. 76 MR.2s were built, being phased into service from 1953; a handful of the airframes would linger on in RAF service until 1993 in an Airborne Early Warning Role. In doing so, it would prove to be the last piston engined aircraft in British front line service.
The Shackleton MR.2 was very much a Cold War Warrior, serving everywhere that the British had an interest until the fleet was replaced with the Nimrod in the 1970s. They served in support of NATO in the North Sea, the Atlantic Ocean and the Mediterranean, in the Persian Gulf and the Indian Ocean. They were most in the public eye for Search and Rescue missions far out over the oceans.
| THE KIT |
This comes in a large glossy box
that seems to be about 15% too big in all dimensions, containing eight parts
frames in Airfix’s current pale blue plastic and one of clear. There is a 20
page instruction booklet in A4 greyscale format and a two page A3 colour chart
in full colour
 with paint
references keyed only to the Humbrol range of paints. There is a further two
page leaflet showing the placement of the stencils on each variant.
with paint
references keyed only to the Humbrol range of paints. There is a further two
page leaflet showing the placement of the stencils on each variant.
The parts were well packed in sealed bags and only two had fallen off the frames, however even as it was being unpacked it was obvious that some of the large parts such as the wing panels and fuselage halves were warped. The parts seemed to be crisply moulded with a good level of lightly engraved panel detail.
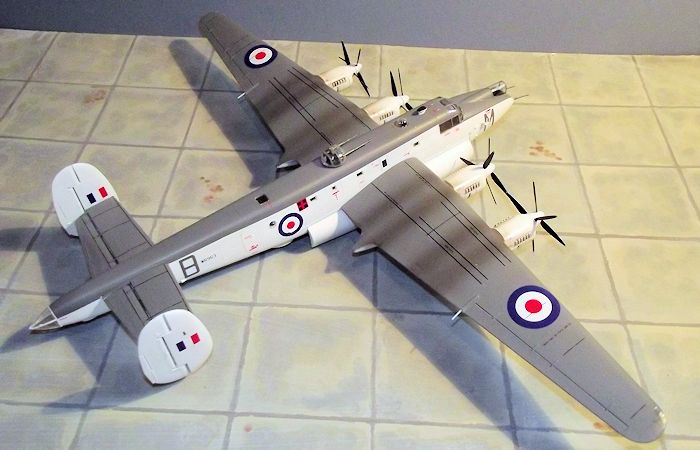
A densely packed decal sheet gives two choices of finish: an early style MR.2, with top turret and nose cannon, finished in mainly white, with upper surfaces of medium grey and a later style MR.2 Phase 2 with the turret and nose guns deleted and finished in overall dark grey with white panels to the wings and fuselage roof. The decal sheet is beautifully printed and includes a mass of stencils and walkways and even 48 decals for the propeller tip striping. There are two different sets of airframe stencils which allow for the different background colours.
There are 113 stages of construction called out and there are options in both interior and exterior fit to be considered, so very careful study of the instructions is recommended. Two different styles of engine exhaust are provided, the undercarriage and bomb bays can be open or closed and four torpedoes, of two different types, can be fitted in the open bomb bay. The breakdown of parts suggests that Airfix could also release this subject as an AEW.2 with appropriate alternative parts.
| CONSTRUCTION |
With all of the options for parts open or closed, extended or retracted and the detail differences between the two versions offered, the first order of business was a careful study of the instructions, using a pen to strike out the stages not required. Next, I went through and harvested all of the parts not needed for my choice of finish and tucked them safely away into a small zip lock bag, just in case I had made the wrong call. Next the instructions were revisited and any location holes that needed to be drilled out were identified and dealt with. Finally I went through the instructions and marked up the actual colours of parts, mainly in the interior, that need to be painted during construction. Colour call outs are mainly as Airfix paint numbers so such some sort of interpretive reference, such as a Humbrol paint chart, needs to be consulted. It would sure be helpful if Airfix were to mimic some other manufacturers and provide named colours in the build sheets and a parts chart. This process of checking, rehearsal and selection went on over two days before I felt confident enough to begin.
 In the
past couple of years I have built about ten of the new breed of Airfix kits. The
designs are bold and detailed, with extensive interior detail and very precisely
engineered. The fit of parts tends to be so snug that even a coat of paint can
throw the fit out and misalignment of parts can cause cumulative errors as
sub-assemblies are built up. So I find that it is essential to Plan, Plan and
Replan, Test, Dry Fit, Fiddle and Fettle before committing glue to plastic. The
rather soft new-style Airfix plastic can, in my experience, react to thicker,
slow setting plastic glues by melting some of the finer details so I use Tamiya
Ultra Thin cement which evaporates quickly and does not burn into the plastic in
while drying.
In the
past couple of years I have built about ten of the new breed of Airfix kits. The
designs are bold and detailed, with extensive interior detail and very precisely
engineered. The fit of parts tends to be so snug that even a coat of paint can
throw the fit out and misalignment of parts can cause cumulative errors as
sub-assemblies are built up. So I find that it is essential to Plan, Plan and
Replan, Test, Dry Fit, Fiddle and Fettle before committing glue to plastic. The
rather soft new-style Airfix plastic can, in my experience, react to thicker,
slow setting plastic glues by melting some of the finer details so I use Tamiya
Ultra Thin cement which evaporates quickly and does not burn into the plastic in
while drying.
The build starts with the
extensive interior and Airfix have gone to town on this. The interior
accommodation runs from the nose almost unbroken to the tail, with the only area
omitted being the galley to the rear of the wing. Two pilot seats are located on
a raised platform which sits on a long floor section running from the cockpit to
the rear fuselage and this also serves as the bomb bay roof. The interior is
further sub divided with bulkheads between the main internal compartments and
two massive wing spars cross the cabin. It was obvious that very little of this
luxurious interior detail would be visible through the few fuselage windows, so
I elected to build all of the interior before painting so as to ensure strong
paint-free joints to the major structural parts. This included fitting the long
floor/bomb bay
 structure
into the left fuselage, the large tactical consoles in the centre fuselage area
and the nose compartment complete with its cannon breeches. Glazing can be
safely left until later in the build since the windows are designed to be fitted
from the outside. A remarkable eleven crew seats are provided, one in the nose,
two in the cockpit, eight in the tactical and navigation compartments and a
further prone bench in the tail.
structure
into the left fuselage, the large tactical consoles in the centre fuselage area
and the nose compartment complete with its cannon breeches. Glazing can be
safely left until later in the build since the windows are designed to be fitted
from the outside. A remarkable eleven crew seats are provided, one in the nose,
two in the cockpit, eight in the tactical and navigation compartments and a
further prone bench in the tail.
The basic interior colour is medium grey, using Tamiya Acrylic XF-77. The cockpit, tail compartment and nose compartment is Black XF-1 and the rear fuselage Interior Green XF-71. The main cabin floor is XF-64 Red Brown.
The cockpit is provided with throttle boxes, rudder pedals and seats with armrests, together with a decal for the instrument panel and a cockpit coaming. The all Black areas of the nose were dry brushed with light grey in an attempt to pick out some of the detail and the seat cushions painted medium green.
So, 27 stages of construction gone by and it was time to join the fuselage halves. There are a lot of joints to the flooring and bulkheads that need to be tucked in place when the fuselage halves are closed up. The fit was pretty good but the lower seam to the rear of the bomb bay would not close up until I had ground about 1mm off the edge of the fuselage floor. This was probably operator error on my part, but eventually the large fuselage assembly was taped up and left to harden for a couple of days. When the tape was removed I found that the warped fuselage halves had had the last say and filler was needed along the join line to both the upper and lower seams to smooth over a slight step between the halves. At this stage I added the cockpit and nose glazing, suitably masked with Tamiya tape, although all of the glazing aft of the cockpit can be added later in the build, including the top turret assembly. An overhead console is provided for the main canopy glazing, with a moulded in representation of the overhead window blinds. This was painted dark grey, with the blinds in light grey and the assembly was glued to the underside of the glazing with Humbrol Clear Fix.
The whole fuselage assembly was set aside while the wings and tail components were built up as sub-assemblies. The horizontal tail planes consist of upper and lower halves which trap a one piece elevator between projecting hinges, an old fashioned solution which can provide “movable” control surfaces, although I chose to glue them in place. The vertical tail components have a similar arrangement of two piece fins and a single rudder. This highlights a slight inconsistency in the design of the kit which offers posable elevators, rudders, flaps and bomb doors, but the ailerons are moulded fixed into the wings. I kept the vertical tail parts separate from the horizontal sections to make painting easier.
 Attention
now turned to the wings and I had to order a replacement left wing from Airfix
since the upper and lower panels were badly warped. Their UK Spares Department
responded handsomely with new parts on my doormat within four days of my e-mail.
The main wing structures are one piece from root to tip and can be glued as one
unit, taped up to ensure they stay straight and left for a day or two to harden.
Each wing has a protruding (fuel jettison?) pipe on the trailing edge which is
vulnerable to breakage, so I cut them off to be re-attached at the finishing
stage. I glued the inner and outer under wing flaps closed, a choice that gives
strength to the thin trailing edges that are prone to warping.
Attention
now turned to the wings and I had to order a replacement left wing from Airfix
since the upper and lower panels were badly warped. Their UK Spares Department
responded handsomely with new parts on my doormat within four days of my e-mail.
The main wing structures are one piece from root to tip and can be glued as one
unit, taped up to ensure they stay straight and left for a day or two to harden.
Each wing has a protruding (fuel jettison?) pipe on the trailing edge which is
vulnerable to breakage, so I cut them off to be re-attached at the finishing
stage. I glued the inner and outer under wing flaps closed, a choice that gives
strength to the thin trailing edges that are prone to warping.
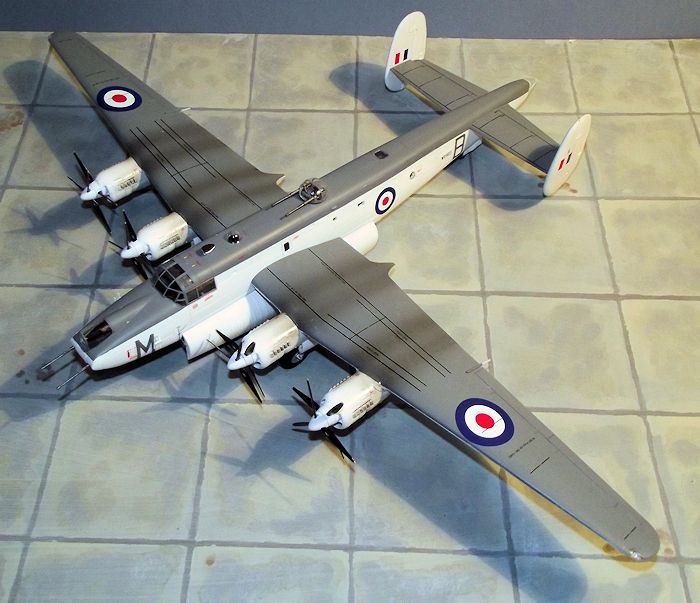
The engine nacelles can be built up as separate sub-assemblies, the outer units consisting of simple half shells, to which two cooling flaps are glued and a choice of exhaust pipes, my choice being the early plain type, that do not have an extension tube. The larger inner nacelles feature a detailed under carriage bay, with front and rear bulkheads and rib detail to the sides and bay roof. The interior was sprayed flat White. The construction sequence now demands that the undercarriage legs are glued to a section that represents the front face of the wing spar. It might be possible to add the legs after the nacelle has been fitted to the wing but by fixing then at this stage you keep a good view of the joint and can ensure that it is firmly fixed. The main legs have a good positive fit and are provide with two trailing struts to brace the assembly against the rear bay bulkhead. The legs were painted in pale grey with details picked out in silver and white. The down side of this arrangement is that the main gear sticks out for the rest of the build and needs careful handling. I added the well sculpted engine fronts, each provided with a circular backing plate that features radiator detail. The back plate traps a propeller shaft in place. I found that some filling and filing was needed to get the engine fronts to lie flush with the cowlings.
 While the
large sub-assemblies were hardening, it was time for the propellers, the
3-bladed units have positive assembly keys, each having a spinner and back plate
to trap the props in place, but I still double checked to ensure that the rear
units have reverse pitch to the blades at the front. The blades were painted
flat Black with Trainer Yellow tips and the spinner assemblies flat White. Since
I had chosen the early White-scheme aircraft the blade tips, all 24 of them, had
to be painted yellow. The four torpedoes for the weapons bay were assembled and
painted and set aside for later.
While the
large sub-assemblies were hardening, it was time for the propellers, the
3-bladed units have positive assembly keys, each having a spinner and back plate
to trap the props in place, but I still double checked to ensure that the rear
units have reverse pitch to the blades at the front. The blades were painted
flat Black with Trainer Yellow tips and the spinner assemblies flat White. Since
I had chosen the early White-scheme aircraft the blade tips, all 24 of them, had
to be painted yellow. The four torpedoes for the weapons bay were assembled and
painted and set aside for later.
| COLORS & MARKINGS |
At this stage I elected to go ahead and paint the main sub-assemblies without attaching the wings to the fuselage, so the undercarriage and weapons bays were masked off and the main airframe upper surfaces given a coat of mid grey auto primer from a rattle can, followed by two airbrushed coats of XF-53 Neutral Grey applied with my trusty Iwata HP-C airbrush. The upper surfaces were masked off with copious amounts of Tamiya tape and the sides and under surfaces first coated with Tamiya White Fine Surface primer applied from a rattle can, followed by two misted on coats of XF-2 Flat White.
 Left to dry
for a couple of days the paintwork was then coated with Future/Klear floor
polish applied with a brush and decaling could begin. Now the decal sheet is a
delight, providing over 100 airframe stencils. Airfix provide two decal
placement drawings, one for the stencils and one for the colour scheme. My only
gripe is that the placement drawings are to about 1:150 scale, so the
orientation of the underside decals is a matter of some guesswork – should they
be placed to read from the front or the rear? Decalling occupied a couple of
evenings steady work, the only challenge being to persuade one or two of the
larger ones to settle over lumps and bumps in the airframe, but they reacted
well to Micro Sol and Micro Set. The decals were sealed with two brushed coats
of Future/Klear and the airframe finally sealed with a couple of airbrushed
misted coats of Xtracrylix Flat Varnish. Now the kit instructions point out that
White painted Shackletons of the period had Gloss White undersides but this
subtlety was too much for me to incorporate in 1:72 scale. The canopy masking
was removed at this stage.
Left to dry
for a couple of days the paintwork was then coated with Future/Klear floor
polish applied with a brush and decaling could begin. Now the decal sheet is a
delight, providing over 100 airframe stencils. Airfix provide two decal
placement drawings, one for the stencils and one for the colour scheme. My only
gripe is that the placement drawings are to about 1:150 scale, so the
orientation of the underside decals is a matter of some guesswork – should they
be placed to read from the front or the rear? Decalling occupied a couple of
evenings steady work, the only challenge being to persuade one or two of the
larger ones to settle over lumps and bumps in the airframe, but they reacted
well to Micro Sol and Micro Set. The decals were sealed with two brushed coats
of Future/Klear and the airframe finally sealed with a couple of airbrushed
misted coats of Xtracrylix Flat Varnish. Now the kit instructions point out that
White painted Shackletons of the period had Gloss White undersides but this
subtlety was too much for me to incorporate in 1:72 scale. The canopy masking
was removed at this stage.
| FINAL BITS |
It was time to bring the sub-assemblies together, although I found that the wings were such a snug fit to the large wing spars there was no need for glue so the wings remain demountable for transport or storage of what is a large model – having a 20in. wingspan.
The twin tail wheel assembly
fitted positively into the rear fuselage compartment and both the main and tail
gear doors are provided with a recessed tab to enable them to fit neatly into
place. The main wheels have an unusual stub axle moulded in and these glue onto
the ends of the gear legs – an effective arrangement, but the alignment of the
flattened tyres should be checked before committing glue to
 plastic.
The large bomb bay doors were glued via a series of tabs and sockets along the
edge of the bomb bay and the doors aligned against a pair of V struts to the
front and rear.
plastic.
The large bomb bay doors were glued via a series of tabs and sockets along the
edge of the bomb bay and the doors aligned against a pair of V struts to the
front and rear.
The mid upper turret can be built as a separate sub assembly and just clicked into place on the upper fuselage. I found that the turret base caught on the internal structure of the cabin and the lower part of the turret needed some trimming to get it to sit down, but this was no problem since it was concealed within the fuselage.
A quick round up of the remaining parts saw the aerials, direction finding loop and nose cannon installed and the small windows to the fuselage finished with a dab of Micro Kristal Klee.
The final touch was the application of some Tamiya X-19 smoke to the wings and engine nacelles to replicate some of the filth that the exhausts pumped over the wings of the early Shackletons. With the airbrush set to about 10psi I passed and repassed over the wing upper and under surfaces about ten times to get some semblance of staining to match some of the photos that I have examined. My efforts fell far short of replicating the astounding mess found on some of the more worn aircraft in RAF use, but I could not bring myself to really dirty up the rather smart grey and white livery.
| CONCLUSIONS |
This is a big and imposing model and definitely one for those who enjoy building. The internal detail is impressive and I found the kit to be well detailed. There are some niggles with warped parts and the need for carefully planned assembly. The price is at the top end of the Airfix price structure but is actually about the same as that charged by Italeri for their 4-engine heavies in the UK market.
The subject seems an ambitious choice for Airfix, although it has been happily embraced by UK modellers with many outlets reporting sold out within days, indeed my LHS had cleared its initial order within 48 hours.
It is big, imposing when finished and definitely recommended by me.
Kit supplied by my LHS, Spot on Models and Games of Swindon, England. As a note, Hannants has a couple of new sheets for this kit.
| REFERENCES |
Avro Shackleton by John Chartres, published by Ian Allan, 1985.
Airfix Model World Magazine, November 2015
The Shackleton Preservation Trust, Coventry, England, where the full size can be seen.
Frank Reynolds
November 2015
Copyright ModelingMadness.com. All rights reserved. No reproduction in every form without express permission from the editor.
If you would like your product reviewed fairly and fairly quickly, please contact the editor or see other details in the Note to Contributors.