Fly Models 1/48 Jet Provost T.3
| KIT #: | 48017 |
| PRICE: | £30-00 |
| DECALS: | Four options |
| REVIEWER: | Frank Reynolds |
| NOTES: | Short run kit with resin parts |
| HISTORY |
Plain and
simple, the Jet Provost was an aircraft that represented a new concept when it
first flew in
February 1955. It was a radically re-engineered version of the propeller-driven
Percival
Provost that had first flown in February 1950 and was
developed as a private venture. Britain’s Royal Air Force was interested in the
concept of a relatively cheap jet trainer and undertook four years of trials
using around 10 pre-production aircraft, a programme that was so successful it
resulted in the Royal Air Force being the first air arm in the World to
introduce all-jet training where a student with no previous flying experience
could begin with a jet and go through primary and basic training on the same
type. The RAF was sufficiently impressed to order 201 of the production variant,
the Mk.3, which began widespread service in 1958. Based on the experience of the
trials unit, the Mk.3 was equipped with two Martin Baker
 ejector
seats, tip tanks on a strengthened wing and a clear view canopy. To students who
would have been exposed to piston engine tail draggers as trainers, the JP3 was
a revolution, for the nose wheel arrangement would allow it to take off and land
almost horizontally and the pilot’s view was not restricted by the bulk of a
piston engine and propeller.
ejector
seats, tip tanks on a strengthened wing and a clear view canopy. To students who
would have been exposed to piston engine tail draggers as trainers, the JP3 was
a revolution, for the nose wheel arrangement would allow it to take off and land
almost horizontally and the pilot’s view was not restricted by the bulk of a
piston engine and propeller.
The JP3 was equipped with an Armstrong Siddeley (later Rolls Royce) Viper 102 engine of 1,750lb thrust, which was just enough for the training function, although it was so marginal on power the early Jet Provost was often referred to as “constant thrust, variable noise machine”, highlighting the fact that opening the throttle produced little return over an increase in noise. But the JP was a success and trained generations of British military pilots. Another 300 of the updated Mks. 4 and 5 would join the fleet and continue to serve the RAF until the 1980s. The training syllabus would be modified in later years when it was realised that the aircraft was so easy to fly it was not weeding out unsuitable candidates at an early enough stage in the training programme. Jet Provosts would figure strongly in at least eleven RAF flight demonstration teams over the decades and also serve as trainers for fast jet navigators and air traffic controllers. The JP3 had potential to serve as an armed trainer for export customers, with minimal modifications to fit a pair of under wing stores pylons. The first export version was the T.Mk.51 with 12 sold to the Royal Ceylon Air Force; Sudan (4); and Kuwait (6). This would form the basis of an export programme for the later variants which would see another 190 aircraft delivered to export customers. Truly a remarkable record for what was originally a piston engine aircraft modified for jet propulsion.
| THE KIT |
This comes
in an end opening box with a full colour top painting of a single aircraft. The
back of the box serves as the colour guide with three- views of the four options
available, being:
RAF
No1
Flying Training School, 1961-70. Overall silver with large patches of solid red
dayglo to
the nose and wings.
The
contents are neatly bagged and consist of two main parts frames in tan coloured
plastic, fairly crisply moulded but as with many short run kits there is some
flash to be trimmed away. Surface detail is finely and lightly etched but in
some areas fades away to nearly nothing and some minor rescribing was
 necessary.
There are just 31 plastic parts forming the basic airframe. A third frame is
moulded in clear, providing the canopy, windscreen and landing light covers.
necessary.
There are just 31 plastic parts forming the basic airframe. A third frame is
moulded in clear, providing the canopy, windscreen and landing light covers.
There is a
separate bag of cleanly cast dark grey coloured resin parts providing the
wheels, engine inlets, cockpit interior and jet pipe. The resin was protected in
plastic bags and the only tiny area of damage was a missing tip to one of the
control sticks.
The decals
are cleanly printed and in good register and provide a good range of stencils,
wing walks and warning stickers. The instructions consist of an eight page A5
booklet in greyscale, with a parts chart and 17 stages of construction in
exploded views. There are useful separate charts showing the positioning of
external aerials and stencil positioning diagrams.
In choosing
a finish I discarded the private warbird and ground based engineering trainer,
since I prefer to model operational aircraft. The remaining options each had a
different version of dayglo paint, which can be a nightmare of undercoats and
masking but I found a possible solution on Hannants website. Model
Alliance/Aviation Workshop in the UK had produced a sheet of dayglo decal strips
for RAF Canberras in 1:48 scale.
Although this manufacturer is no longer around,
Hannants still
have much of the range in stock and I picked up a sheet No. MAS 489026 for £9-20
| CONSTRUCTION |
The first
job is to wash all of the parts in a solution of water and mild detergent to
remove any mould release residue.
As with any short run kit, the parts should be carefully
separated from the runners and checked for fit before assembly. There are few
locating pins and joining surfaces need to have any small moulding tags removed
with a swipe from a sanding stick or file.
 The main
resin parts were separated from their casting blocks with a razor saw and the
joining faces sanded smooth. I use a face mask during these operations to avoid
inhaling potentially harmful dust.
The main
resin parts were separated from their casting blocks with a razor saw and the
joining faces sanded smooth. I use a face mask during these operations to avoid
inhaling potentially harmful dust.
Construction begins with the interior, which is primarily painted Black – I used
Tamiya XF-1. The plastic parts were first glued together, consisting of the
cockpit floor and angled rear bulkhead, then the resin cockpit side walls fixed
with cyano. I then added the resin centre console, control sticks and rudder
pedals. The instrument panel was detailed with an approximation of dials and
needles touched in White using the smallest brush that I could find.
The
ejection seats were treated separately, since I wanted to add them later in the
build, when I could check to ensure that they would seat comfortably under the
canopy. They were well cast with good detail, including the seat belts. I
followed the kit’s colour instructions and hand painted each seat using a
selection of acrylics from the Citadel range. The seats are essentially Black,
with Blue seat cushions, Sand head rests and Cream straps. They certainly make a
colourful centre piece under the large canopy.
While the
cockpit interior was setting the fuselage halves were fitted with small tabs of
plastic card around the edges to aid alignment when joined. The cockpit tub was
glued into the right hand fuselage half, together with the resin jet pipe to the
rear. At this stage the instructions flag up the need for nose weight, but do
not indicate the amount, so I guessed at
8 grams of lead
shot, bedded into the nose by pressing it into shallow sheets of Milliput epoxy
putty that will set rock hard overnight. The fuselage
 halves were
then joined with tube cement and left to set.
halves were
then joined with tube cement and left to set.
While
waiting for the fuselage to set, attention can turn to the wings which are
simple structures consisting of upper and lower panels to the left and right
wing halves. A small resin frame is provided to serve as the walls of each wheel
well and once this is tacked in place with cyano the wing panels go together
swiftly. The tip tanks consist of upper lower sections which are butt jointed to
the wing tips. The instructions remind you to cut off the nose of the wing tanks
to enable the clear nose cones to be added later.
The basic
airframe was assembled. The one piece horizontal tail sections are butt jointed
to the rear fuselage and the wing panels have a tab and slot fitting to the wing
roots. Each of these joints needed some filing and adjustment but closed up
satisfactorily using tube cement for strength. The engine intakes are a one
piece resin casting and needed some filler to blend into
the compound
curves of the fuselage/wing area.
When set,
the airframe was checked over and I found that filler was needed along the
length of the seam between the fuselage halves. This is not unusual with short
run kits when mould wear is found at the edge of larger parts.
This was a
convenient point to go around the airframe and add some of the small intakes
bumps and bulges that are supplied as both plastic and resin components, but the
most fragile, such as the aerials, were left until completion of paintwork.
The
undercarriage sub-assemblies were tackled next. The stubby legs and support
struts were moulded in plastic and wheels in resin. The gear legs and hubs
painted in Xtracrylix XA1015 Light Aircraft Grey and the tyres in Tamiya XF- 58
Rubber Black. Gear doors on a Jet Provost are few, consisting
of two tiny
flaps either side of the nose wheel strut and covers to the main legs. The rest
are of a flip-flop type only appearing when the gear is cycled, so the kit has
them moulded shut.
| COLORS & MARKINGS |
 The main
airframe was then prepared for painting with an undercoat of medium grey auto
primer applied from a rattle can. The airframe was checked for scratches and
minor imperfections which were corrected with a smear of Revell Plasto filler.
The main
airframe was then prepared for painting with an undercoat of medium grey auto
primer applied from a rattle can. The airframe was checked for scratches and
minor imperfections which were corrected with a smear of Revell Plasto filler.
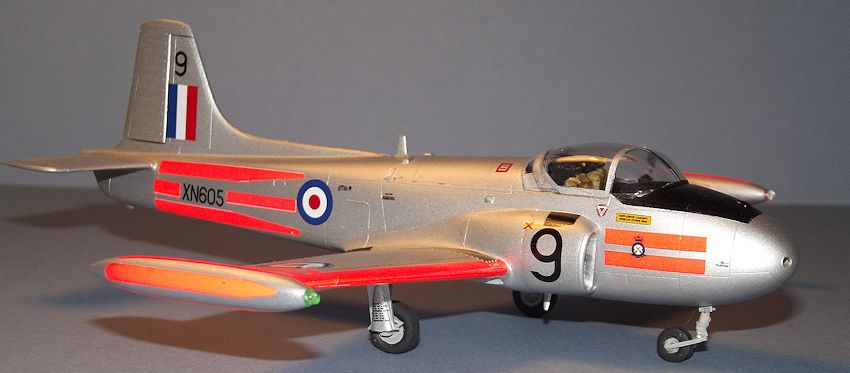
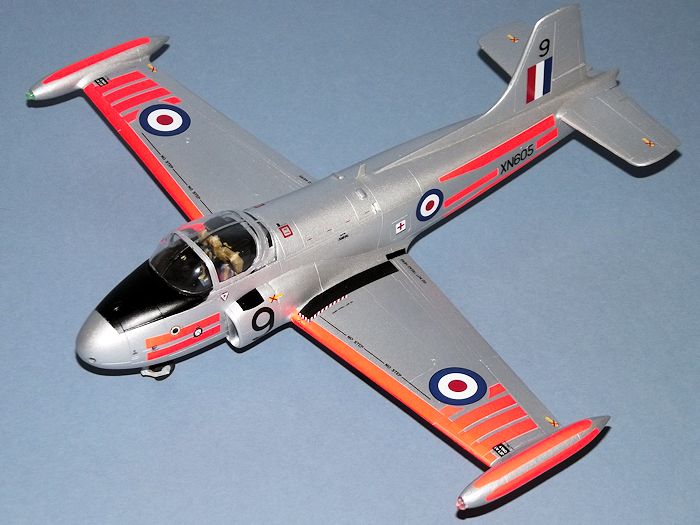
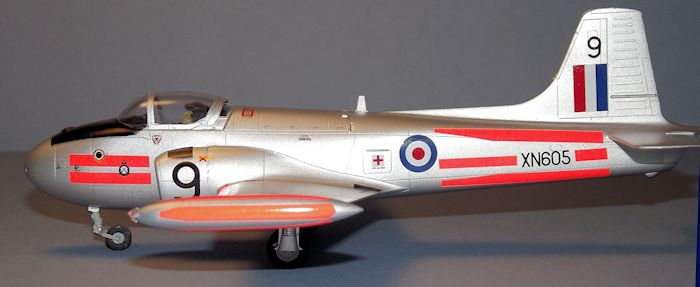
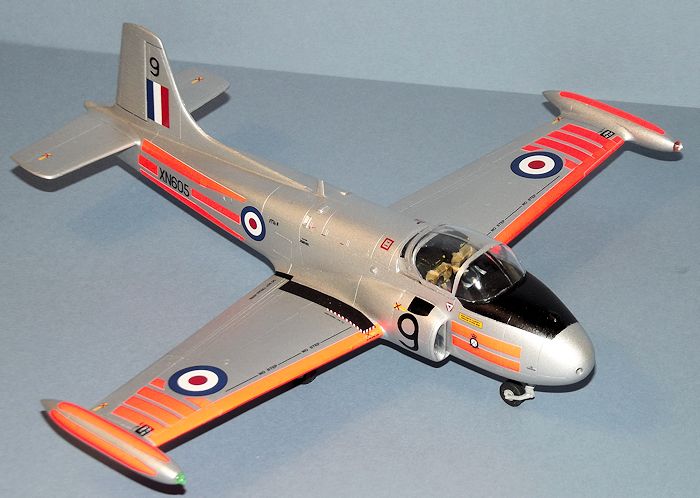
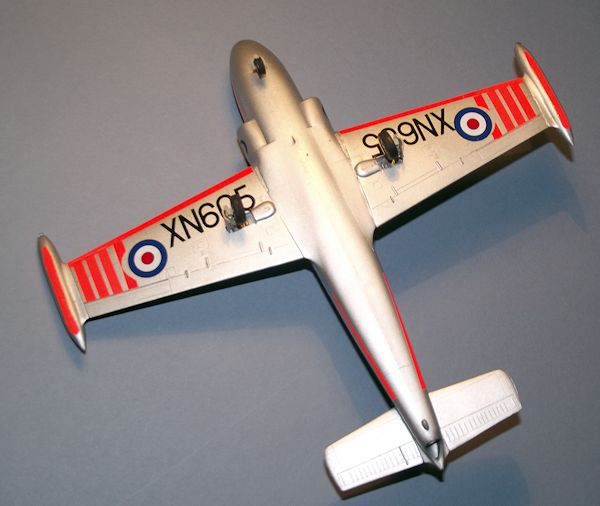
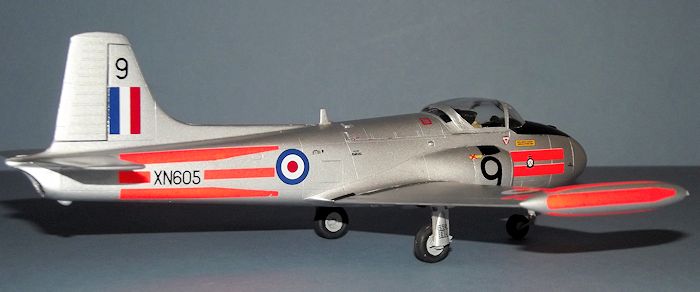
I chose to
finish the JP in the early RAF training colours of NO.6 FTS, the spectacular
dayglo and silver scheme that, only a few years ago, I would have considered way
the beyond my skills, but the availability of aftermarket decals made it worth a
shot
The basic
airframe colour is a very simple overall High Speed Silver airbrushed in Tamiya
Aluminium Silver applied with my Iwata HP-C. With some localised masking the
nose anti-glare panel and forward canopy frame were painted
in
Tamiya XF-11
Flat Black.
The
colourful dayglo striping came from the Model Alliance aftermarket decal sheet
and proved to be quite a challenge. The sheet provides plenty of striping in
varying widths but each stripe had to be cut and trimmed to shape and the wing
leading edge colour built up from a series of strips. The decals were relatively
thick and reluctant to sit down over the surface detail or to conform to curved
surfaces, with some areas needing three or four applications of Micro Sol. The
whole process took place over several days with constant reference to the
Warpaint book to get the pattern correct, since the layout and distribution of
the orange stripes varied in detail between different RAF units over the years.
The kit
supplied decals fairly leap off the backing paper. They went on fairly easily,
responding to Micro Sol and Micro Set decal setting
solutions but
they seem thin and quite fragile and not keen to be moved around once on the
surface of the paintwork, so need to be handled with care. The paintwork was
then sealed with two brushed coats of Future/Klear to give a nice semi-gloss
finish.
The
job finished with fixing the nose and wing tip lights, external aerials and the
undercarriage.
| CONCLUSIONS |
 Although
this is a short run kit, providing that the parts are carefully cleaned up, it
is well engineered and the fit of components is good. The resin interior parts
ensure that the finished result is satisfyingly detailed and it would be
suitable for a first attempt at a short run kit. But it is deceptive, for what
seemed an easy-ish build actually
required
a lot of time in finishing, especially with the number of decals.
With patience and determination it got there in the end.
Although
this is a short run kit, providing that the parts are carefully cleaned up, it
is well engineered and the fit of components is good. The resin interior parts
ensure that the finished result is satisfyingly detailed and it would be
suitable for a first attempt at a short run kit. But it is deceptive, for what
seemed an easy-ish build actually
required
a lot of time in finishing, especially with the number of decals.
With patience and determination it got there in the end.
I enjoyed
the exercise and I am happy to have the little JP3 in my collection. I
thoroughly enjoyed making the Fly Jet Provost.
Definitely
recommended.
| REFERENCES |
BAC Jet
Provost and
Strikemaster, by
Adrian Balch, Warpaint Series No 82, Warpaint Books Ltd.
Jet
Provost, by Bob Clarke, Amberley Publishing 2008
January 2015
If you would like your product reviewed fairly and fairly quickly, please contact the editor or see other details in the Note to Contributors.